Tag Archives: Shutter Speed

Your exposure is simply the way you want to see the image

IMG_0232_v03_500px

There is no such thing as the perfect exposure, only the one you favour.

Expose to see what you want to see.

The truth is, your exposure can be anything you want. The issue is what do you want it to be? Are you a technical photographer or an artist? Lets look at the options…

The technical photographer

The technical photographer tends to put the emphasis on exposure being “correct” at the balance point in the triangle of exposure. The aim of the exposure is to produce a bright representation of the scene. The technical photographer is concerned with getting the settings “right” and the scene summed up in a “realistic” representation of what they saw. The technical photographer tends to be more concerned with recording the scene.

The artistic approach

For the artistic photographer there is more interest in composition and representation of the scene as as they want to depict it. They are more intent on passing a message to the viewers of the image. They want to create a picture that stimulates emotion and strong feelings. The artistic photographer has an idea. They want to make a photograph to fulfil the idea, express the emotion, tell the story. The artist is concerned with communication, not representation.

The spectrum of types

Of course these two extremes are not really as polarised as I have made out here. We all have elements of both of these personalities in our photography. The artist needs to know about the technical side in order to have artistic control over their work. The technical photographer needs to make the picture to suit the light and the scene. At least some interpretation is needed in the technical approach.

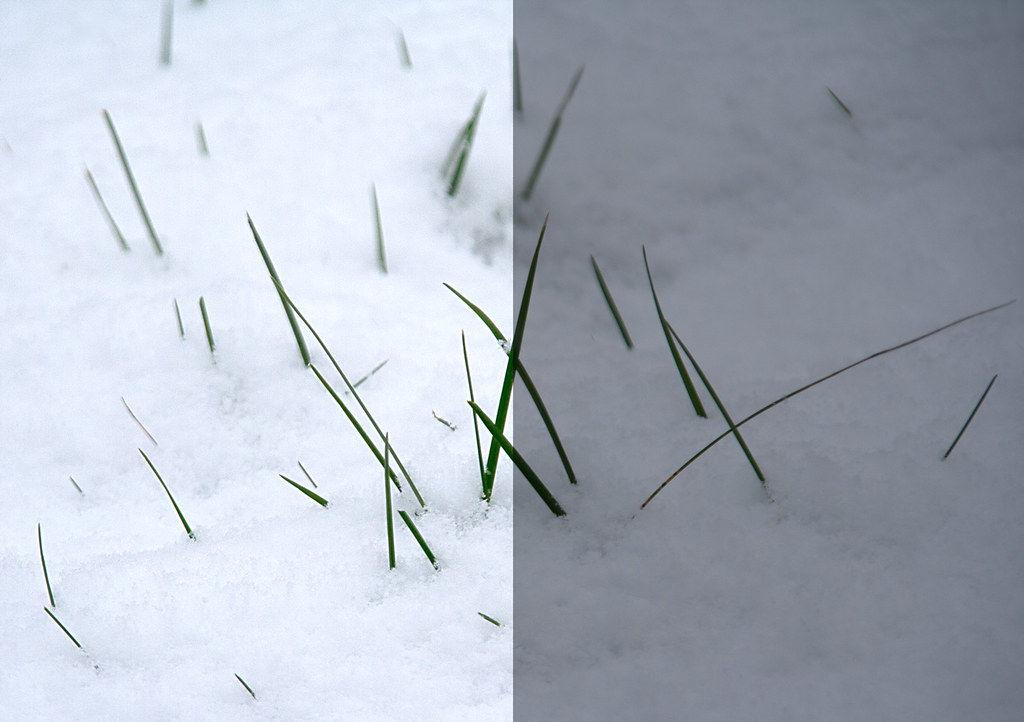
The issue here is about exposure. Sometimes we want to present a shot with the exposure on the darker, more subdued side. We are going for mood maybe, or using light to express itself strongly through shadow. The extreme is the very dark shot, what we might call a low key shot. On the opposite end of the scale is the high key shot – bright, white – strong bright, tending to over-exposure.

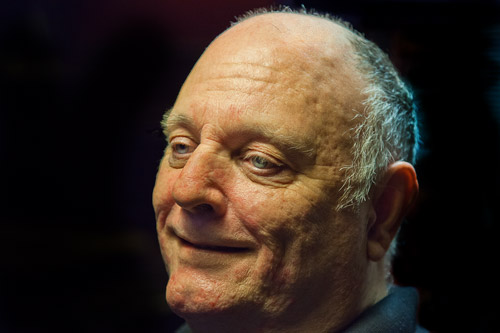
When we take an exposure with a DSLR we normally centre the camera meter reading. Supposing we want to take a picture like the portrait above, slightly underexposed. If we are working with the camera in full manual mode we can simply under-expose by doing one of the following: narrowing the Aperture, lowering the ISO or using a faster Shutter Speed. The opposite is also true. You can over-expose too. In other words you can creatively make what you want out of your shot by controlling the exposure. In the portrait above I wanted to emphasis the strong maleness of my subject. The strong shadows provided the vehicle for that. So the slight under-exposure complemented the already low lights… just what I was looking for.

In the case of the semi-manual modes, the option for full control of the exposure is not available. However, the exposure compensation dial can be called into play. If you want to under expose you can dial to the negative side. If you want to over expose slightly then dial to the positive side. This frees up your exposure to bias the result in favour of your creative idea. Check out the manual for your camera to see how the exposure compensation dial works.

The whole complex of variables that affect exposure, ISO, Shutter speed and Aperture settings are an interaction of functions that allow us to control our image. If we ignore the “ideal” exposure indicated by the camera light meter we actually have a whole world of potentially creative controls. There is no such thing as the perfect exposure. If you are a technical photographer you can still free up your exposure to make a photograph that expresses what you see in a scene. If you are an artist, you can be quite technical about exactly the exposure you want.

Enjoy your exposures. There is no such thing as perfection, and that applies to photographic exposure too. But there is a perfectly good exposure for every photograph… that is the one you want.

find out more...Photokonnexion tips by email
If you enjoyed this article please sign up for our
daily email service.
                                                 Find out more
#11030#

By Damon Guy (author and Photokonnexion editor)

Damon Guy - Netkonnexion

Damon Guy (Netkonnexion)

Damon is a writer-photog and editor of this site. He has run some major websites, a computing department and a digital image library. He started out as a trained teacher and now runs training for digital photographers.
See also: Editors ‘Bio’.

The Zen of sharpness – 12 easy ways to improve

Sharpness factsSharpness facts

Making sharp images takes knowledge and practice.

Photographers often wonder why they cannot reproduce publication sharpness. It’s not difficult, but there is more to it than clicking away. Here we look at all the factors that may affect sharpness.

Seven common problems

1. Poor focus:
• Frequently, focus problems occur because the focus has been taken from the wrong part of the scene. Choose one of the auto-focus (AF) points you can see in your lens (see how in your manual). Use that point to select the point of focus in your scene. The choice of where you focus is also critical. The eyes are often the most important point of focus. (See: The Eyes Have It… nine ways to emphasize eyes).

2. Camera blur:
• Movement of the camera during the shot will create a softness or complete blur. The solution is to improve your actual shooting technique. Holding the camera, your stance, your breathing and even the way you click the shutter button can all create camera movement. (See: Simple tips for a good stance). Camera blur can also be created because the shutter speed is too low. If you have a relatively long exposure the camera is more likely to move during the shot. If you have a higher shutter speed the chance of movement is reduced – sharpness is improved. Most people find they cannot hold the camera steady at 1/60th of a second or longer. With practice you can get better. A good starting shutter speed for hand-held shots is about 1/200ths of a second. It is possible to also change the ISO to enable higher shutter speeds and still maintain a good exposure.

3. Motion blur:
• If the subject moves and the camera is stationary the subject will be blurred. You may need to change your focusing mode to to compensate for movement. Use Continuous focus mode for constant movement [AI Servo AF (Canon)/AF-C (Nikon)]. Alternatively you can use autofocus mode [AI Focus AF (Canon)/AF-A (Nikon)] for slight movements or unpredictable/unexpected movement.

4. Poor quality lens:
• It is a common mistake to spend a lot of money on a camera then skimp on the lens. In fact it is best to spend as much as you can afford to buy quality lenses. They will pay you back with quality sharpness much more than the camera body will. Poor lenses can give you colour fringing, poor focus, distortions, softness and limited depth of field.

5. Depth of field too shallow:
• The depth of field (DoF) is the zone of sharpness in a picture. You can determine the DoF by changing the size of the aperture. (For more information see: One big change – one easy step forward).

6. Diopter set wrongly:
• If your eyesight is poor, or does not match the optical properties of the viewfinder, you will need to adjust the diopter. Most people can use it to adjust the viewfinder sharpness for their eyesight. If your sight through the lens is sharp it helps you fix a good focus to ensure sharpness.

7. No sharpening in RAW:
• When the picture is uploaded to your computer it’s file format effects sharpness. RAW, the native file formate for your camera, is created as a file without sharpening. The *.jpg file format is highly processed in the camera. It is sharpened as part of the processing. So *.jpg files may look sharper than RAW files on screen. The solution is to make sure you apply some sharpening to RAW files as the last action of any post-processing you do.

How to Take Sharper Pictures

By way of consolidating the above here is a video discussing the above points with examples…
(More after the video)

Beyond the basics

Sharpness is about continuous improvement. Here are some more ideas to extend your skills…

8. Stance and the anti-roll “bar”:
Many self-made photographers don’t recognise the importance of stance. Holding the camera steady is part of a “whole-body” effort. You should create a stable platform to comfortably hold your camera to ensure a steady camera position. The way you hold your arms, the way you breath and other factors affect your focusing and the amount of camera movement.

In addition to poor stance an additional unintentional movement causes softness. Some photographers click the shutter button then “roll” the camera away from their face prematurely. Doing the “roll” will induce movement in the camera – often before the shutter has closed. The solution is the “anti-roll bar” – you must “bar” yourself from doing the roll.

Learn more about stance and the “anti-roll bar” in this article: Simple tips for a good stance.

9. Test shots

Today we have the digital freedom to take as many shots as we wish without paying for film developing. To improve your sharpness spend time making sure your shot is going to be sharp. Do test shots to familiarise yourself with the scene and to practice for ‘the’ shot. You can find out more here: How to take a test shot.

10. Viewing the image at 100%

When you upload your image files they are not sized to 100% on screen. They are presented much smaller so you can see the whole picture. Photographers often don’t look at their pictures in full size. What is not obvious is that when pictures are resized on screen they are sharpened. If you are not aware of this you might be disappointed when you print the image. It will not be as sharp as it could be because you never looked at it in full size. If you are aware of how sharp you have made your image (at 100%) it will help you to develop your skills. You can find out more about viewing at 100% here: The benefits of 100% viewing.

11. Use a tripod

The vast majority of shots can be taken from a tripod. Using one is undoubtedly the single most effective sharpening technique. You can find out more about using a tripod here…
Three Tips for Pin Sharp Shots with a Tripod
Definition: Tripod
The Tripod
The Third Most Important Piece of Kit

12. Practice, practice, practice

Knowing all these things is different to actually being able to put them into practice. Making your pictures sharp is about doing all of the above. Then, reviewing your own achievement after each shot. You must practice all these regularly and consistently in order to succeed in producing the sharp images you want.

#11030#

By Damon Guy (author and Photokonnexion editor)

Damon Guy - Netkonnexion

Damon Guy (Netkonnexion)

Damon is a writer-photog and editor of this site. He has run some major websites, a computing department and a digital image library. He started out as a trained teacher and now runs training for digital photographers.
See also: Editors ‘Bio’.

Correct snow scenes using exposure compensation

Bright snow scenes create a problem with the auto-settings for exposure

Bright snow scenes create a problem with the auto-settings for exposure
Click image to view large
Green shoots through the snow By Netkonnexion on Flickr External link - opens new tab/page

Snow reveals a problem with auto-modes.

The brightness of a snow scene throws off exposure. Cameras in auto-modes work to a “normal” type of scene. When unusually bright scenes are encountered the camera cannot compensate. It leaves the scene grey. This is because the camera is calibrated to work with a mix of colours, light and darks that represent the sort of scene we encounter every day. It senses the luminance levels in the scene and sets exposure to the middle of the range between light and dark.

If the camera senses an unusually bright scene, like the snow scene above, it is unable to compensate properly. The brightness is outside its normal range of compensation. The camera responds by underexposing the shot, and the snow turns grey. The photograph above shows the scene as shot in the right hand panel. It is grey. The left hand panel shows the correct exposure after the underexposure is compensated by an exposure compensation of 1.66 stops (one and two thirds stops). (See: Definition: f-stops)

Photographers are more accurate than camera auto settings

In these bright (or dark situations) we can dial in exposure compensation to manually set the scene to be brighter. Using the exposure compensation we can increase the exposure to brighten the scene (+ settings) or even darken the scene (- settings) as appropriate. Then, we take another picture. By looking at the screen on the camera (“Chimping”) we can get the exposure correct by adjusting the exposure compensation to correctly whiten the scene.

This exposure compensation principle applies to the camera modes which are automatic or semi-automatic. In full auto, the camera calculates the exposure by balancing the ISO, shutter speed and aperture settings. However, in the semi-automatic modes the photographer changes one of the settings while the camera changes the other. In these modes, as in full-auto, the camera can still make the mistake of under-exposing (or over-exposing). Only the photographer can judge the exposure correctly.

When using aperture priority mode, you the photographer, makes the decision on the aperture size (f-stop setting). The camera calculates the appropriate shutter speed. If your camera cannot correctly interpret the scene, as with snow for example, then you will need to dial the exposure compensation to correct for the under-exposure. If you are using shutter priority, same again, the camera calculates the aperture (f-stop) setting. If the camera makes a wrong exposure decision, you can manually set the exposure compensation to over-ride the f-stop setting the camera would set.

Full manual mode, where the photographer sets all the settings directly, cannot use exposure compensation. In this mode the photographer makes all the decisions. The camera does not interfere with the exposure settings. In this case the photographer is free to make decisions to fix the exposure setting for all three factors of exposure – ISO, aperture and shutter speed. There can be no element of compensation for a failed camera decision. The photographer stands by their own settings and has full discretion to control the exposure as they wish. Deliberate over or under-exposure as well as accurate exposure are all possible. It is for this reason that I urge you to work in full manual where you can. You have far more control over the outcome of the shot. You also as a consequence have more artistic control over your image.

If you are working in RAW, the native data mode of image files in camera, it is possible to correct for camera exposure errors in post-processing. As I have argued elsewhere it is better to try and get all the settings correct in camera than to spend time processing afterwards for a number of reasons. So, no matter what file type you are using, try to set the shot up correctly from the start.

There you have it. Exposure compensation is a camera setting which is wholly dedicated to compensating for the mess-ups that the camera makes with its exposure calculations in auto or semi-auto modes. But when using auto-modes, and/or using *.jpg files, it is essential to be able to compensate for the cameras’ failings by using exposure compensation – otherwise your snow will be grey!

find out more...Photokonnexion tips by email
If you enjoyed this article please sign up for our
daily email service.
                                                 Find out more…
#11030#


By Damon Guy (author and Photokonnexion editor)

Damon Guy - Netkonnexion

Damon Guy (Netkonnexion)

Damon is a writer-photog and editor of this site. He has run some major websites, a computing department and a digital image library. He started out as a trained teacher and now runs training for digital photographers.
See also: Editors ‘Bio’.

How to take a test shot

Cornish Dusk - Test shot

• Cornish Dusk – Test shot •
Underexposed, over bright at the top, over dark in the foreground, poor focus… the test shows a need to do some work…

Click image to view large final version with corrections
• Cornish dusk • By Netkonnexion on Flickr External link - opens new tab/page

Ever taken a shot without thinking?

…And regretted it later. We all have. Yet it’s simple to run through a simple check list and do a few test shots. In this article we look at setting up that procedure.

What needs doing?

I will assume you are in the right place and have your camera out of the bag, ready to go. The first thing to do is work the scene and try to see what sort of shots will serve your subject best. Find which angle looks the best through the viewfinder. Your subject is the critical item to focus on, so walk all around to get a full range of ideas of how best to frame it. Then, when you have composed and decided on your shot, you need to start considering your settings.

Approaching the settings

You will be working with the idea of ‘chimping’ now. If you don’t know what that is then read this first.

Here is the list of adjustments you need to make…

  • The first thing to consider is focus. If that is wrong you are in trouble from the start. So make sure that you can get a good focus.
  • White balance – It helps to have your white balance correct even if shooting raw.
  • ISO – Set your ISO for the light levels you are experiencing as your ambient light. If you don’t know about setting the ISO correctly then read ISO: get control of your sensitive camera!
  • Next select the mode you want to work in. You should select for…
    • Shutter speed if you want to adjust exposure length.
    • Aperture if the critical issue is depth of field (DoF).
    • Full manual if you want to work with both, or have more control overall.

Next you need to decide if you are going to work with the DoF or the shutter speed as your main consideration…

  • If working with DoF set the aperture you want to work with now. DoF is one of the primary considerations when composing a shot. Where you want your image to be sharp and where you want it to be unsharp. So play around with aperture for a while. Take a shot, chimp it, adjust the aperture, take another and so on. Once your DoF is correct.
  • If you are working with shutter speed as your main control then you need to adjust this instead of your DoF first. Again, shutter speed is a primary consideration in your shot. A long exposure will get more blur if there is any movement in the field of view. The shorter the shutter speed the more the shot will appear frozen, movement blur will tend to be eliminated.

As you set up each setting you can take a test shot of your subject. Then, by doing a bit of chimping, you can work out if you have your setting correct. You may need to take one, two, or maybe three shots to get your setting correct.

Once you get experienced working with these settings you will do them in seconds. Two things helps to achieve that. First, you will become familiar with which settings are appropriate for the conditions you are working with. Secondly you will be more sensitive to what you need to think about as you set up your shot. In particular the type of light is the main consideration. That in turn leads you to get a feel for what settings you need.

Some issues to note…

If you are working with landscapes you will need to do a bit of ranging to get your focus right. When working with longer distances the DoF and the focus vary. As your focus point gets further away from you the distant edge of acceptable sharpness rapidly goes into the distance. It is not always easy to determine DoF control precisely at long distances. There are methods but I will discuss them in another article. Just remember that from f11 you will effectively get sharpness right through the shot.

If you are working with an on-board (pop-up flash) then the camera will sync automatically to your camera settings. When working with off-camera flash, adjust that at the same time as the shutter speed. Normally your camera will have a ‘sync-speed’ to work with your flash – it maybe 200ths sec or 250ths sec depending on the camera. So you will need to consider that too.

Working with a tripod? Make sure you turn off all electronic motors in your camera to prevent tripod vibrations (Vibration compensation, auto-focus). This means you will have to manually focus the lens.

By Damon Guy (author and Photokonnexion editor)

Damon Guy - Netkonnexion

Damon Guy (Netkonnexion)

Damon is a writer-photog and editor of this site. He has run some major websites, a computing department and a digital image library. He started out as a trained teacher and now runs training for digital photographers.
See also: Editors ‘Bio’.

Don’t get lucky, get great photographs

Random or 'splatter' tactics when shooting are not going to make you lucky.

Random or ‘splatter’ tactics when shooting are not going to make you lucky.

Ever taken a few more shots, just for luck?

I think we all have if we are honest. We know that approach is really about random shooting and not about getting good shots. Here are some ways to help you get over blasting off shots just for luck.

The tell-tail signs

You always come back from a shoot with hundreds of shots. A high percentage of them are throw-aways. It’s difficult to know what to point your camera at when shooting. Your shots appear to be random. It is difficult to know what settings to use… feel uncertain while out shooting. You suffer photographic stress. Simple, you need to get organised about your shoots.

Here’s a plan…

To move forward, you need work on a plan to get past the randomness and work toward taking consistent shots.

Increase your confidence: Low hit-rates are pretty demoralising. You need to find ways to increase the successes. Go back to basics. BUT, you need to do it in a way that will help you move on. When in a new situation set your camera to auto-settings. Take a few test shots. Note what settings your camera uses. Once you have the measure of things, swap back to the settings that give you creative control. You will be more confident – you know what settings to return to if your settings don’t work out on a shot.

Learn about light: Light is a very fickle entity. Just when you want great light it’s not there. Other times it’s there but you are not sure how to use it to best effect. Well, here are two pieces of advice. First, shoot late or early – long shadows help define your subject and with better colours in the light. Second, learn the difference between hard light and soft light. Hard, harsh light will tend to be less forgiving and less aesthetically pleasing. Once you know these things, you are on the path to improvement. Check over our other Light and Lighting resources on light to continue your improvement.

Learn about settings on your camera and exposure: The most important ideas in photography rest on getting a good exposure. Start with simple shots, simple light. Learn the settings on your camera, in particular about ISO, Aperture and Shutter speed. Together these form a golden triangle for photographers. Read your manual so you know how to control them. Then read up on exposure. Here are a range of links to get you started on exposure…
Definition: Exposure
Definition: Aperture
Definition: f number
Definition: ISO
Definition: Shutter Speed

Portraiture: Friends or family expect you to do it right and you are under pressure. To make the situation more controlled ask a supportive member of your family, or a good friend, to try out a few poses. There are quite a few posing guides in books. Here are a list of books on Amazon that I have found particularly useful to get you started…

Start simple and work on a set of poses to commit to memory. Memorise about five or six poses for a male and the same for a female. These will let you get a session going. After that you rely on your intuition while working with your subject – work out what will suit them. Watchwords here are: Keep it simple; keep it well lit. To get under way read this article to get you thinking about portraiture… Simple positions for classic portrait work.

Finger off the trigger: I know it is easy to punch away at that button and hope something comes out. Take it from me you need to do just the opposite. Stop. Consider. Compose. Frame. Fire. Make sure you get into the habit of thinking each shot through before you push the button. Visualise your shots so you have a good idea for your picture before you even raise the camera to your eye. Pre-visualisation in most pursuits is how you can focus your energy and skill. It is no different in photography. Try improving your stance too. Most people improve their shots a huge amount if they take time to get the stance right. I have a system I teach my students. Read about it in: Simple tips for a good stance.

Composition: There are simple things you can do to improve immediately. Here are three posts on the fundamentals:

  1. Rule of Thirds
  2. Golden Hour; Magic Hour;
  3. Don’t Stick the Horizon Line in the Middle!

Follow up with more composition reading: Composition – resource pages on Photokonnexion.

Planning your shoot and being productive: It is best to do a bit of planning. Get some ideas going before you start shooting. Read about planning a shoot without the scatter-gun approach: Shoot Less – Keep More.

Putting it all together…

That is the fundamental plan. To do it you need to work on one bit at a time. Practice the simple principles above, work with the camera, make sure you look at good photographs daily. Oh! And, one further thing… you are not alone. We all went through this stage. With practice you will soon be making great images regularly.

By Damon Guy (author and Photokonnexion editor)

Damon Guy - Netkonnexion

Damon Guy (Netkonnexion)

Damon is a writer-photog and editor of this site. He has run some major websites, a computing department and a digital image library. He started out as a trained teacher and now runs training for digital photographers.
See also: Editors ‘Bio’.

New verses the old – photography in flux

The photographs of the past have suffered from lack of contrast depth, but they are still precious.

Photographs of the past are still precious. Old style photography has given way to the great technology of today. We should want more for the future of photography. However, we should not forget the roots of our skills.

Photography has changed a lot in a short time.

As a result there has been a global image revolution. Photography is the latest form of communication that has moved into the public realm. Sometimes we need to be careful about what we have lost as well as what we have gained.

Contrast depth

For many years I waited for digital to become a reality. I have been doing computerised image editing since 1988 and photography for much longer. Waiting for digital camera technology became frustrating. Today, digital is here to stay, but it still suffers from its problems. Readers of this blog will know that I am concerned about the poor contrast depth in digital cameras. Digital image sensors are getting better. Nevertheless the eye is still better than the camera for seeing into the depth of a scene.

Today manufacturers want to keep selling on the basis of real improvements in the technology. They sell the latest upgrades on the basis of technical steps forward. In my opinion most of the technology upgrades in the last two years have been about tweaks, not real technology leaps. What we need the manufacturers to do is tackle the real problems. More realistic photographs will have to come from getting pictures that more closely resemble what the eye sees. for that reason contrast depth is something that will have to improve. It is one of those problems never solved by film, it is still weak in digital images.

Great new technology

We have seen some wonderful leaps forward. Night-time photography has seen the biggest improvement over film. The digital sensor is a great improvement over early photographic night work. The ability to produce images using incredibly low levels of light is a real leap forward. Its a pity that most people don’t do more night photography.

Another great leap forward in modern photography equipment is auto-focus. While I personally enjoy using manual focus it is not very often that I have to resort to doing so. In the main macro photography is best done with auto-focus. When you are working with a very shallow depth of field you should be careful to ensure that what you want in as the subject is where the focus is centred.

Auto-focus has its problems. On a tripod the action of the auto-focus motor actually creates movement and vibration. The vibrations reverberate up and down the tripod and cause movement-softness while the shutter is open. So beware of this issue and work with manual focus on a tripod.

In general auto-focus, for me, beats manual focus for most things. It is with the thorny issue of poor contrast that forces me to use manual focus. Sensors are so poor at reading contrast in a scene (which the eye can see easily) they often hunt for a focus match in twilight. Of course that is prime shooting time. So the issue is something of a problem.

Often forgotten from past photographic experience is the single focus point in old film SLRs. The big round circle where the focus point lay has now been replaced by a range of pinpoints where we can arrange the focus to be placed. This has been a revelation for the improvement of composition, especially for amateur photographers. Being able to focus off centre and control the focus to meet the need of the shot in that area is excellent. Many digital photographers without the experience of the old SLRs may not recognise this issue, so just rejoice in the AF points array.

What have we lost?

I am for learning and changing with the technology if it improves the shot, but definitely go for the old school where digital cannot cope. Are there places where we can still be better off using the old skills?

Once upon a time photographers were limited by their equipment so they could control only three things. The depth of field, the length of exposure and the sensitivity of their film. Keen photographers know these today as Aperture, Shutter Speed and ISO. They are the key components of exposure. Despite those being so important in the past, today the vast majority of people taking pictures have probably never heard of them. If they have they do not know what they mean. I am talking here of your average happy snapper. They will probably never read this blog or any like it. They just get pictures they like from a camera that is pretty automatic. People are right to be happy with that if that is as far as they want to go.

For me, the expression of my photography is in the power of the images I produce. If I enrich my viewer through an image, then I have succeeded in communicating. I personally don’t feel that using the automatic functions of a modern camera can help me much. I believe they are set up to please the person who expects a picture to be representative. I want my images to go beyond representative. I want them to be individual, the result of what I see, an expression of the way I see the world.

To meet my personal aspirations for an image I want to have control over the elements of exposure. That means falling back on those old settings… Aperture, ISO and Shutter speed. If I succeed in mastering these essentials of exposure then I can make my image fit the vision I have for it. I don’t want to ‘snap’ and get just a picture. I want to breath life into an image so it tells a story. Only the old skills can really do that.

By Damon Guy (author and Photokonnexion editor)

Damon Guy - Netkonnexion

Damon Guy (Netkonnexion)

Damon is a writer-photog and editor of this site. He has run some major websites, a computing department and a digital image library. He started out as a trained teacher and now runs training for digital photographers.
See also: Editors ‘Bio’.

How to do night photography when starting out

Night shots capture the imagination and the eye.

It is all about making sure that your viewer is drawn into your photograph. The rich colours and strong contrasts are really great for attracting the eye. In this post we will look at doing great night photography.

Night photography is simple

A lot of starters think night photography is difficult. Well it is not difficult, it is different. There is less light – obviously. There is also more light in some ways. This is because the difference between the light and dark portions of your picture are more extreme. In A quick tip to help you see the light (or darkness) we saw that the camera is not as good as the eye in distinguishing wide differences between light and dark. When shooting at night that is something we should remember.

We should not point our camera at a very bright light source at night. This is because it will over-expose quickly and the rest of the scene will remain dark. The darker parts expose slower. Try to find ways to expose your scene where the spread of light is of less extreme whites and blacks.

The concept of night photography is about exploiting light when the rest of the environment is dark. The aim therefore is to make sure you are exposing for the light you want to bring out in your picture. Almost certainly that will mean you need to do longer exposure than for the daytime. As you will see in the video this is not complicated to do. You will need to explore some settings you may not have used before. But photography is all about learning – right? OK…

Here is one idea that will simplify the thinking behind all sorts of exposure situations…

  • Picture a bucket in your mind.
  • Now picture filling it up with a hose.
  • At first you turn the tap a very little.
  • The water trickles out.
  • The bucket takes a long time to fill to the brim, but does get there.
  • Now repeat with the tap turned up more (twice as fast).
  • The bucket fills faster. In half the time in fact.
  • Now repeat again filling the bucket to the brim – tap open fully (speed x4).
  • The bucked fills half as fast again.

The bucket of water is like an exposure. To get the picture light enough you need to fill the camera with the right amount of light (to the bucket rim). At night you have to wait a long time for your exposure to fill to the brim (water at a trickle) because there is less light around. In early evening/dusk you have to wait for the exposure to fill in half the time (tap at half speed) because there is more light before sundown. During the day all that light pretty much zaps the bucket (sorry camera) full of light in double quick time.

OK, now you know all there is to know about exposure. That’s it. All you have to do is practice with the camera settings to wait for a while to fill up at night, wide aperture, long shutter opening to let in as much light as possible.

In the video the CameraLabs team have described the types of setting you might use and how to set them up. The explanation is clear and the settings simple. I think you will learn a lot.

DSLR Tips: Night Photography by CameraLabs
As an aside…

You notice in my bucket analogy how we tested fills? In photography each time you go up or down a stop of light you are halving or doubling the amount of light. Of course, in the bucket situation the timing and change-of-fill speed are not accurate – its only a thought experiment. But you get the idea. I am trying to show you how an exposure builds up over seconds (at night) or thousandths of seconds (during the day). And, the rate it fills is related to the amount of light around. That is measured in stops. Consider reading this article: Definition: f number; f stop; Stop. It will help you to understand the relationship between stops of light and exposure.