Tag Archives: Shutter Speed

Have fun, take great shots – photography at the zoo

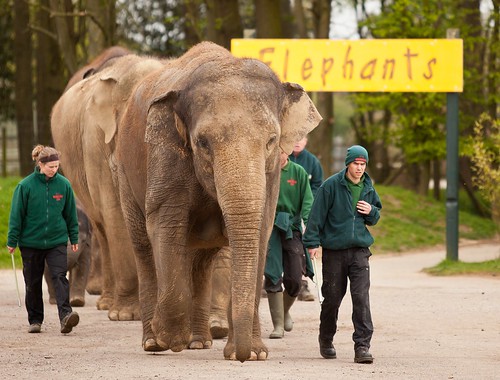
Elephants - at the zoo all sorts of images are there for you to capture.

• Elephants •
At the zoo all sorts of images are there for you to capture. Keep an eye open for the natural shots as well as the well timed ones.

Click image to view large.
• Elephants • By Netkonnexion on Flickr External link - opens new tab/page

The zoo is a rich playground for photographers.

All sorts of opportunities pop up for you. First off, concentrate on getting your pictures sharp and well composed. We will be looking at a few other ideas to help you on your zoo trip.

Sharpness and composition:

A zoo is a great place to practice your five S’s… check these out: Five S’s for super shots. We have also covered a lot of the subject matter in these pages on how to keep your shots sharp and well composed. So here are two links to look back on:

If you want to work through the issues of composition also check out the most important one to get started with: Rule of Thirds. However, composition is a wide study. So here’s the link to the composition articles on Photokonnexion: Composition resources. You can also find these listed under ‘Articles’ on the navigation bar above.

Any special tips?

Yes, fences! They are a pain. But also not as much as a problem as you think. Ring-tail lemurs are hugely cute animals, but great climbers. They need to kept inside a high and secure chain-link fence – you know the diamond linked fencing…
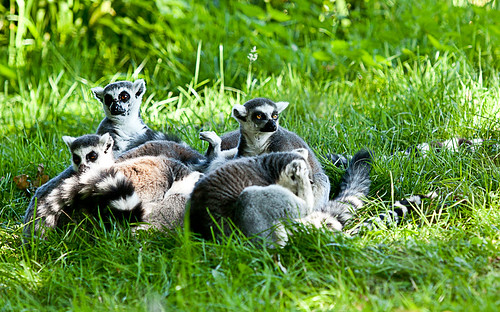
Ring-tail lemur - inside a diamond-shaped link fence.

• Ring-tail lemur •
inside a diamond-shaped link fence. By focusing correctly you can focus the fence out.

Click image to view large.
• Ring-tail lemur • By Netkonnexion on Flickr External link - opens new tab/page

In this picture you cannot see the fence at all! I assure you it was taken through the fence. If you focus correctly you won’t see the fence. Just leave enough room between you and the fence and the fence and the animals. In this shot I was about 2 meters from the fence and the animals were about the same distance inside it. Equal distance either side of the fence and you will be OK. A sharp focus on the animal will put the fence in its most out of focus point. A great tip!

Unfortunately it does not work with thick bars. It is slightly less successful with some finer mesh fences too. It works reasonably well with glass. It does not work from a long way back from the fence because the individual strands in the fence appear to come together and look like a sheen over the shot. So this tip takes a little practice but you should be able to do it if you keep ‘chimping’. Yes, chimping! In a zoo that’s just the thing to do… keep looking at your screen on the camera to see how it came out.

Approach to your shots

Sometimes plain old photos of an animal in a cage are fine. Especially if you are doing a science project or something similar. You do not want to mislead people about where you get the shots. So, if you are doing any sort of a record shot then capture the animal in its enclosure. If you are reporting, taking a journalistic shot, then you must not mislead the public in any way. So, make sure that you take a fair picture of caging as well as the animal itself.

It is great fun, for your own interest, to take shots that make it look like you caught the animal in the wild. This does take a bit of creativity. You need to find ways that show the animal in an environment where it might be seen naturally. Avoid fences, people, artificial surfaces and toys/climbing equipment. Put in plants, other animals, trees, natural nests and so on. Most caged-off areas are quite well suited to this in modern zoos. In the UK, and most other aware countries, zoos must cater for the animal so it has five needs satisfied. They must have…

  1. somewhere suitable to live;
  2. a proper diet, including fresh water;
  3. the ability to express normal behaviour;
  4. any need satisfied relating to being housed with, or apart from, other animals;
  5. protection from, and treatment of, illness and injury.

These five needs also give you a clue as to what to look out for when photographing the animals. Look around their enclosures and find them doing things that fit these five essentials of their lives. That way you will catch them doing things they might be seen doing in the wild. Eating, playing, chasing, sleeping, running… all these things are good photographic material. Capture the animal in movement and stationary… whatever gets your artistic juices flowing! It’s all about enjoying yourself as well as extending your photography.

Portrait of a Rhino - capturing an animal in its noblest pose...

• Portrait of a Rhino •
Capturing an animal in its noblest pose is fun and shows the essential character.

Click image to view large.
• Portrait of a Rhino • By Netkonnexion on Flickr External link - opens new tab/page

Portraiture

It is not always easy to capture animals in action, doing exciting things. Another great pass-time is portraiture. Capture the animal looking at its best. There are lots of things you can do for this, and it helps to use a fresh perspective. So, try high shots, low shots, ground shots. Oblique angles and upside down shots are fun! Sometimes just get a beautiful picture. With your portraiture, as with humans, try to capture the animal looking at its best, and especially, when it is stationary. The idea is to make the essential character of the animal come out in your shot.

Where possible, and it is difficult sometimes, try to get catchlights in the eyes of the animal. The eyes of all animals, including humans are a strong focal point. Catchlights are great for helping to make the animal look alive and dynamic.

A day at the zoo

If you spend a whole day at the zoo you can also have fun people watching. Animals are great, but watch out for stupid humans. Grown ups are especially funny if you catch them with kids. They imitate the animals, and jump around in an attempt to get the kids into the mood. Boy does that make for some fun photography. So keep an eye out for good ol’ Homo sapiens External link - opens new tab/page doing what comes naturally when around kids and animals.

Afterwards

Finally, remember that you should take a lot of shots. Animals, especially on the move, make difficult targets sometimes. So, work hard to get each shot right. Also, concentrate on your experimentation, your sharpness and your composition.

Back at the ranch you have a chance to do some great post-processing. Some of the zoo shoots I have done over the years have seen over a thousand shots in a day. Wow! Weeks of post processing fun! Remember, while the shots may be worth developing in your favourite editor straight from the camera, animals make great subjects for morphing, general ‘PhotoShopping’ and cutting and pasting into other pictures. So don’t think your day is over when you get home. The fun is just beginning.

Have fun on your zoo trip!

By Damon Guy (author and Photokonnexion editor)

Damon Guy - Netkonnexion

Damon Guy (Netkonnexion)

Damon is a writer-photog and editor of this site. He has run some major websites, a computing department and a digital image library. He started out as a trained teacher and now runs training for digital photographers.
See also: Editors ‘Bio’.

How good is your exposure?

There is no such thing as the perfect exposure.

The manufacturers might have you believe there is a perfect exposure for every shot. They invest a lot in their cameras and the programming. What should you look for when trying to produce a great shot? Is it about relying on camera auto-settings or is there something else?

The three pillars of exposure

You are probably aware of the three main controls for exposure

  1. ISO – Controls how sensitive your camera image sensor is to light.
  2. Shutter speed – Controls how long your sensor is exposed to light.
  3. Aperture – controls how much light is allowed to reach the sensor.

These essential elements in exposure are inter-related. Each has an impact on the others. They relate to each other in two ways. As each varies it has an impact on the amount of light which reaches the sensor. And, as each varies, they have a special impact on the quality of the photograph…

  1. Low ISO gives a high quality result. High ISO introduces digital noise.
  2. Shutter speed – movement blur introduced at long exposure; movement frozen at short shutter speeds.
  3. Aperture – Wide aperture, shallow depth of field; small aperture gives a deep depth of field.
Control

Controlling these elements to get a final exposure is essential. Highest ISO, widest aperture and a long shutter speed all together is likely to allow too much light into the camera in daylight. The shot will be over-exposed. The opposite is also true. A low ISO, tiny aperture and very fast shutter speed will allow very little light to enter the camera; result underexposure.

Exposure is about a balance. We must work at getting the three pillars to create the right light for the scene we envision. This is the key – creating the right light in the camera to make the scene come out the way we want. Yes, make the scene come out as we want. A photographer makes the picture that they want by controlling the exposure. A snapper captures the scene they see by relying on the camera to make the exposure for them. The difference between the photographer and the snapper is learning to control the camera.

Genius at work

By way of example I want to show you a short documentary video. Stanley Kubric made a period film, released in 1975, called Barry Lyndon. “Lyndon” was set in the 1750’s. It was a ground breaking work.

Kubric envisioned a cinematic experience which was as close to the way the eye would see life by the light of the time. He procured special lenses for his cameras and had them modified to work together. These lenses were F/0.7 Zeiss lenses made for NASA. They allowed the aperture to be open very wide – much wider than most modern lenses will go. As a result Kubric was able to use these fast lenses to film entire scenes only by candle light. This created an atmosphere which paralleled indoor light in the 1750’s. The costumes and set pieces were also of high quality. The overall effect is one of extreme authenticity.

A lot of pictures as dark as shots in this movie would be considered as under-exposed in the eyes of many photographers. Yet the gloom is the essence of the success of the shots. The exposure is correct for these scenes. Kubric went to extreme lengths to get the exposure he wanted. With the proper approach and control you can do the same in your photography.

The one consequence of shooting at such wide apertures is an extremely shallow depth of field. When you see the candlelit scenes you will see how much bokeh there is behind the heads of those in focus. What a gorgeous result.

This video is actually a commentary on “Barry Lyndon” the movie. I have started the video at the scene where the exposure and special lens set up is discussed. Despite this being a movie, the same internal camera conditions apply as in a DSLR. ISO, Shutter speed and aperture still have the same effect on each frame taken. Kubric showed true genius in marrying the camera and the lens into a unique synthesis that recreated the prevailing light conditions of the time. He literally controlled the exposure to emulate life in the 1750s. That is the genius of the man. It is also the supreme insight in photography.

Ten great tips for photographing landscapes

Landscapes appear inherently attractive to the eye.

We all love taking landscape shots at some time or another. However, they are also quite a challenge. There are a few simple things that you can do to get a great landscape shot.

Use a tripod!

The most important landscape photography technique is to use a tripod. For your shot to be successful you need to get the sharpest and most carefully framed shot.

  • Framing: When you put up your tripod you give yourself the best opportunity to get the framing right because you can take your time. Look around the shot. check the edge of your frame. Make sure you have all the right composition elements and have a meaningful subject in your viewfinder.
    See more on framing here.
  • Stability: The tripod will give you the most stable platform for your shot. Most photographers miss this essential when starting out. Sharpness makes or breaks a landscape shot. Starter landscapers often think a hand held stance is good enough. It may be possible – sometimes. The chances are reduced. If you want to get right into the shot you must get pin sharpness.
    See more on why you should use a tripod here.
Vibration elimination

Beating the movement blur of the hand-held shot needs more than just a tripod. Your tripod technique is critical too. The most important part of using a tripod is to reduce the vibrations through it. Here are my ten tips for making your tripod-based landscape shot pin sharp.

  • Tip 1: Keep the legs as short as possible and don’t use the middle elevating column. The short legs and no-column policy keeps the tripod tight and that reduces any integral vibration in the tripod itself. The vibration is reduced because the tripod is stiffer overall if the legs are retracted. If you must elevate it, make sure you extend the thinner, vibration prone, bottom of the tripod legs last.
  • Tip 2: Use a cable release: Pushing the release button (shutter button) moves the camera and creates vibration in the tripod. A cable release of some type will set the camera off without your heavy finger involved.
  • Tip 3: Use mirror lock-up: Most DSLRs will have a menu setting that will lift the reflex mirror before the shot is fired. The number one source of vibration in a camera is that mirror twanging up and down! The mirror lock-up function will remove this vibration. Check the manual to see how it is done on your camera.
  • Tip 4: Turn off auto-focus: The engine and the act of the camera tuning its focus causes vibrations in the tripod. These set up a resonance up and down the legs – the vibration affects your shot. You will produce a much more accurate focus by hand anyway.
  • Tip 5: Turn off image-stabilisation: If you are on a tripod you don’t need it. However, the slightest breeze or vibration through the ground will set it off. The motor attempting to compensate for tiny vibrations in the tripod will in fact create more vibrations. All image stabilisation systems are designed to iron out natural hand movement. Vibration in a tripod creates its own peculiar vibration which just aggravates the stabilisation system.
  • Tip 6: Hang a weight on the tripod hook under the centre column: This weight adds tension to the legs and forces greater stability to the tripod. One more way to reduce movement.
  • Tip 7: Stay away from vibration sources: Its not always possible, but roads, railways, fairgrounds, airports, ferry terminals and ports as well as the obvious wind all create ground vibrations. Less obvious are underground trains and tunnels under your feet, tall buildings swaying in high wind, bridges vibrating from feet and vehicles… well it’s a long list. Think carefully. You may find you have put your tripod right in the centre of a major vibration source.
  • Tip 8:Remove your camera strap: or as a secondary measure peg the strap tightly to the tripod. If you let it hang loose it will catch the wind. That will move or vibrate the camera.
  • Tip 9: Longer exposures: The camera shutter is also a significant source of vibration. Nevertheless, it has to open. Using a longer exposure is better because the shutter is open completely with no movement for at least part of the shot. This reduces the impact of shutter shake. The shutter release and movement still creates a vibration profile. By design, it has been carefully calculated to reduce the impact of the shutter movement – but it does not reduce shutter vibration completely. So, longer exposures help reduce the vibration just a little more.
  • Tip 10: Use a wind-shield: Even a light wind will induce vibration in a tripod. So, shelter it from the wind. Hold your coat in front of the tripod (not touching it) to shield the wind. Better still, if you are going to be there for a while, put up a staked-out wind-shield to divert the wind properly. Alternatively, take the shot from cover of some sort.

Remember, these measures all add up. Sharpness in your shot is the result of working at all of these. Put all of the above in place and you will get a really sharp shot.

More you can do…

Here is a list of some more top tips to work on for your landscapes…

By Damon Guy (author and Photokonnexion editor)

Damon Guy - Netkonnexion

Damon Guy (Netkonnexion)

Damon is a writer-photog and editor of this site. He has run some major websites, a computing department and a digital image library. He started out as a trained teacher and now runs training for digital photographers.
See also: Editors ‘Bio’.

Can you write? Of course you can!
Write for Photokonnexion...

We would love to have your articles or tips posted on our site.
Find out more…
Write for Photokonnexion.

Shooting very long night exposures

Lights from any building generate a surprising amount of light at night.

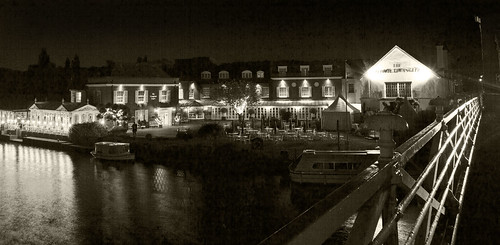
“The Compleat Angler” – This hotel, pictured from Marlow Bridge, Buckinghamshire UK generates a surprising amount of light. Click image to view large.

Shooting by moonlight or other dim lights

It’s true. You can shoot in almost total dark with a digital camera. You make exposures of many minutes and use really dim lights – the moon, stars and low-level hand-held lights are enough for the camera to pick up.

Previously…

In other articles about night photography we looked at Planning and Preparing for a Night Shoot and Out on a Night Shoot – Night Composition. We also looked at Six things you must know for night shoots including the basics of controlling the camera and the sort of settings used. It is worth following up on these articles before proceeding.

Night light

Out of town, away from the urban lights, dark is really dark! Many urban dwellers don’t realise that unless the moon and stars are out our eyes are pretty poor in complete dark. Yet, when the moon is out, and the stars, we can see pretty well. In fact our eyes are not well adapted to this darkness. However, the digital camera can pick up amazingly small amounts of light. In the photograph above the EXIF data is…

Model – Canon EOS 5D Mark II
ExposureTime – 10 seconds
FNumber – 11
ExposureProgram – Manual control
ISOSpeedRatings – 100
Flash – Flash not fired
FocalLength – 25 mm
ExposureMode – Manual
White Balance – Manual – Cloudy
SceneCaptureType – Standard

Ten seconds is a reasonable time with all that light knocking around. Remember that an exposure is like filling a bucket with water. As light enters the camera it fills the exposure, making it brighter and brighter as the shutter is open longer. So, in very low light situations you can take photos with very long exposures.

One thing to consider is how to set the length of exposure. Most cameras cannot time your exposure if it is going to be longer than thirty seconds. You can buy automatic ‘intervalometers’ – devices which count intervals of time. They will be able to set your camera off for longer exposures than thirty seconds. However, on the camera there is normally a setting called ‘bulb‘. This will allow you to time a period yourself and close the camera shutter when you are ready. You can find out more about the bulb setting (B setting) in: What is the ‘Bulb’ Setting?

The video

In the following video, Mark Wallace takes us through the process of taking a photograph by moonlight. He is using a two minute exposure. Besides nearly getting eaten by coyotes (OK I exaggerate) he gets some well lit shots. Remember he is out in the country where there are no lights and is just using the ambient moon/star light.


Uploaded by snapfactory External link - opens new tab/page on May 1, 2011

By Damon Guy (author and Photokonnexion editor)

Damon Guy - Netkonnexion

Damon Guy (Netkonnexion)

Damon is a writer-photog and editor of this site. He has run some major websites, a computing department and a digital image library. He started out as a trained teacher and now runs training for digital photographers.
See also: Editors ‘Bio’.

Six things you must know for a night shoot

Night photography is fun. A little foreknowledge makes your night shoot easy

Night photography is fun. A little foreknowledge helps make it easy

Night shoots can yield great images with a little thought.

There are a few things that will help you get better results. Understand your equipment, ensure you have a steady base, work with your settings. After that it’s about your photographic skills.

1. Before your shoot

Plan ahead for your night shoot. A little thought about night composition is useful. Consider your safety too. In the dark it’s easy to injure yourself, break equipment and lose things. These two articles will help to prepare you:
Preparing for a Night Shoot
Out on a Night Shoot – Night Composition

2. Equipment

You will need to use longer exposures on a night shoot. This means that to get a sharp image you should use a tripod. Most night exposures in an urban environment are from about two seconds to about 30 seconds. Some could be much longer than that, especially if you are outside urban areas where there is little light pollution.

You cannot get a sharp image hand-holding your camera for extended exposure periods. Tripods provide a stable platform at at any time. At night they are essential. If you don’t have a tripod there are alternatives, although I have not found any as effective and flexible as a good tripod.

You can use any of your ordinary day equipment on a night shoot. Lenses, cameras and even flash can be used with no problem. However, you may need to use your equipment in very different ways to the daytime. Also, be prepared to get very different results. You will need to experiment to get familiar with your equipment in night conditions.

You can’t use a Flash-light (torch) when you are shooting, it will affect your local light conditions and the shots you take. Switching a torch on and off will also cause night blindness. You have wait while your eyes adjust to the change in light levels each time. You can get away with a red-light LED torch. I have one that I can wear on my head and it has a red and white light. Red lights don’t spoil your night vision so much. They do affect the shot. So don’t forget to turn them off when shooting.

It’s best to work with the ambient light if you can, especially in urban areas. Using your equipment at night requires that you have a finger touch familiarity. You will probably be surprised if you have been using your camera a lot. You may know many of the buttons by touch anyway. However, some buttons you may not know. Practice builds familiarity.

3. Anti-vibration compensation

One button you may not be familiar with is the one to turn on/off vibration compensation motors. These motors, usually in your lens, help stabilise your shots (Canon: Image Stabilisation; Nikon: Vibration Reduction). They help reduce movement from hand-shake. On a tripod the motor causes vibration which is amplified by the tripod – making the situation worse. This is not just a night shoot trick to reduce vibration, it should be used any time you are using a tripod. It helps your image to be sharper if you reduce anything that causes vibration or movement.

4. Auto-focus (AF) and Manual focus (MF)

At night it is quite likely AF will not work. It might appear to be ‘hunting’ for a focus but not find it. Don’t worry! If you focus on the margin between a light and dark spot it will work again. AF works by detecting contrasts. Anyway, it is better to turn off AF and use MF. Manual focus is much more precise at night. It also stops the lens from ‘hunting’ for a focus point.

5. Flash

Think about how you want to use your flash. If you are using auto-settings your flash may fire when you don’t want it to go off. Read your manual to find out how to turn it off. You will also find a way to change the light intensity of your flash. On-camera flash is a particularly poor tool at night and is very difficult to use to any effect at all. My advice is turn it off for your night shoot work. If you must use flash, consider off-camera flash. Now that IS fun!

In general, you don’t need flash on a night shoot for general shots. In an urban environment the lights are sufficient from the streets. However, the length of your exposure could be very long. You might usefully use off-camera flash to manually fire to illuminate something, a statue, a tree, a car… whatever. The pattern of flashes you fire will determine your local lighting. In the dark flash will only effectively light a small area around where it is fired. So, don’t expect it to light up your whole shot. There will be an article later on night-lighting shots.

6. Settings for a night shoot

If you are using auto-settings on a night shoot you will have problems. There may be a night-mode setting on your camera. Don’t expect to get great results with it. Best results come with manually setting the camera up yourself while doing a night shoot. You should consult your manual if you really want to use pre-programmed settings.

Learn how to use manual settings from the start. A night shoot is great fun. Getting the results you want makes it really worthwhile. Use ‘M’ – manual mode. This is the only certain way to get the results you want. Remember, the length of the exposure is the critical setting on a night shoot. You will be working with long exposures all the time. The shutter may be open between a tenth of a second through to, well, possibly hours. It’s more likely you will start with settings of around 1 to 30 seconds. After 30 seconds you will need to change to the ‘B’ or bulb mode setting on DSLRcameras.

Long exposures are like filling a bucket with water. Over time the bucket gradually fills up. Over a long exposure light fills the shot making it brighter and brighter. Even moderate local lights may overwhelm areas of your long exposure with brightness. However, without a longer exposure you will not get enough light for the darker areas of the scene. Here are some basic pointers.

  • A wide Aperture lets in more light (settings around f4 or less are wide open). You will have a lot of bokeh in the background with a wide aperture. To avoid that you will need a longer exposure (and a narrower aperture).
  • A high ISO will permit faster exposures. High ISO settings will create a lot of digital noise in the final image. To avoid that you should use low ISO and a longer exposure.
  • Longer exposures (shutter speed or time value) give you greater clarity and a wider depth of field in your shot. However, the camera will be much more vulnerable to vibration. (Tripod – remember?).

You will need to adjust your settings to create the correct exposure. If you have not used manual settings before you should consider this simple set up…
(Assumption: urban environment at night, some street lights and other lighting)
– Set ISO to 100 (Low ISO will give low noise – the best quality image).
– Set aperture to f8 for close focus. Landscapes/long focus, use f14.
– Set Time value (shutter speed) to about two seconds.
Now take a shot and check the screen to see what it is like (“Chimping”)
Black? Too dark? – OK, turn the shutter speed on one click and try again, and again, until your shot looks right.
In fact the internal light meter will show you when the exposure is correct. When you push the release button half way, the needle in the bottom of the viewfinder (DSLR) will be centred.

A little experimental work with longer or shorter shutter speeds will give you an opportunity to try out a few shots. Having a go is the best way to move forward with night shots. Everyone messes up quite a lot of shots to start with until you get the feel for the correct exposure. It’s really rewarding when it goes right! Have fun…

By Damon Guy (author and Photokonnexion editor)

Damon Guy - Netkonnexion

Damon Guy (Netkonnexion)

Damon is a writer-photog and editor of this site. He has run some major websites, a computing department and a digital image library. He started out as a trained teacher and now runs training for digital photographers.
See also: Editors ‘Bio’.

Work the scene…

Serious About Photography? Work the scene.

Serious About Photography? Work the scene.

In order to get the best you have to do the most

There are two things you have to accept about photography. One, you are going to take a lot of photographs. Two, you will get a proportion of them wrong. It’s a photographers lot. If you want to get the best out of a scene you have to work it until you get THE shot. Learning to work the scene is about learning to be a photographer.

Finding the scene

There are lots of ways to find a scene. Planning, knowing, researching, discussing… well you get the idea. However, the most difficult scene is one where you discover ‘something’. Ever had that feeling? “Here I am – I think I can make something of this”. If you are anything of a photographer listen to your intuition. If you have had your photographic eye attracted to a scene there is probably something there. Now you have to work the scene to pull off the shot.

Test the scene

Take a test shot. Just do it. Now you have to look at your picture and see whats there. Look at it, look at the scene, look at the shot. This process gets you into the idea of framing the shot.

Now walk around a bit. Look at the background. Look at the angles. See the foreground – look into the background. Consider your rules of composition. Decide on what the detail is you want. Decide on what to include or exclude. Too much clutter and the shot is ruined. Too little content and the scene is empty.

Work the scene

Pick what you think the shot is going to be and start to work the shots. Here is some things to try…

  • Walk the subject – get all the distances
  • Shoot from far away – from the sides far away too
  • Shoot close up – from as many sides as you have access
  • Shoot from different angles
  • Take shots from high level
  • Take ground level shots
  • Use a foreground element in your photo
  • Use a background element to balance the shot
  • Work the light, try all the different ways to get the light on the subject
Work the camera

When you have the composition right – the elements in the right place – get your camera working…

  • Change your depth of field (aperture)
  • ISO… work the exposure brightness
  • Time value, work the shutter speed
  • work the sharpness -> pull out the tripod when you have your shot
The most important thing is to work it

Ultimately the shot is going to be about composition. When you are getting into the scene the composition is something you should study with total compulsion and commitment. Be obsessive. As you get a feel for how to working the scene you will gradually find out more about what works. However, even the most practised photographer still needs to work the scene. New scenes also present new problems. So never just follow one procedure. Try to think of a new way to walk the scene for every situation you encounter. That will help your photography stay fresh and vigorous.

Damon Guy - Netkonnexion

Damon Guy (Netkonnexion)

Damon is a writer-photographer and editor of this site. He has run some major websites, a computing department and a digital image library. He started out as a trained teacher and now runs training for digital photogs.
See also: Editors ‘Bio’.
By Damon Guy see his profile on Google+.

Creating a Fake Smoke Effect

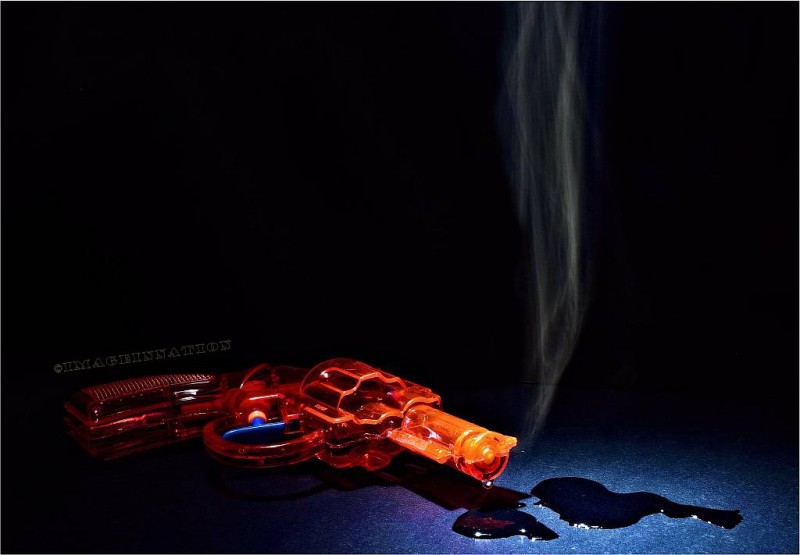
Smokin'... A cool smoke effect for your photographs

Smokin’… A cool smoke effect for your photographs.

A great effect to add to your photography skills

This effect works very well but requires a little preparation and a little practice to get right. It’s great to liven up and add interest to a still life image, making the image stand out and get noticed. Everyone will be asking “how did you do that?”

You will need a small torch (I used an LED torch as the light is whiter than an ordinary bulb), a piece of string, length depending on the height of your background and a plain background.

Firstly, position the background in a suitable place. You will need a dark room as this is going to be a long exposure and you don’t want any stray light affecting your images. As my subjects were not too big I used some black paper covered foam craft boards. These are available at any office supplies store very cheaply.

Then attach one end of the string to the bottom of the torch by tying or use sticky tape.

Set your camera on the tripod. I used a 28mm prime lens as it gives great, sharp images but any lens will do the trick. Set the ISO to as low as your camera will go. An ISO of 100 or less is great. Make sure your camera is in manual mode. Set the time value to 10 secs and F11. Pre-focus on the subject in with the lights on in the room and then switch your lens to manual focus. This way, you will not lose the focus when the lights go out and press the shutter.

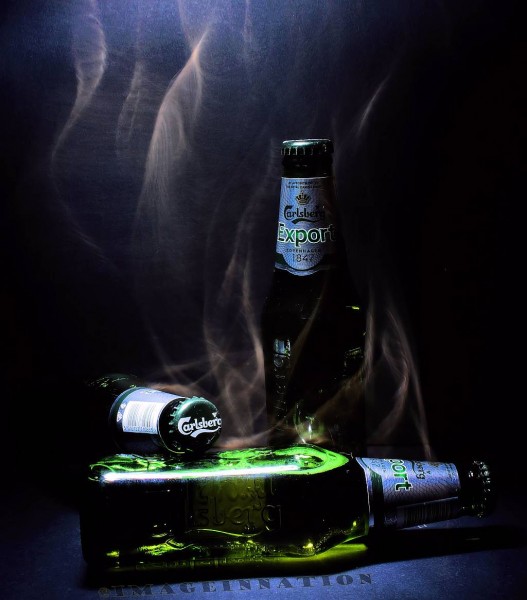
Hold the torch above the subject and let the string dangle below the torch and around the subject. Turn on the torch and turn out the lights. Push the shutter release and within the 10 secs, drape and slowly move the string above, around and over the subject. As you are moving the string, this is not fully captured by the sensor and creates a blurring of the string. This results in a misty effect that looks like smoke rising out of the subject. The torch is acting as the light source so can give some lovely shadows that can make the shot look very effective. Try it using different subjects. It can look good with smoke coming from a hand or fruit or even ice!

Bottles behavin' badly... a smoky atmospheric shot.

Bottles behavin’ badly… a smoky atmospheric shot.


It can take a few practice shots to get the speed of the string right. If you twirl the string so it moves too fast, the sensor will not pick it up. Then you will not see it. Too slow means you will see the string as string and not smoke!

As you can see from the images it looks great and is very easy to do. For more creative ideas this website is very informative PhotoExtremist.com External link - opens new tab/page

By Steve Maidwell (contributing author)

Steve Maidwell is a keen amateur photographer and active member of Marlow Camera Club. He has some superb images to his name and enjoys working with special effects. His website is imageinnation.com  External link - opens new tab/page. You can also see his images on his 365Project  External link - opens new tab/page

Can you write? Of course you can!
Write for Photokonnexion...

We would love to have your articles or tips posted on our site.
Find out more…
Write for Photokonnexion.