Tag Archives: Work the scene

Photography mistake that means you miss great shots

• Thames Crossing •

Focus. It’s too easy to fire off shots without thinking when arriving at a great location.
Click image to view large
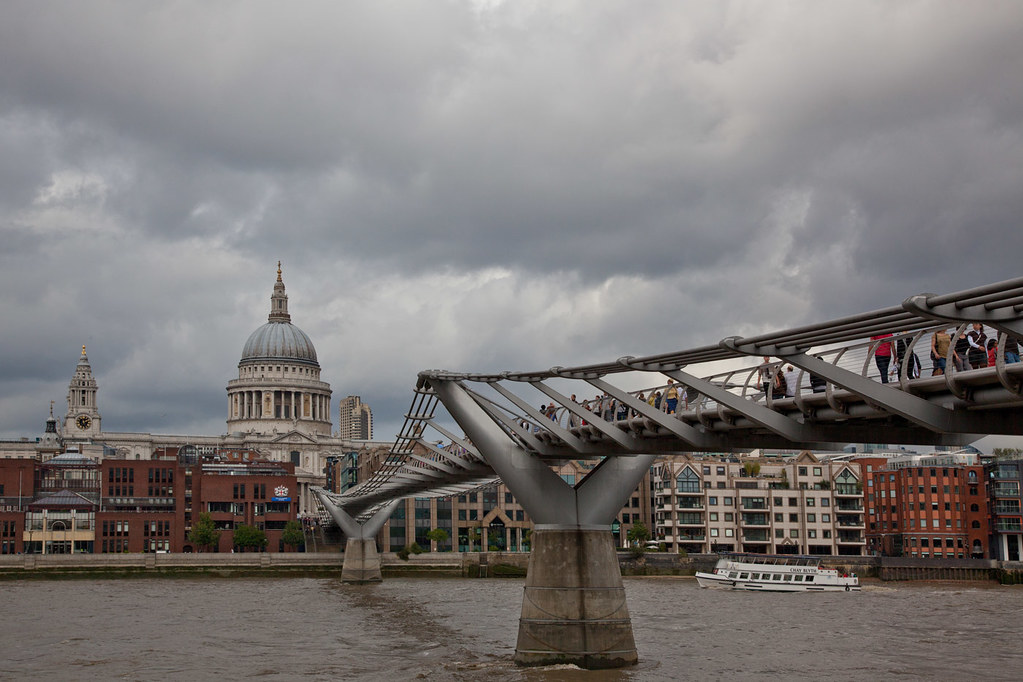
• Thames Crossing • By Netkonnexion on Flickr External link - opens new tab/page

First impressions can overwhelm your photographic senses.

It’s so easy to turn up at a new location and start firing off shots. The machine gun approach will actually damage your results. This simple trick will help you focus your photography.

Great locations seem to have so much to offer. You want to open yourself up to the whole experience. The problem is the new location will offer you too much to take in at once. You simply cannot take pictures of everything. In fact to try will just make your shots boring – you will be diverted from really interesting shots.

Try this simple plan…

When you arrive take these simple steps to help you get great shots:

  1. Go take the postcard shot that everyone takes – get it out of the way.
  2. Sit down and consider the whole location in photographic terms (10 mins).
  3. Think how you might shoot for the unusual views of the location.
  4. Work the scene.
  5. Use the “fifteen second appraisal” to check your composition.

Now go and take the shots you have come up with above.

This simple procedure can be applied to any location. It pulls together different photographic skills into one smooth shoot. The result of taking the time to do this full photographic assessment will be properly considered shots. They will be photographs you will be proud of because you have taken the time to consider what is needed to make great images.

By Damon Guy (author and Photokonnexion editor)

Damon Guy - Netkonnexion

Damon Guy (Netkonnexion)

Damon is a writer-photog and editor of this site. He has run some major websites, a computing department and a digital image library. He started out as a trained teacher and now runs training for digital photographers.
See also: Editors ‘Bio’.

How to take a test shot

Cornish Dusk - Test shot

• Cornish Dusk – Test shot •
Underexposed, over bright at the top, over dark in the foreground, poor focus… the test shows a need to do some work…

Click image to view large final version with corrections
• Cornish dusk • By Netkonnexion on Flickr External link - opens new tab/page

Ever taken a shot without thinking?

…And regretted it later. We all have. Yet it’s simple to run through a simple check list and do a few test shots. In this article we look at setting up that procedure.

What needs doing?

I will assume you are in the right place and have your camera out of the bag, ready to go. The first thing to do is work the scene and try to see what sort of shots will serve your subject best. Find which angle looks the best through the viewfinder. Your subject is the critical item to focus on, so walk all around to get a full range of ideas of how best to frame it. Then, when you have composed and decided on your shot, you need to start considering your settings.

Approaching the settings

You will be working with the idea of ‘chimping’ now. If you don’t know what that is then read this first.

Here is the list of adjustments you need to make…

  • The first thing to consider is focus. If that is wrong you are in trouble from the start. So make sure that you can get a good focus.
  • White balance – It helps to have your white balance correct even if shooting raw.
  • ISO – Set your ISO for the light levels you are experiencing as your ambient light. If you don’t know about setting the ISO correctly then read ISO: get control of your sensitive camera!
  • Next select the mode you want to work in. You should select for…
    • Shutter speed if you want to adjust exposure length.
    • Aperture if the critical issue is depth of field (DoF).
    • Full manual if you want to work with both, or have more control overall.

Next you need to decide if you are going to work with the DoF or the shutter speed as your main consideration…

  • If working with DoF set the aperture you want to work with now. DoF is one of the primary considerations when composing a shot. Where you want your image to be sharp and where you want it to be unsharp. So play around with aperture for a while. Take a shot, chimp it, adjust the aperture, take another and so on. Once your DoF is correct.
  • If you are working with shutter speed as your main control then you need to adjust this instead of your DoF first. Again, shutter speed is a primary consideration in your shot. A long exposure will get more blur if there is any movement in the field of view. The shorter the shutter speed the more the shot will appear frozen, movement blur will tend to be eliminated.

As you set up each setting you can take a test shot of your subject. Then, by doing a bit of chimping, you can work out if you have your setting correct. You may need to take one, two, or maybe three shots to get your setting correct.

Once you get experienced working with these settings you will do them in seconds. Two things helps to achieve that. First, you will become familiar with which settings are appropriate for the conditions you are working with. Secondly you will be more sensitive to what you need to think about as you set up your shot. In particular the type of light is the main consideration. That in turn leads you to get a feel for what settings you need.

Some issues to note…

If you are working with landscapes you will need to do a bit of ranging to get your focus right. When working with longer distances the DoF and the focus vary. As your focus point gets further away from you the distant edge of acceptable sharpness rapidly goes into the distance. It is not always easy to determine DoF control precisely at long distances. There are methods but I will discuss them in another article. Just remember that from f11 you will effectively get sharpness right through the shot.

If you are working with an on-board (pop-up flash) then the camera will sync automatically to your camera settings. When working with off-camera flash, adjust that at the same time as the shutter speed. Normally your camera will have a ‘sync-speed’ to work with your flash – it maybe 200ths sec or 250ths sec depending on the camera. So you will need to consider that too.

Working with a tripod? Make sure you turn off all electronic motors in your camera to prevent tripod vibrations (Vibration compensation, auto-focus). This means you will have to manually focus the lens.

By Damon Guy (author and Photokonnexion editor)

Damon Guy - Netkonnexion

Damon Guy (Netkonnexion)

Damon is a writer-photog and editor of this site. He has run some major websites, a computing department and a digital image library. He started out as a trained teacher and now runs training for digital photographers.
See also: Editors ‘Bio’.

The mistake we make with holiday photography

"The Brave". A tribute to the American Soldiers who landed on Omaha Beach on June 6th 1944.

“The Brave”. A tribute to the American Soldiers who landed on Omaha Beach on June 6th 1944. A brilliant recognition of the sacrifice.
(Sculpture by Anilore Banon, St. Laurent-sur-Mer, Normandy).

Record shot or a family holiday moment?

I love the lines and drama of this sculpture. It is a tribute to the great sacrifice made by so many on Omaha Beach in Normandy, France. It is, as a sculpture, invested with energy and power. It lifts the feelings and at the same time reminds us of darker moments in history.

Is it a fitting reminder of a family holiday? No, I think it is a photographers reminder of a wonderful sculpture. It’s a record shot.

Of records and tourist spots

Whatever you are photographing it’s fine to make a record shot. It reminds us that the subject has a character of its own. We see it in an uncomplicated and straight forward way. It is a pure record.

A sculpture like this, however poignant, is a reminder that we live our lives in places of great significance. Yet, as a photograph it does not come alive. In the same way, many postcards are records of a tourist attraction. They are not your experience of the scene. Why take pictures that are like postcards? Will they really remind you of your experience?

Of people and places

Everyone wants a photographic record of ‘being there’. Yet, most of these shots are a cliche. Google lists more than twenty five million images about the Eiffel Tower. Most of them are, well, the Eiffel Tower. Everyone who goes to the French capital takes a shot of it. You’ve just gotta do it!

While there, look out for different, unusual, bizarre and the odd angles. Have you ever seen a shot of the big rivets in the steel-work of the Eiffel Tower? What about the people who are there around you? They have a story to tell and you can show the location too.

Sit down for a while in these places. See what is going on. Wait for a story to unfold. Capture the old lady reading a newspaper on the pedestal of the monument. Snatch an image of the lovers kissing at the flower stall beside an iconic statue. Look at life and actions around you and invest the image with that life. You will remember the sights, sounds, smells and stories of the moment. See the attraction, but, picture the experience and people sharing it with you. Capture the local moment, the essence of the place.

Here are some sorts of things to think about putting in an image when in a tourist spot…

  • The restaurant where you had lunch.
  • Strong fishy smells from the market in the port.
  • A family playing games outside their home in the old town.
  • Condensation on the glass of a drink you had.
  • A crying lady on the steps of the Taj Mahal.
  • Peeling paint on an old building in Venice.
  • A local food you enjoyed.
  • A puddle reflecting street lights in the town square.
  • Character and integrity in the face of a devout worshiper.
  • Street performers doing something extraordinary.

Show something that makes a memory out of your visit. At the same time show the location. Enjoy!

Work the scene…

Serious About Photography? Work the scene.

Serious About Photography? Work the scene.

In order to get the best you have to do the most

There are two things you have to accept about photography. One, you are going to take a lot of photographs. Two, you will get a proportion of them wrong. It’s a photographers lot. If you want to get the best out of a scene you have to work it until you get THE shot. Learning to work the scene is about learning to be a photographer.

Finding the scene

There are lots of ways to find a scene. Planning, knowing, researching, discussing… well you get the idea. However, the most difficult scene is one where you discover ‘something’. Ever had that feeling? “Here I am – I think I can make something of this”. If you are anything of a photographer listen to your intuition. If you have had your photographic eye attracted to a scene there is probably something there. Now you have to work the scene to pull off the shot.

Test the scene

Take a test shot. Just do it. Now you have to look at your picture and see whats there. Look at it, look at the scene, look at the shot. This process gets you into the idea of framing the shot.

Now walk around a bit. Look at the background. Look at the angles. See the foreground – look into the background. Consider your rules of composition. Decide on what the detail is you want. Decide on what to include or exclude. Too much clutter and the shot is ruined. Too little content and the scene is empty.

Work the scene

Pick what you think the shot is going to be and start to work the shots. Here is some things to try…

  • Walk the subject – get all the distances
  • Shoot from far away – from the sides far away too
  • Shoot close up – from as many sides as you have access
  • Shoot from different angles
  • Take shots from high level
  • Take ground level shots
  • Use a foreground element in your photo
  • Use a background element to balance the shot
  • Work the light, try all the different ways to get the light on the subject
Work the camera

When you have the composition right – the elements in the right place – get your camera working…

  • Change your depth of field (aperture)
  • ISO… work the exposure brightness
  • Time value, work the shutter speed
  • work the sharpness -> pull out the tripod when you have your shot
The most important thing is to work it

Ultimately the shot is going to be about composition. When you are getting into the scene the composition is something you should study with total compulsion and commitment. Be obsessive. As you get a feel for how to working the scene you will gradually find out more about what works. However, even the most practised photographer still needs to work the scene. New scenes also present new problems. So never just follow one procedure. Try to think of a new way to walk the scene for every situation you encounter. That will help your photography stay fresh and vigorous.

Damon Guy - Netkonnexion

Damon Guy (Netkonnexion)

Damon is a writer-photographer and editor of this site. He has run some major websites, a computing department and a digital image library. He started out as a trained teacher and now runs training for digital photogs.
See also: Editors ‘Bio’.
By Damon Guy see his profile on Google+.

Time – 5 Essential Tips For Photographers

The cosmic clock is ticking... photographers should be aware of time

The cosmic clock is ticking... photographers should be aware of time

Time is an imperative for photographers

An essential element of photography, time impacts on us photographers in many ways. Here are some of the issues you should be thinking about.

The Obvious
Of course… shutter speed, the time the shutter is open. We all know that it is one of the most important aspects of taking a photograph. Tip number one: is to know the impact of shutter speed on the other two important aspects of exposure. I am talking about ISO and Aperture. Without a clear understanding of how these three components interact photographers are doomed to live with auto-settings.

Shutter speed, ISO and aperture all work together to produce your exposure. Between the three of them there is a balance. Raise/lower one of these and one or both of the others have to be adjusted to compensate. Your exposure is a dynamic balance between these three elements. Shutter speed is inseparable from the other two. Read up on the three components of exposure so you understand the impact of shutter speed.

Less Obvious

Composition is a time related activity. We all think about the best way to take a shot. What do we included or exclude? How do we frame? What angle is best? The questions are endless… the compositional variations are too. Actually, the important issue is getting the shot. Some people walk up to a scene snap and go. Have they considered the composition fully? There is a balance to be had. Time is important. I find that as my students develop the shot consideration-time shortens. They spend less time thinking about ‘the’ shot and more time working on variations… hunting for the right shot; working the scene. Tip number two is learn the settings on your camera and practice thinking about compositional elements but remember the time. Get in a number of shots, different angles, perspectives and so on. As you practice these skills try to work to time. Don’t machine-gun your shots. Work the scene – quickly, efficiently.

Being there

Timing is everything: If you don’t turn up you will miss the shot. In photography getting to the right place at the right time is everything. If you are late you will miss something… I am certain that quite often it will be the importing ‘thing’. Tip number three… leave on time, know where you are going and leave enough time to set up before you are going to take the shots. It sounds an obvious tip. However, there is a hidden component. The most important part of getting the shot is being in the right place at the right time. That will need some work. Work the scene before the event; the day before, the hour before. Which ever is right. Know where you will be taking the shots. Know what are the best places to stand. Know in advance what shots you want to take. This planning is essential if you want to make the right moves when you are doing your shoot.

Knowing the time: A lot of activities in photography are about time of day. The Golden Hour at the beginning and end of the day is quite a precise time. Knowing when it starts and ends is something you should think about if you are to make the best use of your time. Precise timings for the Golden Hour are calculated as are the angle of the sun to a particular location. It is therefore possible for you to know what time you need to be at a place to catch the golden glow of this great time of day. And, you can find out what direction to look in if the sun is not apparent when you arrive. If you don’t know the terrain you could turn up at a location and find that your times are out because the hills prevent you seeing the sun at that time.

Tip number four… know the time, and direction of your shot in advance and make sure the light is right! Consult a map to work out if you will be in hills. Ordnance Survey maps  External link - opens new tab/page have contours to indicate the lie of lines of hills and their height.

You can find out the times of the Golden Hour on The Photographer’s Ephemeris (Desktop computer version) The Photographer's Ephemeris | External link - opens new tab/page – the site helps you plan outdoor photography in natural light. The website will show you how the light will fall on the land, day or night, for any location around the earth. There are phone apps available too. Details available on the site.

You can also find the position of the sun  External link - opens new tab/page at any time of the day.

Tip five… Other important times of day you should know about:
Dawn and Dusk times: dawn is the start of the morning golden hour; Dusk is the end of the evening golden hour. However, having a knowledge of exactly what time the sun rises and sets lets you know how much time you have left on your shoot (or when it is about to start).
Mid-day: this is the time the sun is likely to be harsh, producing hard light. Mid-day is not a good time for photography. Colours may be washed out and the overhead sun reduces those all-important shadows. Remember, local DST (Daylight Saving Time) may may affect the time the sun is overhead.
Moon phases and times: The moon is a great addition to night shots. Knowing when it is up and what phase it is at is important. There are several websites with Moon tables and times.
Astronomy: The astronomical side of photography is great fun and very rewarding. You will need to have precise timings of astronomical events starting and finishing as well as knowing where to look.

Contribute A Definition?

Send us a definition of a photographic word or phrase...

Send us a definition for our list of photographic words and phrases. Simply write a clear definition and send it in. Include an original picture if you wish. Give us your name and a link to your website and we will credit your work.

By Damon Guy (author and Photokonnexion editor)

Damon Guy - Netkonnexion

Damon Guy (Netkonnexion)

Damon is a writer-photog and editor of this site. He has run some major websites, a computing department and a digital image library. He started out as a trained teacher and now runs training for digital photographers.
See also: Editors ‘Bio’.