Tag Archives: Buying equipment

Easy ideas for controlling your flash unit

Specular highlights

Bath toy
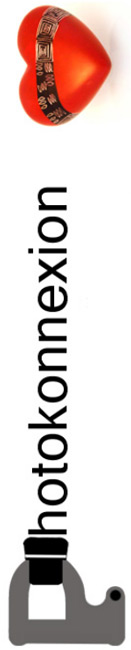
Specular highlights are distracting and draw the eye which spoils the shot.

Flash is a great benefit and a problem all at once!

Most people don’t realise two things about flash. First, the standard setting is nearly always too powerful. Second, the highlights resulting from flash are very distracting.

Working with flash power

Like all things in photography you need to think carefully about using flash. It is not simply click and move on. Most improving photographers are just beginning to make shots rather than snaps when they begin to see the quality and colour of light. So it is easy to miss some of the impacts that flash has on a subject. Here are a few consequences of a flash shot…

  • An over-bright subject.
  • Strong highlights with a tendency to wash out colours.
  • Specular highlights that create sharp, bright spots that distract the eye.
  • Bright foreground, dark background.
  • Flesh tones strongly whitened giving a sick look to the face.

Each of these is almost always down to using too much power in the flash. So, the way to over come these issues is to do two things. Turn down the power of the flash and diffuse the flash so it scatters the light.

Turning down the flash is simple. You must find the setting that adjusts the flash power level. This is easy if you are using an off camera flash because the unit usually has a display and a dial or buttons to change the settings. On-camera (pop-up) flash is usually adjusted by finding a menu setting that turns the power up or down. You may need to consult your camera manual to find where that setting is found.

The key to getting the right setting for your flash is to understand how to change it. Most off-camera flash units are marked up so there is two stops of light on the flash. Normally if the flash is marked 1:1 then that is full power, and more often than not this is the default setting. You can usually turn this down by one third of a stop of light at a time. Each time you stop down the setting one stop you are halving the light it emits.

Pop-up flash units may not be marked so clearly. Some are marked [low – medium – high], others, particularly point and shoot cameras, may just have “full | half”. More sophisticated pop-up units may also be marked in the same way that off-camera flash units are marked. Which ever your flash is, you should practice with it so you have an idea of how powerful it is and how much the settings can change the impact of the flash.

Flash diffusion

The best way to get used to using flash and controlling the power is experimenting. However, the issue of nasty highlights is the other problem the inexperienced user often does not spot at first. Strong highlights raise the light levels so you can see the tonal changes in the colour of the surface the light hits. This helps to define the shape of an object. So, for example, a brighter top on a ball and dark shadows under it help to define the spherical shape.

If the light intensity is too high, particularly on reflective surfaces, the reflected light level will exceed the level the camera can cope with. The highlight then becomes blown out. The light is so bright in that area that it becomes a bright spot where all the detail is lost to pure white. Unfortunately such strong, blown out areas, are severe distractions. In the picture above, the small reflective points, called specular highlights, are also strongly distracting. So what can you do to avoid these nasty effects?

If your power adjustments are not working and you still have blown out spots or highlights then you should consider diffusing the flash. This makes a difference in two ways. The diffused light will scatter the light from the flash over a wider area. This effectively lowers the light intensity even further in the area of the highlight since the light is not hitting it from a direct focused hard light from the flash.

Secondly, diffused light spreads the effect of the light. This makes it more likely to bounce off other surfaces nearby. These surfaces then become multiple mini-light sources. All these sources hitting your subject create a soft light which is much less likely to create specular highlights or very strong colour-destroying highlights.

So how do you do this diffusing? I just love this great flash diffuser. Designed to fit your off-camera flash unit it is an ingenious design and easily adaptable to any flash unit. Check out the Rogue FlashBender 2 – off camera flash. If you have an off-camera flash this is the best. It is the most adaptable diffuser I have ever used. You attach it to the flash with a wrap around grip. The big diffuser stands up above the lens of the flash. It is tough, flexible and creates a lovely daylight-white light. It is superb for portraits and still life work. Coupled with adjustments to the power settings on your flash it gives you excellent control and helps reduces highlights and the effects of hard light direct onto the subject.

For off camera flash there are a range of diffusers available. They are based on various different mounting or reflector principles too. So, you need to look around to see if you can find a diffuser that suits you.

For pop-up flash the options are not as easy. However, I recommend one of two options. I have successfully used ordinary white tissue paper sticky taped over the pop-up flash to both reduce and diffuse flash. However, while this works well, reducing the light by about a full stop, it is a temporary solution. Also, if you use the flash a lot the extra insulation may cause the flash to over heat. So, not for regular use.

My favoured options for pop-up flash diffusion are one of these three methods…

Professor Kobre’s Lightscoop, Standard Version Bounce Flash Device, Universal Model, fits over the Pop-up Flash of most SLR Cameras This diffuser produces a very effective ceiling bounce for the diffusion. However, make sure that in rooms where you use it there is no strong colours on the ceiling or it will cause colour casts.


Gary Fong Puffer – Pop-Up Flash Diffuser for Canon / Nikon / Pentax / Olympus / Panasonic- Lumix pop-up flashes A well reviewed unit, and has the advantage of an easy fit. The other advantage is that it diffuses the light moving forwards. The other two units here bounce the light which puts you slightly at a disadvantage in controlling the flash light direction.


Cateye LETS Flash Reflector/Diffuser Hybrid, for use with DSLR pop-up flashes Although I have not used this one personally, I know some people who have. I have had some very good feedback on this unit and it seems to work effectively in a wide range of situations.


Great shots with flash…

Yes, like everything else in photography, to get good with it, you have to practice use of flash. However, first you need to make sure you can spot the highlights, specular highlights and over-powered flash. Once you know what you are looking for you can adjust your flash power.

The best way to gain control of your flash is reducing the power, or at least adjusting it. Also, the more you soften the harsh, hard flash light the less distracting and natural the highlights will be.

Whatever you decide to do to make your flash manageable do plenty of experimenting to gain control of the light. Don’t forget to Examine Shots Before Shooting Again – “Chimping” to check for highlights. The practice will pay you back in great, well lit shots many times over.

find out more...Photokonnexion tips by email
If you enjoyed this article please sign up for our
daily email service.
                                                 Find out more
#11030#

By Damon Guy (author and Photokonnexion editor)

Damon Guy - Netkonnexion

Damon Guy (Netkonnexion)

Damon is a writer-photog and editor of this site. He has run some major websites, a computing department and a digital image library. He started out as a trained teacher and now runs training for digital photographers.
See also: Editors ‘Bio’.

A simple introduction to tripod sharpness and tripod heads

PhotographyPhactoids

Photography Phactoids number 006.

Buying a decent tripod can be quite taxing. Getting a quality result requires a quality tripod. Many photographers do not realise how important the tripod head is that fits on top of a good tripod. Today we have included a new article in our Photographic Glossary that explains all about tripod heads, how they work and the different types.

Photographic accuracy and sharpness

It is surprising how accurate your photography becomes as you develop. After all, improving your sharpness (see: The Zen of sharpness – 12 easy ways to improve) is about tightening up your camera control and minimising any movement in the process of taking the shot.

Most starter photographers rarely use a tripod. After a while they realise that the softness they suffer is down to poor control of the camera and lack of a tripod. What they do not realise is that a poor tripod is as bad as no tripod at all. I know many, many people who have bought cheap and then had to buy again – because with tripods, cheap is rubbish!

Well, the same can be said of tripod heads. A poor piece of engineering on a tripod head, or one that is too flimsy will give you as many problems as a poor tripod. Almost certainly you will get poor accuracy, bad alignment, wobble, poor locking and damage. Working to improve your sharpness is about being accurate, tightly controlled and stable in all aspects of the shot – including the tripod and tripod head combination. When everything is tight and there are no weak links you can expect tight and sharp photographs.

Make sure you understand about tripod heads… they are an essential item. You may have a great tripod, but a poor head will let the whole combination down.

See: Definition: Tripod Head for a detailed examination of how the heads work, the different types and some example pictures.

By Damon Guy (author and Photokonnexion editor)

Damon Guy - Netkonnexion

Damon Guy (Netkonnexion)

Damon is a writer-photog and editor of this site. He has run some major websites, a computing department and a digital image library. He started out as a trained teacher and now runs training for digital photographers.
See also: Editors ‘Bio’.

What is the aperture range of a lens?

Photography phactoid number 004

We are used to working with apertures in the range of f16 (small aperture) down to say f3.5 (large aperture). These are commonly available on many consumer lenses. But what sort of aperture range is there for camera lenses?

Working ranges

Some consumer lenses have begun to show quite big ranges. The really popular Canon EF 70-200mm F/2.8 L IS II USM Lens is a great example. I just love that baby! Wow! Excellent definition and clarity and brilliant control of aberrations. An incredible lens – no wonder it is so popular. Well, that lens shows an upper aperture range to f45 on my version (I think the latest version is f32). Now that is a small aperture. That sort of small aperture is used only for very, very bright conditions and long exposures. I don’t think I have ever used such a small aperture.

Pro lenses and specialist lenses

The reasonably priced nifty fifty Canon EF 50mm – f/1.4 USM Lens is another really popular lens. For aperture size however, it is beaten by another Canon lens that is also a 50mm, the extraordinary Canon EF 50mm f/1.2L USM Lens. An amazing lens, the depth of field on mine is so controllable you can focus it so that a wedding ring, looking through the hole, is in focus from front to back. Nothing else in the picture is in focus. Wonderful, but essentially a pro-lens.

Specialist lenses go further. On the minimum aperture size the smallest I have heard of is an f64. I am not sure how practical that is for a lens in the modern digital context. Has anyone some knowledge of that sort of aperture? Please comment below.

In the making of the film in this post: “How good is your exposure?”, they used ex-NASA lenses that were rated at f0.7. Now that is a wide aperture. Talk about a fast lens! Again, probably not practical for most purposes on a modern still digital camera.

In effect then, for modern every-day photography, an aperture range of f2.8 to f32 is acceptable and reasonable. In the pro-lens domain some exceptional lenses might stretch to f1.2 at the wide end. For other lenses, the aperture may narrow as far as f45. Outside of those boundaries you are talking specialist applications and big, big money… barrow loads of it!

Some links about lenses after this…

find out more...Photokonnexion tips by email
If you enjoyed this article please sign up for our
daily email service.
                                                 Find out more…
#11030#


By Damon Guy (author and Photokonnexion editor)

Damon Guy - Netkonnexion

Damon Guy (Netkonnexion)

Damon is a writer-photog and editor of this site. He has run some major websites, a computing department and a digital image library. He started out as a trained teacher and now runs training for digital photographers.
See also: Editors ‘Bio’.

Five great ways to improve your photography

I heart Photokonnexion

The top five posts from 2012

In our first year as a website we learned a lot about our readers and worked hard to provide great content for you. We did some research and identified the most read posts of the year.

Number five

Light is the most important component of our work as photographers…
Six things to know about light.
[Also check out other Light and Lighting resources].

Number four

Composition was an important theme through the year. Simple ideas are the best. This post captured a consistent readership…
The Rule of Odds – Uneven Composition

Number three

This is a great post from my friend Steve Maidwell (imageinnation.com). As a contributing author he made a hit with our readers. He’s promised another post soon…
Creating a Fake Smoke Effect

Number two

I made a personal recommendation for two ideal Christmas presents. They really went down well. These would make great gifts to yourself too…
Two great Christmas gift ideas for photographers

And the top post of the year:

Number one

Street photography has been a consistent success on Photokonnexion. The most viewed post in 2012…
Forty six quick street photography tips

By Damon Guy (author and Photokonnexion editor)

Damon Guy - Netkonnexion

Damon Guy (Netkonnexion)

Damon is a writer-photog and editor of this site. He has run some major websites, a computing department and a digital image library. He started out as a trained teacher and now runs training for digital photographers.
See also: Editors ‘Bio’.

Ten obvious reasons to change your approach and how to do it

Your photograph is not perfect.

You see good quality photographs every day. Why does your photo not match up to the photographic quality in a publication? What can you do? The answer is simple. You need to look at your overall technique.

Things add up…

Assuming a great idea and composition – what can go wrong? In photography every step of the process counts. The more you get right the better the result.

Professional photographers often repeat a shot tens of times to get it right, sometimes more. They aspire to excellence. Care, dedication, persistence and attention to detail add up to technical quality.

What can go wrong?
  1. Bad lighting: There’s no substitute for suitable, interesting light that’s sympathetic to the subject. If the light is wrong, your shot will not work either.
    Solution: Learn everything about the quality of light, hard light, soft light, the colour of light and the properties of light.
  2. The whole picture is soft: You moved the camera while shooting.
    Solution: Pros use tripods – good ones. They use them fast and efficiently because they practice.
  3. The whole picture is soft: You had to hand-hold the shot.
    Solution: Professionals know how to set up a manual exposure that suits the light. Learn to shoot in manual modes. Know what shutter speed/ISO combinations you can use without movement.
  4. The exposure is too dark/light: Common when learning manual camera control.
    Solution: Use RAW, then you can compensate. With RAW you can deliberately manage your exposure too. There is no ‘perfect exposure’ – there is only the result you want. To get the result you want you have to adjust your exposure. (Hint: you can’t adjust your exposure effectively in *.jpg unless you use exposure compensation).
  5. Colours off: If you are shooting in *.jpg you deserve all you get. The white balance is probably wrong. The manufacturers settings are limited. You can’t fix it in processing. Remember, *.jpg is a RAW file developed in-camera to manufacturers settings, not yours. The settings are applied to your shot blind. No wonder they are not what you want.
    Solution: Get it right. It’s easier to shoot in RAW and develop the shot yourself. It gives you fine control and you can develop your shot work the way you want. Something *.jpg cannot do.
  6. Poor focus: Focus is critical to the right technical and artistic result.
    Solution: Learn about: Depth of Field; aperture, Bokeh, Circle of confusion and how they relate to your lenses. Pros know these things intuitively. You can too with practice.
  7. Poor or soft focus from movement: Focus mode is on the wrong setting.
    Solution: Learn to use the correct focus mode (eg. single shot or continuous etc). Also, learn to focus manually. There are situations where auto-focus is poor (eg. in poor-contrast light). Switch off auto-focus to get better results.
  8. The shot is not sharp: A suspect, poor quality or broken lens.
    Solution: Buy decent lenses. All lenses have sweet and sour spots – even professional ones. Cheap lenses have a poorer optical quality and have more sour than sweet spots.
    Solution: Quality costs money. However, look after a good lens it will last longer than your camera. If you choose right, it’ll fit your next camera. It pays to buy the best quality lens you can afford.
  9. Great lens and tripod! My shot’s still not sharp: Sharpness requires attention to the above and these specific details too…
    Solutions:
    one: Turn off vibration reduction functions. On a tripod motors cause vibration, not stop it.
    two: Turn off auto-focus (another motor), or at least the continuous-focus setting (use the ‘one-shot’ setting).
    three: Use ‘mirror lock-up’ (DSLRs). Mirrors clunk up causing tripod vibration.
    four: Keep out of wind, away from vibration and keep your tripod low (don’t fully extend legs).
    five: Use a remote shutter trigger. Button pushing causes vibration.
  10. I did all this and it’s still not right!
    Solutions:
    one: Practice – putting this together takes time and effort.
    two: Return to locations many times to get the right light and conditions.
    three: Post processing! RAW users, this is where you polish the shot up. Since the earliest photography developing the shot has been a key process. RAW processing is another skill to learn. It’s essential, so learn it. Only *.jpg’ers should worry because they have disabled files. If you used *.jpg there is no hope of properly completing the job.

There is a lot to do! Follow the links and keep at it – you WILL succeed.

By Damon Guy (author and Photokonnexion editor)

Damon Guy - Netkonnexion

Damon Guy (Netkonnexion)

Damon is a writer-photog and editor of this site. He has run some major websites, a computing department and a digital image library. He started out as a trained teacher and now runs training for digital photographers.
See also: Editors ‘Bio’.

Easy introduction to light modifiers – don’t miss out (pt 2)

Light modifiers manipulate light.

Photographic lights are shaped and controlled by the light modifier. With it you create the lighting you need. Use the right modifiers and you create the scene you want. Knowing which one to use is crucial. The resources set out here aim to help you understand what light modifiers are and what they can do.

In a previous post, Easy introduction to light modifiers (pt 1), we examined:

In this post we are looking at more of these useful tools for controlling light.

Grids

Much more open than the honeycomb are a variety of other types of grid. They are used in front of many different types of light source. The aim of a grid is to…

Beauty dish

The beauty dish is widely used in fashion industry. Photographers love it’s flattering light. Using this dish creates…

Barn doors

Originally used on film sets barn door light modifiers have a special function. They are normally fitted to…

New resource pages

Part one and part two (this post) have added a number of new resources about light modifiers to the photographic glossary. However, as a group of resources they can also be reached from the page of light resources…
Light and Lighting – Resource pages on Photokonnexion
Light modifier resources on Photokonnexion – A new page linked from the Light and lighting page.

Simple tips to save you from disaster on your photoshoot!

Am I preaching to the converted?

Ever gone on a shoot and forgotten something? I have. If you’re like me you will have a bag packed ready. But, check the night before. Things may have changed. Here is some help.

Checking

The night before you go is the first time you should check your equipment. That’s the time to realise you need to charge your batteries. Yes, always have more than one – you don’t want to run out. Charge both. If you have an off-camera flash, check they are up to power too. I use rechargeable batteries in my flashes. So I charge them. But you may have standard disposable ones. Have fresh ones on hand.

Check you have a memory card in the camera and at least one spare. A corrupt card is as good as stopping your shoot if you have no spare. Oh, and make sure you downloaded the previous shoot. I turned up to a shoot once with a card nearly full of my previous shoot. I had not had time to post process them. OK, no problem. Ah! Had I downloaded them? Er… I could not remember. Then, eeek! I had no spare card. One full, no spare. It cost me an hour to find a shop for a new card – I was not impressed with the card either, but no choice. How stupid did I feel when I got back and found out I had downloaded the previous shoot. I could have used the card I had. Better safe than sorry.

Lenses

Choose your lenses if you have more than one. Also check they are clean, properly packed and have lens caps. Camera bags are generally made of very harsh material. If the glass rubs against the material it will rub off the coating and may scratch the glass. Look after your lenses and they will last for years. Got clean lens cloths? Make sure you do… you may need to clean up while out. Oh, I have an extender for my 70-200mm. It takes the lens up to 280mm – enough for most long shots. Don’t forget lens accessories. And, if you think you are going to need them, what about filters?

Camera straps?

Check your camera straps for damage. The little slits the straps go through gradually wear the strap. If a strap breaks your pride and joy will crash to the ground! Check the straps and zips on your camera bag are good too.

Got your tripod? Ah, but have you got the quick release plate? I forgot one once and had a day of really hard shots and poor results.

I normally carry three different light modifiers. They are a little honeycomb for focussed, hard light and a strap on diffuser which directs the light in one direction for soft wide focussed light. Finally, a plastic diffuser for popping on top of the flash for all-round bounce light to give wide-spread light. So, check your modifiers. If you don’t have any get some. Flash is too harsh for most shots.

Camera?

Ha ha! I am not joking actually. I once went on a shoot with a great friend. He had a new Canon 7D – proud as punch. He turned up on our shoot with a wonderful camera bag. In it was everything he needed for the shoot – except the camera body. He had left it on the table at home. Fortunately I was able to lend him one of my spares.

Sundry other items may be important too… Torch? Large plastic sack to cover everything in a sudden shower? Map? Tablets? Sandwiches, drinks, money? Well you get the idea. Everyone’s list is personal, so work out what is meaningful for you.

Going on a shoot for a day or more is a complex business. Your day can be ruined or shortened if you are not prepared. So why not make check lists. One for the night before, one for the morning before you go. Go through everything you have an then put it on the list. Then, check it all in complete confidence that you will have a great day.