Tag Archives: Aperture

A quick look at image stabilisation

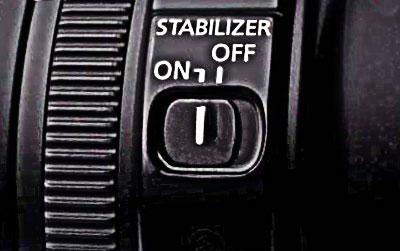
Image Stabilisation

Image Stabilisation

Image stabilisation helps you get a sharper picture.

Good images rely on a steady hand or a tripod. You also get a help from the image stabilisation in your camera or lens. These systems help your lens stay steady. Here we are going to get a look at what is involved and how to use it.

What is image stabilisation?

The term “Image stabilisation” represents a number of technologies used to reduce blurring caused by camera movement during exposure. It compensates for movement in two planes. These are referred to as pan (lateral twisting or yawing movement) and tilt (vertical or pitching movement).

Camera movement is recorded as blur when the shutter is open long enough for the movement to be captured. The slower the shutter speed the more likely it is that the movement will be detected. The tiny, but continuous movements of our hands tend to make hand held shots a little soft. Longer exposures will be even softer since the tiny movements will continue blurring the shot throughout the exposure.

Using an image stabilisation technology allows a mechanism to off-set or compensate for the movement not prevent it. Extreme or large movements will still cause blur during the exposure. However, image stabilisation systems are designed to compensate for the movements created by the almost imperceptible movements of our hands while hand-holding a shot. Typically recent image stabilisation systems will compensate for exposures four to sixteen times longer than could be hand held without the compensation. This would mean that instead of using a shutter speed of 1/250th of a second, you can use image stabilisation to get a shutter speed of around a 1/30th of a second and still get similar image quality. This could significantly improve the light levels in your exposure.

Types of image stabilisation

Optical image stabilisation: This type is mounted in the lens. It uses high speed motors to shift a lens element around changing its orientation to compensate for the movement of the camera. It is highly accurate, compact and fast. It does add quite a lot of weight (and expense) to the photographic lens unit overall. However, it performs really well under all types of movement even fairly extreme movement that might be found in panning for example. It will not prevent the gross movement blur, but will compensate for the tiny variations while panning for example.

In-camera stabilisation or sensor shift stabilisation
This technology uses motor technology to move the Digital Image Sensor to compensate for the movement of the camera. This method concentrates the stabilisation in the camera body and therefore it is only paid for once on the purchase of the camera body (unlike lens-based systems). Sensor shift technology tends to mean the lens is lighter too making handling easier for some people. This type of system does not cope as well as lens-based systems for more extreme movements. Long focal lengths and telephoto lenses will tend to exaggerate the degree of movement of a beam of light hitting the sensor. Consequently the sensor needs to be able to compensate for more extreme vibrations or movements to get the same image quality as a lens system. As the sensor shift system is limited by its range of movement it has limited tolerance at the more extreme end of the range.

Stay sharp!

Many learners find that the softness they get when using a DSLR is very frustrating. While image stabilisation helps, it does not cure the problem. Remember that these systems can only compensate, not prevent, movement blur and softness. So you need to take other steps to make your shots sharp. Here are some issues to consider regarding image stabilisation…

High ISO (in manual control modes): Raising your ISO can help reduce movement blur because you are making the sensor more sensitive to light. Your image sensor will be exposed more readily allowing you to still have a faster shutter speed to take your shot – then movements don’t have time to make the shot soft. Remember, high ISO may increase your digital noise, particularly with very high ISO levels (say 800 or more).

One way to overcome this softness created by hand movement is to raise the and set a faster shutter speed The point and shoot mode or auto mode of your camera will do this to ensure your get sharp shots in most daylight situations. Of course this means a short exposure which may not be suitable for your shot.

Wide aperture(in manual control modes): This too will allow more light into the shot and will allow you to have a faster shutter speed. However, the depth of field will be reduced and that will reduce your sharpness in some areas of the shot.

Use a tripod: Using a tripod is probably the best way to get a sharp shot. In most situations you should turn off your image stabilisation to use a tripod. The motors that do the stabilisation actually create vibration in the tripod and can cause softness. Some systems compensate automatically for being on a tripod so read your technical manual to get guidance for your camera.

Panning: This will definitely create movement blur. But some image stabilisation systems have mechanisms to reduce the vertical movement while panning. In this case make sure you know how to switch to this mode. The difference it can make to getting a moving object sharp is surprising.

Mirror lock-up: Vibration is caused when the reflex mirror in a DSLR flips up. You can lock up these mirrors while you take the shot. The procedure for that is different on every camera so check the manual for the correct method. The image stabilisation mechanisms will not compensate for movement caused by the mirror movement.

Careful use of the shutter button
Don’t stab the shutter button. Roll your finger onto the button gently depressing it. If you stab at it there will almost certainly be an erratic movement that the image stabilisation will not be able to compensate for.

Eagerness!
While enthusiasm is great, taking the camera away from your face too quickly can induce movement before the exposure is complete. Image stabilisation will not compensate for this type of action. Try to count to two before taking the camera away from your face.

Improving overall

Image stabilisation systems vary in their effectiveness according to model, camera, lens, use and how much movement there is. They can be very effective in helping you gain control over your sharpness but they are not the final answer. Sharpness involves a range of techniques and procedures which you will need to learn and practice to improve. Nevertheless, if you are hand-holding a shot you will get significant improvements in sharpness by using these systems. If you want to know a little bit more detail about image stabilisation you can see some more detail in Definition: Image stabiliser; Image stabilisation.

find out more...Photokonnexion tips by email
If you enjoyed this article please sign up for our
daily email service.
                                                 Find out more
#11030#

Can you write? Of course you can!
Write for Photokonnexion...

We would love to have your articles or tips posted on our site.
Find out more…
Write for Photokonnexion.

By Damon Guy (author and Photokonnexion editor)

Damon Guy - Netkonnexion

Damon Guy (Netkonnexion)

Damon is a writer-photog and editor of this site. He has run some major websites, a computing department and a digital image library. He started out as a trained teacher and now runs training for digital photographers.
See also: Editors ‘Bio’.

Simple explanations of camera exposure modes

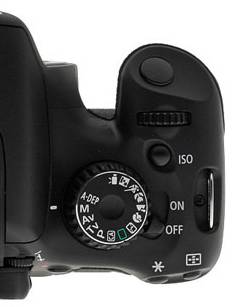
Choose your settings from a range of modes.

Canon550DModeDial

Camera Mode Dial
Choose the most suitable setting for your shot.


The DSLR contains a sophisticated computer providing a wide range of exposure options. They may seem bewildering. In this post we will provide simple explanations for the most common exposure modes to help you choose the best method for your next shot.

Exposure…

The modern Digital Single Lens Reflex (DSLR) can accommodate so many options that it is often difficult to know how to get started. So it is helpful if you have some idea of what exposure is about.

As photographers we are concerned with the use and manipulation of light. Everything else is secondary. We need to understand the concepts relation to how the camera detects light and the impact that has. Basically there are three controls which affect way the camera uses light. These controls are:

  • ISO – controls how sensitive the camera is to light. However, at high ISO levels there is an increase in digital noise.
  • Shutter speed – controls how long the camera sensor is exposed to light. The shutter speed also affects the amount of movement blur in the shot. The slower the shutter speed the more blur.
  • Aperture – controls how much light is allowed into the camera. Aperture also controls the depth of field. The wider the aperture the shallower the sharp zone in the picture.

(The links above take you to a full explanation of each control).

Between them these three provide control over your exposure. Co-ordinating them requires a little practice. Nothing too difficult. It is about balance. For the camera to create an exposure it has to collect a fixed amount of light. Too much light and the picture will be over-exposed. Too little light and the pictures will be underexposed. Getting it right requires a little knowledge of your camera light meter and how to change the controls to create the balance that makes the exposure.

In addition to the direct controls listed above there are the others called “modes” found on most cameras. These have been developed by the camera manufacturers to try and assist beginners who don’t understand the exposure process. The modes are intended to provide easy pre-selections for certain situations.

The different modes range from fully controlled by the camera (fully automatic mode) through to fully controlled by you (full manual mode). That is a range of controls from where the camera does everything for you through to where you make all the decisions. These modes differ from camera to camera but in general terms they are described below. The names may be different with each manufacturer too…

Full Auto: Basically this puts your camera into “point-and-shoot” mode. The camera uses its sensors to make an exposure. It responds to its programming and creates a picture which is of good quality but which you have no creative control over at all. It will even activate the flash if the camera detects insufficient light to create a balanced exposure.

Auto with No Flash: This is the same as the full auto setting, but the flash will not work under any circumstances. This leaves the camera to make the exposure without the additional light from the flash.

Program: The camera responds to its programming and makes an exposure by controlling the settings on your behalf. However, you have the option to make changes to that pre-programmed exposure – small adjustments that allow you to have a small amount of creative control.

Scene settings:
The scene settings on your camera includes a number of scene variations. These are likely to vary widely between the manufacturers and various models they make. Here are some of the more popular options:
• Portrait (for taking portraits)
• Landscape (landscapes shots and long distance shots)
• Night-time (night and dark shots)
• Sports and/or Action
• Macro
The above are standard modes. In most recent cameras these may be extended to include other additional modes to cover children, pets, specialised filters for colours and vintage settings for example. All sorts of other modes may be included depending on the target market for the camera.

These automatic modes above are pretty much camera controlled. Aside from tweaks, the camera has all the control. The problems with all of these is that the manufacturer is calling the shots. You can compose the shot, but have little control over what it looks like in the exposure. The discerning photographer wants to take creative control and use the main three controls mentioned above. Then they will be able to use the depth of field, movement blur and sensitivity to light to create the exposure that expresses their interpretation of the scene they are shooting. As a result there are three modes to deal with this. The first two are “semi-automatic” and the third gives you full manual control of the camera.

Aperture Priority:
The aperture semi-automatic mode relates to the manual control of aperture and the automatic control of the shutter speed and ISO. When you are in ‘A’ or ‘Av’ (aperture value) mode you are able to change the size of the aperture. The different sizes of the aperture are measured in “f-stops”. You can find out more about f-stops in this Definition: f number; f stop; Stop. The term aperture relates to the size of the hole which allows light into the camera. As the aperture varies the depth of field changes. Controlling the depth of field gives you discretion over the sharp area of the picture. The sharp parts of the picture attract the eye. Controlling where the sharpness is in the picture therefore affects where the viewer looks. This makes aperture control a valuable aspect of your composition.

Aperture also determines how much light is allowed through to the digital imaging sensor. A wide aperture allows more light in (say, F2.8) and has a shallow depth of field. A narrow aperture allows less light through (say, F22) but has a deep depth of field – at F22 sharpness will be more or less right through the picture.

Aperture priority allows you true control over the creative aspects of the light levels in the exposure. However, the camera balances your exposure control to make a good quality exposure because it sets appropriate ISO and shutter speed. You have creative control, it provides the quality exposure you need to make a great image.

Shutter Priority: This too is a semi-automatic mode. However, using this mode you have access to the shutter speed. Nominated as S, T, or Tv (time value) mode allows you creative control over the length of the exposure. Using this mode you can set yourself up for longer or shorter shutter opening. If the shutter is open for longer anything moving in the field of view will tend to blur. If the shutter is open longer the movement will be more blurred.

Shutter speed allows for control over the creative aspects of the total amount of light allowed to influence the exposure. While using the shutter speed the aperture setting and the ISO are under the control of the camera so it can balance the overall exposure while you control the creative part.

Manual or Full manual setting: The manual setting or “M” setting on the modes dial of your camera is used to give you full control. If you do it right your exposure will allow for depth of field control as well as creative use of movement blur. This mode gives you full control of all three aspects of the exposure.

So which mode do you choose?
In essence the automatic modes and scene modes are manufacturers programming – they do all the work for you. They represent an attempt to create classic ways of doing certain shots without you needing to take part in the exposure control. However, as a result these modes respond to make a picture that is not of your vision. Instead it is the suggested settings that manufacturers have researched about what the average shot of that type. These modes are in effect telling you how to take the shot.

On the other hand, the semi-automatic modes allow you to take control of major aspects of the control of the camera. As you have control of only one of the controls it allows you to concentrate on working on the creative part of the shot. That leaves the camera the make a balanced exposure to support your creativity. As this mode gives you an important aspect of the control without upsetting the outcome of the exposure it is an excellent mode to learn control of the camera.

Likewise, when using the shutter speed as a way of controlling the camera. You have the creative control over the length of exposure and any movement blur. This too is a great mode to learn control of the camera.

Both Av and Tv modes are affected by the other controls when in use. So, it stands to reason that you do not have the total control needed to get an exact overall exposure. However, for you to make full use of such a full manual control you should also have quite a sophisticated vision of what you want to achieve in your final exposure. While that is quite a normal requirement for a picture it does require some practice. The semi-automatic modes allow you to learn about the use of these controls and to develop the vision you need to start using the full manual mode. Learn to use these semi-automatic modes and you are not only on the way to full manual control, but also learning about how to envision your final exposure.

find out more...Photokonnexion tips by email
If you enjoyed this article please sign up for our
daily email service.
                                                 Find out more
#11030#

The advantages and disadvantages of live view

• DSLR Camera •

• DSLR camera diagram (side veiw) showing mirror down position •
Click image to view large
• DSLR Camera • By Netkonnexion on Flickr External link - opens new tab/page

Live view is here to stay.

What are the good and bad aspects of this technology? Should we be using it? What does it offer the DSLR user over the time honoured viewfinder system? In this post we look at the pros and cons.

The DSLR mirror system

If you are not familiar with the inner workings of the DSLR you can read more about it in this post: DSLR; Digital Single Lens Reflex Camera.

The essence of the mirror system is simple. The photographer peers through the viewfinder (see the diagram above) and the eye receives light directly from the main lens. Light reaching the eye has been redirected by the mirror up through the camera to the viewfinder eyepiece. When the photograph is taken the mirror flips up. Then the shutter opens allowing the digital image sensor to be exposed to light entering through the lens. While the mirror is up the photographer is unable to see through.

Live view…

When using live view the mirror is flipped up. You cannot see through the viewfinder. The view detected by the image sensor is instead created electronically on the camera screen on the back of the camera. In the most up to date mirrorless cameras the view is projected electronically into the viewfinder so you can use that instead of the screen-view on the camera.

The screens on the back of the DSLR, bridge cameras and point-and-shoot cameras provide a good, clear image on the screen. The displays offer a pretty good representation of the image seen through the lens. Reviews of the new mirrorless cameras suggest that electronic viewfinders are apparently not as good as those using mirrors. However, the technology is young and significant advances have been made recently. I think eventually electronic viewfinders will provide as good a view as the back screen.

Why do we need a viewfinder?

One of the problems of a back-screen is holding the camera steady. When you have a big lens on a camera the sheer unbalanced weight-in-hand makes it difficult to steady the camera with two hands held out in front of you. For a professional, or the keen amateur, the extra softness this induces is intolerable.

This is less important with light point-and-shoot cameras which can be held steady with one hand. Mirrorless cameras are smaller and lighter than DSLR counterparts. Bigger lenses still make them relatively heavy. Pressing a camera-lens combo to your eye while also held in both hands gives a third point of stabilisation to your camera – a steady position. So, a practical consideration for more substantial combinations of large camera and lens.

Retaining a viewfinder also ensures the “eye-view” is actually available to the photographer. By this I mean that the camera can be placed where the eye actually is on the body. Then the photographer sees through the camera in the same plane and level as the eye. I find this leads to better composition. We are more used to using eye-level views in our everyday vision. I acknowledge that the free-roaming screen composition may provide a more unusual point of view. However, artistic considerations aside, when composing an image I find close scrutiny of the scene leads to cleaner images and a rigorous composition. OK, this is not for everyone. It is a point to bear in mind for the more discerning photographer.

In my experience doing a back-screen composition is difficult because the eye is distracted from the screen. This leads to limited, incomplete composition, or missed details. I have been guilty of this sort of sloppy composition and have seen it in the images of others. Personally, I think the viewfinder helps me to compose accurately and cleanly allowing proper examination of detail.

What live view can offer…

Despite the shortcomings of back-screen composition and lack of steadiness there are good reasons to use live view.

On a tripod… While using a tripod to compose for landscapes, macros, wide angle and fish-eye shots do a quick check in live view before the shot. I suggest you do your initial composition using a viewfinder on the tripod. Once composed quickly check the live view simultaneously scanning your scene by eye. This enables comparison of the lens-distorted view against the scene as the eye sees it. This cross-checks your composition against your vision for the final outcome of the shot.

Mirror lock-up… When using a tripod use mirror lock-up to help sharpness. This mode sets the camera to flip-up the mirror ahead of the shot. The vibration from the ‘mirror-flip-up’ then passes before the exposure takes place. This reduces vibration enabling a sharper shot. Most DSLRs offer the mode which is found in the menu screens. Live view also performs a mirror lock-up action on many cameras. If you have a “live-view” button, do your composition, perform a live view check and take a mirror lock-up shot in the same sequence.

Access to the viewfinder is restricted… Yes, sometimes I simply cannot get to the viewfinder. When doing macro work, complex close-ups suspended under a tripod and when holding the camera high all create situations when the eye cannot easily get to the viewfinder. In this case the live view mode is a definite advantage and enable otherwise impossible shots.

Depth of field… The viewfinder has its own optical characteristics additional to the main photographic lens. Normally viewfinder lenses are pretty faithful and do not affect the view through the main lens. When using a fast lens, say f1.2 wide open aperture, the depth of field may be distorted by the viewfinder. It’s said live view helps you better see the areas of bokeh. I am sceptical. I have not seen this effect accurately on my Canon 5D MkII to make any difference. I am prepared to accept it works on other cameras. Try it and see.

Horizons, converging verticals and straight lines… Live view offers a set of lines dividing the screen up into thirds (nine segments). This “rule of thirds” grid is helpful in composition. I find it most useful when checking converging verticals when lining the camera up. However, a good electronic display of focus points laid out in your viewfinder is excellent for most compositions. The focus points usually allow for rule of thirds composition and more. So, live view offers an option, but no better than the viewfinder. Other cameras may differ on this, make your own choice.

Live view histogram… Some cameras allow the display of a live view histogram. This enables you to check your colour and light intensity prior to the shot. This saves later examination of lots of frames online. However, I prefer “Chimping”. The post-shot histogram review is the best way to tell if you have a good shot or not. If you do use the live view histogram beware of poor composition. The histogram takes up screen space I prefer to use for composition. So, not to my taste, but the opportunity is there on some cameras.

Live view can be useful

More cameras are providing good live view mode and offering more facilities with it. I think there are some good reasons to use this mode especially with a tripod. It certainly provides some useful functions. There are some severe shortcomings with live view composition and personal stance when using it. The good old viewfinder still wins the day for me. However, a lot depends on your camera. I hope these points have opened your eyes. I leave you to draw your own conclusions.

find out more...Photokonnexion tips by email
If you enjoyed this article please sign up for our
daily email service.
                                                 Find out more
#11030#

By Damon Guy (author and Photokonnexion editor)

Damon Guy - Netkonnexion

Damon Guy (Netkonnexion)

Damon is a writer-photog and editor of this site. He has run some major websites, a computing department and a digital image library. He started out as a trained teacher and now runs training for digital photographers.
See also: Editors ‘Bio’.

Your exposure is simply the way you want to see the image

IMG_0232_v03_500px

There is no such thing as the perfect exposure, only the one you favour.

Expose to see what you want to see.

The truth is, your exposure can be anything you want. The issue is what do you want it to be? Are you a technical photographer or an artist? Lets look at the options…

The technical photographer

The technical photographer tends to put the emphasis on exposure being “correct” at the balance point in the triangle of exposure. The aim of the exposure is to produce a bright representation of the scene. The technical photographer is concerned with getting the settings “right” and the scene summed up in a “realistic” representation of what they saw. The technical photographer tends to be more concerned with recording the scene.

The artistic approach

For the artistic photographer there is more interest in composition and representation of the scene as as they want to depict it. They are more intent on passing a message to the viewers of the image. They want to create a picture that stimulates emotion and strong feelings. The artistic photographer has an idea. They want to make a photograph to fulfil the idea, express the emotion, tell the story. The artist is concerned with communication, not representation.

The spectrum of types

Of course these two extremes are not really as polarised as I have made out here. We all have elements of both of these personalities in our photography. The artist needs to know about the technical side in order to have artistic control over their work. The technical photographer needs to make the picture to suit the light and the scene. At least some interpretation is needed in the technical approach.

The issue here is about exposure. Sometimes we want to present a shot with the exposure on the darker, more subdued side. We are going for mood maybe, or using light to express itself strongly through shadow. The extreme is the very dark shot, what we might call a low key shot. On the opposite end of the scale is the high key shot – bright, white – strong bright, tending to over-exposure.

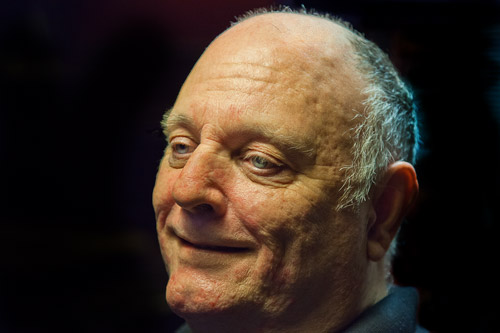
When we take an exposure with a DSLR we normally centre the camera meter reading. Supposing we want to take a picture like the portrait above, slightly underexposed. If we are working with the camera in full manual mode we can simply under-expose by doing one of the following: narrowing the Aperture, lowering the ISO or using a faster Shutter Speed. The opposite is also true. You can over-expose too. In other words you can creatively make what you want out of your shot by controlling the exposure. In the portrait above I wanted to emphasis the strong maleness of my subject. The strong shadows provided the vehicle for that. So the slight under-exposure complemented the already low lights… just what I was looking for.

In the case of the semi-manual modes, the option for full control of the exposure is not available. However, the exposure compensation dial can be called into play. If you want to under expose you can dial to the negative side. If you want to over expose slightly then dial to the positive side. This frees up your exposure to bias the result in favour of your creative idea. Check out the manual for your camera to see how the exposure compensation dial works.

The whole complex of variables that affect exposure, ISO, Shutter speed and Aperture settings are an interaction of functions that allow us to control our image. If we ignore the “ideal” exposure indicated by the camera light meter we actually have a whole world of potentially creative controls. There is no such thing as the perfect exposure. If you are a technical photographer you can still free up your exposure to make a photograph that expresses what you see in a scene. If you are an artist, you can be quite technical about exactly the exposure you want.

Enjoy your exposures. There is no such thing as perfection, and that applies to photographic exposure too. But there is a perfectly good exposure for every photograph… that is the one you want.

find out more...Photokonnexion tips by email
If you enjoyed this article please sign up for our
daily email service.
                                                 Find out more
#11030#

By Damon Guy (author and Photokonnexion editor)

Damon Guy - Netkonnexion

Damon Guy (Netkonnexion)

Damon is a writer-photog and editor of this site. He has run some major websites, a computing department and a digital image library. He started out as a trained teacher and now runs training for digital photographers.
See also: Editors ‘Bio’.

Five easy tips for better photos in difficult weather and light

Its easy to make weather excuses, but….

We can actually find a way to shoot in almost any weather situation. Here are some tips to get the shot even though the weather conditions are not ideal for a photograph.

1. Rain…

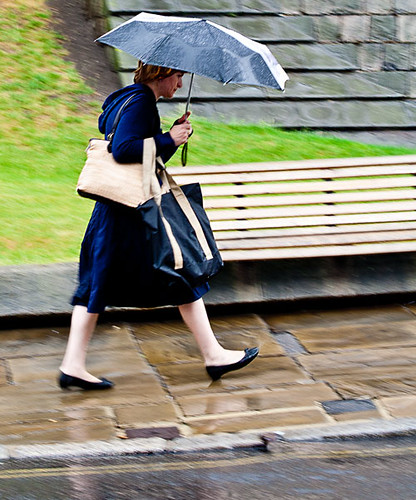
Cameras hate water. If there is a sure fire way to ruin your equipment, get it wet. So we want to dodge the rain shots. Actually rain is fun. You don’t need to be shooting right in the rain. Most of the time there is cover you can use to work from for your shot. Shop fronts, cars, through open windows, under canopies… you can think of thousands of rain hides if you try. And, rain provides lots of great things to shoot too. Rain is a great cleanser. The pavements and side roads are dust-free, shiny, or with splashing drops and running water. Yet life goes on. Street photography becomes dynamic, frenetic and full of new behaviors. People are doing things they normally do not do. They run, they put up umbrellas, they crowd under cover… lots of great behaviors that often do not get photographed. Look to catch people in the puddles, jumping, dashing for cover. Look for colours and reflections. Look for droplets, wet surfaces, running water. Most of all try to catch the reactions of people as they try not to get wet. Rain is great fun. Don’t hide your equipment away. Get out and take some great shots. After the rain look for skyward glances, great reflections, splashes and people emerging from cover.

2. High noon…

A high and harsh sunlit situation is not good for any kind of photography. Normally we think of it as pretty awful for any kind of portrait shot. The direct light creates washed out, over-exposed areas of the shot. The faces look flat and colours lose the subtle tonality. You can still get a great shots though. Seek out some cool, even shade. Under the canopy of shops or malls is ideal, or maybe within the shade of a substantial tree. Look for anything that provides enough shade for you and your subject to get out of the direct sunlight. However, stay near to the main sunlight area. The direct sunlit area will act as your main light source. The shade will act as a diffuser. Now, make sure you do not shoot into the direct sunlight or deeper darkness of deep shade. Try to keep your shot on your subject and make sure any background you use is also in the same light-shade level of intensity. That way your contrasts and colours will all be within the same dynamic range of light – which your camera deal with. However, the main light source will be diffused – creating a lovely soft, bright light source. Remember, if you shoot out of the shade into the sun you will find the contrast range too high. You will get bright highlights and over-exposure which will draw the eye away from your subject. So keep the shots tight to the light level you are working within and your shots will be fine and bright. Don’t shoot in mixed or dappled light.

3. Insufficient shade?

Avoiding very hard light or direct sunlight makes sense but what if you cannot find enough shade for you and your subject to be in the same light. If you are trying to photograph a person the impact of this direct light is particularly hard on their face and unflattering. Unfortunately putting your subject into the shade can make the situation worse. The darkness in the shade contrasts strongly with the bright light outside where you are standing. So you get bright spots in your shot and harsh darker areas in the deeper shade – very distracting. To overcome this high contrast situation take your shot on the shadow line. Line up the person you want to shoot on the shadow edge so the bright light is softened. In this intermediate place your subject gets the golden glow from the brighter light but it is softened by the slight shadow.

To help your camera to cope try to shoot from the same half-in half-out of shadow position too. The contrasts will not overpower your sensor there. If you get it right you will split the light to make it just right. Carefully placed you will capture the lovely sky and background but not lose detail in the shadow-darkness under the shade. Be careful not to get dappled light from sun through the leaves, and make sure the shadow line does not cross your subject. Bright contrasts and sharp shadow lines on the subject are very unflattering. Instead shoot along the half shade into the brighter light utilising the foreground weaker light as your main source for the subject.

4. The sun flattens the landscape

Often, particularly on holiday or when out on a shoot, we cannot wait for the golden hour. We are in a place where there is a deadline to move on and you want to get the shot. Unfortunately the high, direct sunlight flattens everything, eliminating shadows and ironing out colour tones. The light is boring and harsh and the shadows minimal.

How do you get the landscape? Include more sky than usual. Often in these situation the most interesting lighting is for the sky. The clouds and far away places look good. So expose for the sky and reduce the amount of landscape you include. This means using the sky as the main bright source of light. Point your focus point to a cloud. If the auto-focus ‘hunts‘ and will not focus turn it off and focus manually. Make the sky your subject and concentrate on the distance and sky. This may mean some of your foreground will be slightly underexposed. However, it is easier to brighten the foreground or a near subject later in post-processing if you have exposed for the sky.

#11030#

5. Dreary, grey diffused sky light

Another bad light situation for the photographer is the dreary grey day. Uniform light from across the sky leaves little or no shadow detail anywhere. Everything looks flat and dead. The problem here is there is nothing in the landscape that provides relief for the greyness. The sky is difficult too – you cannot do foreground shots as the uniform lack of colour or shadow means everything is pale and uninteresting. The distance has lost its sky appeal too. Even exposing for the sky creates almost uniform grey.

Well, this is the time to get out the flash. Off-camera flash is best, although pop-up flash will also do the trick. Get close to the ground or a surface with great texture. Then, shoot along the surface with the flash. If the flash is off-camera set it off to one side so it exaggerates ground shadows. If you are working with pop-up flash then make sure you work with the shadow at its maximum. This may mean shooting with your camera upside down so the light is really close to the surface and the optical axis is across the surface lit by the flash. If you use a relatively wide aperture, these low-level flash shots will bring out shadow detail in the foreground and leave the distance in bokeh and out of focus.

Some places to find great surfaces for this type of shot are low grasses, sandy or gravelly surfaces, tarmac, along road lines, autumnal leafy forest floors, bare rock… well, you get the idea. Seek out any surface that provides texture for you to capture. Lots of small to medium undulations and detail is best. Large objects will block the foreground so reserve them for the middle distance.

Remember the five rules…

The key to difficult weather and light situations is…

  • Find the right vantage point to shelter/shoot from
  • Maximise the opportunities for spotting unusual behavior
  • Make the most of the weather opportunities (sky, puddles, splashes etc)
  • Keep the light where you are shooting within approximately the same dynamic range
  • Look for, or create, light situations that exploit texture detail

By Damon Guy (author and Photokonnexion editor)

Damon Guy - Netkonnexion

Damon Guy (Netkonnexion)

Damon is a writer-photog and editor of this site. He has run some major websites, a computing department and a digital image library. He started out as a trained teacher and now runs training for digital photographers.
See also: Editors ‘Bio’.

The Zen of sharpness – 12 easy ways to improve

Sharpness factsSharpness facts

Making sharp images takes knowledge and practice.

Photographers often wonder why they cannot reproduce publication sharpness. It’s not difficult, but there is more to it than clicking away. Here we look at all the factors that may affect sharpness.

Seven common problems

1. Poor focus:
• Frequently, focus problems occur because the focus has been taken from the wrong part of the scene. Choose one of the auto-focus (AF) points you can see in your lens (see how in your manual). Use that point to select the point of focus in your scene. The choice of where you focus is also critical. The eyes are often the most important point of focus. (See: The Eyes Have It… nine ways to emphasize eyes).

2. Camera blur:
• Movement of the camera during the shot will create a softness or complete blur. The solution is to improve your actual shooting technique. Holding the camera, your stance, your breathing and even the way you click the shutter button can all create camera movement. (See: Simple tips for a good stance). Camera blur can also be created because the shutter speed is too low. If you have a relatively long exposure the camera is more likely to move during the shot. If you have a higher shutter speed the chance of movement is reduced – sharpness is improved. Most people find they cannot hold the camera steady at 1/60th of a second or longer. With practice you can get better. A good starting shutter speed for hand-held shots is about 1/200ths of a second. It is possible to also change the ISO to enable higher shutter speeds and still maintain a good exposure.

3. Motion blur:
• If the subject moves and the camera is stationary the subject will be blurred. You may need to change your focusing mode to to compensate for movement. Use Continuous focus mode for constant movement [AI Servo AF (Canon)/AF-C (Nikon)]. Alternatively you can use autofocus mode [AI Focus AF (Canon)/AF-A (Nikon)] for slight movements or unpredictable/unexpected movement.

4. Poor quality lens:
• It is a common mistake to spend a lot of money on a camera then skimp on the lens. In fact it is best to spend as much as you can afford to buy quality lenses. They will pay you back with quality sharpness much more than the camera body will. Poor lenses can give you colour fringing, poor focus, distortions, softness and limited depth of field.

5. Depth of field too shallow:
• The depth of field (DoF) is the zone of sharpness in a picture. You can determine the DoF by changing the size of the aperture. (For more information see: One big change – one easy step forward).

6. Diopter set wrongly:
• If your eyesight is poor, or does not match the optical properties of the viewfinder, you will need to adjust the diopter. Most people can use it to adjust the viewfinder sharpness for their eyesight. If your sight through the lens is sharp it helps you fix a good focus to ensure sharpness.

7. No sharpening in RAW:
• When the picture is uploaded to your computer it’s file format effects sharpness. RAW, the native file formate for your camera, is created as a file without sharpening. The *.jpg file format is highly processed in the camera. It is sharpened as part of the processing. So *.jpg files may look sharper than RAW files on screen. The solution is to make sure you apply some sharpening to RAW files as the last action of any post-processing you do.

How to Take Sharper Pictures

By way of consolidating the above here is a video discussing the above points with examples…
(More after the video)

Beyond the basics

Sharpness is about continuous improvement. Here are some more ideas to extend your skills…

8. Stance and the anti-roll “bar”:
Many self-made photographers don’t recognise the importance of stance. Holding the camera steady is part of a “whole-body” effort. You should create a stable platform to comfortably hold your camera to ensure a steady camera position. The way you hold your arms, the way you breath and other factors affect your focusing and the amount of camera movement.

In addition to poor stance an additional unintentional movement causes softness. Some photographers click the shutter button then “roll” the camera away from their face prematurely. Doing the “roll” will induce movement in the camera – often before the shutter has closed. The solution is the “anti-roll bar” – you must “bar” yourself from doing the roll.

Learn more about stance and the “anti-roll bar” in this article: Simple tips for a good stance.

9. Test shots

Today we have the digital freedom to take as many shots as we wish without paying for film developing. To improve your sharpness spend time making sure your shot is going to be sharp. Do test shots to familiarise yourself with the scene and to practice for ‘the’ shot. You can find out more here: How to take a test shot.

10. Viewing the image at 100%

When you upload your image files they are not sized to 100% on screen. They are presented much smaller so you can see the whole picture. Photographers often don’t look at their pictures in full size. What is not obvious is that when pictures are resized on screen they are sharpened. If you are not aware of this you might be disappointed when you print the image. It will not be as sharp as it could be because you never looked at it in full size. If you are aware of how sharp you have made your image (at 100%) it will help you to develop your skills. You can find out more about viewing at 100% here: The benefits of 100% viewing.

11. Use a tripod

The vast majority of shots can be taken from a tripod. Using one is undoubtedly the single most effective sharpening technique. You can find out more about using a tripod here…
Three Tips for Pin Sharp Shots with a Tripod
Definition: Tripod
The Tripod
The Third Most Important Piece of Kit

12. Practice, practice, practice

Knowing all these things is different to actually being able to put them into practice. Making your pictures sharp is about doing all of the above. Then, reviewing your own achievement after each shot. You must practice all these regularly and consistently in order to succeed in producing the sharp images you want.

#11030#

By Damon Guy (author and Photokonnexion editor)

Damon Guy - Netkonnexion

Damon Guy (Netkonnexion)

Damon is a writer-photog and editor of this site. He has run some major websites, a computing department and a digital image library. He started out as a trained teacher and now runs training for digital photographers.
See also: Editors ‘Bio’.

Small apertures can mean soft images – why?

PhotographyPhactoids

Photography Phactoid number 005.

A small aperture, lets say f16, normally gives us sharpness all the way through the picture. Actually, there are some circumstances where that is not true. At very narrow apertures the image becomes soft… explanation below!

Normally the widest aperture size is marked on a lens. People want to know if it is a fast lens – one that works well in low light. Fast lenses, with wide apertures, may be in the range of f2.8 to really fast at f1.2. Find out more about aperture sizes in: “What is the aperture range of a lens?”.

The narrowest size of the aperture is not quoted on lenses. Why not? At extremely narrow apertures the lens partially loses it ability to create a sharp image. This is due to a phenomenon called diffraction. As the light wave enters the aperture the edges of the light wave are bent very slightly as they touch the edge. In the case of wider apertures this does not have a very significant effect on the overall image. However, t very narrow apertures, say f22 or smaller, the light bends significantly and the resolution of the image is damaged.

See the diagram below..

Explanation of the diagram:

  • Top image (cross) the wide aperture blurs the image (bokeh)
  • Second image (cross) the image is quite well resolved
  • Third image the narrow aperture has softened the image to an interference pattern of concentric circles
  • In the bottom image the blur is almost complete – the image is blurred out

A whole range of aperture sizes resolve the image normally – our image is sharp. However, as the aperture gets very small the image will get softer as the diffraction effect becomes more pronounced. This happens despite correct focussing. At the narrowest aperture of the lens the image may be unrecognisable. In other words there is an optimum size of minimum aperture.

When your lens is stopped right down it may create a softness in the picture. There is a simple way to correct it. Open the aperture one half to a full stop wider to enable the lens/aperture focusing to restore the resolution.

By Damon Guy (author and Photokonnexion editor)

Damon Guy - Netkonnexion

Damon Guy (Netkonnexion)

Damon is a writer-photog and editor of this site. He has run some major websites, a computing department and a digital image library. He started out as a trained teacher and now runs training for digital photographers.
See also: Editors ‘Bio’.

Can you write? Of course you can!
Write for Photokonnexion...

We would love to have your articles or tips posted on our site.
Find out more…
Write for Photokonnexion.