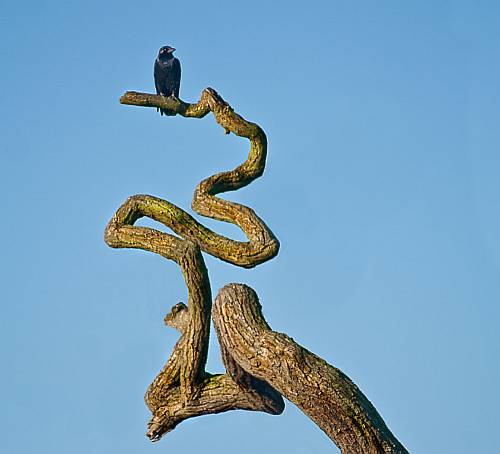
Category Archives: Projects

Wait for the shot – an easy guide

• Contorted •

• Contorted •
Wait for the right moment. What would there be in this picture without the bird?

Every great shot is a splendid moment in time

A significant difference between an accomplished photographer and a “snapper” is the insight to wait. Realising a potential shot at the right moment is the supreme judgement call. Microseconds or months – it makes no difference. Understanding the visualisation and committing to the time element are skills great photographers cultivate.

Seeing the moment

Once the idea comes to mind you have the basic material for the most important moment in the life of a great image – it’s visualisation. While visualising the shot you have to consider all the details including the timing. The image above would have been very uninteresting if not for the bird. I first saw this shot from a quarter mile away and no bird. After watching the bird alight and fly several times I worked closer and waited. The capture at that moment made the shot. Knowing the moment is a critical visualisation skill.

How to wait…

Watchful waiting: Sometimes your visualisation has shown you the shot you want to make. However, conditions have to be right. The right people, light, weather, things… it all has to come together and you need to watch for the right time. Could be a long time, but you can wait.

Lying in wait: You have seen the shot. You know it is going to come together. You are there, waiting for that one piece to fall into place. A person to walk into the right space; a car to drive onto the ferry; a skier to make the jump… it will happen! Wait for it, wait for it: click!

Passive waiting: You have in mind a shot. It is an agonising itch. You are not sure how, when or where it is going to happen. You just have to wait for things to start coming together. Maybe you need to find the right location; perhaps you have not seen the right fashion accessory; need access to the right car? This is a sort of one-shot project. At some time you will know the time is right and you can then work to put together the shot. I have three of these in mind right now… one day; one day.

find out more...Photokonnexion tips by email
Enjoying this article? Please sign up for our
daily email service.
                                                Find out more

Repeat waits: Often the situation is wrong. I have some landscape shots I want to make. I know they are right, but I have to get the right weather. It is a 250 mile drive, so I have to make an effort to get there and wait. So far one image has eluded me 6 times. I will try again… and again.

Active waiting: Every street photographer knows this one. You are observing, hunting, seeing, looking for the moment, the right move, just the right character. Then suddenly the light and the person and the move all happen… the decisive moment – click!

• Coming And Going •

• Coming And Going •
Click image to view large
• Coming And Going • By Netkonnexion on Flickr External link - opens new tab/page

Constructive waiting: You have your idea. You have visualised every detail. Now you need to put it together. You need to buy a particular candle; to find a specific book; to contrive just the right mood and lighting. Then, after a few days, it all comes together and the production can start. People, props, positioning – perfect… click. Aaaah!

Wait! There’s more…

There are bound to be other types of “wait”. You may call them something different to me. Whatever, I think you can see, waiting is not only a critical aspect of your visualisation… it is also a fundamental part of the life of your shot.

Can you write? Of course you can!
Write for Photokonnexion...

We would love to have your articles or tips posted on our site.
Find out more…
Write for Photokonnexion.

By Damon Guy (author and Photokonnexion editor)

Damon Guy - Netkonnexion

Damon Guy (Netkonnexion)

Damon is a writer-photog and editor of this site. He has run some major websites, a computing department and a digital image library. He started out as a trained teacher and now runs training for digital photographers.
See also: Editors ‘Bio’.

Seven deadly photography sins

Seven Deadly Sins

Seven deadly sins of photography – it will catch up with you!

Some things you should be careful about…

Photography is full of pitfalls! You will come across them. Keep your eyes wide open. In the meantime here are some of the obvious sins that create problems for all the unwary…

Lust

Drooling over the latest release of some mega-technological update of the latest camera, lens, equipment… Then actually buying it because you think it will make you a photographer! Every photographer has suffered from equipment lust. Not one photographer, ever, has become a great photographer because they have suddenly purchased the latest and most expensive equipment. All that will happen if you succumb is that you will be the same photographer with less money in your pocket. Concentrate on getting better with what you already own. When your excellence surpasses the ability of the camera to show it, then consider moving to something new.

Pride

Carrying your equipment as a badge… If you buy equipment because it looks good, or shows off your purchasing prowess you are misguided. Successful photographers carry equipment because they need it for the shoot. Your pictures will be much better if you buy equipment only because it is necessary. Then use it until it falls apart. Your photography will improve, your pocket will thank you.

Sloth

Not using the equipment you have… If you have the equipment you are not a photographer unless you use it. If you stay in bed and don’t take photographs your photography will stagnate. Get up early, stay up late, travel to distant locations, take thousands of pictures and make lots of friends who also shoot pictures. The only way to enjoy photography is to get out there and do it. Then your photography will improve.

Envy

Being jealous of someone else’s equipment, photographs, ability, lights, job, whatever.. This is a shameful waste of your own time and ability. There is no better camera in the world than the one you own. Your own ability and skill will increase if you spend the time focussing on your photography. Share with others what you enjoy, and enjoy what you have. That way your photography will benefit directly from attention to your own improvement.

Gluttony

Buying more and more equipment, because its on sale, because its new, because it’s, well, photography equipment… Just because it is photography equipment does not make it good. Just because it is cheap does not make it worthwhile. Just because it is on sale does not mean you have to buy it. Good equipment should be well made, well designed and last a long time. Research your needs very well. Question your motives for every purchase. See if you can borrow something to try it first. Buy only what you need every day for your photography. Anything else you can probably do without.

Wrath

Hating on others because… The “Other” camera manufacturers products are not to your taste. If someone has something that is not your thing, or they shout about how good it is, then there is only one response. Celebrate the fact they are photographers. Express joy for their ownership. Rejoice with them over their successes. Getting angry about things you have no control over will do nothing for your photography. It will certainly do nothing to help you make friends. Concentrate on working with your own equipment, your own ability and take joy in your successes too. Then your focus will be on improving your photography. Stay with that.

Greed

Wanting it all now… No amount of wanting will give you what you want now. Money may buy the equipment, if you have the money. If you don’t then save up for it. There is very little money in photography. So make sure you fund the purchases you make with readily available cash. Debt will do nothing for your photography. It will reduce your ability to get to locations and take photographs. Instead, work consistently for well formulated goals. Set up a savings fund to ensure you get what you really need. Concentrate on what you need to do to improve and focus on working with what you have got. If you work and plan for your improvement what you want will come in time and with step by step positive action.

Being a better photographer…

Is really about being a better person. Great photographers have great insights. Those only come with introspection, self-improvement and concentrated, goal directed work. Oh, and you should enjoy yourself too!

By Damon Guy (author and Photokonnexion editor)

Damon Guy - Netkonnexion

Damon Guy (Netkonnexion)

Damon is a writer-photog and editor of this site. He has run some major websites, a computing department and a digital image library. He started out as a trained teacher and now runs training for digital photographers.
See also: Editors ‘Bio’.

Projects… get going on your photography

After Christmas – rested and ready to go..

A happy new year to all our readers and followers! How wonderful, a whole year to do more photography. Here are a few project ideas you might like. Get them up and running for the new year. There is nothing like a good project to crystallize your vision and get your photography off to a great start. A great project will also help you improve your photography and to think of ideas about the best photographs to take.

Panda by kevin dooley, on Flickr

Panda by kevin dooley, on Flickr
Panda by kevin dooley, on FlickrExternal link - opens new tab/page

Panda to your passion

If you have a pet passion then photography is a great way to express it. If you love the rainforests, relish a good book or are passionate about people you can find a way to express your enthusiasm. The best way to make your photography work for you is to focus it on something you are really motivated by in your life. Even if your project is about the rainforests and you won’t be going there, why not make your project about selling pictures to raise money. Love books? Create great scenes that depict the story, or a part of it. Your ideas will help you to develop your photography and really give your photographic story-telling skills a work out. If you really love something then expressing it through your photography is both compelling and exciting.

Photo-diary

Lots of people would love to keep a diary – but somehow it gets lost in the words. Pictures on the other hand say so much. There are lots of ways to express yourself with images. At the same time they provide you with a great way to tell the story of your activities. You can do it day by day or focus on the best times.

There are a number of ways you can do a photo diary. Some people just do a photo-blog. There are lots of possibilities. Have a look here for a few inspiring ideas: 50 Wonderful inspiring photoblogs. You can start a blog for free at WordPress.com.

Another possibility is to try a 365 Project. This is where you post a photograph every day for a year. It is a bit of a commitment. But you soon get into the swing of things. There is nothing better than carrying your camera with you every day, every where, to improve your photography. The project I recommend is 365project.org. I have been posting on that site for nearly two years now. What a great community. You will be welcomed with open arms and there is plenty to do there to keep you interested and focussed. You can try it out with a free daily account. Many committed 365ers go on to take an ‘ace’ account. For a small payment you can have three albums, photo-editing facilities and options to extend your account. There are great learning opportunities and most of the users are starters. So you are all getting going together. It is wonderful to see pictures made by people you become friends with. People post from all over the world and you will see some places you never thought you would. Its a great place to get your photography off to a flying start.

Photo-sharing websites

Another popular choice for getting your photos out there to be seen is on photo-sharing websites. Flickr, 500PX, Instagram and dozens of others provide opportunities for you to store your pictures where others can see them and comment on them. Of course what you post there is up to you. If you make friends and comment on other peoples images they will often comment back. You might already know people there who will be happy to look at your pictures too. Have a look at all these possibilities on Google.

Getting started

There is no doubt that the start of a project is down to you. You can choose some of the ideas above. When it comes down to it however, it is up to you. You need to define your ideas and get on with your project. You can make as much of it as you like or as little as the time you have to spare. Whatever you do, start with a little planning. Write a short paragraph about what you are going to do. Say how many photos you hope to achieve. Not total shots, but the top keepers. Say, “I will have completed this project when I have [insert number of images] top quality images of [your subject here]”. By giving yourself a defined target you are helping to set your boundary and your scope. Make your goal achievable but a challenge. Never let it be said you underperformed! Your project should be fun. It should also help you to enjoy and improve your photography. After all, we would all like to make our pictures better.

A productive 2013…

If you do a project – have fun. If you decide to be more general in your approach… still have fun. Your photography is all about having a great time.

Let me wish you all a happy and photography filled new year. Be productive and most of all enjoy your photography.

By Damon Guy (author and Photokonnexion editor)

Damon Guy - Netkonnexion

Damon Guy (Netkonnexion)

Damon is a writer-photog and editor of this site. He has run some major websites, a computing department and a digital image library. He started out as a trained teacher and now runs training for digital photographers.
See also: Editors ‘Bio’.

A great range of simple resources for landscape photography

Early Morning in Richmond Park - Landscapes cover a wide range of different types of photography

• Early Morning in Richmond Park •
Landscapes cover a wide range of different types of photography

Click image to view large.
• Early Morning in Richmond Park • By Netkonnexion on Flickr External link - opens new tab/page

Landscapes provide us with some of the most enduring images.

Yes, and they perhaps present the greatest challenge too. Get it wrong, the scene looks flat and uninteresting. Get it right, the wow factor hits the viewer.

The principles and concepts behind landscapes

When we talk about landscapes we can actually be talking about a wide range of types of photographs – usually taken in the countryside. Of course that is pretty nebulous. But it is sensible to talk about the sort of principles that apply to the construction of a good landscape photograph and then relate them to the picture you are going to take.

I have compiled a list of links below. If you follow through on all these together you get a great introduction to landscape photography…

  1. The Third Most Important Piece of Kit
  2. Seeing the Quality of Light
  3. Easy introduction to ‘visual elements’ in photographs
  4. Simple ‘Principles’ of photographic composition
  5. Don’t Stick the Horizon Line in the Middle!
  6. Rule of Thirds
  7. Landscape loves – do you know why you are photographing this scene?
  8. Ten great tips for photographing landscapes
  9. The easy way to give depth to landscapes
  10. Simple ideas about perspective in photography

More after this…

Mastering landscapes

Like all photography mastering landscapes takes time and learning. It especially needs time. I have on occasion taken many return trips to one location, and, many hours there each time to get the shot I wanted. On the other hand, sometimes it all just comes together. That is both the joy and fun of landscape photography… you never know what you are going to get out of a shoot until you have seen the shots afterwards.

Damon Guy - Netkonnexion

Damon Guy (Netkonnexion)

Damon is a writer-photographer and editor of this site. He has run some major websites, a computing department and a digital image library. He started out as a trained teacher and now runs training courses ing digital photography.
See also: Editors ‘Bio’.
By Damon Guy see his profile on Google+.

Night photography – beautiful images, new ways of seeing

Night image, night introduction.

Taking photos at night is interesting. Photographers normally deal with light. Night photographers deal with the lack of it. Everything is done in minutes, not 100ths seconds. Understanding night photography takes a new approach to dealing with light.

What is it all about?

Instead of working with the instant click-and-capture of light, night photographers manufacture light pools over many minutes. These light pools are often created by simple sweeps of a torch or the use of several lights over several minutes. By sweeping and re-sweeping the light intensifies. The camera picks up a building emphasis of light in the areas of the sweeps. Sweep many times and the final exposure in that sweep radius becomes bright. Lesser areas where the sweeps are few, or the light has just spilled are much darker.

The low light intensity over long times adds up to a full exposure in the lit areas which rapidly falls off to the dark of the surrounding night. This sort of light dark contrast leads to some striking imagery. However, we see things which are unlike our everyday experience. The result is both unworldly and at the same time a fascinating insight to our own world.

The video documents a Night Photography Workshop at Big Bend in West Texas led by photographers Scott Martin and Lance Keimig. In the film the leaders and their students create images of desert places. Some stunning shots are produced in the lights of the night photographers.

The video is six and a half minutes long. And, after the video some news about a forthcoming attraction…

Night Photography: Finding your way in the dark from Mark & Angela Walley on Vimeo. Made by walleyfilms.com

Sparks will fly!

The post on Friday will be a guest post from photographer Steve Maidwell. His website is Imageinnation.com. He is very interested in night photography. The tutorial is about some great night photography effects. Make sure you have time to read that one!

Steve has done a tutorial for us once before. You can find the previous tutorial here: Creating a Fake Smoke Effect. Enjoy!

Simple facts about successful birds-in-flight shots

Vultures on the wing

Vultures on the wing – the capture of these birds needs the same panning techniques as any other moving objects.
Click image to view large. “Vultures on the wing” By Netkonnexion on Flickr External link - opens new tab/page

The capture of birds in flight is fun.

Birds rarely stay still for long and move fast when flying. The techniques here will provide basic ways for you to master birds-in-flight photography. The ideas build on techniques used in other areas of photography.

Panning techniques

Bird-in-flight shots are about movement. With any moving thing the only way to capture a sharp shot is to pan with the subject as it moves. Bird-in-flight panning uses the same techniques as other action shots. To learn panning techniques check out this series Action shots – How to….

As with any photographic technique, mastery comes with practice. If you are learning panning to photograph birds, start by panning cars. They are big targets and move with consistent speeds. They come past at regular intervals so practice is easy. You can practice almost anywhere and you will learn to pan quickly. Then, when you are ready, move onto smaller bird targets when you have mastered the simple movements and turning speeds.

Camera settings

Applying simple panning techniques is easy but the detail is important. The speed at which the birds are flying is critical. The focus you need to use is equally as critical. Here are some simple steps to set up the shots…

  1. Take a photograph of your subjects using automatic mode. You will use this as a starting point. Note down the settings for:
    ISO,
    Shutter speed and
    aperture.
  2. Next, set the camera to manual mode.
  3. Set your manual settings to those you noted from your auto-mode shot. You are going to gradually vary the settings until you get them right.
  4. The ISO setting will need to be fixed (for now). Leave it as you set it from your first (automatic) shot.
  5. Aperture is going to be an artistic decision. If you need to have the background sharp then you can tend toward higher F.stop numbers – say F11. If you need it soft (with bokeh) then use a wider aperture (F 4.0 to F5.6).
  6. Shutter speed is going to dictate how much movement you will see in the wings. To be safe, start with a faster shutter speed to freeze the action (500th, or 200th with flash).

You will be making changes to these settings from your original setting you noted from the auto-mode shot. Just remember, all settings are related. They balance. A change one way with a setting will need a compensation with another setting. If you need to move toward a faster shot to freeze the action you need to…

  1. Change the manual setting for shutter speed by one click toward a faster setting. This will be one third of a stop on most DSLRs.
  2. Then, to balance the settings, move the aperture setting one click off toward a larger aperture. This is because if you have less light coming in (faster shutter) you will need to open the aperture to compensate.
  3. You can repeat this process until you get the bird to freeze in its movement.

If you set a faster shutter speed, you need to open the aperture to compensate for less light getting in. A wider aperture reduces your depth of field. If you want to keep the depth of field as it was, then you need to increase the ISO by one third of a stop instead.

In other words, to move a setting towards your desired position you need to keep the balance of the other settings by equal amounts.

Focus and framing

When capturing birds-in-flight the focus is critical because the bird is moving. Set your camera focus to “continuous auto focus”. Continuous focus mode adjusts the focus as the bird moves. This allows your camera to maintain some focus control for the moving target.

You also need to set your focal length to approximately where you are going to capture the bird in flight. This means being ready with the approximate focal length to capture the incoming flight path of the bird(s). You may have no idea where the next bird is going to come from. However, you can make some approximate guesses based on experience and your location. The rest is up to you.

Zoom out from the shot leaving enough room to hold the bird in the frame while panning

Zoom out from the shot leaving enough room to hold the bird in the frame while panning. Click image to view large.
“Seagull in flight” By Netkonnexion on Flickr External link - opens new tab/page


Setting up the framing is the critical final step.

You need to be able to confidently place the bird in the frame for the shot. However, it is not easy to frame the bird so it fills the frame because they move so fast and are a small target. If you fill the frame when panning you will find it very difficult to get the subject consistently in the frame throughout the pan. So, zoom out. You will have to crop the shots later to bring the bird up to size. Yes, this probably means you are going to have to take more shots and do more post-processing. Unfortunate, but it is in the nature of these types of shots.

You should also consider leaving some room in front of the subject so it looks like it has some space to fly into. If your bird is right up against the edge of the picture in the direction it is going it looks like it is about to fly into something. The viewers eye naturally follows the line of flight and they will be distracted by that line if it is about to fly directly out of the frame.

Applying the techniques

So now you have the settings and you have the location/focus/framing worked out. The rest is practice. Now it’s shoot and wait – shoot and wait. It is time to apply yourself, to try out the techniques.

My personal experience with birds has involved plenty of practice and trial and error. What you read here will give you the essentials. Applying them is about doing some photography and learning as you go along. Enjoy it, panning and photographing birds in flight is great fun.

#11030#

Five tips for boosting your photographic creativity

Getting ideas is more than just seeing new things to photograph

“Celebrity on the red carpet”
Getting ideas for shots is more than just seeing new things to photograph.
Click image to view large

Get past photographers block – try these tips.

When you run out of ideas you’re stuck. Getting past this block may be simple. Going somewhere new helps, but you’ll soon run out of places. Try a few idea-boosting tips.

The list of new places to go can be as long as your arm. But, you can’t get to them all. Too far away, too expensive, too time consuming… a problem. Sometimes you have to rely on your wits. You need to think past your lack of ideas. There are some simple things you can do.

Repeats

In photographic competitions I often hear judges say “…it’s a good project, worth following up”. What they mean is the picture is pretty good, but more work will help it become perfect. It’s a fair bet there are lots of pictures in your portfolio that you can re-work with another shoot. Having looked at the shot you will see things you can improve. Repeating old work with a new eye and technique is a great way to improve. It’s also a confidence booster. You will see how much you have improved your skills.

The other thing you can do is take the same picture under different conditions. There’s more variety in the same scene than you might think. Try shooting out of the same window every day for a year. Capture all the seasons, all the states of light and events. There is enough to look at, just read this article… Photographer snaps a million photos out his window in two years External link - opens new tab/page.

Explore new topics

Sometimes a creativity block is about knowing your subject well so you seem to know all the angles. That is rarely true. How to get past it is to take a new perspective. Some of the great advances in science have been from people learning new topics and cross-connecting the ideas. So, try something new. Learn a new topic. Explore a new area of photography. Research a new technique and then use it. New things frequently lead to new ideas. These feed back to your block. Change tack and try a new direction.

Take up a project

Being creative and trying new things takes commitment and application. Often a creativity block is about not committing yourself enough. Try a new project. Commit time, resources and energy to your project. You will learn new things, try new ideas and explore them in depth. Set yourself a personal project. For example, try water-droplet photography – it takes time and practice to get it right. You need to do some research, you will have to put together some basic equipment. You will need to work with new techniques and new ways of looking at your subject. This is not a one evening project – you could make it a whole career. The point is that running a project on one subject gets you into a subject in depth. This opens up your ideas. Try it – its fun.

Challenge yourself

Developing yourself and your skills is about getting past what you can do and trying out some things you cannot do – yet. Sure, there is some fear of failure there, but, no one will criticise you for trying and not getting it right on the first shot. Take time and try out something totally new. You can do it. Look for more difficult approaches, try out alternatives or deliberately do it differently to your normal way. It is certain you will learn something. I often suggest to my students that they buy or borrow a new lens. Then spend a month using it – stop using all other lenses. You will learn a lot of new ways to look at old ideas.

Look for new inspiration

Read a book; search Google images on a new subject; talk to another photographer; break an old habit… there are thousands of things you can do to find new ideas. Most of them are about raising questions. Look at yourself and find out what you know very little about. Then find out about it. Ask new questions, get new answers. The Internet is an endless source of new information… do some idea searches. You will find lots to think about.

The way of creativity…

I have sometimes heard from students that ideas and creativity are a genetic gift of some kind. I don’t subscribe to that. Creativity is more often about playing with ideas, trying new things, and making connections. Creativity is not a talent. It is a skill that can be learned and encouraged. Watch this video. It’ll help you look at yourself as a different, more creative person: How To Be Creative – its not a talent! External link - opens new tab/page