Tag Archives: Vocabulary

Using the command dial to pick the right Mode

The Command or Modes dial

• The Command or Modes dial •
(Image taken from the video)

Setting up your shot.

The settings you use when taking a photograph affects the shot outcome. Before choosing camera control settings, first choose the camera mode. Here is an explanation on the ‘Command’ or ‘Modes dial’ where you make that choice.

Getting into manual mode

In “The Exposure Triangle” I looked at how you should balance…

These settings, when balanced, create an optimal exposure. You need to understand these settings to go manual with your camera.

What the dial offers

The Command or Mode dial sets the camera to use particular controls. You see a typical example of the command dial above.

‘Auto-mode’ or ‘Auto’ – the camera does everything for you. This setting is sometimes called the “green square” or Green mode. It’s normally green on the command dial. Using Auto you hand over full control to the camera. It provides a set of fairly average exposures. It’s used to snap basic shots in everyday situations.

To make your photography really effective you want full creative control. Learn to use the semi-manual modes and ‘Manual’ Mode. These give control to the three exposure factors. The picture shows these settings as ‘M’, ‘A’, ‘S’ and ‘P’ in a silver band.

  • M – the full Manual setting. You have full creative control over exposure.
  • A – Aperture – you set the aperture (f number) and the camera finds the right shutter speed for you.
  • S (or Tv) – the shutter speed setting or Time value. It sets the shutter opening time. The camera finds an aperture setting to match.
  • P – ‘Program’ allows some menu settings that ‘Auto’ will not allow. This auto setting gives only limited artistic control.
  • Also… B (not shown) means ‘Bulb’. It’s a setting for long exposures of more than 30 seconds. Bulb may not be available on all cameras.
Other modes

There are often other modes available. But these are really pre-sets. They do the same thing as manual and semi-manual modes. However, they give you less than full control over your shot. So I am not going into them here.

Camera Controls (intro) – command dial

Mike Browne goes through these settings (except ‘Bulb’). He explains the ideas and points out each mode. Remember, the command dial only sets the exposure controls for Auto-modes. The manual and semi-manual modes allow you to change the exposure factors from other controls.
Mike Browne  External link - opens new tab/page

Comments, additions, amendments or ideas on this article? Contact Us
or why not leave a comment at the bottom of the page…

Like this article? Don’t miss the next — sign up for tips by email.

Netkonnexion

Damon Guy (Netkonnexion)

Damon is managing editor of Photokonnexion.com with professional experience in photography, writing, image libraries, and computing. He is also an experienced, webmaster and a trained teacher. Damon runs regular training for digital photographers who are just starting out.
See also: Editors ‘Bio’
By Damon Guy :: Profile on Google+

Abstract photography – three abstract insights

When Science Meets Art - Fabian Oefner. (About abstracts in art)

• When Science Meets Art – Fabian Oefner •
Abstract art is all around us. Some projects get deep into special ideas. Others are more about the abstracts we all miss right in front of our eyes.
{Image taken from a video below}

Art is not straight forward

Abstract photography is often about how an artist views things rather than what is shown. Abstracts bring out the artists unique view of the world. The photog isolates the special characteristics of the subject.

The nature of abstracts is…

The photographers vision of the world is often about emotion. We are able to see into a subject because we become attached to it, understand it. We try to feel its impact on ourselves and to find a way to translate that into a picture. Often such “seeing” comes from a personal study of composition and aesthetics. It helps to understand the elements of art too. These are not requirements for making abstracts. They are a base for abstract seeing. They help artists analyse and know “abstract”. However, they contribute little to creating one.

The real issue is the way that an individual artist approaches making an abstract.

Abstract art comes to those who observe more than the “whole” of something. The minute detail through to the overall view of a subject is important. Abstract artists are aware of form and shape, texture and colour and a myriad of other detail. This awareness is different in everyone. Certain details catch the eyes of some people and not others. Some forms or patterns stimulate some and not others. This uniqueness is the key to “seeing” abstracts.

By ignoring some details or components of a scene or subject, and by building up others, it’s possible to construct the ‘abstract’. This is a new entity emphasising these details and elements.

Success in making abstract photos grows with experience of, and a personal view of, the subject matter. That might be made up of a deep study of the material and behaviour of the subject. It might also be a deep response to cultural and artistic baggage in the artists character. It could be both and more.

The mystery of creating abstracts?

The emotions that commit artists to a creative act are not easy to analyse. The act of creating abstracts is difficult too. By knowing a little of our own background, interests and experience we can see how to approach their creation.

Our own creativity can develop from learning about it in others. One route to knowing an abstract artist is via their enthusiasm and commitment. In the videos below you see into the artists themselves. They may help your view of the process of making abstracts.

The first artist is Fabian Oefner. His interest is in abstracts through science. He shows a number of his projects. He explains how they came about and what was involved.

Fabian Oefner: Psychedelic science  External link - opens new tab/page

Lester Hayes was an early maker of abstract photos. He knew very little to start. He talks about becoming involved and why he saw abstracts. Clearly there is a deep emotional commitment for him in making abstracts.

Abstract Photographer Lester Hayes Uploaded by Anthony Mournian  External link - opens new tab/page

Next, we visit the world of Sergio Muscat. His abstracts have an organic quality. He shows his wonder of nature. He explains where he gets his vision with quotes and written comments between pictures. I became wonderfully connected to his thinking while watching.
Sergio Muscat  External link - opens new tab/page
In the quote below he shows that photos reflect reality. But they interpret the world. His insight into abstracts is about the same plastic reality on which photography is based.

Unlike other media, a photograph is always based on a real, material origin. Rather than looking at this as a disadvantage, we should understand that this same fact makes photography the ultimate surreal medium – simply because photography, although based on reality, is very far from the truth.
Sergio Muscat – Abstract Photography – YouTube

Photos never truly show what the eye sees. This is a deep part of the ideas in abstracts.

Seeing is not knowing

We may come to know the nature of the ‘abstract’. Yet, abstracts are a fragile gossamer. Each has its own essence. Catch it and you may destroy it.

Knowing a little of the artist helps. With that we may know a little of their approach to abstracts. That way we may learn to bring it out in our own work.

Further reading on abstracts

In other articles I have looked at the nature of abstracts. For more interest, follow up on these…

Comments, additions, amendments or ideas on this article? Contact Us
or why not leave a comment at the bottom of the page…

Like this article? Don’t miss the next — sign up for tips by email.

Damon Guy - Netkonnexion

Damon Guy (Netkonnexion)

Damon is a writer-photographer and editor of this site. He has run some major websites, a computing department and a digital image library. He started out as a trained teacher and now runs training for digital photogs.
See also: Editors ‘Bio’.
By Damon Guy see his profile on Google+.

How many types of blur are there in photography?

Blur by Netkonnexion - types of blur

Blur by Netkonnexion
Click image to view large
Blur By Netkonnexion on Flickr External link - opens new tab/page
There are many types of blur in photography.

Not all blur is equal.

There are various types of blur. It sounds odd. In fact there is a lot more to blur than most people realise. It is quite a varied subject. It is used in nearly all aspects of photography. From abstracts to zooming, we will find some aspect of blur. Lets take a look…

Okay bokeh…

First up, and one of the best known types of blur, is Bokeh. This Japanese word means haze or blur. It originally referred to the quality of blur. Today we use it to describe the actual blur. A sharp subject and a blurred background is created by a blur of tiny circles where each of the tiny points of light are not focused, that is bokeh. It is created by the lens and aperture.

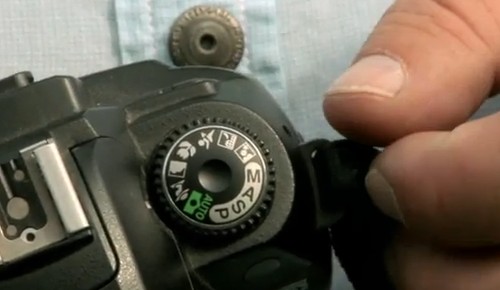
When you use a wide aperture, say f4.0 (or wider) you get a shallow depth of field. The depth of field is the sharp part of the picture. The rest, the out-of-focus part, is blurred. That blur is the bokeh.

Bokeh can add a whole range of composition effects. It is also has its own aesthetic quality. The quality of the little ‘circles’ varies as does the true circular shape of the circles themselves. Photographic lenses with apertures that are more circular produce the best bokeh. Some apertures are more like regular polygons (say a hexagonal). Polygon bokeh is not as pleasing to the eye as circular bokeh. Fewer sides on the polygon forms a less circular bokeh circle. It may even form an obvious bokeh polygon. Manufacturers go to some lengths to make the bokeh pleasing. One way to make the bokeh more circular is to add blades to the aperture diaphragm. That can raise the cost of the lens.

Subject-movement types of blur

When a subject moves in front of your stationary camera the resulting image has a blurred subject. This is movement blur. The types of blur which include movement can be varied. In the picture above the motor bikes are moving at around 90 miles per hour. When taking this shot I was panning with the far bike resulting in that bike being sharp. The pan meant that my camera was not paced at the same speed as the nearest bike. As a result its movement was relatively out of synchronisation with my camera. The nearest bike was in relative movement and thus blurred.

In “The Barber”, below, I have set my camera to capture the blur of his working hands. As with any movement shot, you want some of the shot blurred and some sharp. If it is all blurred it just looks badly taken.

The Barber

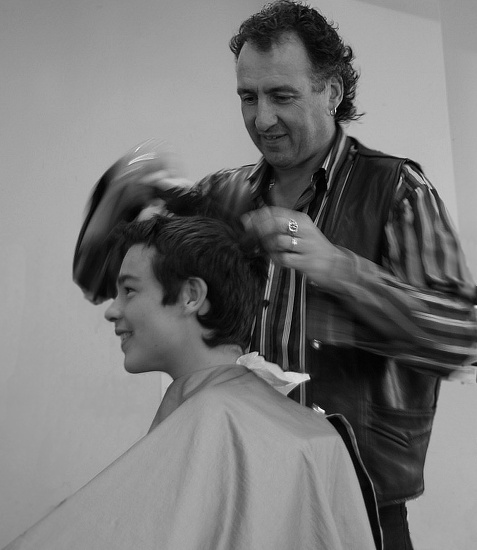
• The Barber By Netkonnexion in 365Project •
Click image to view large
The Barber By Netkonnexion in 365Project External link - opens new tab/page
The movement of the hands is blurred to simulate his hair cutting work. Types of blur created in-camera are most effective.

Movement of the subject is controlled by shutter speed. To get it right you have to practice with the speed of that subject. Try the subject at slow speed first. Once you have an idea of the settings, speed the subject up. As you develop a feel for the speed-of-movement versus the shutter-speed you will be able to get a sharp background but a blurred subject.

More types of blur… Camera movement

When a subject is moving pan your camera with it. I did that in the bike picture at the top of the page and got a sharp bike placed against a blurred background. That is not bokeh in the background. As the camera panned with the bike it captured a stationary background. However, as the camera was moving it created a movement blur on the background.

Movement blur of the background normally occurs when panning. If you hold a stationary camera out of a car window and take a long exposure and the same type of blur will result. However, nothing will be sharp in that case (unless something next to you is travelling at your exact speed).

Done right background blur from camera movement has great impact. In the motorbikes above it gives a race feel. It looks really fast.

Some blur is not so good

Hand movement during a shot causes all sorts of blur. You get blurred shadows, blurred faces, possibly jerky tracks… not good at all. However, you can have some fun with this sort of movement. Some famous pictures have been created by deliberate hand movements. There are lots of shots, like tree shots  External link - opens new tab/page, where the movement of the camera creates a surreal or abstract view of the subject. Some people have tried throwing their camera and triggering it in mid-air – some bizarre results can be obtained (including a smashed camera).

Out of focus types of blur

Of course it is possible to completely blur a shot quite deliberately. Some pleasant aesthetic effects can be achieved. Wedding and romantic photographers love the “soft focus” shot. This is a deliberate very slight lack of sharpness. It emphasizes the romantic, soft nature of something… kittens, brides, the first kiss, baby and so on. Google images of soft focus shots provides quite a good range of possibilities for this type of blur.

The soft focus shot can be created different ways. Each give slightly different types of blur. You can literally set the lens to manual focus. Then when properly focussed pull the focus slightly back. so as to create a small amount of blur. Another way to do it is to use a soft focus filter. These are simply screwed to the end of the lens and give the same effect. When I was first starting out in photography many wedding photographers carried a flesh coloured or white nylon stocking. Pulled tight over the lens while the photograph is taken it creates a soft focus effect. Others like a skylight (ultraviolet) filter with a tiny amount of grease smeared on it. All these work, but give you a slightly different soft focus effect. Experiment… have fun!

Zoom blur

One of the less well known types of blur – zoom blur. You need a steady hand or better, a tripod. It makes the picture look like the world is rushing toward you very rapidly.

Adjusting the zoom during exposure creates zoom blur. Set your camera to have a long exposure – around one second is good. Balance the shutter speed with the ISO and aperture to get a proper exposure. You will need to use manual focus to adjust the zoom in the shot. Press the shutter button and rotate the zoom focus ring. A short turn or through its full arc – the amount of turn gives different effects. With a bit of practice you can reduce hand-shake blur. A smooth zoom throughout the exposure creates some great effects. Look through this page of zoom blur images on Google for some ideas…  External link - opens new tab/page.

Artificial blur

Most image editors have software filters to create types of blur. In fact there are a variety of different software filtersavailable. Gaussian blur is one common type. It softens or smooths the image, but also causes loss of detail. There is also rotational blur (self explanatory); linear blur or movement blur – you choose the direction of the blur. Other editng packages will have other blur types too.

Artificial types of blur do not have the same effect as blurs created in-camera. Artificial blur tends to lack depth. Whereas, blur using depth of field gives depth to a picture. The bokeh and movement blurs both have the impact of realism and depth as they vary throughout the depth of the image. Applying a uniform artificial blur can affect the realism. Applied with care and artful work you can make artificial blur look real. It is all about care and attention.

Are there more blurs?

There are probably other types of blur. They may fit into one or more of the categories above. Why not let us know about others. I would like to hear of new ideas and types of blur.

Comments, additions, amendments or ideas on this article? Contact Us
or why not leave a comment at the bottom of the page…

Like this article? Don’t miss the next — sign up for tips by email.

By Damon Guy (author and Photokonnexion editor)

Damon Guy - Netkonnexion

Damon Guy (Netkonnexion)

Damon is a writer-photog and editor of this site. He has run some major websites, a computing department and a digital image library. He started out as a trained teacher and now runs training for digital photographers.
See also: Editors ‘Bio’.

Umbrellas and softboxes

umbrellas and softboxes

• Softbox Vs. Umbrella •
Umbrellas and softboxes seem to have similar characteristics… or do they?

What IS the difference?

Photographers learning to use lights find it difficult to understand the difference between a softbox and umbrella set-up. It is important to understand if you want to have control of light.

The nature of soft and hard light

Hard light is not some mutated form of ordinary light. It is a type of light that is focussed and which shows a hard transition from bright to dark. The shadow line is a sharp contrast. On the other hand, soft light wraps itself around curves and has a soft transition from light to dark.

The definitions of hard and soft light tell us much about the characteristics of the light but not how the light is formed. Well, it turns out that the light source, its shape, size and focus or diffusion as well as distance from the subject all have an impact on the characteristics of light.

Photographic umbrellas and softboxes

In the video Mark Cleghorn examines the characteristics of photographic umbrellas and softboxes. He does some great shots with both. Pay attention to the way he uses the lights and what characteristics he points out. Distance and size of the sources play an essential role in the formation of the softness and hardness of the light. His experiments are interesting and show you how the nearness of a large light source can create softness. It seems counter intuitive, but it is correct.

The first half of this video is very useful and you will learn a lot about Umbrellas and softboxes as light sources. The second half showcases advanced features of Photoshop. This is a less useful section if you are only interested in the practical issues for umbrellas and softboxes. You can safely skip it.

Lastolite Umbrella Versus Softbox from Lastolite on Vimeo  External link - opens new tab/page.

Types of lights

There are many types of light source that can generate light for umbrellas and softboxes. For most situations it is best to use off-camera flash units. The more expensive studio flash units are more for professional use. If you are just starting out they will be more powerful than required for most general purpose needs. Off camera flash helps give you flexible use. It is also easily controlled. You can work with both umbrellas and softboxes with an off camera flash.

Fortunately, most umbrellas and softboxes units designed for off-camera flash will mount most types of flash units. When looking to purchase lights think about what you want to achieve. Then buy the flash unit needed to meet your need.

Below is an example of a photographic umbrella set…

DynaSun W968S Professional Kit with Holder, Umbrella, Stand and Bag for Cold Shoe Mount Flash Gun Flashgun  External link - opens new tab/page
This is a high quality but affordable photographic umbrella unit. The complete package includes everything you need except the off-camera flash unit. The inclusion of the small carrying bag makes the whole thing neat and well presented.

When it comes to the purchase of a soft box these too have the universal fittings for off camera flash units (although studio units are also available). Here is an example softbox…

24″ 60cm x 60cm EZ-Fold Studio Softbox Kit with 2 x Diffusers and Ballhead Bracket for Portable Flash and Speedlite  External link - opens new tab/page
This is a high quality, well produced softbox with easily adjustable fittings and a variety of ways to set up light diffusion within the unit.

Of course both these units are among many others in the field. You can see the various types of each on these search pages…
Photographic umbrella – Search page on Amazon  External link - opens new tab/page

Softboxes – search page on Amazon

These various examples include studio light units, always on bulb mountings and fittings for off-camera flash. Check for what you want before you buy. The most flexible is for off-camera flash when you are starting out.

No removable flash? Read this: Off-camera flash. It’s a great introduction and recommends an affordable flash unit.

Comments, additions, amendments or ideas on this article? Contact Us
or why not leave a comment at the bottom of the page…

Like this article? Don’t miss the next — sign up for tips by email.

Damon Guy - Netkonnexion

Damon Guy (Netkonnexion)

Damon is a writer-photographer and editor of this site. He has run some major websites, a computing department and a digital image library. He started out as a trained teacher and now runs training for digital photogs.
See also: Editors ‘Bio’.
By Damon Guy see his profile on Google+.

What good is a lens hood?

Five Types Of Lens Hood

• Five Types Of Lens Hood •
Attribution: Photo of five lens hoods for a mix of lenses; March 2013; Author: Geni; Permission: GFDL CC-BY-SA

Using a lens hood is important.

It is not always clear why we need a lens hood. Why do we need them and what are they for? Actually they are pretty important and can help prevent some nasty visual artefacts.

What is going on in the lens

Normally photographic lenses perform really well. They receive light reflected from your subject as parallel beams. These are focused by the lens into an image formed on the digital image sensor.

When light hits the lens from the side the situation is slightly different. Some of the light is refracted through the lens correctly. Some of the light however, is reflected off the surface and lost. But there is a percentage of light that goes astray in the lens. It can be bounced around in the lens – reflecting around from the surfaces of different lens elements internally. If it does so, on each reflection some of the light will get through to the sensor. Each time that happens there will be a slightly side-shifted ghost image. All sorts of light aberrations can be created by this internal reflection in the lens. It is these that cause the artefacts you see in the image.

Light is also scattered by inconsistencies in the lens glass. Chemical, and structural variations in the glass can impact on the way the light travels through the lens. This scatter contributes to the problem. These artefacts, and often an associated haze, are called lens flare and can be worse the further to the side that the light enters the lens. Flare and haze will not only form a distraction but also act to wash out the colours in your shot and reduce contrasts. These will make your picture look flat and lifeless. Unintended flare can simply kill the effectiveness of the shot.

A sharp angle of side-light can therefore cause all sorts of visual image ghosts which are not there in the scene. You can see a range of different types of flare in this Google image search…
Google images: Example lens flare images  External link - opens new tab/page

In general, poor quality glass and multiple elements in the photographic lens will tend to create more flare. Of course better lenses (read: “more expensive”) can help to reduce the problem. Higher quality lenses will incorporate a range of ways to reduce the problem. These include optimised lens-element design, surface coatings and non-reflective surfaces/parts internally as well as high quality glass. Despite that no lens is immune to flare.

What does a lens hood do?

The most common reason we use a lens hood is to reduce the incidence of a bright light source hitting the lens from the side. This will act to reduce the chance that the lens will suffer from the flare problem. In other words, the hood will help to keep the light coming in from the front of the lens in parallel rays.

It is simple really. Put up a wall at the side and the side light is cut out. However, it is not so simple to design a lens hood that will do that without obstructing the lens. The field of view of the lens cannot be allowed to catch the hood sides. If it does it will leave its mark on the image. So all sorts of hood shapes and sizes are required to match the visual characteristics of the lens. Lens hoods are quirky shapes because they have been designed to optimally reduce the side incidence of light and not interfere with the field of view.

Common design elements include “petal” shaped edges. These allow the corners of the sensor a wide field of view without interference in the corners from the hood. The long petal shape must be along the long side of the sensor (landscape view). If you put it on the other way the side of the picture will show the edge of the hood and light will also get in from the top (or bottom) because the cover is insufficient there.

There are conical shapes and cylindrical shapes too. When these don’t have petals they are designed to accommodate the full field of view of the lens from any angle. You may find that these types of hoods are common on lenses where the front of the lens extends when changing focal length. As the extension of the lens will change the field of view the hood shape must be wide enough for the widest angle of view. But it cannot have petals because they would rotate with the lens and at some focal lengths would interfere in the picture.

Lens hoods do more…

As you can see you should buy a hood for your lens that has specially been designed for it. If you don’t, you risk the hood intruding in your shot, or not providing sufficient protection against flare.

Hoods can help in other ways too. When you have a lens hood on the lens it acts as a primary protection for your vulnerable front element. Once, when I was panning to follow a bird with a heavy/expensive pro-zoom lens I whacked the lens hood off the glass of my car window. I am convinced I would have broken the window and damaged the front lens element if I had not had a lens hood on. It harmlessly bounced. Phew! I use hoods whenever I can these days.

Lens hoods also help to reduce over exposure generally from incident reflected light on bright days. There may be no direct bright light source shining into your lens. But it helps to reduce the high levels of brightness from the side regardless. That helps to reduce the overall high light levels and especially the contrast.

Lens hoods are worth the effort

Lots of learner photographers forget the lens hood. Yet it can have quite a significant impact. Even if it is not significant, when you are trying to get a sharp image and reduce the colour wash-out in bright light every little detail counts. Great images come from the attention to detail.

Comments, additions, amendments or ideas on this article? Contact Us
or why not leave a comment at the bottom of the page…

Like this article? Don’t miss the next — sign up for tips by email.

By Damon Guy (author and Photokonnexion editor)

Damon Guy - Netkonnexion

Damon Guy (Netkonnexion)

Damon is a writer-photog and editor of this site. He has run some major websites, a computing department and a digital image library. He started out as a trained teacher and now runs training for digital photographers.
See also: Editors ‘Bio’.

Action portraits… easy to do

Action Portraits

• Action Portraits •
Getting the shot in action situations is not difficult although the lighting can prove a key aspect of success. (Shot taken from the video)

Getting it right…

Most photographers have a go at action shots. Vehicles are common targets – they are easy to find and fun to do. Action portraits can be great fun too and you can do them at home.

Lets talk flash…

 Set up pictures at home to show some action.

Easy action shots at home for anyone.
“Some more bed-jump!!” by Mr Din, on Flickr  External link - opens new tab/page

In its most basic form, it’s a portrait of someone in motion (action?). The wonderfully muscled fighter in the shot above is one way to go. On the other hand pictures of your grand children jumping into the air can be just as effective – and probably more relevant for many of us!

Use off-camera flash for best results

The basic technique is to capture the action with a flash. You can use the on-board flash on your camera. However, it will tend to leave tight shadows on the wall behind the action because the flash is directly in line with the optical axis of the camera. Such shadows look artificial and are difficult to remove in post processing. They look as if there is a slight double image. In the picture of the jumping children the flash is from the left hand side. If you look carefully the shadows are projected away from the kids giving a more realistic feel.

Off-camera flash can be placed to the side of the shot and used to illuminate the scene, give it a little depth and off-set those harsh shadows. For this you can use an off-camera flash. I use this one…

YONGNUO YN460 Flash Speedlite for Canon Nikon Pentax Olympus…  External link - opens new tab/page
This is an excellent buy… it is inexpensive and can be used for any off-camera flash situations. It is reliable, robust, flexible and effective.

I have several of these flash units. At about one fifth of the price of a branded product they are excellent value. If you want to get something a little more sophisticated you can get the YONGNUO YN-560 II Flash unit  External link - opens new tab/page – also a great product. With inexpensive remote flash triggers  External link - opens new tab/page you can set them off when not connected to the camera.

What are you going to capture?

Plan out your scene in advance. You will need someone to be the action taker. You could use more than one person. Then, work out what they are going to do. Jumping on the spot is a favourite. You also try jumping or stepping off something like a chair or low table. You can do skipping, walking, Kung Fu, Juggling, tumbling, hula-hoop, playing ball… well all sorts of things.

How do you do it?

I am assuming that you will be working in a domestic room with a white wall behind the actions.

It is best to use a robust tripod to mount your camera. This is essential. Action shots often cause floor movement and you want a good tripod (Manfrotto 055XPROB)  External link - opens new tab/page and tripod head (Manfrotto 322RC2 Grip Ball Head)  External link - opens new tab/page to give you a chance.

You will need to pre-focus your shot and have it ready to take because you cannot easily compose for action in progress. So set up the camera in advance. Here are some typical settings to get you started…

  • Turn off image stabilisation on your lens.
  • Focus your lens on your subject then turn off the auto-focus.
  • Set white balance to the appropriate ambient light setting.
  • Set ISO to 200 (or 400 experiment).
  • Aperture priority (select F5.6 as a start) [Shutter speed will be set by the camera].
  • Flash synchronisation – 200ths or 250ths of a second (if you need to set it check your manual).
  • Flash setting, try the lowest setting or 1/16th or 1/8th power – again, experiment.

This will give you appropriate starting points. Check you shot and then make any changes to the settings. If you click up or down a setting – say aperture or ISO – then the camera will compensate with a different shutter setting for you. Experimentation is good!

OK, now you are ready for action… this part takes a little practice. The idea is to sit next to your camera ready to push the shutter button as soon as the action is where you want it. As you have already lined up your focus the person can now perform and you can press the button as you see fit to capture your shots. Fire away, enjoy yourself.

Two tricks you have learned here

1. The pre-set-up of your shot is important. There are lots of situations where you can do that. So think about it – that is one of the benefits of having a tripod.
2. Flash! The way to capture a good shot like this is to have a very fast shutter speed. That freezes the action. However, I have suggested you hand the shutter speed to the camera by using the “aperture priority” mode. Well, you can in fact control shutter speed another way. By varying the flash duration. “What?”… I hear your cry. “You did not tell us about that control! But I did. Flash intensity is always the same for any given micro-second. It becomes more intense for the sensor if you leave it on longer. When you set the power of the flash to low power you are actually shortening the length of the flash. Hence you are more able to freeze the action. However, to do this you will need to have your ambient light lower. So using natural light rather than bright room lights works better for this technique.

See how its done in a video

In the video you can see all this action in a full process. The photographer, Joel Grimes, starts off by some discussion about how he came to discover this secret and how he used it in a studio context. Then from about six minutes into the video he shows you how to take the shots.

Remember that the settings are important. He mentions about low power and says that it works to freeze the action IF the flash is more intense than the ambient light. Watch out for that.

One other thing worth looking at is the shot progression. He is constantly assuring his model that he has done a good job. Then he is at the same time developing his shot. He is constantly evolving the positions and situations until he gets the shot he wants. This is critical. Make sure you look out for odd lighting effects, hands over face, bits of body out of the frame etc… He works the shot to reach his ideal as he visualised it – then stops. Even great photographers have to practice and perfect a shot. This is quite a helpful lesson about that. Enjoy!
“Special FX, High Speed Action”

Framed show  External link - opens new tab/page

Comments, additions, amendments or ideas on this article? Contact Us
or why not leave a comment at the bottom of the page…

Like this article? Don’t miss the next — sign up for tips by email.

By Damon Guy (author and Photokonnexion editor)

Damon Guy - Netkonnexion

Damon Guy (Netkonnexion)

Damon is a writer-photog and editor of this site. He has run some major websites, a computing department and a digital image library. He started out as a trained teacher and now runs training for digital photographers.
See also: Editors ‘Bio’.

Review your own photographs

Low flying aircraft

• Low flying aircraft •
Click image to view large
• Low flying aircraft • By Netkonnexion on Flickr External link - opens new tab/page
Every picture has its merits. However is there enough in the picture to interest and invigorate the attention of your viewers? Sometimes, like this picture, if you don’t have a point worth making then you should not really bother with it.

A picture is a wonderful communication.

But like speech if there’s no point there is no impact. To help you see if you have made a great picture here are some guiding points.

We are going to consider…
• What you are communicating:
• Presentation:
• Camera technique:
• Technical Quality:
• Visual Awareness, Visualisation, Seeing and aesthetics:

Looking critically at your own picture

When you make a picture your previsualisation of what you want to achieve is critical to the outcome. If you don’t know what you are trying to make how can you make it convincing? So try to have a mental image of what your picture it going to look like when you make it. If you can see the image before you make it you should have a good point in mind – a reason for making it. All too often snappers see something and just ‘snap’. That being the case, few of the images will have real meaning or impact.

When looking at your own picture you must see if there is really something there. Are you really saying anything? Are you really communicating with the viewer of your picture? Or, is what you have just made only a simple picture? To have real impact is to create in the viewers mind an image. An image that means something to them. So look at your picture and honestly ask yourself what is the viewer going to get from it? What will it mean to them? If you find that you have really said something in the picture then the first criteria for success has been passed.

To this end you should consider how successfully each of these things has contributed to the success of the image…

  • Personal input: have you understood and connected with the subject
  • Appropriate communication the message, mood, ideas, and information you want to pass to your viewer
  • Complementary use of the photographic media (mounting, projection, printing, texture of print etc.)
  • Appropriate imagination and creativity / suitable timing for the shot
What about the other things?

• Presentation: It is important to have a good presentation for your picture. Have you edited out distractions and sensor/lens spots, removed the errant sweet rapper littering the foreground etc. In other words, have you done the little tidying up tasks that make the image stand up as clean representation of your original vision for it? If it is a print, is it well mounted in a non-distracting way. Is the printing immaculate or are there streaks and spots; over-run and smear.

• Camera technique: Is the sharpness the way you want it – deliberate softness is fine as long as that is making an artistic point in a way you intended. Is the depth of field right for the composition? Have you emphasised the point or simply missed the point. Is the digital noise too high, or the contrast too low. What you are looking for here is to see if your prowess with the camera has come through. Did your technique work or were there any errors or mistakes that detract from the delivery of your point? Some of the other things to consider are…

  • Viewpoint to the subject – exciting, interesting, different, right?
  • Choice of lighting – does it complement or complete the subject or is it at odds with your point?
  • Accurate focusing – accurate choice of focus for the subject.
  • Appropriate quality and choice of exposure.
  • Suitable use of depth of field (aperture).
  • Appropriate shutter speed for the subject (and shot timing).
  • Highlights and shadows (ensuring detail is retained)
  • Appropriate quality and choice of exposure – does the balance of light and dark complement or detract from the subject?
  • Is the quality of the light effective or bland; does is make a statement or is it of little consequence?

• Technical Quality:
In this category you should consider exposure, colour and tonal control…

  • Absence of processing faults (dust, spots, hairs, processing artefacts, image damage by sharpening etc.)
  • Appropriate adjustments of colour temperature; hue, saturation, colour balance etc.
  • Appropriate tonal use and control of the range of tones.
  • Good image finishing: removal of distractions, removal of abrupt or discordant features.
  • Appropriate use of levels, curves, colour management, filters, overlays etc (post processing)

In this category you are looking to make sure that the image is digitally developed properly. Is the exposure even or has it been obviously enhanced and changed. Is the light effective to make the point or has the exposure not been fine tuned. It is easy to take a picture, but all these thing go into making an image. Think about what you are trying to achieve and does this picture achieve it with its colour and technical delivery/

• Visual Awareness, Visualisation, Seeing and aesthetics:
Do you think that your shot, the one you have in front of you sees anything different? Are you reporting what you saw or expressing a point, message, communication, feeling… does this picture have IMPACT?

  • Is the composition, design and cropping of the image an effective aesthetic construction?
  • Appropriate simplification (minimising complexity and clutter)
  • Distractions / intrusions should not divert the viewers eye
  • Good use of light, mood, texture and colour
  • Good use of masking/manipulation where appropriate
What you are doing…

Each time you want others to look at your picture you want to impress them, to lift them, to… well, get out your message or point for the picture. The type of questions I have asked above are aimed at getting you looking at your images with a critical eye. If you are honest, you will find that none of your pictures will be satisfactory in all of the above. But if you find you are gradually improving your standard of delivery you will see that the above get closer to ideal with every new picture. Critically reviewing each picture before you publish print or show it to other people helps make sure you are producing something worth showing.

You won’t be right every time. But you will see as you develop, your comments will begin matching those of other people. You will than have a benchmark that tells you if your work is measuring up to peoples view of it. Or, more importantly to see if your picture is measuring up to your original vision of how you wanted the shot.

Comments, additions, amendments or ideas on this article? Contact Us
or why not leave a comment at the bottom of the page…

Like this article? Don’t miss the next — sign up for tips by email.

By Damon Guy (author and Photokonnexion editor)

Damon Guy - Netkonnexion

Damon Guy (Netkonnexion)

Damon is a writer-photog and editor of this site. He has run some major websites, a computing department and a digital image library. He started out as a trained teacher and now runs training for digital photographers.
See also: Editors ‘Bio’.