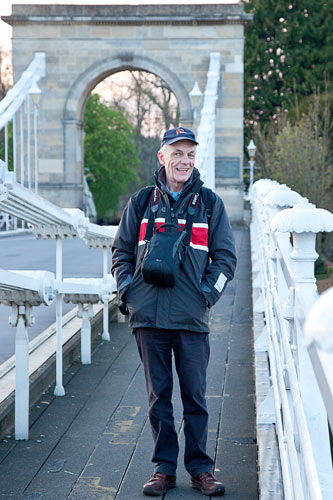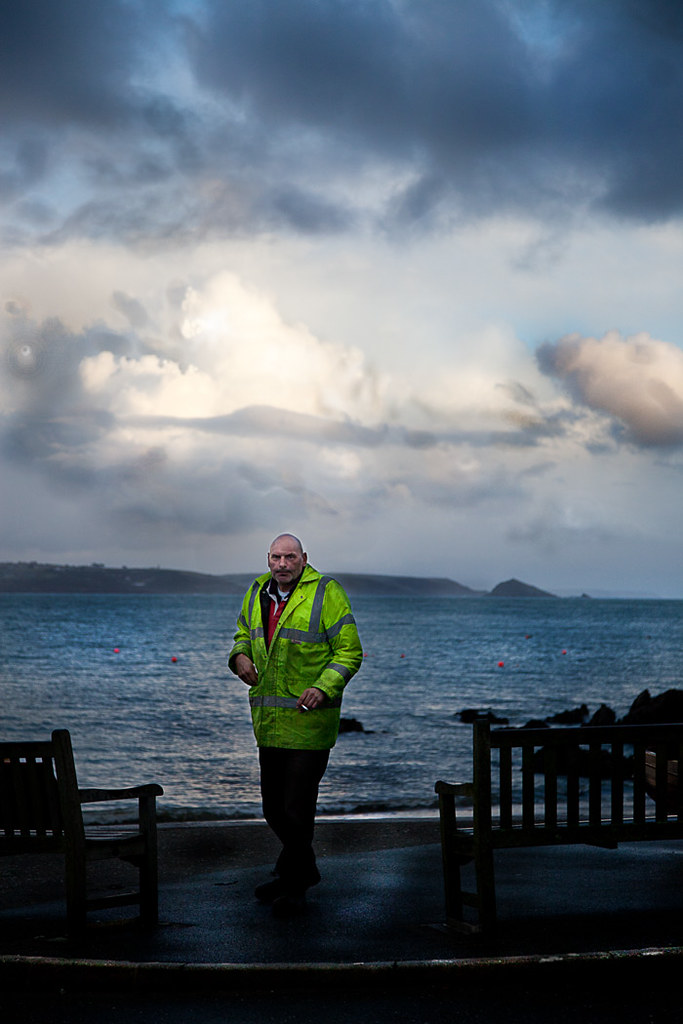
• Early morning worker •
Click image to view large
• Early morning worker • By Netkonnexion on Flickr ![]()
A great way to show off your subject is to find a way to make them brighter than the background. This projects them right out into the viewers eye. Environmental portraits are particularly good subjects for this technique.
Subjects should come first.
Every photograph should have a subject, but sometimes they get lost in the overall picture. If that happens you lose the viewers eye. Make the subject stand right out. In environmental portraits, one of the best ways to do that is to bring out your subject. Find a way of making them brighter than the background.
Environmental portraits
Most people shots, whether street photography, simple portraits, or even an event shot benefit from emphasis. There are lots of forms of emphasis. Here are a few examples…
- High contrast
- Big colour variations
- Placement in the frame
- Perspective…
Probably one of the most effective forms of emphasis in environmental portraits is subject highlighting. Environmental portraits are where a person is captured in the context of their environment. You can see them as they are in that environment. This helps you see into the person and their character.
If you can use highlighting your emphasis has two impacts. First, it provides an immediate draw for the eye. This is because the eye is drawn to the brightest spots in a picture. Secondly, the scene takes on more depth because of the impact. The very fact that the background is more subdued helps the eye to perceive the depth. The highlight creates a wider contrast between the darkest and lightest parts of the picture. In environmental portraits this has a profound effect on the eye.
How?
During the middle of the day the ambient light is very bright. You have to take care when highlighting to prevent blown out areas or over-exposure. There is one way to do it. Pick out your subject as the focus. Then turn down your exposure to slightly underexpose your background. Then use a manually set flash to illuminate the foreground subject. You will see the background as darker from the slight under-exposure. The subject will be properly exposed by the flash. Be careful not to have your flash too powerful. It will over expose the foreground and leave the background too dark. You might need to practice your technique.
In the photograph above I was lucky enough to capture the subject in bright clothes. The incidental light that did most of the work for me. A little brightening in my post-processing helped bring out the details. The emphasis of the light made the foreground object (the man) stand out. Often, what makes environmental portraits powerful is the understated background lighting.
In environmental portraits, bringing out the subject with highlighting is about taking advantage of natural lighting. Nearly every situation has local lighting variations. So if you take the time to look around your location and find light/shadow situations you are sure to find some place where the natural highlighting will give you an advantage. Most of the time it is down to becoming aware of the light and shade relationships.
Two lessons
What we should be doing when the light is right is highlighting the subject. It gives the picture impact and depth. When doing environmental portraits you will always have local light variations. Take advantage of them where you can. If you need to, use a little flash to emphasis the subject and make them stand out.
Comments, additions, amendments or ideas on this article? Contact Us
or why not leave a comment at the bottom of the page…
Start Photokonnexion email subscription now!
Photokonnexion Photographic Glossary – Definitions and articles.
Composition resources on Photokonnexion
Light and Lighting – Resource pages on Photokonnexion
Definition: Ambient Light
Portraiture – Resources on Photokonnexion.com (not just environmental portraits).
 Photokonnexion tips by email
If you enjoyed this article please sign up for our
Tips by email service.
Find out more…

Damon Guy (Netkonnexion)
See also: Editors ‘Bio’.
By Damon Guy see his profile on Google+.