Tag Archives: Manual Control

Facts about focus… how much do you know?

Orb Out Of Focus

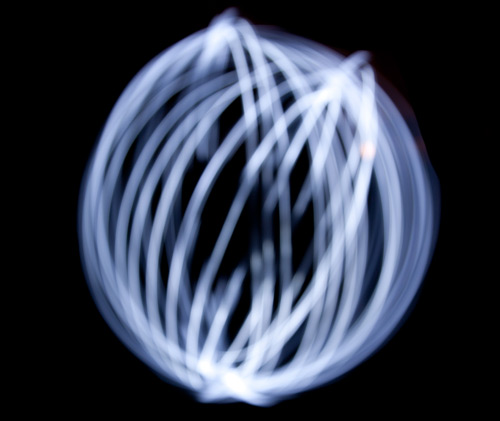
• Orb – Out Of Focus •

Focus is more complex than at first sight.

Focus, and the associated functions on a camera, take a little time to sort out in your mind. Here are some fundamentals and some obscure facts for you to think about.

Focus facts…
  1. When you point your camera at a single colour, blank space, solid blue sky or night sky the auto-focus will ‘hunt’ for some contrast. The lens will be unable to focus but keep trying. If it detects a difference of contrast in the frame it’ll be able to balance it out and use it to create a focus. If your lens is ‘hunting’, find something with a bit of colour or light contrast. Then it will stop hunting and focus. More…
  2. The light from your lens focuses on the “image plane”, the flat surface that is also the surface of the Digital Image Sensor. The circle of light it creates is bigger than the sensor. The light that falls outside the sensor area is normally inferior to the light which falls on the sensor surface. This is because the edges of the lens creates an inferior quality of light compared to the middle part of the lens. More…
  3. There is such a thing as a “fixed focus lenses”… they have no focus capability. They are put in the camera at time of manufacture and set to give a deep focus from a few meters through to infinity. Can you imagine why such a lens would be used in a camera? More…
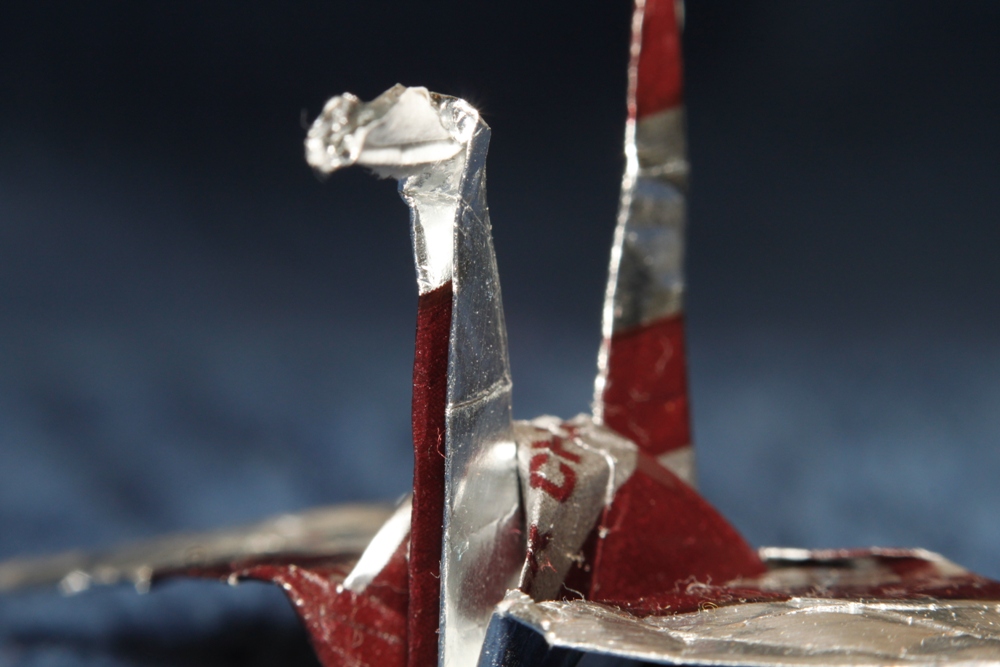
  4. Bokeh appears in out-of-focus areas. Some people think that the prominent little circular highlights are the bokeh. This is incorrect. In fact bokeh is a statement relating to the quality of the out-of-focus blur. The blur itself is called… blur! More…
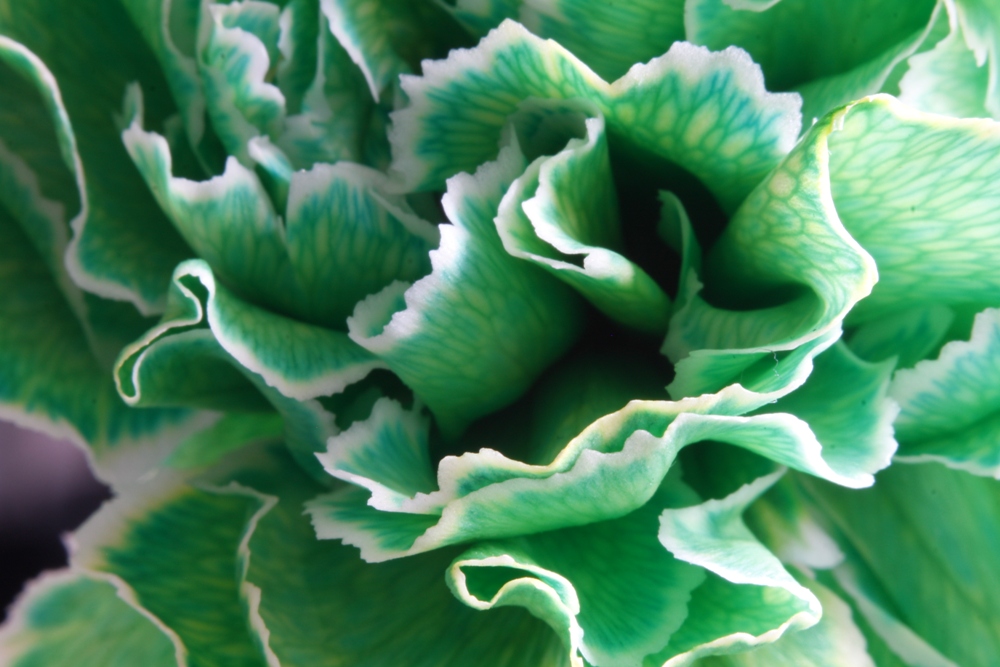
  5. Macro lenses are highly effective at focusing at short distances from the lens and to enlarging the image. Actually they will also focus at other distances too. Macro lenses produce a great portrait. More about macro lenses…
  6. When a lens lets light through the light follows something called the optical path. The focus is achieved on the optical path. However, in a DSLR when the mirror is down, the optical path ends up at the eye. The optical path is not the same all the time. More…
  7. Where you focus affects your exposure. Most people assume focus and exposure are two separate things. And, in fact, they are. But, your camera senses the light conditions where you are focusing and sets that focus at the same time as taking readings for the light meter. Change your point of focus and you may change the light reading. Even a tiny movement may change your exposure readings if your focus changes from a lighter to darker surface. Useful to know if you are in a darker environment with bright light sources around. Especially useful if you are trying to learn manual control.
  8. The ‘sensor plane’ is the surface on which the image is projected by the lens. It is the surface of the sensor itself. In former times it was the same surface that the film was laid upon. Any idea what other names might be applied to the same surface in a camera? More…
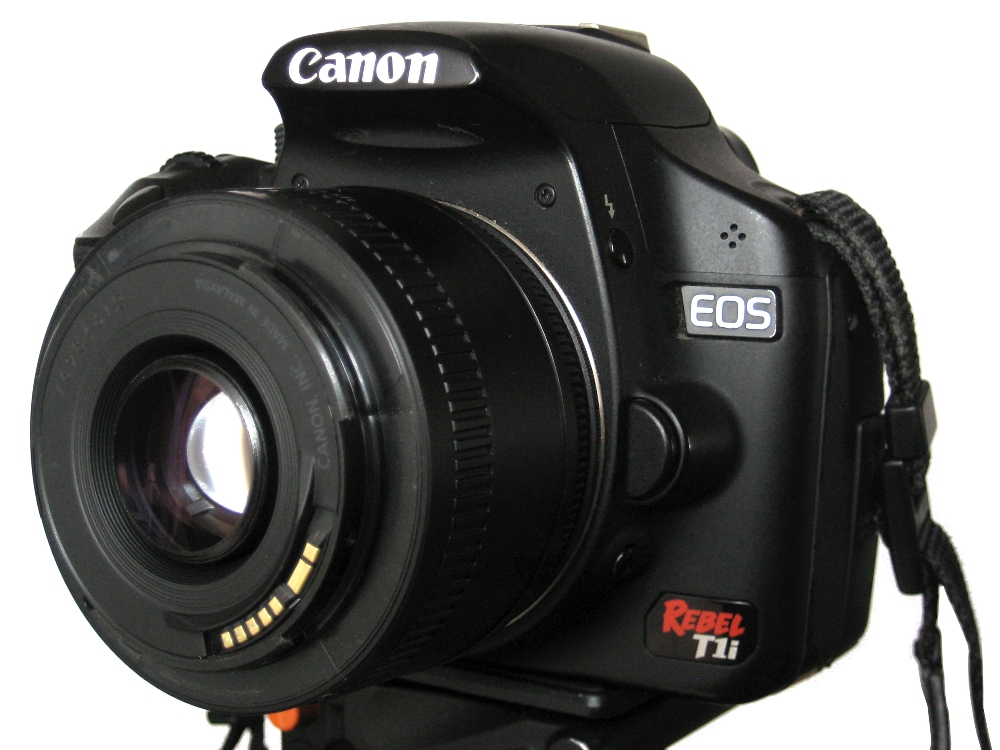
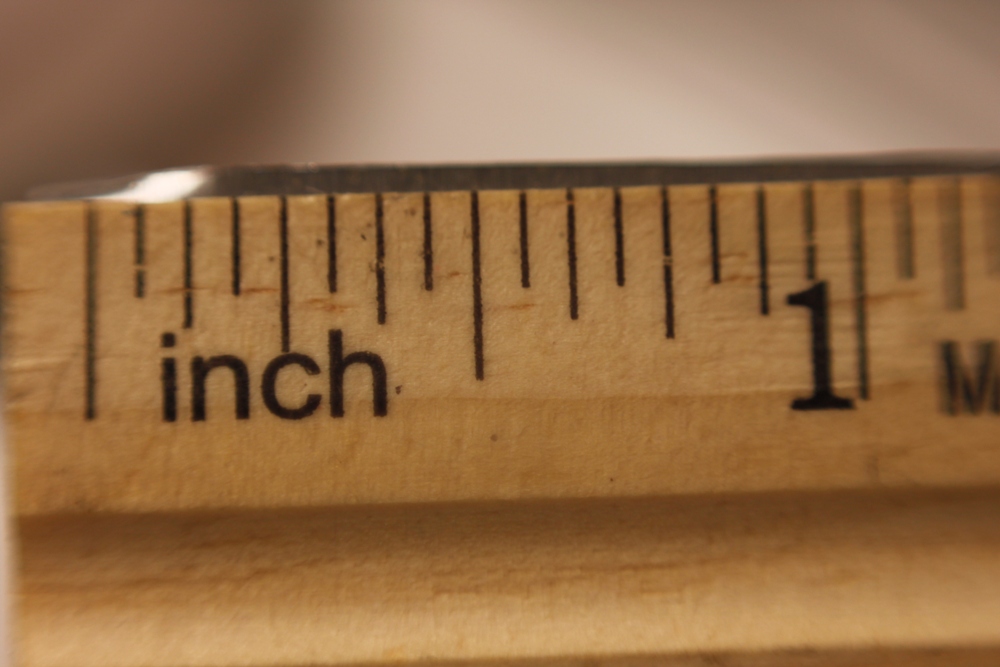
  9. Sometimes it is important to measure your focus distance precisely. For example if you want to repeat shots or vary the distance form camera to focus-point by a measured amount in a series of shots. Such measurements are often used in forensic photography, macro work and for working out scene sizes and distances. There is only one place where you can take a true measurement from on a DSLR. It is clearly marked. Know what it’s called and where it is? More…
  10. Consider turning off your auto-focus when using a tripod. The motor that works the auto-focus creates vibration that may affect your shot. It is less likely to have an effect on long exposures, but if you get into the habit of doing it you may help to sharpen your shots. Reducing any vibration is good when you are trying to sharpen your shots.
  11. The Plane of focus is a very important concept – it is about where you are focussing. It gives you an idea of what your focus is doing at any angle of the camera. You should really have a good idea about it if you want to make sure you are getting a proper focus on the subject of your shot. More…
Lots more to learn…

Focus is big subject and can become extremely technical. There is a lot more you can learn. These points are just some fun ideas to help you learn about different aspects of focus in general. If you have any comments, other ideas or want me to write about another aspect of focus – leave a comment at the bottom of the page.

Comments, additions, amendments or ideas on this article? Contact Us
or why not leave a comment at the bottom of the page…

Can you write? Of course you can!
Write for Photokonnexion...

We would love to have your articles or tips posted on our site.
Find out more…
Write for Photokonnexion.

By Damon Guy (author and Photokonnexion editor)

Damon Guy - Netkonnexion

Damon Guy (Netkonnexion)

Damon is a writer-photog and editor of this site. He has run some major websites, a computing department and a digital image library. He started out as a trained teacher and now runs training for digital photographers.
See also: Editors ‘Bio’.

Handshake blur – do your shots suffer?

Handshake Blur Problems?

• Handshake Blur Problems? •
It is so easy to lose sharpness in your shot because your hands make tiny movements. There are simple ways to fix it. Here’s how…

Handshake blur – a cause of blurred shots.

It is not the only cause of blur, but it is more common than most learners think. Handshake blur is a devil in the camera. Or is it?

In auto modes, most of the time, the camera will cope and help keep your shots sharp. When you get more advanced and start to use manual modes then the problems arise. Most people are perplexed – their shots appear to be getting more blurred as they get more advanced. What is causing this handshake blur?

Auto modes limit your photography

Auto modes are set up to average out the conditions you encounter to give you a “reasonable” result every time. The auto mode is set up to compensate for your handshake blur. It will tend toward higher-than-necessary shutter speed for example. That will help you to freeze the shot, cutting the handshake blur. When you encounter more challenging shots the camera cannot produce the results that manual modes produce.

As you advance you want to start doing things that give you more creative control. This is when manual modes help you. However, working the camera appears to become more technical. In fact it is just responding to more sensitive settings – the ones you choose. What you may not realise is that your camera holding, stance and breathing have an impact. You need to be more sensitive to those when you hold the camera. Take everything into account – personal body movement and breathing.

Toward a handshake blur cure…

Handshake blur is quite a technical problem. The camera manufacturers have been working to improve the response to handshake blur for years. Image stabilising mechanisms are built to help reduce handshake blur problems. Good ones can reduce it a right down. And, you need to work on it too. So how do you stop the problem?

There are three basic responses to handshake blur…

  • Increase shutter speed freeze the picture in time. If the shutter is open for a shorter time your hand has less opportunity to move. Then, blur is reduced.
  • Improve the way you hold your camera. The basic hand position is one hand under the lens and one hand holding the body ready to push the shutter button.
  • Improve your stance and breathing. Your body is acting as a tripod. If you are wobbly, so will your shot be! A practiced stance, will help your stability.

You can read my guide to a good stance and breathing techniques in “Simple tips for a good stance”.

There is another response that’s hardly ever mentioned… but it’s extraordinarily important. Most advanced photographers never mention this. They don’t think it is a problem. Working mostly with beginners I know it can be a huge issue. The problem is…
Muscle tone/strength
…even fit people suffer from weakness with a camera at first. I find that disabled people and older people are more sensitive too. Handshake blur can have a big impact on anyone. It is not something to worry about though.

Cameras are quite heavy – especially DSLRs. They are also unbalanced – long lenses make them more-so. People who are not regular camera holders do not develop the fine muscular control and strength needed to hold a camera and use it.

Sure, one or two shots are OK. If you are on a longish shoot, even tough men find they are unaccustomed to the position and control of a DSLR. Your shots slowly lose sharpness as you get tired. Through a whole day handshake blur can be a real issue.

If you are fit, and if you hold a camera a lot you will find your muscle tone and control improves. So will your control over handshake blur. You don’t have to do weights or go to the gym, although that will help. All you have to do is to carry your camera around and use it regularly. Not too much of a problem! The practice will put strength in your arms, shoulders, fingers and hands. Before long you will be steadier with a camera, reduce that handshake blur and improve the sharpness – a lot.

If you are disabled, have problems holding the camera, or suffer from weakness a chest harness can help. Check out DIY Camera Chest Harness for Weak Hands & Arms

Handshake blur… a video

In this video Mike Browne shows us the things I have mentioned above (except the muscle tone part) and how to put them into practical use.

Uploaded by Mike Browne  External link - opens new tab/page

Comments, additions, amendments or ideas on this article? Contact Us
or why not leave a comment at the bottom of the page…

find out more...Photokonnexion tips by email
If you enjoyed this article please sign up for our
Tips by email service.
                                                 Find out more

Damon Guy - Netkonnexion

Damon Guy (Netkonnexion)

Damon is a writer-photographer and editor of this site. He has run some major websites, a computing department and a digital image library. He started out as a trained teacher and now runs training for digital photogs.
See also: Editors ‘Bio’.
By Damon Guy see his profile on Google+.

Seeking the light – the essence of photography through the eyes of a war photographer

Don McCullin - Seeking The Light

Don McCullin – Seeking The Light • Video

Great equipment does not create great images.

Photographic insight is not in the equipment but the vision of the photographer. This is never more true than can be seen in this video. Don McCullin was a war photographer for more than 30 years. He saw some of the most appalling atrocities and covered some of the worlds most horrific wars – conflicts that would sear the sole. Yet in all that time he has retained a human and gentle perspective that provides a delicate insight but which also covers a dark vision too.

Transition

In this video Don McCullin is confronted, in his 70’s, with using a brand new digital camera for the first time. After more than 50 years of film and darkroom work as a professional photographer he abruptly makes the transition to digital. This film charts the progress of his first week. It is a transition which anyone who has started to learn digital photography has gone through. For Don it is a shock and revelation as well as a considerable learning curve. Many of you will empathise with his self-questioning and re-evaluation of his own skills and knowledge.

Canon CPS | Don McCullin Feature “Seeking the light”


Frank Algermissen

Iconic

Despite his gentle and unassuming approach in the video Don McCullin has demonstrated an amazingly insightful photographic vision. His war photography, and his street photography is eye-catching and beautiful. His control of dark tones and wide variations in light is his signature – one that made his war photography iconic.

In a previous article I covered a BBC programme Vivian Maier: Who Took Nanny’s Pictures?  External link - opens new tab/page in the Series “imagine – Summer 2013”. There is now also a wonderful programme on Don McCullin. You can see the recently broadcast BBC programme on the BBC iPlayer if you have access. The programme has some upsetting images and some extraordinary photography covering the ugly truth of war photography in the face of grave personal, life threatening danger. It is an amazing film. “McCullin”  External link - opens new tab/page will be available for another few weeks (published 11/07/2013).

Insights into an extraordinary life

For an insight into a very dark path through war photography, as well as some of his amazing photographs, watch this interview on a Canadian television programme. Don McCullin tells of his extraordinary life, some of the horrific things he has seen and explains who he is today. Well worth watching.
The Agenda with Steve Paikin  External link - opens new tab/page

Comments, additions, amendments or ideas on this article? Contact Us

By Damon Guy (author and Photokonnexion editor)

Damon Guy - Netkonnexion

Damon Guy (Netkonnexion)

Damon is a writer-photog and editor of this site. He has run some major websites, a computing department and a digital image library. He started out as a trained teacher and now runs training for digital photographers.
See also: Editors ‘Bio’.

The top twenty phototips that you should know

20 spots - twenty tips

• 20 spots – twenty tips •
Click image to view large

Learning photography is about…

Doing the simple things really well. Although there are a lot of things to learn, the important ones are a few things you do over and over again. If you improve them you will automatically improve your photography.

Work on these to make the biggest improvement
  1. A proper stance will provide a proper, steady hand-held camera position.
  2. Go everywhere with your camera. Use it every day – improve every day.
  3. Learn with what you’ve got, better equipment will not improve your skill.
  4. Three essentials – camera, lens, tripod. Learn to use them all equally well.
  5. Get close, fill the frame, your shots will probably be better.
  6. Think about every shot before you push the shutter button.
  7. Count to two before taking your camera away from your face.
  8. Never just look at others’ photos – do a critique every time.
  9. Work on your composition skills at least as hard as your technical skills.
  10. Be inspired by other photographers, but develop your own style.
  11. Discuss photography as much as possible with other photographers.
  12. Look for contrasts in colour, light, shape and other variables.
  13. Declutter your shots, show it as simply as possible.
  14. Use natural light as much as possible – get to know its properties.
  15. The rule of thirds works more than 95% of the time.
  16. Try different perspectives, points of view and heights at each scene.
  17. Vary shutter speeds, ISO and aperture settings to experiment with exposure.
  18. Make people, and especially faces, a central study in your photography.
  19. Great photos can be found everywhere – you just need to look out for them.
  20. Be completely obsessed with the study of light and the language of light.

If you pay attention to these important tips you will find your photography will develop.

Photography becomes a way of life, but don’t make it the only thing in your life. You need other interests to bring new perspectives into your photography.

Most of all enjoy what you are doing. Photography should be fun… don’t take it too seriously. Laugh a lot.

find out more...Photokonnexion tips by email
If you enjoyed this article please sign up for our
Tips by email service.
                                                 Find out more

By Damon Guy (author and Photokonnexion editor)

Damon Guy - Netkonnexion

Damon Guy (Netkonnexion)

Damon is a writer-photog and editor of this site. He has run some major websites, a computing department and a digital image library. He started out as a trained teacher and now runs training for digital photographers.
See also: Editors ‘Bio’.

Using a neutral density filter

ND filters can be used to produce some great images

Lee Filters – Big stopper neutral density filter reduces the light by ten stops. You can produce great images like this one from the video.

Sometimes you need a long exposure…

However, to take a very long exposure in daylight will mean too much light will burn out your picture. So you need to turn down the incoming light. For that you use an ND Filter. Here is how they are used.

Remind me, why do I need this?

Remember, shutter speed controls movement blur. If you want to show a car looking blurred as it goes past you might set the shutter speed to about a fifteenth or thirtieth of a second. But what if you want to capture a much less obvious movement or a really slow movement? Say two minutes? Well, normally the amount of light coming in will burn out the shot. Of course you can use a really small aperture (eg: f22) and let less light into the camera. But on a bright day two minutes will still burn out the shot. This is where Neutral Density (ND) filters come in. They are specially darkened filters that cut the light down allowing you to extend your exposure. With one of these you can do some awesome effects.

10 stop Neutral Density Filter (video)

In the video we see the making of a picture (above) by using the Lee Big Stopper Neutral Density Filter. This ND filter is very dark, which takes down the light by 10 stops. It creates a great effect on of the water swirling under the pier. This is the darkest type of ND filter.

ND filter strengths

ND filters can reduce the light entering your camera for up to 10 stops. This allowed 2 minute exposures in the video. However, there is also ND2, then ND4 and ND8. Other strengths exist, but these are the most common. They allow you to have shorter exposures so you can adjust the exposure to the needs of your shot. You can also put them together so an ND8 + ND2 gives you an effective ND10 – the strength in the video.

ND Grad.

Another of these type of filter is the graduated Neutral Density, or ND grad. The use of an ND grad is quite specific. It is used to reduce the incoming light from the sky when you have a bright sky and dark ground. If you expose for the ground the sky burns out. If you expose for the sky the ground is too dark. The ND Grad. helps prevent the sky burning out.

The ND Grad. is dark at one end and clear at the other. The two zones meet in the middle where the clear graduates into grey. Put the filter over the lens so the line of clear/grey graduation lies on the horizon, darkening the sky. Now, you can expose for the scene and get even light distribution. The next video will show you how this type of ND is used.

Mike Browne  External link - opens new tab/page
Problems?

No, filters are simple and easy to use. There are some important things to remember…

Always use a tripod. It is impossible to hold a camera steady for more than about half a second. After that your image will start to get blurry.

You need to be quite precise about lining up ND Grads with the horizon. Take a little practice before going out to do the BIG shot.

The darker the ND Filter the more there is a tendency to impact on the white balance. Sometimes you get a blue colour cast, sometimes a red one. You can remove this in post production if you are using the RAW file format. Alternatively you can test the filter with your camera and adjust the white balance setting in-camera to correct for the aberration. Most of the stronger ND filters have this colour-shift tendency. it is exaggerated by the sensor type. CMOS sensors tend to magnify the effect.

Sometimes getting the exposure right is a matter of experimentation. Take a few test shots and make sure you do some “Chimping”.

If you are buying ND filters, especially ND Grads buy square ones. You can buy adaptors for these to fit any lens and it allows you get creative in more ways than round, screw-on filters that only fit one lens.

There are many different kinds of filters which produce a huge range of fun effects in-camera. Many of these effects cannot be processed into the shot later. The square filter system shown in these videos allows you to expand your collection and develop a new set of skills without buying an expensive filter for each lens.

ND Filter set…

3 full ND filters
3 graduated ND filters
Full fitting kit for a range of camera
and lens sizes.
10 Adapter Set + 6 Filter ND2 ND4 ND8 G.ND2 4 8 For Cokin P Canon Nikon Sony LF6

Please leave any questions or comments you have about these in the comments below.

find out more...Photokonnexion tips by email
If you enjoyed this article please sign up for our
Tips by email service.
                                                 Find out more
#11030#

By Damon Guy (author and Photokonnexion editor)

Damon Guy - Netkonnexion

Damon Guy (Netkonnexion)

Damon is a writer-photog and editor of this site. He has run some major websites, a computing department and a digital image library. He started out as a trained teacher and now runs training for digital photographers.
See also: Editors ‘Bio’.

The secret to a wonderful black background with moody lighting

Mastering the black background

• Mastering the black background •
With very little practice you can get a perfect black background and moody lighting.

The eye is captured by solid black.

It provides a really focussed experience for the viewer. Low key and solid black backgrounds provide a wonderful insight on detail and features. If you get this right it provides an excellent insight for portraits and helps many other aspects of your photography. This is a technique I use for product photos, still life, landscapes and flower photography.

Simplicity itself

The technique involves using a bright light (off camera flash) to overpower the ambient light. The steps are simple…

  • Set your camera to its lowest ISO setting (around ISO 100) – the sensor is least sensitive to light.
  • Set your aperture to a high f number (small aperture = low light), say f11, or higher so that the amount of light your camera lets in is very small.
  • Take a test shot to ensure your screen is black – you want nothing to show.
  • Shoot with a diffused off-camera flash at full power using a narrow beam.

This simple technique is relying on extreme underexposure. Basically you are underexposing the whole scene to blackness. But then you are introducing a very narrow beam of brightness that overcomes a limited area of the underexposed shot. This leaves your highlighted spot on the subject in a moody light with the rest in black.

Photography Technique: The Invisible Black Background

Glyn Dewis  External link - opens new tab/page introduces the technique on video. Notice the way the umbrella is creating a focussed narrow beam of light. You can do the same thing with “barn door” lights or cards either side of a reflected flash. Enjoy the video…

By Damon Guy (author and Photokonnexion editor)

Damon Guy - Netkonnexion

Damon Guy (Netkonnexion)

Damon is a writer-photog and editor of this site. He has run some major websites, a computing department and a digital image library. He started out as a trained teacher and now runs training for digital photographers.
See also: Editors ‘Bio’.

Inexpensive Close-Up Photography – Reverse Rings

Bubble Wrap

Green bubble wrap shot with Canon 50 mm f/1.8 lens reversed.
Hand-held to the camera body.
• Bubble Wrap •
By Archaeofrog

Anyone can use reverse rings.

Close-up or macro photography is something every photographer should try. However, a macro lens can be an expensive investment. This series covers inexpensive ways to get great close-up results. The first article “Inexpensive Close-Up Photography – close-up rings” discussed using close-up lenses that attach to your existing photographic lens. A second way to achieve close-up results, surprising as it may sound, is to reverse your DSLR camera’s lens by mounting it on backward.

It is possible (but awkward) to simply handhold your lens backwards against your camera body, as in the top photograph. I don’t recommend it, as it can allow dust or other debris into your camera that may affect the sensor. The inexpensive alternative is to purchase a reverse ring camera mount adapter that fits your lens (based on its diameter) and the make and model of your camera body.

Canon Reversed Lens

Canon 50 mm f/1.8 lens attached backwards to a Canon T1i body using a reverse ring. The depth of field preview button is visible underneath the lens release button.
Click image to view large

How to use the reverse ring

First, remove any filters you have on your lens. To use a reverse ring, screw the ring securely on to the front of your camera lens filter thread. Hint, it is easiest to screw the ring on while the lens is in the camera body. After attaching the reverse ring to the lens, remove the lens from the camera body. Now reverse it and fit the lens-mount side of the ring into the camera body and lock it in place. You will no longer be able to use the autofocus function of your camera or adjust the aperture of the lens once it is reversed, but you will be able to adjust the shutter speed and ISO. Your camera may display an aperture value of F00 or other default. I recommend that you change the shooting mode on your camera to aperture priority or manual. In aperture priority mode, the camera will calculate and set the shutter speed for you, while in manual, you will set it yourself. Now you are ready to use the lens.

Origami Crane

• Origami Crane •
Click image to view large
Origami paper crane folded from a bite-sized Hershey wrapper.
Captured with a reverse-mounted Canon 50 mm f/1.8 lens

A reverse ring gives better results when used with a prime lens rather than a zoom lens. Prime lens are often faster, which means that they have a wider maximum aperture and can use a faster shutter speed, even in lower light.

You can use any type of lens, although light lenses are recommended. Very heavy lenses may damage the reverse ring mount adaptor or the lens filter thread.

Using a zoom lens, particularly when fully zoomed out, can be awkward to support. Because the lens is reversed, zooming the lens requires you to be further from the object you are photographing and does not give such a close-up view of the subject. The working distance (distance from the lens to the object in focus) is about five inches with the Canon 50 mm f/1.8 lens reversed. Using my Tamron 18-270 mm zoom lens at 18 mm, I have to be within about two inches to get an object in focus, while it is greater than six inches at 270 mm.

Adjusting the aperture

When your camera lens is not attached to a camera, its default position is to be open to its widest aperture. So, for the Canon 50 mm f/1.8 that would be f/1.8, which results in a very shallow depth of focus. In the crane picture above, the neck of the crane is in focus, while the beak and tail are not. When I reverse this lens on my camera, the aperture will still be f/1.8, and I will be unable to adjust the aperture value after the lens is reversed on the camera. But there is a work-around.

Most DSLR cameras have a ‘depth of field preview’ button. The purpose of this button is to allow you to look through the viewfinder and see exactly what your camera will see at the aperture that is set. When you press that button, the blades inside the camera lens close down to the selected aperture. This will allow you to set the aperture for your lens. (Please note: not all DSLRs have a depth of field preview button).

Carnation at F22

• Carnation at F22 •
By Archaeofrog

Here is the procedure. Using aperture priority or manual mode on your camera, dial in the aperture that you want to use for the shot. Next, depress and hold the depth of field preview button. While still holding down the button, press the lens release button and remove the camera lens. Then you can mount it on your camera body using the reverse ring. The camera lens will maintain whatever aperture you had selected. If you want to return to the default position or change the aperture again, simply put the lens back on the camera the regular way and repeat the process. Tip: if working outside, you may want to set your aperture first and reverse the lens indoors, to avoid dust getting into the camera body and on the sensor.

Advantages and limitations of reverse rings

The reverse ring is a fun and easy way to experiment with close-up photography. The ring itself is very inexpensive, usually less than $10 USD (around £7-£8 UK), and is small enough to fit in a purse or pocket. Depending on the lens that you reverse, you can get very close to macro-level results.

Ruler

• Ruler •
Click image to view large
This photograph of a ruler demonstrates the scale of a reverse-mounted Canon 50 mm f/1.8 lens, which gets down to an image of about an inch and a quarter wide and has a working distance of about five inches.

Like other close-up techniques, using a reverse ring does require you to be physically close to the objects you are photographing. Depending on your lens and your comfort level, however, you may still be able to capture detailed shots of slower moving insects, such as the bee below. A reverse ring is also ideal for indoor shots or other stationary details.

Bee

• Bee •
Click image to view large
Bee photographed using a reverse-mounted Canon 50 mm f/1.8 lens.

You will lose some of the automatic functions of your camera, including autofocus, with a reverse ring. The electrical contacts that normally carry signals to the lens are not in contact with a reversed lens. This is not that much of a disadvantage. Generally, with close-up shots, you get better results when using manual focusing.

While you can adjust the aperture (on some cameras), there is an additional step of setting the aperture using the ‘depth of field preview button’ before reversing the lens.

As with any close-up or macro technique, the depth of field (area in focus) will be very shallow. You can maximize sharpness by keeping the camera lens parallel to the object being photographed. In the photograph of the bee, above, the body of the bee is parallel to the camera lens and stays in focus. The flower is perpendicular to the lens and falls out of focus quickly.

Another technique to maximize sharpness is to use a smaller aperture like f/22, but this may require a longer shutter speed than you can easily hand-hold. You can solve this problem by using a tripod for stationary objects, which allows you to use a longer shutter speed to achieve the desired sharpness.

All close-up techniques benefit from the additional stability of a tripod. Although, as you can see from the shots above, you can get effective results from hand-held techniques.

A flexible option

Overall, a reverse ring is an inexpensive and portable way to use your existing lens for close-up photography. Depending on the lens you reverse, there is enough working distance to photograph insects, flowers, or any other small subjects that interest you. There is flexibility to adjust the aperture value before reversing the lens, which gives you a little control over the depth of focus. It is an inexpensive option to get you started in the tiny world of close-up photography.

Buyers guide

The inexpensive nature of these rings makes a quick purchase worthwhile. Remember that you will need to buy the ring that suits your specific camera mount (eg. Canon, Nikon etc). The size of the filter thread on your lens is important too. On the following link you can find a range camera mount types as well as thread sizes…
Reverse ring camera mount adapter products  External link - opens new tab/page

A great lens for doing close-up work is a 50mm prime lens. More information on buying 50mm prime lenses including product links can be found in…
Are your pictures distorted? Considered a 50mm?

For general reference: 50mm Prime lens product listing  External link - opens new tab/page

Lego

• Lego •
Click image to view large
Lego explorer mini-figure.
Using a reverse-mounted Canon 50 mm f/1.8 lens at f/1.8.
• Lego • By Archaeofrog

Articles on Close-Up and Macro Photography
by Katie McEnaney

Part 1 of this series focused on using close-up lenses. Part 3 will cover extension tubes, and Part 4 will bring all these techniques together with a range of close-up ideas and tips.

Inexpensive Close-Up Photography – close-up rings
Inexpensive Close-Up Photography – Reverse Rings (this article)
Inexpensive Close-Up Photography – Extension Tubes
Inexpensive Close-Up Photography – Tips and Tricks

By Katie McEnaney (contributing author)

Katie is an elementary school teacher in Wisconsin, USA. She is an avid photographer with wide interests. She is always interested in learning more and growing in her photography.
By Katie McEnaney (Archaeofrog)

Can you write? Of course you can!
Write for Photokonnexion...

We would love to have your articles or tips posted on our site.
Find out more…
Write for Photokonnexion.