Tag Archives: hard light

Tips for improving your use of flash

Simple tips about flash help all aspects of your photography.

The use of flash is all about increasing the light intensity in the area where you are working. There are many ways that flash can be used. Here is a great round up of flash tips to get you started.

In Six tips for photographing silhouettes we talked about how to create a silhouette. One of the reasons for flash is to prevent a silhouette. Often when you have a bright background you want to light the foreground to prevent your subject being too dark. You can use your on-board flash, an external flash or studio lights to fill that foreground light and bring your subject up to a brightness level that makes them look natural and well lit.

One thing to remember is that your flash is adjustable. This is a fact that many people forget. Look in your camera or flash manual to see how to make the adjustment. Then make sure that you do not have too much power. Nearly always photographers have the flash too high. Very bright flash makes faces look washed out and tired. It will also cause nasty and distracting highlights. You can turn your flash off, down or sometimes up. It is certainly worth experimenting with it to see how much you can adjust it and what effects the adjustment has on your subject.

On-board flash and off-camera flash are two different things altogether. You can easily do some things with the off-camera flash that you can with you pop-up (on-board) unit. However, there are some things you should know about on-camera flash – it is pretty limiting.

The differences between types of flash, and many other useful tips, including more on the tips above, can be found in the video below. It explores quite a few aspects of flash and is a great background for you to get started.

Posted on YouTube by: http://www.steeletraining.com

By Damon Guy (author and Photokonnexion editor)

Damon Guy - Netkonnexion

Damon Guy (Netkonnexion)

Damon is a writer-photog and editor of this site. He has run some major websites, a computing department and a digital image library. He started out as a trained teacher and now runs training for digital photographers.
See also: Editors ‘Bio’.

Five tips to help your portraiture from the Renaissance

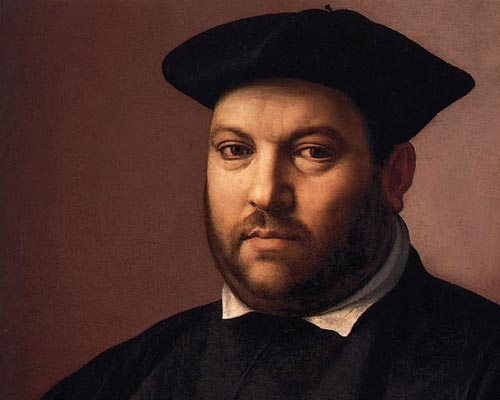
Renaissance Painting - "Portrait of a Gentleman" by Ridolfo Ghirlandaio

“Portrait of a Gentleman” by Ridolfo Ghirlandaio (Part copy of the original)
Renaissance painting can teach us a lot about portraiture.

The way we look at people is a constant in time.

Renaissance Portraits represent the artists view at the time. Our photographs represent our view today. Artists paint to bring out features. We can see lessons in that emphasis to help our portraiture in photography.

The Renaissance painters created a culture of portraiture leaving us with a superb legacy. Their realistic portraits were a study of light and shadow – the fundamentals of art. their study specialised in the face. They wanted the lines and shadows to be flattering, portraying the features in the best possible light – literally. Today we have a lot of portraits by masters who knew how to see light and shadow and pick it out.

Here are five things that we can look at in Renaissance portraits to apply to our own photographic work.

The direction of light

To make the best of the features of our portrait sitter we need to understand light direction. Renaissance portraits tend to have slightly exaggerated shadow lines. As a result we can see which direction the light is coming from. Once we have worked this out we can apply the principle to our own shots. We can place the sitter relative to a light source or move the lights.

Light intensity

In general Renaissance portraits have no highlights on the face. Modern flash and lighting techniques tend to produce harsh, hard lights unless we carefully control it. The Renaissance images sometimes have bright light, but the painters left them as bright, not white. Spots of white, blown out light, are very distracting for the viewer. We should be on the lookout for the brightest spots try to reduce the light intensity. In films the make-up reduces skin reflection. When that is not practical we can instead just use reduced lighting, or diffusion screens.

Angle of incidence

In the picture above there’s quite a strong shadow line on his forehead under the hat line. This is because a hard light is striking the face slightly from above and to the side, not straight on. This imitates the sun, or a high point of light – say, through a window. By looking at the shadows on the face we can see how the light is angled in addition to it’s direction. Different angles of lighting and the shadows responding to it give clues about how the scene is lit. An evening scene with a lamp would show a lower angled light and it would be more yellowish. An evening light would be more straight from the side and tend to be redder. Bright daylight will tend to be from a higher angle. Looking at the angle light strikes the face, and the type of shadows, helps you to imagine how your own portraits could be set up.

Hard and soft light

Sometimes the old masters cheated or messed about with light to emphasise something on the face. In the picture above you will see quite a hard line of shadow down the shadow-side of the nose. This hard line of shadow comes from a harder light. Yet on the cheeks the light is soft – the shadows have a gradual tenancy toward darker areas rather than a hard line. In general, it is difficult to mix hard and soft light lines like this in real life. It is interesting because here it shows how the face is well defined. I think this is because the artist was trying to define a quite rounded face. Too rounded and the face becomes feminine. To avoid that feminine look he has put one or two harsher, sharp lines on the face to bring out the masculine side. For your portraits remember that hard light brings out masculinity and soft light brings out feminine features.

Eyes

Eyes are something of a study for artists and photographers. They establish life and vitality as well as a rapport with the viewer. If you can mark the direction of the eyes so the person in the portrait is looking directly into the viewers eyes then you capture the viewers attention. We are transfixed by eyes that look at us. In a very clear picture the pupils gives us a clue. In most pictures the catchlights in the eyes indicate the direction light in the face, the direction they are looking and also provides vitality and expression in the eyes. In the portrait above the catchlights are small, the picture is reduced in size and low resolution. But the catchlights are present. Have a close look at them. When working your portraits make sure your catchlights are a good shape and are true to the direction of the main light.

Here is a fun exercise

To improve your portrait skills pick a Renaissance portrait. Try to create a modern version of it. Look carefully at the light direction, intensity, angle, relative hardness/softness and the eyes. See if you can get someone to sit for you while you reproduce the light, shadow, catchlights and the pose. Work on the ways that the shadows lie on the face. See how the shadow graduation works. Soften and harden the light to reproduce that softness.

Here is a link to the Google image pages for Renaissance Portrait Paintings External link - opens new tab/page

This is an exercise in light control. You can do it with natural light. You can even do it with a table lamp (although it may create a colour-cast). The idea is two-fold. First, get control of the light. Second, try to reproduce classic portraiture pose. Both are fun, and both will teach you all sorts of lessons about what in the light makes people look the way they do.

How to work with reflectors… essential!

Every photographer likes natural light – reflectors give you more.

Using a reflector you can use ambient natural light and modify it to suit your needs. The 5-in-one reflector is probably one of the best buys you can make to extend your lighting.

The five-in-one reflector is a system of reflectors in one package. The system includes a white ring (42inch) with white translucent material filling the ring. The translucent ring is accompanied by reversible covers. The set provide the following properties…

  • Translucent white: creates a strong light diffuser It creates a soft light so it has a vibrant wrap-around quality. Ideal for softening hard light sources, direct sunlight and effectively creating soft shadow edges particularly on the face for portraits.
  • Silver cover: reflects silver-light for increasing specular highlights and high-contrast light reflectance.
  • Gold cover: reflects a warm golden colour for gold colour fill light which is ideal for sunsets, portraits indoors and out, and for special work like fashion highlights, jewellery and back reflection on other surfaces.
  • White cover: produces an even and neutral reflection which will be an effective fill-light for still-life, portraits, product shots and many other situations where light is needed at an angle to the main source of light.
  • Black cover: used to absorb light increasing the shadow on the side used and to dampen the softer lights in the area. Effectively applies definition to glass on the edges of illuminated glass pieces. It will also stop-down sun light and bright hard lights.

In the video the guys from ImprovePhotography go through the different reflectors and how they can be used… more information after the video.
Published on May 23, 2012 by ImprovePhotography External link - opens new tab/page

The use of reflectors is the best way to create a second light-source to produce fill-light for your shots. Reflection or diffusion softens light and reduces its intensity. This is great news because it means that the reflected light looks natural and in proportion to the main light source. It even exhibits similar tonal quality to the main source unless the reflector colours it as gold or silver for example. One side of the shot will be illuminated with ambient light from a natural source or from a flash or other light. The other side is filled by the reflected light. Reflectors are a great way to extend your lighting equipment cheaply and to create great light that is controllably in proportion to the other light in the area. Excellent!

You can buy a five-in-one reflector set on Amazon now…

By Damon Guy (author and Photokonnexion editor)

Damon Guy - Netkonnexion

Damon Guy (Netkonnexion)

Damon is a writer-photog and editor of this site. He has run some major websites, a computing department and a digital image library. He started out as a trained teacher and now runs training for digital photographers.
See also: Editors ‘Bio’.

Can you write? Of course you can!
Write for Photokonnexion...

We would love to have your articles or tips posted on our site.
Find out more…
Write for Photokonnexion.

Use window light for portraits

You don’t have to have strobes or flash for great light.

The quality of your shot is not proportional to how much equipment you have. You can create great shots with simple equipment and great light. Got a camera and window? You are nearly there.

In the video below you can see simple steps to create great shots often come from simple set-ups. It is the simplicity that often makes these shots work well. A great portrait shows off the subject and if the environment is understated they become the main focus. Simple light and simple props are the key.

The photographer, JP Morgan, uses lighting contrasts, hard and soft light with reflectors to manipulate the light in this portrait session. The use of the light is constantly aimed at creating shadows that flatter the face and colours that bring out the skin tones.

Although he does not mention it, look out for highlights on the skin of the subjects. Did you see any? Well, he used the light at a natural level to control the highlights. Flash often creates nasty bleached highlights on prominent features of the face. That distracts from the overall view of the face and destroys the balance. Natural light, especially soft light helps to minimise highlights and that brings out the character of the face more.

Notice that he explored the different potentials of the two girls to suit them. Skin tone, hair colour, clothes and posture were all considerations. Notice too that most of the poses were ones that suited the girls individual character. They probably had a lot of input to those positions. Remember to involve your portrait subject, they will respond better and photograph better if you work with them and make it about them.
More after this…

He worked the scene continuously. He used reflected light a lot to prevent the camera creating a silhouette against the window light. The reflector brought the natural light to the front of the shot, but toned it down. This meant there was a difference between the intensity of the window light and the subject lighting.

The creative use of shadows is great. They are endlessly fascinating to work with and they make a scene look deeper and more natural. The window frame on this shoot also made the shadows more dramatic which complemented the girls own shadow.

This video is an interesting insight to shooting with natural window light. There is also a lot about how to work with a model there too. Watch out for the way the girls seem to be enjoying themselves.

50 ways to do it at the weekend!

Inspiration – just when you need it

When it comes to photography the inspiration seems to be there until you actually pick up the camera. I must admit I have ‘idea’ days and I have brain-dead days. So sometimes it helps to get a few ideas from somewhere else when it comes to brain dead days.

I have added below a short video with lots of interesting photos to set you thinking. The fun thing is that most of these pictures give you ideas for doing shots with stuff lying around the house. That is great because it does not require much activity to get going and do something with your camera. That’s just right for the weekend.

Here are three tips to help you when doing still life or shoots with things from around the house…

  • Make sure everything is absolutely clean. It is so easy to ruin a shot because it is dirty or dusty. When it is opened up in full size you will see dirt all over if you do not clean it properly before the shot.
  • Use soft lighting. It is very difficult to make hard light look atmospheric or effective unless you are doing a murder scene!
  • Use longer exposures than if you were taking shots outside and a use a tripod too.

Light – the essential component

There is one thing in photography that is more important than anything else – light. Funny thing that, many photographers don’t get it until quite late on. Maybe that sounds daft to you. Maybe it does not. If it does sound daft you need to look carefully at what it is you are photographing. Light is the defining factor of EVERY shot.

The knowledge that light is so important makes it almost essential that any equipment photographers use either controls the light or captures it. Try these for size…

Diffusers:
Anything that causes light to be diffused has to be an important aspect of photography. Flash, bright lights and direct strong lights as well as hard light needs to be diffused. Hard light is very unflattering, particularly in portraits. So think of ways to diffuse and soften the light. Here is a detailed entry in the Photographic Glossary, published today, looking at diffusers…
Definition: Diffuser; Diffusion; Diffusion Filter

Photographic Umbrella:
One of the great pieces of equipment that any photographer can have is an umbrella. It is used with a flash to diffuse the light in one of main ways. Here is a new article about the umbrella in the Photographic Glossary…
Definition: Photographic Umbrella


Ring flash:
If it is not about light modifiers like the diffusers and the umbrella, then it is about light sources. Off-camera flash is the most flexible type of flash for working from the camera direct. However, flash is often a harsh and very hard light. A ring flash is also a hard light but can be used close to the subject. It gives off a ring of light. Here is more detail about the Ring Flash in a new article today…
Definition: Ring Flash
 
Open faced light:
The harshest light is a hard light. An open faced light tends to be the harshest artificial source of light since the face of the light is exposed directly to the subject with no diffusion screen in the way. There may even be a focusing lens to make it even more concentrated. Here is a definition for this light…
Definition: Open Face Light; Undiffused Light; Open Light


Contribute A Definition?

Send us a definition of a photographic word or phrase...

Send us a definition for our list of photographic words and phrases. Simply write a clear definition and send it in. Include an original picture if you wish. Give us your name and a link to your website and we will credit your work.

By Damon Guy (author and Photokonnexion editor)

Damon Guy - Netkonnexion

Damon Guy (Netkonnexion)

Damon is a writer-photog and editor of this site. He has run some major websites, a computing department and a digital image library. He started out as a trained teacher and now runs training for digital photographers.
See also: Editors ‘Bio’.

Some Quick Portrait Tips

It goes without saying that every photographer has to do portraits at some time. I remember that I took some great portraits back in the day… or did I? Well, I laugh at myself now because when I look back at my early portraits I made all the classic mistakes! I cut off bits, I got the lighting wrong, I fluffed the focus. Well I guess we all did those things at least once.

In this video are some very quick tips to improve your portraits. I expect that you have got past the mistakes I made above! So these quick points are nice easy ways to move forward with your portrait shots without too much effort. Small changes make for big improvements in the shots. So have a look at this…

Can you write? Of course you can!
Write for Photokonnexion...

We would love to have your articles or tips posted on our site.
Find out more…
Write for Photokonnexion.