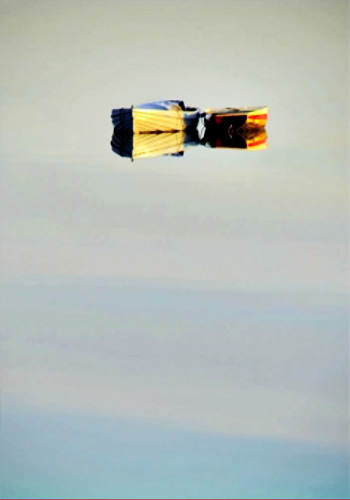
Tag Archives: Composition

Use implied infinity to make your shots bigger than the frame

• Passing Boats •

• Passing Boats •
Click image to view large
• Passing Boats • By Netkonnexion on Flickr External link - opens new tab/page

You can fool the brain into seeing beyond the frame…

The eye is trained to see sideways and the brain to imagine things we cannot see. The eye/brain system sees things that are peripheral to our vision – or beyond the frame.

Major compositional impact

When we see a picture containing things we expect to be extensive we make a leap of imagination. Although a picture is quite small the content takes the imagination beyond the frame – possibly to infinity. The picture above is an example. One of the boats is heading close to a substantial rocky outcrop. You cannot see it in the picture and get the impression that they are both sailing into open water. Our knowledge of the sea and the fact that we see no break in the picture we get the impression that it is clear open water.

The use of continuous patterns, open/extensive scenes and continuous lines can take the imagination beyond the frame. It makes a picture have a much larger aspect in our mind than might actually be there. The feeling of extensiveness which takes the imagination beyond the frame is down to how you crop or frame your photo.

In the next picture the stones are cropped so they are continuously cut off on the edge of the image. It gives the impression of a great expanse – a whole beach – extending beyond the frame.

Stones and shell

• Stones and shell •
Click image to view large
• Stones and shell • By Netkonnexion on Flickr External link - opens new tab/page

In fact the picture was taken on a beach so the impression is realistic and effective. However, in the next picture the roof looks as if it might extend to infinity.

• French Roof •

• French Roof •
Click image to view large
• French Roof • By Netkonnexion on Flickr External link - opens new tab/page

The lines and roof tiles give you the impression that the roof extends way beyond the edges of the frame. In fact it is cropped to look like that. The actual house edges are just beyond the frame on each side. But the implied size fools the eye.

You can also give the impression of more when you don’t have more with lots of little things. In the next picture I leave you to imagine how far the rubber bands extend either side. Do they really go far beyond the frame?

• Rubber Bands •

• Rubber Bands •
Click image to view large
• Rubber Bands • By Netkonnexion on Flickr External link - opens new tab/page

In this example the crop, and the pencil, still allows you to see beyond the frame of the picture. Yet it does seem to limit the view a bit. The fact that we normally don’t view a sea of rubber bands in our minds eye, puts limits on the extent of them beyond the frame. The pencil also seems to stop the view being truly extensive beyond the frame.

The limits of the implied expanse

The crop or framing of the picture is crucial to patterns, continuous lines and extensive scenes which open implied spaces in our images. You have to ensure that nothing intrudes into the picture to terminate the view. Had you seen the rocky outcrop in the top picture you would have had your imaginary journey foreshortened on one side of the picture. The pencil provides a limiting scale to our thinking which also foreshortens our vision outside of the frame.

Paraglider

• Paraglider •
Implied infinity created by openness gives a great sense of freedom to a picture.

Openness

What is lovely about this compositional idea is that when we have a truly extensive potential in a scene our imagination plays wonderful tricks of escapism, freedom and openness. It can really set us free when we see a scene like this. However, it can be ruined if we put in something which limits our imaginary journey out of the scene.

Comments, additions, amendments or ideas on this article? Contact Us

By Damon Guy (author and Photokonnexion editor)

Damon Guy - Netkonnexion

Damon Guy (Netkonnexion)

Damon is a writer-photog and editor of this site. He has run some major websites, a computing department and a digital image library. He started out as a trained teacher and now runs training for digital photographers.
See also: Editors ‘Bio’.

Can you write? Of course you can!
Write for Photokonnexion...

We would love to have your articles or tips posted on our site.
Find out more…
Write for Photokonnexion.

Simple portrait tips, excellent advice

Simple portrait tips - Excellent Advice

• Portrait by Bambi Cantrell •
Simple portrait tips: seeing the person, seeing the light, seeing simplicity.
(Image from the video)

The best portraits show the person

When photographer and subject gel the magic of portrait photography bursts forth. Bambi Cantrell just bubbles over with enthusiasm about portraiture. And, she gives simple portrait tips and great advice. See the person, see the light – make it simple. In this short video she explains about her portraiture. Really worth watching for the enthusiasm and the advice.

Wedding & Portrait Photography Tips & Advice by Bambi Cantrell

This video is all about simple portrait tips although Bambi also includes wedding photography ideas. But much of wedding work is about portraiture.
Marc Silber – Silber Studios

Simple portrait tips and light

The simplicity in seeing light passes many beginners by when they are starting. These simple portrait tips reveal how light can be used to good effect. But in real terms many of the most important tips about photography are lost if you don’t get great light. So follow up these simple portrait tips with a study of light – especially in your portrait work. Check out these Light and Lighting resources, articles and links

Comments, additions, amendments or ideas on this article? Contact Us

find out more...Photokonnexion tips by email
If you enjoyed this article please sign up for our
Tips by email service.
                                                 Find out more

Damon Guy - Netkonnexion

Damon Guy (Netkonnexion)

Damon is a writer-photographer and editor of this site. He has run some major websites, a computing department and a digital image library. He started out as a trained teacher and now runs training for digital photogs.
See also: Editors ‘Bio’.
By Damon Guy see his profile on Google+.

Engaging portraits – it’s all in the hands

• It's all in the hands •

• It’s all in the hands •
The hands are very important for directing the eye around a portrait
Click image to view large
• Portrait 4 • Kayte Allen on Flickr External link - opens new tab/page

Make your portraits draw the eye…

Here is a quick tip with lots of examples. To make your portraits flow and to help direct the eye to the right places use the hands to help direct the viewers eye.

Up and down loses the eye

The typical beginners full length portrait shows the subject standing upright, arms limp and lifeless at their sides and a sort of half grimace on their faces. Coupled with a portrait-aspect crop this disaster is a straight-through for the eye.

Despite what charms lie below the face, we look there first. We seem to be programmed to do it. Then we follow the rest of the body down with our eyes. IF everything points downward our eyes continue to the feet and then we lose the eye out of the bottom of the frame.

The hands can use the power of lines to redirect the eye

The eye is trained to follow lines and edges – these are places where contrasts are the most obvious and there the eye can see the differences in light and pick out detail. This is the power of lines in Composition – they literally create tracks that the eye follows.

The power of the lines in upright, long portraits is to direct the eye downward and out of the picture. That will always happen unless some form of stopper can be used to direct the eye to where the main interest lies. No better way to do that than with arms and hands. They can be used to stop the eye progressing downward by placing them across the body or they can be used to direct the eye back to the face by pointing upward. They can even be used to direct the eye around to follow the curves of the face and head as in the portrait above.

Some long shots

In the next few pictures you can see how the eye is directed out of the picture by the vertical lines, the portrait crop and the stance of the subject…

• The Photographer •

• The Photographer •

Mum - the loving supporter

Mum – the loving supporter

• Portrait by Virotutis on Flickr •

• Portrait by Virotutis on Flickr •
While this is an interesting picture and has a fun aspect to it, the whole image works to force the eye downward. It is a great picture, but the direction to the eye is almost undeniable.
Click image to view large
• Portrait by Virotutis on Flickr •External link - opens new tab/page

The hands can change everything…

Consider now the way the subtle lines and positions of the hands and the arms redirect the eye back to the face in these shots. These portraits have so much more to offer the eye because the hands bring us back – prevent us from going out of the image.

• Portrait with the hat •

• Portrait with the hat •
The hat acts to stop the eye getting lost upwards. The arm and hand
act to keep the eye returning from the lower end of the shot. The enigmatic smile
provides wonderful interest. A thoroughly engaging portrait.
Click image to view large
• Portrait with the hat • by DeusXFlorida on Flickr External link - opens new tab/page

• Portrait by GummyPiglet on Flickr •

• Portrait by GummyPiglet on Flickr •
The wonderful light, the great use of the arm and hand and the lovely expression create a circle for the eye. Out down the arm and back to the face. A great shot.
Click image to view large
• Portrait by GummyPiglet on Flickr •External link - opens new tab/page

• Portrait by Benjamin Ballande, on Flickr •

• Portrait by Benjamin Ballande, on Flickr •
The strong framing with the darker top and hood act to allow the eye to stray downward after the face. But the upward arm and the hand around the face creates an endless cycle of interest around this lovely portrait.
Click image to view large
• Portrait by Benjamin Ballande, on Flickr •External link - opens new tab/page

• Portrait by natali Antonovich on Flickr  •

• Portrait by natali Antonovich on Flickr •
The technique works on men too. The eye naturally comes down the shoulder, and is drawn back up the arm to the face again. An interesting character in this one.
Click image to view large
• Portrait by natali Antonovich on Flickr •External link - opens new tab/page

Portrait workshop, I by Vicco Gallo

• Portrait workshop, I by Vicco Gallo •
The sweep of the hair, the collar and hint of jewellery act to take the eye out of the picture. In the nice of time the thumb sweeps up the eye and the fingers divert us back to the face again. Engaging!
Portrait workshop, I by Vicco Gallo, on Flickr External link - opens new tab/page

The hands and the arms rule the lines

We have an almost pathological need to go to the face or hands with our eyes. The rest is almost incidental. Used properly you can cycle the viewers eye endlessly in the portrait. It is a great technique and one that really satisfies the eye.

Comments, additions, amendments or ideas on this article? Contact Us

find out more...Photokonnexion tips by email
If you enjoyed this article please sign up for our
Tips by email service.
                                                 Find out more

Can you write? Of course you can!
Write for Photokonnexion...

We would love to have your articles or tips posted on our site.
Find out more…
Write for Photokonnexion.

By Damon Guy (author and Photokonnexion editor)

Damon Guy - Netkonnexion

Damon Guy (Netkonnexion)

Damon is a writer-photog and editor of this site. He has run some major websites, a computing department and a digital image library. He started out as a trained teacher and now runs training for digital photographers.
See also: Editors ‘Bio’.

Lenses and designations? Confused? An easy guide

• Lenses •

• Lenses •
Buying lenses optimised for your sensor is confusing.

Lenses are a big investment…

It is difficult to know which lens is optimised for your digital image sensor. There seems to be so many different designations. Here is a guide to which lens designation you want.

Explaining the differences

Brands like Canon and Nikon have their own lenses range. Third party manufacturers, like Sigma, Tokina and Tamron etc. manufacture lenses for brands like Nikon, Canon and others. if buying lenses the third party manufacturers have lenses which are equivalent to the Camera brand manufacturer or possibly better. Look around at online reviews to see what standard of lenses and prices are available.

Make sure you buy lenses fitted with the correct lens mount for your camera. Older models of cameras may have the correct mount but some of the more recent lenses might not be suitable to work with the camera. So check the mount and camera are compatible before buying.

Why are lens mounts specific to brands? It’s mainly historical – the development paths of the manufacturers differ. However, they also want their customers to stay loyal to the brand. This unfortunate situation means you have to reinvest in a new range of lenses if you change your camera body. Hmmm! Expensive.

There are two types of camera sensor. There are cropped sensors – which is a small size. These are more often referred to as APS-C format.

The other sensor format is full frame sensor. These are the size equivalent of the old film SLR frames on a roll of film.

Full frame digital sensors are less common than cropped sensors. The cropped sensors are easier and cheaper to manufacture. However, in recent years we are seeing an increase in full frame releases of new cameras. The higher resolution (more pixels) and potentially bigger print sizes are attractive to consumers. As full frame format gets cheaper they are likely to become more common.

The full frame sensor size is the same size as a 35 mm (36mm ×24mm) film frame in old SLR cameras. Because of the historical significance of the 35mm format modern DSLRs are based on the same standard. Lenses are normally designed to fit either the full frame format or the cropped format.

Lenses designed for the full frame sensor have an image circle that covers the whole 35mm sensor. These lenses tend to be more expensive because they need a wide circle of light thorough them to cover the sensor. They have bigger glass elements as a result.

Full-frame sized lenses are able to fit a camera with the same mount and a cropped sensor. The image circle from the lens remains constant. The smaller sensor size (APS-C) is therefore only able to process the light from the centre of the circle – the rest of the light spills over the side of the sensor. The resultant photograph is like a zoomed-in crop of the image that would have otherwise been taken with a full frame sensor.

This image-cropping effect of smaller sensors is known as the “crop factor”. It represents the ratio of the size of the full-frame 35 mm sensor to the size of the smaller format. The apparent zooming effect also gives rise to an alternative name – the “focal-length multiplier”.

The ratio of full-frame to crop tends to lie in the range 1.3–2.0 for most cropped sensor DSLRs. You might say that a 100 mm lens on a camera with a 1.5 crop factor creates an apparent zoom multiplying the focal length by 1.5. A 100mm lens would then appear to produce the same picture as a 150mm lens. This is not a true magnification since the focal length of the lens is the same on both cameras. Instead the cropped sensor is likely to produce a lower quality result than than the full frame sensor while revealing a closer result.

You can use lenses designed for full frame sensors on cropped sensors. It does not work the other way. A lens designed for a cropped sensor creates an image circle smaller than the full-frame sensor. It would create a circular image with very strong vignetting around the sides. Manufacturers recommend not using lenses designed for cropped sensors on full frame cameras.

Designations

To ensure that buyers purchase the correct lenses for full frame or cropped sensor manufacturers designate them with specific marques. Here is the breakdown of the most common designations…

 Manufacturer  Full frame
(and APS-C)
 APS-C
(cropped)
    Canon           EF pEF-S
    Nikon          FX DX
    Sigma          DG DC
    Tokina          FX DX
    Sony     Various‑incl.
3rd party mounts
DT
    Tamron          Di Di-II
    Samsung   Not available‑2013 NX
    Pentax Check manufacturer
specification
DA
  Konica‑Minolta Check manufacturer
specification
DT
Other related sources…

Lens manufacturers (Wikipedia) External link - opens new tab/page
Photography equipment manufacturers (cameras, lenses etc) (Wikipedia)  External link - opens new tab/page

Comments, additions, amendments or ideas on this article? Contact Us

find out more...Photokonnexion tips by email
If you enjoyed this article please sign up for our
Tips by email service.
                                                 Find out more

By Damon Guy (author and Photokonnexion editor)

Damon Guy - Netkonnexion

Damon Guy (Netkonnexion)

Damon is a writer-photog and editor of this site. He has run some major websites, a computing department and a digital image library. He started out as a trained teacher and now runs training for digital photographers.
See also: Editors ‘Bio’.

Can you write? Of course you can!
Write for Photokonnexion...

We would love to have your articles or tips posted on our site.
Find out more…
Write for Photokonnexion.

How to use negative space effectively

• Boats •

• Boats •
Picture by Mike Browne (from the video)

Composition that is not there!

The space that surrounds the subject and fills the gaps between important objects in your picture can be described as negative space. In some ways it defines the objects you see. In another way it is not really there. Instead the background is what you see.

The concept of negative space is important. The shape of your subject is created, at least in part, by the space around it. The space helps to define its character too. How much space surrounds your subject, and the type of space, all pass messages to the viewer about your shot.

Negative Space in Photography

Negative space is a strong artistic element yet it is not always obvious how to use it in your photography. Seeing negative space, and using it, takes a little practice and some ideas on how to place the elements in the shot. In the video Mike Brown shows us, despite the annoying balloon, how to use negative space and how to place your subject. He shows us how to use the balloon too – eventually.

find out more...Photokonnexion tips by email
If you enjoyed this article please sign up for our
Tips by email service.
                                                 Find out more

By Damon Guy (author and Photokonnexion editor)

Damon Guy - Netkonnexion

Damon Guy (Netkonnexion)

Damon is a writer-photog and editor of this site. He has run some major websites, a computing department and a digital image library. He started out as a trained teacher and now runs training for digital photographers.
See also: Editors ‘Bio’.

Can you write? Of course you can!
Write for Photokonnexion...

We would love to have your articles or tips posted on our site.
Find out more…
Write for Photokonnexion.

The top twenty phototips that you should know

20 spots - twenty tips

• 20 spots – twenty tips •
Click image to view large

Learning photography is about…

Doing the simple things really well. Although there are a lot of things to learn, the important ones are a few things you do over and over again. If you improve them you will automatically improve your photography.

Work on these to make the biggest improvement
  1. A proper stance will provide a proper, steady hand-held camera position.
  2. Go everywhere with your camera. Use it every day – improve every day.
  3. Learn with what you’ve got, better equipment will not improve your skill.
  4. Three essentials – camera, lens, tripod. Learn to use them all equally well.
  5. Get close, fill the frame, your shots will probably be better.
  6. Think about every shot before you push the shutter button.
  7. Count to two before taking your camera away from your face.
  8. Never just look at others’ photos – do a critique every time.
  9. Work on your composition skills at least as hard as your technical skills.
  10. Be inspired by other photographers, but develop your own style.
  11. Discuss photography as much as possible with other photographers.
  12. Look for contrasts in colour, light, shape and other variables.
  13. Declutter your shots, show it as simply as possible.
  14. Use natural light as much as possible – get to know its properties.
  15. The rule of thirds works more than 95% of the time.
  16. Try different perspectives, points of view and heights at each scene.
  17. Vary shutter speeds, ISO and aperture settings to experiment with exposure.
  18. Make people, and especially faces, a central study in your photography.
  19. Great photos can be found everywhere – you just need to look out for them.
  20. Be completely obsessed with the study of light and the language of light.

If you pay attention to these important tips you will find your photography will develop.

Photography becomes a way of life, but don’t make it the only thing in your life. You need other interests to bring new perspectives into your photography.

Most of all enjoy what you are doing. Photography should be fun… don’t take it too seriously. Laugh a lot.

find out more...Photokonnexion tips by email
If you enjoyed this article please sign up for our
Tips by email service.
                                                 Find out more

By Damon Guy (author and Photokonnexion editor)

Damon Guy - Netkonnexion

Damon Guy (Netkonnexion)

Damon is a writer-photog and editor of this site. He has run some major websites, a computing department and a digital image library. He started out as a trained teacher and now runs training for digital photographers.
See also: Editors ‘Bio’.

Seeing what you want to create

• Mushrooms •

• Mushrooms •
Photographers learn many techniques to achieve a particular outcome or ‘look’ in their images. They go beyond reality to create a specific previsualised final image.
Click image to view large
• Mushrooms • By Netkonnexion on Flickr External link - opens new tab/page

Visualise the image you want to make.

Producing a picture can be as simple as point and shoot or as complex as a long planned production. To produce great images you often have to go beyond an elementary snap-capture. The best images are made from a careful thought process. The photographer has a goal in mind, a visualisation of what they want the final image to be.

What is visualisation?

People who use visualisation techniques seek to perform challenging tasks to achieve the visualised goal. The existence of a previsualised goal gives them a clear sense of being able to achieve the goal while trying to achieve it. Users of the technique report they gain an internal boost from having the outcome already in mind.

In sports users of the technique are taught to visualise an explosive use of energy through which they then see themselves complete a record breaking event or win a race. In business the user visualises a goal for their business and continues to enrich the detail and nature of the successful outcome in their mind while working toward attaining it in the real world.

In cinematography whole scenes are previsualised and committed to storyboard form. This creates for the director a clear, detailed mock-up of the scene(s). The storyboards augment and crystalise their mental visualisation of the scene. The latter provides a shared vision for the production team with which to pursue the quality cinematic outcome.

In still photography there has been a long tradition of visualisation. Ansel Adams and several of his contemporaries used the technique. Adams himself defined the use of visualisation as…

…the ability to anticipate a finished image before making an exposure.
Ansel Adams, The Camera, 1980

“.
Adams continued to write about visualisation in photography throughout his life and clearly attributed much of his own success as a photographer to being able to see the finished print in mind before he took the picture.

Adams came to understand the nature of the visualisation through the creation of one of his most important pictures. While working in Yosemite making a picture of the “Half Dome  External link - opens new tab/page” he was using yellow filters to darken the sky. This was a common practice at the time used to simulate in black and white the depth of colour in a sky. However, Adams imagined that the yellow filter would provide an insufficient depth of sky tone to show the drama of the scene before him. Instead he imagined the final print would look better with a darker sky-tone. Applying a red filter instead, he created in the final print the dramatic outcome he had visualised before setting up the camera.

This proved an important moment. He became aware the camera did not simply record a scene. Instead it could be set up to achieve an outcome he had imagined before making the exposure. This visualisation became his guide to the production of the image rather than the absolute reality in the scene.

This realisation enabled Adams to see past the literal and technical capture of the plain camera and lens combination. Instead he was able to create something “expressive” that was a manifestation of the vivid image he had visualised in his imagination.

Today photographers learn many different techniques to achieve a particular outcome or ‘look’ in their images. We see deliberate under or over exposure scenarios created from daylight scenes, or dramatic blood-red sunsets over-saturated to emphasis the power of the retiring sun. The use of visualisation allows the photographer to see in their minds-eye what they want the final image to look like.

Visualisation does not ensure the success of an outcome but it does provide a powerful guide in the process of achieving success. As the photographers visualisations become more detailed and their artistic talents develop so does the visualisation.

Where visualisation is used the technique can only be successful if the appropriate technical steps are deployed. The successful rendering of the visualisation can only come out of a quality photographic process. However, there must also be an interdependence.

Visualisation can be achieved artistically without knowledge of the photographic process. And, the act of visualisation is improved with practice. At the same time, the scene conjured in the minds-eye must also be achievable by the available photographic skills. As skills develop their visualisation skills are more likely to respond to the growing range of techniques the photographer knows. In other words, as a photographers experience grows what is achievable through visualisation also develops. The strength and quality of the visualisation will also be better in areas where the photographer has practised and polished skills.

So, we can reliably infer that visualisation and skill set work together. Landscape photographers will tend to produce better sunset visualisations and images because that is their area of practice and expertise. At the same time fashion photographers will see an outcome for an image that shows off an article of clothing or a delicate facial bone structure because that is how they spend the majority of their time. Each has their specific photographic skill set and technical process. Each photographer also has their own artistic and observational skills that help build expressive visualisations for the type of images they want.

Practice and development

Visualisation is a dynamic and evolving skill. As you become familiar with new techniques your ability to achieve a particular visualisation develops. Visualisation is a skill that develops with awareness of the potential and an ability to imagine a great image before you produce it. The earlier you start to try deliberate visualisation and planning for its fulfilment the more likely you are to take control of your development as a photographer.

By Damon Guy (author and Photokonnexion editor)

Damon Guy - Netkonnexion

Damon Guy (Netkonnexion)

Damon is a writer-photog and editor of this site. He has run some major websites, a computing department and a digital image library. He started out as a trained teacher and now runs training for digital photographers.
See also: Editors ‘Bio’.

find out more...Photokonnexion tips by email
If you enjoyed this article please sign up for our
Tips by email service.
                                                 Find out more