Tag Archives: Camera

Six things to consider for starting portraiture

A dear friend

• A dear friend •
Click image to view large
• A dear friend • By Netkonnexion on Flickr External link - opens new tab/page

Portraiture – the photographers passion.

Starting in portraiture can be daunting. We are going to look at the important things to consider when getting started with photographing portraits. There are also links to some of the portraiture resources available on Photokonnexion.

This post is aimed at introducing the portraiture resources found here…

Location

Choice of location can make or break a portrait. If you choose an outdoor location you have to consider a range of issues like the weather, how to pose your subject and exactly what you will be putting in the background. The problem with outdoor portraits is that there is potentially a huge number of composition decisions to make. Taking the shot can be quick. Deciding on what background is right can take a lot of effort and research.

If you are just starting out with portraits it might be better to focus on indoor shots. The environment and light is potentially simpler and the lighting more controllable. The essence of good indoor shots is to reduce the composition to a very simple background and lighting and to focus your attention on the subject. This gives you time to practice the posing, including expressions, and the lighting set up.

Lighting

Light and Lighting can be as simple or complicated as you make it. My advice is to make it as simple as possible. Most great portraits are done with one simple source light. Working with one light gives you the ability to try out shadow casts and hard light vs. soft light. Practice with simple ideas will help develop your skills more than working with confusing multiple light sources.

Background

This is not the same as the location (which is really more about the surroundings). When you are considering the background this could be as simple as a blanket suspended behind your subject. It could also be as complicated as a workbench that your subject works at. What you have to do is decide how to set it up, how to light it and how to place your subject in front of the background. You have to make a decision as to whether you are taking an environmental portrait (a large amount of the background is visible) or a simple portrait where the background is a minimalist setting, where you show very little of the environment and make it as simple as possible.

It is better to start simple. Placing your subject in front of a coloured, white or black background is a great way to get started. You will be able to focus on posing your subject and spend less time worrying about what to include or exclude in more complex backgrounds.

Posing

The best advice for starters is to work with your subject. He or she will be comfortable with certain poses. Get them to start the posing. Then, when you see how they like to pose, you can ask them to vary it to get your light right and get them showing their best side (the left side of the face is best).

Remember that that definition of the features of the face are defined by light and dark. Your poses should be aimed at using the shadow/light relationship to bring out your subjects facial and body features.

find out more...Photokonnexion tips by email
Enjoying this article? Please sign up for our
daily email service.
                                                Find out more…
#11030#

Props

It is difficult to provide resources about props. There are as many props as there are things people can hold, wear, sit on, stand next or or play with. Yes, props can be pretty much anything you want. However, one thing is certain. Your portrait subject will suddenly come alive when they have a prop to distract them from the daunting prospect of the camera. Try to get them to work with a prop they are familiar with – get them to tell you about it or show you how they use it while you photograph. These things will make the comfortable and help them to relax. It will also show you the character of the person they are.

Camera settings and lenses

Some people will tell you this is the most important point. Others will say the posing, still others will focus on the other things above. How you set up your camera, and how you place your subject are very closely related. But there is a lot to learn here. Start simple so you can feel in control. If you are not yet working with manual controls then be comfortable with auto mode – try to become aware of the types of settings that seem to work.

Exposure settings are an important study. There are some exposure links in the link box below. However, you should be concentrating on natural colours. The type of light you use is important to your exposure. I have one piece of adice on this. Beginners at portraiture almost always over-light. Keep your lighting soft and your exposure moderate and not over-bright to start. If you are using flash, turn it down. Bright flash always washes out flesh colours and sometimes causes nasty highlights on the face. It is worth reading up about how you can ruin your shots with flash.

I hope that this article has provided you with some options for getting started in portraiture. Please spend some time going through the links on the portraiture resources page to get more detailed information.

By Damon Guy (author and Photokonnexion editor)

Damon Guy - Netkonnexion

Damon Guy (Netkonnexion)

Damon is a writer-photog and editor of this site. He has run some major websites, a computing department and a digital image library. He started out as a trained teacher and now runs training for digital photographers.
See also: Editors ‘Bio’.

How to make a digital camera

How to make a digital camera

How to make a digital camera

A lot goes into making a digital camera.

Canon have made this video to explain the key processes and ideas that lie behind camera design and production. The video is Canon focussed, but the concepts apply to any digital camera.

All the key processes are mentioned in the video. It is particularly interesting to see the considerable technology that backs the manufacturing itself. Camera production is very high tech and the degree of precision involved is considerable.

Despte the complexity of the actual technology the video is a simple and easy watch. The ideas are explained in easy steps and the diagrams make it easy to see what is going on. No mad scientists were involved in making this video! Simple clear ideas and demonstrations are used throughout.

I found this a very useful video to watch. I am sure you will find it interesting and eye opening. Enjoy!


Published on 13 Apr 2012

Beginners mistakes and how to overcome them

Beginners mistakes :: We all make them.

Beginners mistakes :: We all make them.

Everyone has to start somewhere

Most aspiring photographers make simple, easily avoidable, mistakes. What’s surprising is how many photographers go on making the same mistakes despite information being freely available. To save you frustration here are the top mistakes I have come across and how to overcome them.

Beginners mistakes :: 1. Buying the first serious camera

Most beginners lack guidance. They look in camera magazines and buy a camera according to a budget. The mistake is to assume a big spend is a better spend. In photography a bigger spend buys more control. Beginners don’t yet know how to control a camera. So more control is just more bewildering and more expensive.

Learning camera control takes a lot of practice. It is like any complex skill. Most modern DSLRs are complex machines. This is true even of the entry level ones. They are complex enough to last the average beginner quite a few years. Even then they will still be learning skills within the capability of the camera. An expensive camera is wasted. It will probably be way beyond the skill level of a beginner. Normally beginners will not even get off ‘auto mode’ for a while. This means that the expensive camera is essentially doing what a point-and-shoot camera will do.

The beginner rarely goes beyond the-point-and shoot skill level without help from more experienced photogs. The background skills needed at the start is a lot to cope with. Here’s what beginners should do to learn quickly and without frustration…
1. Join a club. Learn a little about composition, editing, camera control, light and lenses. Try out things.
2. Produce some fun and interesting pictures.
3. Try out a few cameras from friends.
5. Make friends who know a lot about photography.
6. Ask someone to help them consider a new camera.
With help, the beginner can buy an entry level camera to move to the next stage. They will be more informed. Most important, it will be less bewildering.

Beginners mistakes :: 2. Shooting without understanding the camera

The beginner is often forced to put a complex camera into auto-mode. Lack of experience and knowledge keeps them there. To get off the starting blocks find out what the camera can do. Read the manual. They are pretty dry to read and have few examples. So, dip in and follow up with Internet reading to help you learn.

Beginners mistakes :: 3. Working on your own

Working on your own is disheartening and isolating. At a club you can get and meet kindred spirits. Working with experienced people and other beginners you realise that questions you want to ask, are the same questions everyone needs to know. It boosts confidence and you learn more. Go meet people, share, have fun and learn.

Beginners mistakes :: 4. New gear will solve the problem

People think a new piece of gear will help them improve. A famous modern photographer said,

Gear is good, vision is better.
David DuChemin

And he was right! There is little new in conceptual terms in photography. Most shots can be done with a pretty simple set-up. Piles of expensive equipment do little to improve beginners. New equipment will definitely not sort out your beginners mistakes. You would be better concentrating on the next point…

Beginners mistakes :: 5. Eyes open but not seeing

Photographers realise most people have their eyes open but do not see. Most of what a photographer learns is vision. Colour, light, dark and shadow all define the world. Most people miss this. I did too. I think there are three dimensions of photography. The length of photography is seeing light; the width is distilling simplicity and the height is capturing meaning. To understand image-making one needs to learn vision. You need to know how to think an image out of a scene, create it in the camera. Great images are produced before the shutter button is pushed. A gifted few know these things and can see. For the rest of us we have to learn it by patient study, practice and interaction with those who can do it.

Beginners mistakes :: 6. Shooting *.jpg not RAW

It is an irony, most beginners think that shooting in *.jpg format is easiest. Actually nothing could be further from the truth. The *.jpg format is severely disabled.

When the camera creates a *.jpg file it does a lot of editing according to the manufacturers ideas. Then the camera dumps the data that the image does not need. As a result there is very little editing potential in the file. If you work with the RAW file, the full and original data from the capture, you have a huge editing potential to work with. RAW is also much more true to the original image. Don’t let the camera manufacturer make decisions for you. If your camera can produce RAW files, work with RAW. You will then be able to create images according to your vision. If you can’t make RAW, put that on a list to ensure in your next camera.

Beginners mistakes :: 7. Shooting the wrong resolution

Beginners frequently work with the wrong file resolution. Always shoot with the biggest size and highest file resolution – even if you must work in *.jpg. You will get bigger images and can do more with it. Read your manual and set to the largest, highest resolution image.

Beginners mistakes :: 8. Insufficient memory card space

The largest, highest resolution image will need more memory. However, memory is cheap today. There is little excuse for running out of space. Buy larger memory modules than you think you need. Always have at least one spare. Better still, have more than one spare. Also, memory does develop faults, so keep spares to cover a problem. Check out memory card issues with these articles…
20 Ways to Protect Files on Memory Cards (Part 1) (and then link to part 2).
Memory Card Rotation – play it safe.

Beginners mistakes :: 9. Relying on the LCD screen

The lowest resolution picture your camera makes is on the LCD screen. Making decisions about an image on the basis of such a low resolution image is difficult. Use the screen to see if you captured what you wanted. Don’t delete or edit an image in-camera. You simply cannot tell what you are deleting. And, you cannot even see what you have done wrong. Get all the images home. Then, in comfort and full size you can analyse exactly, and in detail, what you did right or wrong. That is a great learning point. You can also see in proper detail if the image is what you wanted and what editing is needed.

Beginners mistakes :: 10. Deleting Pictures

Most beginners ruthlessly delete images they think are no good. In hindsight most photographers realise that as a beginner you are in no position to make that judgement. Beginners often make bad decisions about images. Decisions which later they would not make. You could easily be deleting your best and not realise it. Keep everything but the worst case no-hopers. Memory is cheap. If they are bad images they are great learning points in the future.

Beginners mistakes :: 11. Not interested in exposure

Most beginners do not understand ‘exposure’. They think the camera does all that stuff! Well, it can do it – that is auto-mode. But, “auto” is the manufacturers attempt at an average job for the light conditions. Learn about exposure. Work toward controlling your own exposures. There is no perfect exposure. There is only the image you want. So create the exposure you intend, instead of the one you wanted. This will allow you to change your pictures into images and your seeing into vision.

Beginners mistakes :: 12. No back up, no safety net

Back up, back up, back up. If your hard-drive fails you will lose everything. Buy two external hard drives. Back up to one every time you download pictures from your camera. Back up to the other as soon as you can. Keep the second one at a different location. This will protect your images against fire and theft at your home. Remember this procedure…

  1. Download your photos from the camera to your hard drive.
  2. Back them up to a second drive.
  3. Now format your memory card in the camera.

I have seen a grown man cry when he downloaded wedding photos, then formatted his memory card. Only then did he find the download did not happen. All the images were destroyed.

Beginners mistakes :: 13. Only one battery

Buy at least one extra battery. They run down, get left uncharged, get dropped and break, or get lost. In cold weather they last for a shorter time. No battery will mean your shoot is ruined. Spend a little extra and cover yourself.

Beginners mistakes :: 14. Not doing editing

If you think your image does not need to be opened in an editor and digitally developed, you are probably shooting *.jpg. In which case the manufacturer has done the developing for you in-camera according to their ideas. Get over it. Photographers always had to develop. What comes out of the camera is an unfinished piece of work. To turn a picture into an image takes your input and finishing.

Beginners mistakes :: 15. Software and hardware is inadequate for the job

Beginners underestimate the power needed to do image processing. They wonder why their computer is so slow. Buy the most powerful hardware and most flexible software you can afford. It will pay you back in speed and quality.

Beginners mistakes :: 16. Use a tripod

A properly used tripod gives you sharp images. Use one every opportunity. If you are serious about photography you will use tripods a lot in the future. Start now and give yourself a head start. Most photographers don’t buy them for years. Then they find they have got really bad habits. Then it takes a lot of time and effort to get past the problem. Buy a proper tripod. They are not cheap. However, they are definitely worth it.

Take your time to understand…

These simple points are those that most beginners will benefit from at the start. A lot to take in. Read this article several times over the next six months and your photography will improve enormously. Enjoy your learning!

Comments, additions, amendments or ideas on this article? Contact Us
or why not leave a comment at the bottom of the page…

Like this article? Don’t miss the next — sign up for tips by email.

Damon Guy - Netkonnexion

Damon Guy (Netkonnexion)

Damon is a writer-photographer and editor of this site. He has run some major websites, a computing department and a digital image library. He started out as a trained teacher and now runs training for digital photogs.
See also: Editors ‘Bio’.
By Damon Guy see his profile on Google+.

Ten obvious reasons to change your approach and how to do it

Your photograph is not perfect.

You see good quality photographs every day. Why does your photo not match up to the photographic quality in a publication? What can you do? The answer is simple. You need to look at your overall technique.

Things add up…

Assuming a great idea and composition – what can go wrong? In photography every step of the process counts. The more you get right the better the result.

Professional photographers often repeat a shot tens of times to get it right, sometimes more. They aspire to excellence. Care, dedication, persistence and attention to detail add up to technical quality.

What can go wrong?
  1. Bad lighting: There’s no substitute for suitable, interesting light that’s sympathetic to the subject. If the light is wrong, your shot will not work either.
    Solution: Learn everything about the quality of light, hard light, soft light, the colour of light and the properties of light.
  2. The whole picture is soft: You moved the camera while shooting.
    Solution: Pros use tripods – good ones. They use them fast and efficiently because they practice.
  3. The whole picture is soft: You had to hand-hold the shot.
    Solution: Professionals know how to set up a manual exposure that suits the light. Learn to shoot in manual modes. Know what shutter speed/ISO combinations you can use without movement.
  4. The exposure is too dark/light: Common when learning manual camera control.
    Solution: Use RAW, then you can compensate. With RAW you can deliberately manage your exposure too. There is no ‘perfect exposure’ – there is only the result you want. To get the result you want you have to adjust your exposure. (Hint: you can’t adjust your exposure effectively in *.jpg unless you use exposure compensation).
  5. Colours off: If you are shooting in *.jpg you deserve all you get. The white balance is probably wrong. The manufacturers settings are limited. You can’t fix it in processing. Remember, *.jpg is a RAW file developed in-camera to manufacturers settings, not yours. The settings are applied to your shot blind. No wonder they are not what you want.
    Solution: Get it right. It’s easier to shoot in RAW and develop the shot yourself. It gives you fine control and you can develop your shot work the way you want. Something *.jpg cannot do.
  6. Poor focus: Focus is critical to the right technical and artistic result.
    Solution: Learn about: Depth of Field; aperture, Bokeh, Circle of confusion and how they relate to your lenses. Pros know these things intuitively. You can too with practice.
  7. Poor or soft focus from movement: Focus mode is on the wrong setting.
    Solution: Learn to use the correct focus mode (eg. single shot or continuous etc). Also, learn to focus manually. There are situations where auto-focus is poor (eg. in poor-contrast light). Switch off auto-focus to get better results.
  8. The shot is not sharp: A suspect, poor quality or broken lens.
    Solution: Buy decent lenses. All lenses have sweet and sour spots – even professional ones. Cheap lenses have a poorer optical quality and have more sour than sweet spots.
    Solution: Quality costs money. However, look after a good lens it will last longer than your camera. If you choose right, it’ll fit your next camera. It pays to buy the best quality lens you can afford.
  9. Great lens and tripod! My shot’s still not sharp: Sharpness requires attention to the above and these specific details too…
    Solutions:
    one: Turn off vibration reduction functions. On a tripod motors cause vibration, not stop it.
    two: Turn off auto-focus (another motor), or at least the continuous-focus setting (use the ‘one-shot’ setting).
    three: Use ‘mirror lock-up’ (DSLRs). Mirrors clunk up causing tripod vibration.
    four: Keep out of wind, away from vibration and keep your tripod low (don’t fully extend legs).
    five: Use a remote shutter trigger. Button pushing causes vibration.
  10. I did all this and it’s still not right!
    Solutions:
    one: Practice – putting this together takes time and effort.
    two: Return to locations many times to get the right light and conditions.
    three: Post processing! RAW users, this is where you polish the shot up. Since the earliest photography developing the shot has been a key process. RAW processing is another skill to learn. It’s essential, so learn it. Only *.jpg’ers should worry because they have disabled files. If you used *.jpg there is no hope of properly completing the job.

There is a lot to do! Follow the links and keep at it – you WILL succeed.

By Damon Guy (author and Photokonnexion editor)

Damon Guy - Netkonnexion

Damon Guy (Netkonnexion)

Damon is a writer-photog and editor of this site. He has run some major websites, a computing department and a digital image library. He started out as a trained teacher and now runs training for digital photographers.
See also: Editors ‘Bio’.

How Safe Is Your camera sensor from dust?

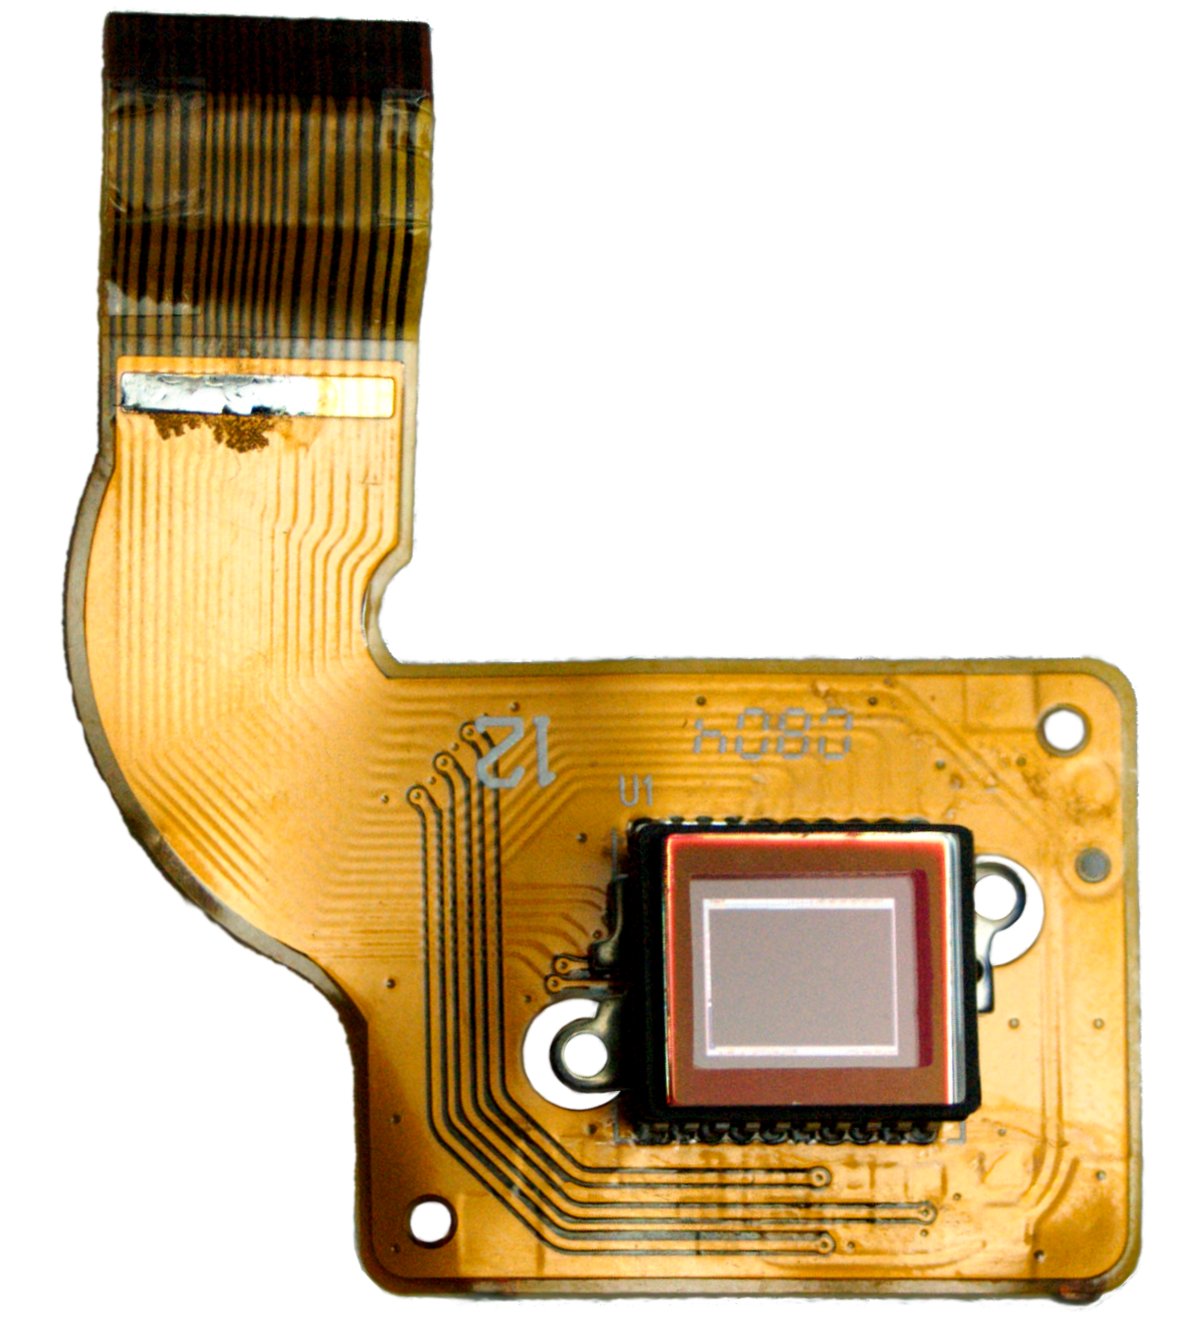
The camera sensor is incredibly sensitive to dust. Your shots can be ruined!

The camera sensor is incredibly sensitive to dust. Your shots can be ruined!
Image Sensor picture curtesy of Wikipedia  External link - opens new tab/page

Your image sensor is your camera!

Without it, you have no means of taking pictures. It makes sense to look after it and to prevent dust from getting onto the working surface. What can you do if it does get dust or other substances on it?

How does dust get onto your sensor?

In a variety of ways… The main entry point is the lens hole. Every time you open your camera, you expose the inside to dust. It is impossible to avoid this. However you can minimise the potential for dust entry…

  • Avoid any opening of your camera unless necessary.
  • Avoid dusty environments. Wipe down your camera with a slightly damp cloth and wipe dry before opening.
  • Avoid windy environments. Get out of the wind before opening.
  • Avoid damp environments: dry before opening. Moisture kills cameras and takes dust inside.
  • Hold your camera with the lens hole pointed toward the ground so that dust/skin/hair cannot fall into it.
  • Avoid having an open lens hole for any longer than necessary.
  • Do not breath or blow directly into the lens hole!
  • Avoid opening the camera in the warm soon after coming in from the cold. The same when entering air conditioned places from hot out-doors. Temperature differences cause air to be sucked in and moisture to condense inside the camera. Allow several hours to equalise temperatures inside and out before opening.

Some cameras leak in other places too… The battery cavity, plugs and jack holes for cables may allow air and dust inside. Every time you put a battery into the camera you are creating a piston to push air (and dust) into your camera. Beware – apply the same rules above for all plugs, batteries and cards movement.

I suspect dust on my sensor – how can I tell?

It’s sometimes difficult to tell if dust is on the lens or on the image sensor, or even if it is on the viewfinder. Here is how it is done.

A dust spot most often shows up on your pictures in the lightest areas. If you are looking for dust, hairs and specks then photographing blue sky does the trick. First, thoroughly clean your lens with lens cleaner and a proper lens cloth. It is best to do the photographs in aperture priority mode. Choose f22 or the smallest aperture. Zoom out to the maximum amount. Then, manually focus to infinity (the camera will probably not be able to auto-focus in a clear sky). Take a few pictures of the sky – the blue areas only.

Download the pictures to your computer. Enlarge them on-screen to the full size. Any dark spots, specks or lines you see on every picture in the same place are dust, other detritus or hairs. Birds, aircraft and UFO’s will be in different positions on the pictures.

What can I do about dust I find?

The simple answer is, clean it. This sounds terrifying. It really is not. It can be done in a few seconds with one simple piece of equipment. You will need to buy a blower. They are simple pump-action nozzles that expel fresh air against the sensor and blow off the dust. Here is the one I recommend… I have used them for years without any problem.


The Rocket Blower

Once you have your blower find out how to lock the mirror up on your DSLR. The mirror lock-up function will be somewhere in your menus. Check in your manual.

The procedure below is best with the camera on a tripod. You can look into the camera with your hands free to use the blower. There will be no danger of moving the camera while doing the blowing.
To blow-clean the sensor with the Rocket Blower:

  1. Mount camera on a fixed position/tripod away from contaminants.
  2. Take off your lens so the lens hole is open.
  3. Turn on your camera.
  4. Set mirror lock-up to enabled in your menu.
  5. Activate mirror lock-up for cleaning (as advised in the camera manual).
  6. There will be a click and you will now be able to see the sensor.
  7. Hold the blower so the nozzle points at the sensor, at about 60mm to 100mm from it.
  8. Squeeze the bulb of the blower about 3 to six times, directing the air at the sensor.
  9. Unlock the mirror lock-up (as advised in the camera manual).
  10. The mirror will click and drop.
  11. Turn off the camera.
  12. Replace the lens.
  13. Retest for dust – re-take sky pictures and view on the computer.
  14. Repeat if dust is still present. (Normally once or twice is enough).

The whole procedure for one test and clean-up should be about five to ten minutes.

Check that the procedure is compatible with instructions in your camera manual before proceeding. Follow any variations suggested.

Common Sense

Be sensible. While you are cleaning your sensor make sure you…

  • Use only air.
  • Use only the type of blower shown above (any similar brand).
  • Do not use compressed air (especially canned). It may damage your camera beyond repair.
  • Do not use other gases (they may contain particulates, corrosives or moisture).
  • Do not use anything to directly touch the sensor.
  • Do not use your mouth to blow into the hole – grease and bodily fluids will be forced onto the sensor surface and will not come off again.
If after three or four attempts you still have dust…

The next level of cleaning involves wiping the sensor with a sensor cleaning fluid and using a cleaning implement. This is a much more delicate operation. It should only be carried out if you are confident dealing with delicate electrical components. I do not cover this operation here. If not confident, take it to a properly accredited service agent for your camera manufacturer.

By Damon Guy (author and Photokonnexion editor)

Damon Guy - Netkonnexion

Damon Guy (Netkonnexion)

Damon is a writer-photog and editor of this site. He has run some major websites, a computing department and a digital image library. He started out as a trained teacher and now runs training for digital photographers.
See also: Editors ‘Bio’.

Stunning waves – some great insights

Zak Noyle calls himself a water photographer. Actually he is almost a merman. From his pictures and his lifestyle he seems to spend most of his life in the water. Wow! What inspiring images he produces. Stunning shots, amazing insights.

What makes Zak so special is his complete dedication. In the videos below you can see how his whole life is slanted towards getting in the water and producing inspiring images. He is obviously in love with photography. But that love is surpassed by his love of the water. He trains for it and lives it. Dedication itself is inspiring, but when you are dedicated you are also in a position to be inspired; and that comes out in Zaks work.

If there is one lesson in this, it is about dedication. Photographers gain a lot from getting to know a subject. Not only do you see the deeper meaning in something when you explore it from all angles, you also get to understand the dynamics of your subject. You learn how it works and what is important. Like working the scene, dedicating yourself to a subject allows you time to get to know it in different light, different times of the day, different weather. It is about growing into your subject, learning to be at one with it.

I am not suggesting you need to become Zak Noyles in your own right. Instead I am saying that Zak shows us what it is like to get inside a subject. As photographers we can gain a lot of our own insights by having a project that we work on over days, weeks or years. Project photography is not only fun, it allows us to show a little of something that other people don’t know. Then they will look at your images to find that ‘something special’.

The original videos featured in this blog have been taken down. However, Zak has a number of videos available as a continuing testimony to his work and enthusiasm for water. Check out this YouTube link… Zak Noyal surfing Zak Noyal Surfing | External link - opens new tab/page

Damon Guy - Netkonnexion

Damon Guy (Netkonnexion)

Damon is a writer-photographer and editor of this site. He has run some major websites, a computing department and a digital image library. He started out as a trained teacher and now runs training courses ing digital photography.
See also: Editors ‘Bio’.
By Damon Guy see his profile on Google+.

Exposure metering and exposure compensation

Start to get control of your exposures

Many beginners do not realise that the photograph they take on auto-settings is an auto-programed response by the camera. The camera senses the light and makes a decision on the exposure. It takes into consideration the lens, the ambient light and if the flash is set to auto. Then it takes its exposure according to some pre-programed instructions in its on-board computer. As this requires no intervention by the user it looks like the exposure is fixed. However, nothing can be further from the truth.

The user has quite a lot of control over exposure. In fact there is no such thing as a perfect exposure. There is only the exposure you prefer. The camera manufacturers have done a pretty good job of creating a ‘typical’ exposure for the layman photographer. Set the camera on auto and away you go. You get credible shots, they look bright and lifelike. What more do you want? Well, the keen photographer soon realises that the programed exposure is a bit limited.

Book Suggestion…
If you want to improve your exposure get into manual control. This book gives you lots of interesting insights and great pictures. A clear narrative and a well organised book. The most important point? It encourages you to get away from auto and get control of your camera.
 
A great book – a recommendation from me!
Damon Guy – Photokonnexion Editor

 
What if you want to introduce a romantic tone into your shot. A little under-exposure does wonders for adding atmosphere. The brooding shadows of an underexposed shot brings out the mood. On the other hand, a high-key shot (very bright and very vibrant) often requires a little over-exposure. The programed response cannot do that. Alternatively, in very bright or very dark scenes you can also compensate, using exposure compensation, to help the camera out and brighten a dark scene or darken an over-bright scene.

In the two videos below you will learn about how to use your camera meter. Then, how to affect your exposure using exposure compensation. These two features of the DSLR provide you with the tools to start influencing your exposure. It is a great way to start learning about your camera light meter too. So follow these through and you will be on the way to gaining greater control of your camera.

Digital Photography 1 on 1: Metering Part 1…

Digital Photography 1 on 1: Metering Part 2: Exposure Compensation

By Damon Guy (author and Photokonnexion editor)

Damon Guy - Netkonnexion

Damon Guy (Netkonnexion)

Damon is a writer-photog and editor of this site. He has run some major websites, a computing department and a digital image library. He started out as a trained teacher and now runs training for digital photographers.
See also: Editors ‘Bio’.