Tag Archives: Camera

Your exposure is simply the way you want to see the image

IMG_0232_v03_500px

There is no such thing as the perfect exposure, only the one you favour.

Expose to see what you want to see.

The truth is, your exposure can be anything you want. The issue is what do you want it to be? Are you a technical photographer or an artist? Lets look at the options…

The technical photographer

The technical photographer tends to put the emphasis on exposure being “correct” at the balance point in the triangle of exposure. The aim of the exposure is to produce a bright representation of the scene. The technical photographer is concerned with getting the settings “right” and the scene summed up in a “realistic” representation of what they saw. The technical photographer tends to be more concerned with recording the scene.

The artistic approach

For the artistic photographer there is more interest in composition and representation of the scene as as they want to depict it. They are more intent on passing a message to the viewers of the image. They want to create a picture that stimulates emotion and strong feelings. The artistic photographer has an idea. They want to make a photograph to fulfil the idea, express the emotion, tell the story. The artist is concerned with communication, not representation.

The spectrum of types

Of course these two extremes are not really as polarised as I have made out here. We all have elements of both of these personalities in our photography. The artist needs to know about the technical side in order to have artistic control over their work. The technical photographer needs to make the picture to suit the light and the scene. At least some interpretation is needed in the technical approach.

The issue here is about exposure. Sometimes we want to present a shot with the exposure on the darker, more subdued side. We are going for mood maybe, or using light to express itself strongly through shadow. The extreme is the very dark shot, what we might call a low key shot. On the opposite end of the scale is the high key shot – bright, white – strong bright, tending to over-exposure.

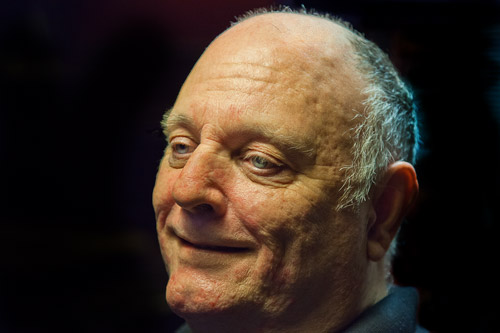
When we take an exposure with a DSLR we normally centre the camera meter reading. Supposing we want to take a picture like the portrait above, slightly underexposed. If we are working with the camera in full manual mode we can simply under-expose by doing one of the following: narrowing the Aperture, lowering the ISO or using a faster Shutter Speed. The opposite is also true. You can over-expose too. In other words you can creatively make what you want out of your shot by controlling the exposure. In the portrait above I wanted to emphasis the strong maleness of my subject. The strong shadows provided the vehicle for that. So the slight under-exposure complemented the already low lights… just what I was looking for.

In the case of the semi-manual modes, the option for full control of the exposure is not available. However, the exposure compensation dial can be called into play. If you want to under expose you can dial to the negative side. If you want to over expose slightly then dial to the positive side. This frees up your exposure to bias the result in favour of your creative idea. Check out the manual for your camera to see how the exposure compensation dial works.

The whole complex of variables that affect exposure, ISO, Shutter speed and Aperture settings are an interaction of functions that allow us to control our image. If we ignore the “ideal” exposure indicated by the camera light meter we actually have a whole world of potentially creative controls. There is no such thing as the perfect exposure. If you are a technical photographer you can still free up your exposure to make a photograph that expresses what you see in a scene. If you are an artist, you can be quite technical about exactly the exposure you want.

Enjoy your exposures. There is no such thing as perfection, and that applies to photographic exposure too. But there is a perfectly good exposure for every photograph… that is the one you want.

find out more...Photokonnexion tips by email
If you enjoyed this article please sign up for our
daily email service.
                                                 Find out more
#11030#

By Damon Guy (author and Photokonnexion editor)

Damon Guy - Netkonnexion

Damon Guy (Netkonnexion)

Damon is a writer-photog and editor of this site. He has run some major websites, a computing department and a digital image library. He started out as a trained teacher and now runs training for digital photographers.
See also: Editors ‘Bio’.

How safe is my camera out in snow and cold?

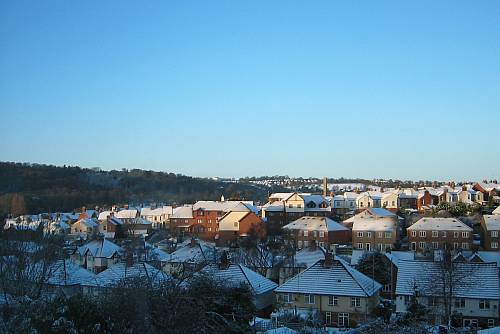
The Homely Hills Of Winter

“The Homely Hills Of Winter” by Netkonnexion
How safe is my camera out there?

We all love to do snow shots…

But, will my pride and joy be safe if I take it out in the snow? It’s true. Camera equipment can be damaged in cold and wet environments. Lets look at the dangers…

Operating environment

Most camera manufacturers will provide guidance for what they consider safe environments. If you look in your manual you will find this data for your camera. Look in the a section entitled “Specification”. For my Canon 5D MkII the advised operating temperature is:
      0°C – 40°C (32°F – 104°F); 85% humidity or less
These sound great on paper but they are not practical. If you want to go out in the snow or even on a frosty morning the chances are your local air temperature will be below freezing. Is there real danger to your camera?

Cold

The camera manufacturers are covering their reputations. If your camera stops working in the cold they can say, “We told you so in the specification”! This absolves them of any responsibility. Canon have regularly published winter photographs on their website and one is there as I write. Probably the same is true of other manufacturers. It is safe to assume by this that cameras can operate in cold environments, but how cold is safe?

Protecting your camera and equipment

The best advice is to protect your camera against extremes. If you left your camera on a frosty lawn overnight in sub-zero temperatures it is likely to be fine as long as it is dry. I have read of people using their cameras in temperatures down to below -30°C. Remember all those documentary films and photos you see in magazines and on television. These are frequently taken in very low temperatures.

Cameras may operate in those temperatures but the battery life will be very short and mechanical parts would be liable to jamming. In most cases therefore, the best thing is to keep your camera out of extreme temperatures. Probably a safe minimum working temperature would be at around -10°C. Below that you may be into seriously heavy battery use and possible mechanical damage. This is a guess and may vary from camera to camera.

You can extend the camera battery life by keeping batteries in your pocket and regularly swapping warm ones into the camera. Battery performance falls rapidly with temperature. At 23°C (a warm room) my battery will give 850 shots/full charge. This falls to 750 shots at 0°C. Greater reductions can be expected as the temperature falls further. Low battery temperature impairs electrical efficiency. However, mechanical inefficiencies are also caused by the cold. The battery has to power resistance created by cold mechanisms in the shutter, the lens focusing equipment, the aperture/iris and the mirror mechanics. These seriously drain the power in severe cold.

If your camera does jam in the cold weather stop using it immediately. Mechanical and/or electrical damage may be caused by jams if you continue to force it. As soon as possible leave the camera to warm up slowly for, maybe, 24 hours. Then, using a fresh battery, try it again. If it is still jammed seek professional technical servicing.

Damp is a huge enemy in the cold

In cold weather one of the biggest dangers is condensation – damp in your camera. When you go from a warm room to a cold outdoors the rapid cooling of your camera is likely to cause any water vapour in your camera to condense on metal or glass surfaces. Where moisture gathers it will cause corrosion and electrical failure. Both will kill your camera – the danger will tend to be cumulative. So it is unlikely to happen straight away. It is therefore worth protecting against damp. It is not unusual to see condensation on the inside of lenses when cameras have quickly transitioned from warm to very cold or visa versa.

When you take your camera out make sure that it is allowed to acclimatise slowly. Keep your camera in a cool dry place. Before you go out put it in a cold place to allow it to cool down slowly. When bringing a camera into your house keep it in your bag for long enough for it to equalise its temperature before you open the camera. If you open a cold camera in a warm, humid room the air will mix and condensation will form inside the camera.

The conclusion?

If you are not going into extremes of temperature most snowy places will be fine. If you are going to more extreme environments I suggest you take technical advice from the manufacturer. Also, consider buying weather sealed equipment. If you are going to photograph your kids having a snowball fight – have fun!

find out more...Photokonnexion tips by email
If you enjoyed this article please sign up for our
daily email service.
                                                 Find out more
#11030#

The basics of portrait light patterns

Portrait light patterns • Portrait :: A man of substance •

• A man of substance •
Portrait light patterns each have a different name This one is called the ‘short’. The main light is onto the side of the face furthest from the camera.
• A man of substance • By Netkonnexion on 365Project Portrait light patterns :: External link - opens new tab/page

Portrait lighting on the face.

Good use of lighting can flatter and enhance your subject. The way you use light on the face is called the “light pattern”. In general there are five or six main Portrait light patterns that are in use. The number varies depending on how important the speaker considers each of them.

These portrait light patterns are:

  • Portrait light patterns :: The butterfly: Soft light, light high, full on to the front of the face. The underside of the nose is slightly dark, but no triangle of shadow on the space under the nose to the top lip. Creates a broad light to the face and shows off the eyes to an advantage and tends to hollow the cheeks. Flattering for females.
  • Portrait light patterns :: The Rembrandt: Light high but off-centre (approx. 45-60 degrees). The main light only lights one side of the face. A triangle of light shows on the upper cheek on the side away from the light. Flattering for men.
  • Portrait light patterns :: The Broad: The light comes in from the side. The face is angled so the camera sees mostly one side of the face and that is lit by the key light. The shadow of the nose and the face on the other side of the nose are lit, but only softly. The nose shadow trends toward the corner of the mouth. May also be called “the loop”
  • Portrait light patterns :: Split lighting: one side of the face is lit; light at face height. The other side is in soft shadow. Technique is sometimes used as a way of preventing shadow from a hat falling on the face. Very dramatic is hard light is used.
  • Portrait light patterns :: The Short: Often used to help rounder people have slightly longer faces. The face is angled so that the shadows are on the side of the face nearest to to the camera. The lighted side is on the side furthest from the camera.
  • Portrait light patterns :: The profile: The camera sees the subject from the side. Lighting is best high, from 90 degrees (above the camera) or greater than 90 degrees so it is pointing at the back of the face. Emphasises the jaw line and nose. A “strong” male pose.

Depending on the authority, the “short” or the “profile” may not be included in the main Portrait light patterns. But they are all used at some time or other. Actually all these can pretty much fade into one another with very slight changes in the light position.

Portrait light patterns – video

In the video we see some of these Portrait light patterns shown off on a dummy. The light shown is much harder/harsher than you would normally do a portrait. This is for the purposes of demonstration. Not all of the above are in the video. You will need to watch carefully to see the characteristics of the others mentioned above.

Damon Guy - Netkonnexion

Damon Guy (Netkonnexion)

Damon is a writer-photographer and editor of this site. He has run some major websites, a computing department and a digital image library. He started out as a trained teacher and now runs training for digital photogs.
See also: Editors ‘Bio’.
By Damon Guy see his profile on Google+.

Get talking to your street photography subjects…

Street photography: It helps to talk to your subjects!

Street photography: It helps to talk to your subjects!

The communications element in street photography…

Really, there are so many different ways to approach street photography that it is no surprise that people don’t know where to start. Today Mark Wallace discusses his communicative approach to the art. While some tend to be observers of people by capturing candids, he really likes to get into conversation and becomes a part of his own scene.

In the last street photography video, “Famous street photographer talks about his work” we saw Travis Jensen using a compact but fully functional camera. In the video today Mark Wallace uses a full frame, full sized DSLR. There is a debate about the camera you use in street photography. Do you go with a big DSLR and risk being really intrusive? Or, do you go with a little camera and risk not having control.

These variations on a theme are fine. Street photography is all about doing what you do best. There is no one way to be a street photographer. Everyone takes their own approach. This is exactly what is meant by your personal style. It is your approach, your way of doing street photography.

Digital Photography One on One: Episode 70: Street Photography

While street photography is endlessly fascinating the fact that we all take different approaches means there is always a benefit in listening to other peoples experiences. It helps you to think around your own approach. So, see what you make of Marks’ spin on the subject. Enjoy!
SnapFactory  External link - opens new tab/page

find out more...Photokonnexion tips by email
If you enjoyed this article please sign up for our
daily email service.
                                                 Find out more
#11030#

By Damon Guy (author and Photokonnexion editor)

Damon Guy - Netkonnexion

Damon Guy (Netkonnexion)

Damon is a writer-photog and editor of this site. He has run some major websites, a computing department and a digital image library. He started out as a trained teacher and now runs training for digital photographers.
See also: Editors ‘Bio’.

The Zen of sharpness – 12 easy ways to improve

Sharpness factsSharpness facts

Making sharp images takes knowledge and practice.

Photographers often wonder why they cannot reproduce publication sharpness. It’s not difficult, but there is more to it than clicking away. Here we look at all the factors that may affect sharpness.

Seven common problems

1. Poor focus:
• Frequently, focus problems occur because the focus has been taken from the wrong part of the scene. Choose one of the auto-focus (AF) points you can see in your lens (see how in your manual). Use that point to select the point of focus in your scene. The choice of where you focus is also critical. The eyes are often the most important point of focus. (See: The Eyes Have It… nine ways to emphasize eyes).

2. Camera blur:
• Movement of the camera during the shot will create a softness or complete blur. The solution is to improve your actual shooting technique. Holding the camera, your stance, your breathing and even the way you click the shutter button can all create camera movement. (See: Simple tips for a good stance). Camera blur can also be created because the shutter speed is too low. If you have a relatively long exposure the camera is more likely to move during the shot. If you have a higher shutter speed the chance of movement is reduced – sharpness is improved. Most people find they cannot hold the camera steady at 1/60th of a second or longer. With practice you can get better. A good starting shutter speed for hand-held shots is about 1/200ths of a second. It is possible to also change the ISO to enable higher shutter speeds and still maintain a good exposure.

3. Motion blur:
• If the subject moves and the camera is stationary the subject will be blurred. You may need to change your focusing mode to to compensate for movement. Use Continuous focus mode for constant movement [AI Servo AF (Canon)/AF-C (Nikon)]. Alternatively you can use autofocus mode [AI Focus AF (Canon)/AF-A (Nikon)] for slight movements or unpredictable/unexpected movement.

4. Poor quality lens:
• It is a common mistake to spend a lot of money on a camera then skimp on the lens. In fact it is best to spend as much as you can afford to buy quality lenses. They will pay you back with quality sharpness much more than the camera body will. Poor lenses can give you colour fringing, poor focus, distortions, softness and limited depth of field.

5. Depth of field too shallow:
• The depth of field (DoF) is the zone of sharpness in a picture. You can determine the DoF by changing the size of the aperture. (For more information see: One big change – one easy step forward).

6. Diopter set wrongly:
• If your eyesight is poor, or does not match the optical properties of the viewfinder, you will need to adjust the diopter. Most people can use it to adjust the viewfinder sharpness for their eyesight. If your sight through the lens is sharp it helps you fix a good focus to ensure sharpness.

7. No sharpening in RAW:
• When the picture is uploaded to your computer it’s file format effects sharpness. RAW, the native file formate for your camera, is created as a file without sharpening. The *.jpg file format is highly processed in the camera. It is sharpened as part of the processing. So *.jpg files may look sharper than RAW files on screen. The solution is to make sure you apply some sharpening to RAW files as the last action of any post-processing you do.

How to Take Sharper Pictures

By way of consolidating the above here is a video discussing the above points with examples…
(More after the video)

Beyond the basics

Sharpness is about continuous improvement. Here are some more ideas to extend your skills…

8. Stance and the anti-roll “bar”:
Many self-made photographers don’t recognise the importance of stance. Holding the camera steady is part of a “whole-body” effort. You should create a stable platform to comfortably hold your camera to ensure a steady camera position. The way you hold your arms, the way you breath and other factors affect your focusing and the amount of camera movement.

In addition to poor stance an additional unintentional movement causes softness. Some photographers click the shutter button then “roll” the camera away from their face prematurely. Doing the “roll” will induce movement in the camera – often before the shutter has closed. The solution is the “anti-roll bar” – you must “bar” yourself from doing the roll.

Learn more about stance and the “anti-roll bar” in this article: Simple tips for a good stance.

9. Test shots

Today we have the digital freedom to take as many shots as we wish without paying for film developing. To improve your sharpness spend time making sure your shot is going to be sharp. Do test shots to familiarise yourself with the scene and to practice for ‘the’ shot. You can find out more here: How to take a test shot.

10. Viewing the image at 100%

When you upload your image files they are not sized to 100% on screen. They are presented much smaller so you can see the whole picture. Photographers often don’t look at their pictures in full size. What is not obvious is that when pictures are resized on screen they are sharpened. If you are not aware of this you might be disappointed when you print the image. It will not be as sharp as it could be because you never looked at it in full size. If you are aware of how sharp you have made your image (at 100%) it will help you to develop your skills. You can find out more about viewing at 100% here: The benefits of 100% viewing.

11. Use a tripod

The vast majority of shots can be taken from a tripod. Using one is undoubtedly the single most effective sharpening technique. You can find out more about using a tripod here…
Three Tips for Pin Sharp Shots with a Tripod
Definition: Tripod
The Tripod
The Third Most Important Piece of Kit

12. Practice, practice, practice

Knowing all these things is different to actually being able to put them into practice. Making your pictures sharp is about doing all of the above. Then, reviewing your own achievement after each shot. You must practice all these regularly and consistently in order to succeed in producing the sharp images you want.

#11030#

By Damon Guy (author and Photokonnexion editor)

Damon Guy - Netkonnexion

Damon Guy (Netkonnexion)

Damon is a writer-photog and editor of this site. He has run some major websites, a computing department and a digital image library. He started out as a trained teacher and now runs training for digital photographers.
See also: Editors ‘Bio’.

Small apertures can mean soft images – why?

PhotographyPhactoids

Photography Phactoid number 005.

A small aperture, lets say f16, normally gives us sharpness all the way through the picture. Actually, there are some circumstances where that is not true. At very narrow apertures the image becomes soft… explanation below!

Normally the widest aperture size is marked on a lens. People want to know if it is a fast lens – one that works well in low light. Fast lenses, with wide apertures, may be in the range of f2.8 to really fast at f1.2. Find out more about aperture sizes in: “What is the aperture range of a lens?”.

The narrowest size of the aperture is not quoted on lenses. Why not? At extremely narrow apertures the lens partially loses it ability to create a sharp image. This is due to a phenomenon called diffraction. As the light wave enters the aperture the edges of the light wave are bent very slightly as they touch the edge. In the case of wider apertures this does not have a very significant effect on the overall image. However, t very narrow apertures, say f22 or smaller, the light bends significantly and the resolution of the image is damaged.

See the diagram below..

Explanation of the diagram:

  • Top image (cross) the wide aperture blurs the image (bokeh)
  • Second image (cross) the image is quite well resolved
  • Third image the narrow aperture has softened the image to an interference pattern of concentric circles
  • In the bottom image the blur is almost complete – the image is blurred out

A whole range of aperture sizes resolve the image normally – our image is sharp. However, as the aperture gets very small the image will get softer as the diffraction effect becomes more pronounced. This happens despite correct focussing. At the narrowest aperture of the lens the image may be unrecognisable. In other words there is an optimum size of minimum aperture.

When your lens is stopped right down it may create a softness in the picture. There is a simple way to correct it. Open the aperture one half to a full stop wider to enable the lens/aperture focusing to restore the resolution.

By Damon Guy (author and Photokonnexion editor)

Damon Guy - Netkonnexion

Damon Guy (Netkonnexion)

Damon is a writer-photog and editor of this site. He has run some major websites, a computing department and a digital image library. He started out as a trained teacher and now runs training for digital photographers.
See also: Editors ‘Bio’.

Can you write? Of course you can!
Write for Photokonnexion...

We would love to have your articles or tips posted on our site.
Find out more…
Write for Photokonnexion.

Five great ways to improve your photography

I heart Photokonnexion

The top five posts from 2012

In our first year as a website we learned a lot about our readers and worked hard to provide great content for you. We did some research and identified the most read posts of the year.

Number five

Light is the most important component of our work as photographers…
Six things to know about light.
[Also check out other Light and Lighting resources].

Number four

Composition was an important theme through the year. Simple ideas are the best. This post captured a consistent readership…
The Rule of Odds – Uneven Composition

Number three

This is a great post from my friend Steve Maidwell (imageinnation.com). As a contributing author he made a hit with our readers. He’s promised another post soon…
Creating a Fake Smoke Effect

Number two

I made a personal recommendation for two ideal Christmas presents. They really went down well. These would make great gifts to yourself too…
Two great Christmas gift ideas for photographers

And the top post of the year:

Number one

Street photography has been a consistent success on Photokonnexion. The most viewed post in 2012…
Forty six quick street photography tips

By Damon Guy (author and Photokonnexion editor)

Damon Guy - Netkonnexion

Damon Guy (Netkonnexion)

Damon is a writer-photog and editor of this site. He has run some major websites, a computing department and a digital image library. He started out as a trained teacher and now runs training for digital photographers.
See also: Editors ‘Bio’.