Tag Archives: How it works

What you can learn from candid photography

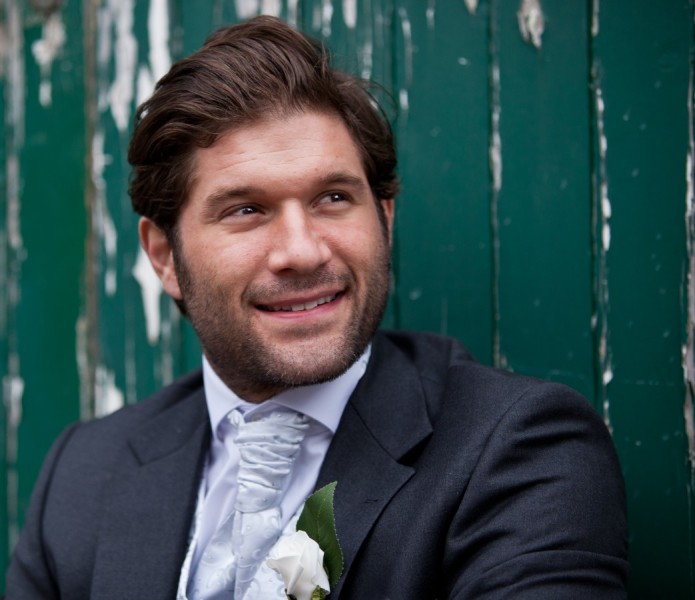
Groom • Candid photography :: getting the shot is a pressure.

• Groom •
Candid photography – getting the shot is a pressure. Weddings are times when you need to work particularly fast and accurately. •

Responding is a skill.

When starting on the path to disciplined photography we’re told to slow down. Take careful, measured and pre-visualised shots. We are told to stop trying to frantically pepper the scene with shots. Take time. Take stock. Think everything through. The aim is to get the shot under control.

A good photographer often needs to respond rapidly. The careful, measured approach still applies. They still have to get the picture. However, the pace of a situation demands swift shots. The practised photog can respond with speed and accuracy. Practice at candid photography is a great way to realise those skills for yourself.

Candid photography and practice

The aim is to make a clean, sharp, well composed image. The nature of a candid shot makes that difficult. While trying to make a success of your candid photography some conditions may apply. Some of those may contradict each other…

  • The subject may not know you are going to take a picture.
  • The subject could know you are going to take a picture.
  • The subject may be unpredictable.
  • You will need to be very quick.
  • You will need to be able to get a sharp image despite speedy working.
  • You may have to take several shots (eg. not dozens).
  • Your subject should be in an interesting position.
  • The subject needs to to be in an interesting context in the scene.
  • You should anticipate the shot (rather than getting lucky).
  • You will have your camera ready and settings correct for the shot.
  • You will have only a microsecond to compose the shot.

You just do not know what you are going to encounter until you have to deal with it.

Dealing with all that may seem a tall order. Especially if you are told not to machine-gun the scene with shots. Haste and frantic bursts rarely lead to good luck. Actually, it is not about doing all that at super speed. Like everything you do in photography, candid photography requires preparation, practice and control.

Equipment – knowing what you can do

NO! Do not go out and buy yourself a micro-weight, super-camera. Up-to-date bells and whistles are not the point. Instead, look for simplicity. Sometimes the best camera is an old and familiar one. What we want for this exercise is knowledge.

The best possible way to get fast with a camera is to know what it can do. The lens too. If you are familiar and well versed in using your equipment you will automatically respond to the scene. Here is an example.
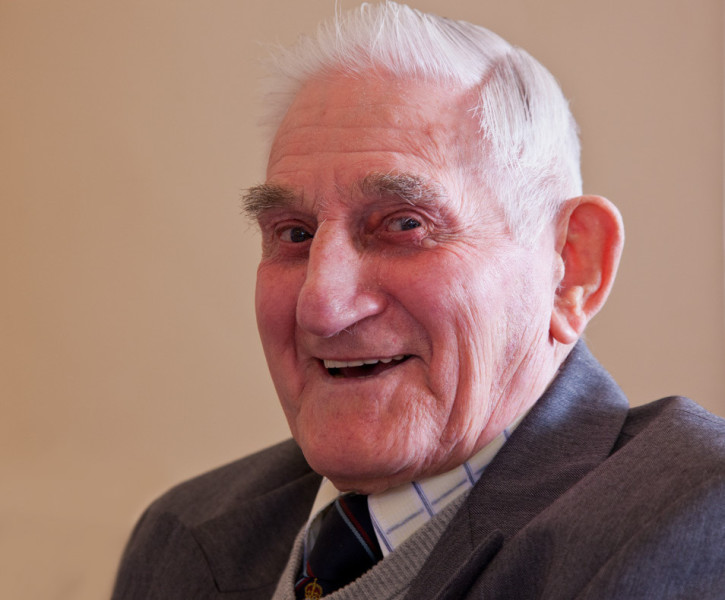
In candid photography control of depth of field is essential

• Impish grin •
Keep the subject in focus but the background is frosted out.
In candid photography control of depth of field is essential
(Click to view large)

This shot was captured as this lovely man turned from a conversation. He was talking to someone on his right. I was ready for his turn toward me. His impish grin as he saw me really made the shot.

I wanted a depth of field that had his head and face sharp. I also wanted the background indistinct. Notice the sharpness is lost just on the far shoulder. My lens was set up to have a depth of field of about 400mm (about 15in to 16in). But there was no measurement involved. This was an estimate. It involved knowing the depth of field at my distance from the man, and using the right aperture. This capture is the result of knowing the lens and camera combo really well. It was a practised shot using very familiar equipment. The successful candid photography came out of the practice and familiarity.

Equally, it is easy to get the shot wrong. Depth of field, especially at close range, is fickle. It is easy to get the tip of the nose out of focus, the eyes and face in focus, and the hair out of focus. It is important to look at the variables involved. The aperture size and distance-from-subject control the depth of field. So, try the exercise below using manual settings.

Take a bright coloured builders tape measure. Place a small object beside a mid-point on the measure. Take a photo of the object down the measures’ length. Use a wide aperture. Check out the depth of field by looking at the measurements that are sharp. Now by varying your distance from the object see how much you change the depth of field. Do this for a wide range of apertures. With experience you will get a feel for controlling the depth of field. With twenty or thirty variations you should get a feel for the depth of field.

Settings

Aperture is one setting. ISO and shutter speed are important too. Getting a feel for your equipment means getting familiar with how these settings work.

Candid photography often involves working in darker lighting. Parties and indoor sessions, weddings in churches and in evening light all require wide apertures. You might use flash. But in a lot of situations that may not be practical or desirable. So using a high ISO setting (more sensitive sensor) will allow you to work effectively in lower light. So, lower the light where you are working with the tape measure. Raise the ISO and repeat the exercises. Get a feel for how you can vary the exposure by changing the ISO.

Needless to say you can vary the shutter speed in similar ways. Try the exercise again. This time keep the aperture and ISO fixed and change the shutter speed up and down through a range of shots. [More on varying shutter speed].

Learning to use your settings manually takes more than one session. That is important. You can gain a lot by training yourself to be sensitive to the settings. Working toward good quality candid photography can really help you gain that sensitivity. Poor photographs of faces and people are immediately obvious! You get great feedback from the experience of poor shots.

Composition – seizing the moment

Candid photography is about seizing the moment. You need to use good settings. You also need some understanding of composition. This means working to get your subject in the right environment. They will have an appropriate pose and possibly the right context or behaviour too. Without all these coming together the moment is lost. Setting it all up takes some thought.

Normally people do candid photography with some idea of what they want to achieve. Random wanderings are normally unproductive. Luck follows more often from preparation and forethought than stumbling upon a notable event.

So, have a good think about your scene composition….

  • Set yourself up in a viable position ahead of the shot.
  • Think about how the light is placed in the scene overall.
  • Place yourself for the right background on the far side of the shot.
  • Fix the camera settings for the composition ahead of the shot.

In other words be prepared. Then, when the right moment comes along, you will have the minimum to do. A little composition, framing the shot, is essential. A tweak of the focus possibly… But essentially – you should be ready.

Now you stand the best possible chance of getting the shot.

Candid photography is successful when it all comes together

All this preparation and practice is about getting you to the moment when you take the shot. Making a success of your candid photography is about three things…

  • Knowing your settings.
  • Practice with and knowing your equipment.
  • Forethought about the scene.

Having everything ready is the key. Then when all the elements of the scene come together all you do is frame it and capture. If you succeed in that, you will also make a swift shot. Because, in fact, you have little to do. Speed and accuracy is about being ready with everything and having the minimum to do when the right events pull the shot together.

Comments, additions, amendments or ideas on this article? Contact Us
or why not leave a comment at the bottom of the page…

Like this article? Don’t miss the next — sign up for tips by email.

Damon Guy - Netkonnexion

Damon Guy (Netkonnexion)

Damon is a writer-photographer and editor of this site. He has run some major websites, a computing department and a digital image library. He started out as a trained teacher and now runs training for digital photogs.
See also: Editors ‘Bio’.
By Damon Guy see his profile on Google+.

World Backup Day – save your files

The only safe files are ones in backup

World Backup Day  World Backup Day | External link - opens new tab/page
Make sure your files are safe. Back them up.

Backup, backup, backup!

March thirty-first 2014 was World Backup Day  World Backup Day | External link - opens new tab/page. “What’s that all about?” you might ask. Well, if you do ask that you probably have not experienced the anguish of losing all your files. For some people it can be devastating.

What if you don’t backup?

I spent fifteen years in managing IT services and image libraries. A job where backup is everything. Without it we might have lost thousands of precious files. Most could not be replaced.

In that time I’ve come across many people who lost files. The most common losses were simple delete mistakes. In most cases these lost files can simply be un-deleted.

However, if you lose your storage media or hard drive you lose everything stored on it. Theft, software failure, software infection, mechanical failure – all are equally devastating. Your files are gone.

I have often heard people say, “well, it could happen”. “But I have nothing precious to lose”. This indicates a state of mind. People often do not appreciate the value of the data they have on their computer. Photographers may appreciate our collection of files. They represent our cumulative photographic efforts. But most people have other valuable data too. Past emails from loved ones. Pictures sent to you. Medical information. Passwords. Personal banking and finance data. Personal correspondence and records. Insurance details; investment files… The list goes on.

Over the years I have so often seen people devastated by what they have lost. They just did not realise what they had on their computer. But when the data is gone it’s too late.

If you lose your data there are also many problems ahead. Finding information again after losing data takes months. Getting in contact with people to get new accounts set up takes time. In fact one or two people have told me that after losing a hard drive they spent years recovering from it. After you lose some information some Internet accounts may never be available again! Will you lose files that way?

The answer is simple – backup

Many photographers do not backup their photos. So what should you do to protect against loss?

Backup is easy. It requires a small investment and a mental commitment. First an important principle…

LOCKSS :: This stands for Lots of Copies Keep Systems Safe.

Of course you need to spread these copies across different storage media. If every file is on one hard drive this becomes a single point of failure.

So, the second thing you need is a second hard drive or storage medium. With a second drive you can back up your files onto it.

A USB drive is a bit unreliable for backup and and easily lost. An external hard drive is best. They have big capacities to hold all your files. Buy one which is the same size as your computer hard drive. They can be purchased at reasonable prices. You can check out a range of them easily – External USB hard drives for your computer  External USB hard drives for backup | External link - opens new tab/page.

A more secure backup system will involve two backup drives. Here is how it will work…

  • Working drive: this has your working files on it – it’s normally the hard drive on your computer.
  • Backup drive: Backup working files by copying them to this dedicated backup drive. Now if your computer hard drive fails you will have your files safe on a standby drive.
  • Third copy: On a regular basis, backup to a third drive.
  • Off-site storage: Take the third backup drive to a different location. Now if there is a fire or other loss (theft, virus etc). The other location represents a safe place for your files destroyed by the fire.

So you will have: two copies where you normally work and one off-site. This is a safe backup system. It will cover most file loss situations.

Backup time

It takes little time to copy files from one drive to another. However, it is easier when you use an automatic system. There are many file archive systems available. A good number of them are free.

One good example is the file backup system I use. Called Allway Sync Backup and archive software - AllwaySync | External link - opens new tab/page. I have found it a very flexible system to use and very easy to run.

There are other backup systems you can research…
Check this page on Google File backup software - Google search | External link - opens new tab/page.

As you can see from this search many of these systems are free software. You have chance with others to try “before-you-buy” too.

Another way to back up your data, photographs and files is to upload them to an online drive. Google has such a drive. Dropbox Dropbox - Online backup and file storage | External link - opens new tab/page is another… there are other versions too. All you do is have one drive to work on – and one drive on the Internet. That way you have a second drive that is off-site and safe.

This cloud-based backup system sounds good. But it can get expensive, and slow, once you start to accumulate lots of files. And, lets face it, photographers really do have lots of files. But it might suit you. So feel free to experiment or try out internet storage.

Backup commitment…

Earlier I said you need some commitment. Well that is needed to backup regularly. You really need to do it. Either have an automated system. Or, diary a date – say weekly. Then back up regularly. Do it daily if you need to do so. But make the commitment. If you don’t backup regularly you will pay for it later. Because, you will have a drive failure one day.

A state of mind

Doing regular backup work is a state of mind. You’ll need to spend a little money on drives or storage. You need to have some software or a regular date with your diary. And, you need to be aware of how much effort it takes to recover from a loss. Setting up a backup system for yourself now can save you a lot of time and pain recovering from losses later.

Make sure you commit. Make sure you backup regularly. I would hate you to be one of those people who spend years recovering from a major data loss.

Comments, additions, amendments or ideas on this article? Contact Us
or why not leave a comment at the bottom of the page…

Like this article? Don’t miss the next — sign up for tips by email.

Damon Guy - Netkonnexion

Damon Guy (Netkonnexion)

Damon is a writer-photographer and editor of this site. He has run some major websites, a computing department and a digital image library. He started out as a trained teacher and now runs training for digital photogs.
See also: Editors ‘Bio’.
By Damon Guy see his profile on Google+.

Dictionary of photography – know the correct terms

We all love a good book.

Despite other reading technologies, books are still popular. For photographers we rely a lot on the Internet. But, there are great books for us. One such book is “The Visual Dictionary of Photography”.

A love of dictionaries

I am an unashamed collector of dictionaries. With over a hundred of them there is always a good definition around. Despite being so well served, I have never found a good dictionary of photography. An author for one needs to be a passionate photographer, a technician, an artist and a writer too. They have to be nerdy about the details. And, at the same time, they must be passionate communicators. David Präkel fulfils the above.

The dictionary of photography

I love this book. There are great diagrams and pictures. It is no surprise that there is one on nearly every page. In fact, to help keep us visually interested, the fonts themselves are also varied. It is refreshing to have a book that is NOT standardised. Dictionaries are usually very consistent. They are very uniformly laid out. They are SOooo… visually boring. This one is not. It has coloured pages. It has different fonts. There are pages of capitals. There are different styles of diagrams. There is LOTS of variety. It is an exciting book to browse. This book is about a visual view – as well as the photography.

But is this book any good? I think so. I love the impact filled text. It is on message and precise. Here is an example from the definition of texture…

Lighting that falls across any textured surface will highlight each protruding part of the material and cast a deep shadow behind. This micro contrast is what we see as texture.
The Visual Dictionary of Photography – David Präkel

That is the essence of ‘texture’ in photography. There is more explanation. There is also a great picture. But really that says it all.

Does size matter?

There are nearly 300 pages. There is a definition per page. So there is plenty of content. It is a small sized book. However, it punches over its weight in what it achieves. The explanations, the content and the visual presentation all make it a full featured visual dictionary of photography. It covers all the important things you need to know to learn photography… size does not matter.

A great present

With Christmas coming this book could make a great present. It would be a cool gift to yourself, or for a keen photographer in your life. Packed to the brim with information it’s fun and great value. It is definitely worth considering. It will be a useful addition to your essential photographic kit.

The Visual Dictionary of Photography is available on Amazon. There is a selection of pages for you to review. So you can make up your mind about it. Have a look now and see what you think. The Visual Dictionary of Photography.

Comments, additions, amendments or ideas on this article? Contact Us
or why not leave a comment at the bottom of the page…

Like this article? Don’t miss the next — sign up for tips by email.

Netkonnexion

Damon Guy (Netkonnexion)

Damon is managing editor of Photokonnexion.com with professional experience in photography, writing, image libraries, and computing. He is also an experienced, webmaster and a trained teacher. Damon runs regular training for digital photographers who are just starting out.
See also: Editors ‘Bio’
By Damon Guy :: Profile on Google+

Tripod myths – why are amateurs tripod shy?

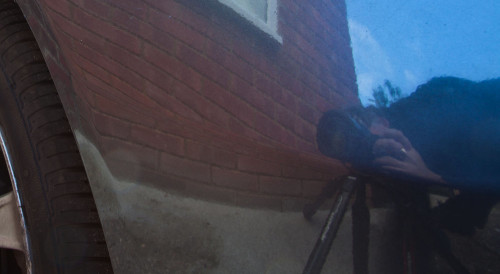
Me and my tripod - reflected in paintwork - tripod myths

• Me and my tripod – reflected in paintwork – tripod myths •
I use a tripod most days in some pretty tight situations. They are
quick, effective and give great results!
[Image by Damon Guy • Click to view large]

Tripods improve your results – fact!

Tripod myths can be heard regularly. Actually they make life a lot easier and faster. So, why are amateurs tripod shy? Why buy cheap? Why is simplicity apparently so difficult for tripod starters? Read on…

What are the tripod myths?

Over the years I have heard all the excuses. Here are some things I have heard…

  • I’ll miss the moment!
  • Tripods are too much bother.
  • I can shoot great shots hand-held.
  • It slows me up.
  • I like to walk the scene…
  • They are cumbersome, get in the way and heavy.
  • It’s not possible or easy to use it all the time.

I am sure there are other issues. But let’s look at these in detail.

Tripod myths: Missing the moment?

Every photographer gets lucky sometimes. They happen to point the camera pointing right and, snap, they got it.

Let’s be honest. How many times does that lucky capture happen? “Journalists?”, I hear you say? Actually, they rarely get lucky either. Photo-journalists train in preparation, planning and investigation. Being there and aware when the event happens is not an accident. They get the story time and time again.

If you plan for your tripod you will get the shot too. You won’t miss the shot getting your DSLR out either.

Forethought and planning are good photographic habits. Cultivate and develop these skills. You get the shot, and it’ll be sharper. If you are going to shoot, do it properly. Have both camera and tripod ready. Don’t be a victim of tripod myths, be in control of your photography.

Too much bother? One of the tripod myths that is just silly

What can be too much bother about getting a sharp, properly framed image? Loading a tripod is no more trouble than putting your camera in the car. It takes only 15 seconds to set up. The tripod will also give you time and scope to take a great shot. It holds your camera for lens changes and while scouting the next shot. Bother? Not really.

Bothered people think tripods are hard work. Do they realise how much the picture is improved? Attention to detail over your shots is what makes excellent images. Taking a quick snap may be no bother. Its unlikely to yield a great image either. This is one of the tripod myths that does not stand up!

Tripod myths: Great hand held shots

There are lots of situations where great light and a steady hand can get a sharp result. Congratulations. The time and effort you put into your photography is paying off. However, of all the situations I take pictures in, only about a third can be hand held. High ISO might help. More likely digital Noise would spoil the image. Better to take a longer exposure and use, say, ISO100. Quality is important.

Tripod myths will limit you to one third of your potential as a photog. It makes you a limited photographer. Tripods extend your shooting time, flexibility and quality of image.

Tripod myths: It slows me up

Yes, finally, a fact! Tripods make you think about your photograph. Perhaps not one of the tripod myths, more of a tripod mistake.

Since digital cameras became common I see a lot of machine-gun photography. A keen photog arrives, sprays off a hundred shots… Then, off they go. Wow.

Spend the first few minutes considering options. Proceed with a plan and with care. Cover all the shots you need. Sometimes you will get new ideas. Great, get more shots.

Once, at an aircraft museum with a keen photographer I was alone in minutes. My friend shot out of sight. We met up later. He had over 1000 pictures. He was elated. I had less than seventy shots. “Ah!”, he said. “You should’ve left the tripod at home!”

Later that week things turned around. He had eleven fair shots and one really good one. He had spent hours and hours in post-processing and missed lots of sleep. My more careful approach paid off. I had more than 40 quality images. As he looked at them he kept saying, “I took a picture of that too, but it didn’t come out”. And, “How did you get that one to look so good?”. My care, quality and composition paid off. The tripod helped me think about my photography and take care. I only spent about two hours in post-processing too. Most on simple tweaks. I had plenty of time for other shoots that week.

One question… Who was really slowed up here?

Tripod myths: Working the scene

One of my regular jobs involves 15 – 20 finished pictures of a scene. Picture order and camera height is important. We often work in low light. Space is restricted at many sites. We are not allowed to do any post-processing.

This is fast work. In 15 minutes I make up to 35 shots at a high enough standard to meet the needs of a court case.

Does a tripod hold me up or prevent me working the scene? Does it prevent my shots? On the contrary. I could not do the job without it. I would have to take many more shots. My shots would be less flexible. I would not achieve court-ready sharpness and detail. Without a tripod I could not work the scene properly.

Tripod myths: Cumbersome, heavy, intrusive?

Sometimes. A tripod can be badly adapted for what you are doing. So, if you are going to do something a lot, buy the right tripod. Travel a lot? Get a light one. Work on beaches a lot? Choose sealed feet to keep the sand out. Working special scenes? Get a special tripod. General photography? Buy general.

If you have the wrong equipment you can rightly claim it’s no good! So, buy the right equipment for the job. Make sure you get a quality piece of equipment. You spend thousands on your camera and lenses, so there is little point in spending only ten on your tripod. Quality workmanship and materials are important to producing quality images. You would not accept less with your camera so why with your tripod? This is one of the tripod myths that does stand up – if you have the wrong equipment. Get it right and you have a friend for life.

Sometimes ya gotta go with the flow…

I am not saying tripods are everything. In fact there are many situations where they are not suitable or you can’t use them. Also, we all enjoy the freedom and creativity of hand-held shots sometimes. If we fall prey to tripod myths we will never get past auto settings and bright daylight shots.

All I am saying is, don’t limit yourself. Get past the tripod myths. Buy a tripod and make sure you know how to use it. Your photography will improve if you use it a lot. Use it only a little and you’ll pay a penalty.

Why not look at some of the options now…

General tripods for DSLRs  External link - opens new tab/page
Manfrotto – Quality tripods for committed photographers  External link - opens new tab/page.

Also check out this post and recommendation…
Buy a good tripod – nothing beats it
Manfrotto 055XPROB Tripod Legs Only – Black External link - opens new tab/page

Comments, additions, amendments or ideas on this article? Contact Us
or why not leave a comment at the bottom of the page…

Like this article? Don’t miss the next — sign up for tips by email.

Netkonnexion

Damon Guy (Netkonnexion)

Damon is managing editor of Photokonnexion.com with professional experience in photography, writing, image libraries, and computing. He is also an experienced, webmaster and a trained teacher. Damon runs regular training for digital photographers who are just starting out.
See also: Editors ‘Bio’
By Damon Guy :: Profile on Google+

The Exposure Triangle – An aid to thinking about exposure

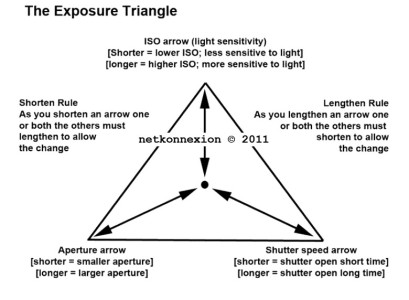
The Exposure Triangle

• The Exposure Triangle •
Click the image to download an A4 *.pdf version to print.

Going manual with your DSLR.

For many people exploring manual settings is a challenge. There is a lot to learn. Without guidance it is difficult to work it out for yourself. Here is my approach to the subject.

Why the exposure triangle

The “Exposure Triangle” is a memory aid to help us balance light for a good exposure.

One thing you should remember. The exposure triangle is NOT a calculator. The aim is to help you get used to using the settings. The ‘Triangle’ loses its importance once you understand the settings. Instead you will see your visualisation of the shot as more important.

Beyond auto-settings

“Auto settings” in modern cameras are average types of shot. They are pre-set in the camera programming. Sports mode freezes the action; landscape mode gives deep focus in the shot; portrait mode promotes close focus and so on. The pre-sets make credible pictures but take creative decisions away from you. Controlling exposure gives you artistic control over our photos.

It’s all about control

Photographs capture light reflected from objects in the scene. Too much light – the object is over-bright, or worse, blown out (completely white). Too little light and the light does not excite the sensor enough. Thnthe object is dark, sombre, or worse – black. At the extremes we have blown out or black. In between are a whole range of capture intensities.

The trick is to balance the incoming light so the sensor can make the picture as we wish it to come out. the idea is to control the light in-camera to create optimal light conditions for the sensor.

Three essential elements

There are three critical elements that control the incoming light…

  • ISO: controls the sensitivity of the sensor and how we capture the light brightness. A sensitive sensor allows a shot in lower light conditions (example: ISO100). High sensitivity to light is referred to as High ISO (example: very high ISO = 3000). The penalty is the picture becomes noisy (Definition: Digital Noise) as the ISO gets higher. Noise affects the quality of the picture. The lower you keep the ISO, the better quality the final image will be.
  • Aperture: controls the amount of light allowed through the lens. It also controls the depth of field. As the aperture increase the amount of light entering the lens also increases. However, as the aperture gets bigger the lens loses the ability to focus at infinity. As the focus shortens part of the picture is not so clearly defined. Taking a photo at F4 means you might be able to focus on a face beautifully and with sufficient light. But you may not be able to discern any detail behind the head. The depth of field has been shortened by the wide aperture.
  • Shutter value or Time value: How long the sensor is exposed to light affects the amount of light you collect. Leave the shutter open too long and the shot is too bright, blowing out parts of the picture. Close the shutter too quickly – the result is underexposed. Long exposures tend to exaggerate movement introducing blur. Fast shutter speeds tend to freeze an object in place.
What is exposure?

There is no right or wrong for achieving the outcome we desire. But there is only ONE point at which the exposure (all three elements combined) is right for your picture. That is the one to make your photo come out the way you want. You must find the correct exposure balance for your visualisation of the picture using all three elements.

Exposure is the right balance of ISO, Aperture and Shutter speed which provides for your intended depth of field, movement blur, brightness and representation of the scene. It is a unique response to the sensor settings you think will make your shot come out right.

The Exposure Triangle is a concept to help you adjust the balance to get the exposure right. The key to using the exposure triangle is that the three elements of exposure: ISO, aperture and shutter speed, must always balance.

It teaches us to understand how the three exposure elements play off one-another. Shorten one arrow the others will need to accommodate by adjusting their length. You can increase one or both of the other elements to accommodate the change.

If you increase one element you will need to decrease one or both of the other elements to accommodate the change.

Full Manual Control

Our exposure settings aim to balance the three elements in the camera. This needs to be done on the ‘Manual’ setting or ‘M’ setting to get the desired result. To gain full creative control we must do two things…

  • First we must have a clear idea of what we are going to achieve for each shot. Do we want the water blurred in our stream or not? Do we want the final picture to look bright and breezy or dark and sombre? Do we want movement blur or sharp, frozen action… and so on. So look at the scene and determine what you want.
  • Secondly, on the basis of what we want we must adjust the camera settings to achieve the desired result.

How do we adjust the settings to get the optimal exposure? Simple. The camera light-meter indicates when exposure is optimal.

The DSLR light sensor is the key

Inside every DSLR is a digital sensor. It detects light intensity. If the light is correctly optimised it will be indicated on the exposure meter.

With the camera set to “M” look through the eye-viewer. At the bottom of the screen you will see a scale. There should be a needle above the scale. This is the indicator of the current exposure. The centre of the scale is the correct exposure level for most shots.

If the needle is off to the right the sensor is getting too much light. If it is off to the left there is insufficient light. The trick is to balance ISO, aperture and shutter speed so the needle is centred.

Your camera manual will show you how to change each of the three settings. There are normally three controls somewhere on the DSLR body to change each of them. Again, your camera manual should have a diagram of the readings in your viewer screen when you look through it. Check out that diagram. You will see the location of the settings on the screen that will change when you alter the controls.

A trick to get you started…

Put the camera on full automatic (the ‘green square’ setting). Take a shot like the one you want. Now look at the settings for that picture on your camera screen. Your camera manual will show you which setting you can look at on the screen. This gives you a guide to what your manual settings should be for this shot.

Now switch to ‘M’ or manual to vary the results. If you want movement blur then slow down the shutter speed (longer exposure, more light let in) and/or decrease the aperture (reduce incoming light) to keep the needle in place. One click of longer shutter speed needs one ‘f-stop’ less of aperture to keep the exposure optimal. But now you get the movement blur!

The aim here is to balance a change in one element by changing one or both of the other elements. In the process you try to keep the needle over the centre of the scale in your viewer. The centred needle tells you you have an optimal exposure that your sensor can use.

Experience…

If you practice regularly with your camera on ‘M’ you will get control of your shots. Try to relate the settings to the type of results you get. Relate shutter speed to the resulting blur/sharpness. Similarly, relate depth of field to aperture size. Relate ISO to balancing light sensitivity to achieve the correct sensitivity for your intended exposure. Gaining experience with these attributes will help you remember settings to use in particular situations.

Comments, additions, amendments or ideas on this article? Contact Us
or why not leave a comment at the bottom of the page…

Like this article? Don’t miss the next — sign up for tips by email.

Netkonnexion

Damon Guy (Netkonnexion)

Damon is managing editor of Photokonnexion.com with professional experience in photography, writing, image libraries, and computing. He is also an experienced, webmaster and a trained teacher. Damon runs regular training for digital photographers who are just starting out.
See also: Editors ‘Bio’
By Damon Guy :: Profile on Google+

How many types of blur are there in photography?

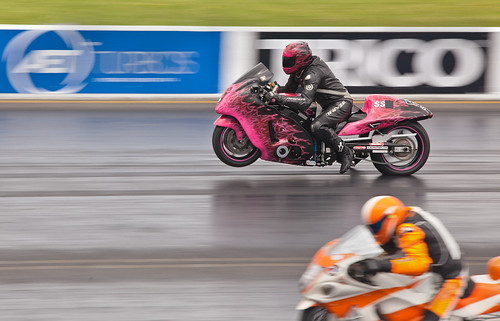
Blur by Netkonnexion - types of blur

Blur by Netkonnexion
Click image to view large
Blur By Netkonnexion on Flickr External link - opens new tab/page
There are many types of blur in photography.

Not all blur is equal.

There are various types of blur. It sounds odd. In fact there is a lot more to blur than most people realise. It is quite a varied subject. It is used in nearly all aspects of photography. From abstracts to zooming, we will find some aspect of blur. Lets take a look…

Okay bokeh…

First up, and one of the best known types of blur, is Bokeh. This Japanese word means haze or blur. It originally referred to the quality of blur. Today we use it to describe the actual blur. A sharp subject and a blurred background is created by a blur of tiny circles where each of the tiny points of light are not focused, that is bokeh. It is created by the lens and aperture.

When you use a wide aperture, say f4.0 (or wider) you get a shallow depth of field. The depth of field is the sharp part of the picture. The rest, the out-of-focus part, is blurred. That blur is the bokeh.

Bokeh can add a whole range of composition effects. It is also has its own aesthetic quality. The quality of the little ‘circles’ varies as does the true circular shape of the circles themselves. Photographic lenses with apertures that are more circular produce the best bokeh. Some apertures are more like regular polygons (say a hexagonal). Polygon bokeh is not as pleasing to the eye as circular bokeh. Fewer sides on the polygon forms a less circular bokeh circle. It may even form an obvious bokeh polygon. Manufacturers go to some lengths to make the bokeh pleasing. One way to make the bokeh more circular is to add blades to the aperture diaphragm. That can raise the cost of the lens.

Subject-movement types of blur

When a subject moves in front of your stationary camera the resulting image has a blurred subject. This is movement blur. The types of blur which include movement can be varied. In the picture above the motor bikes are moving at around 90 miles per hour. When taking this shot I was panning with the far bike resulting in that bike being sharp. The pan meant that my camera was not paced at the same speed as the nearest bike. As a result its movement was relatively out of synchronisation with my camera. The nearest bike was in relative movement and thus blurred.

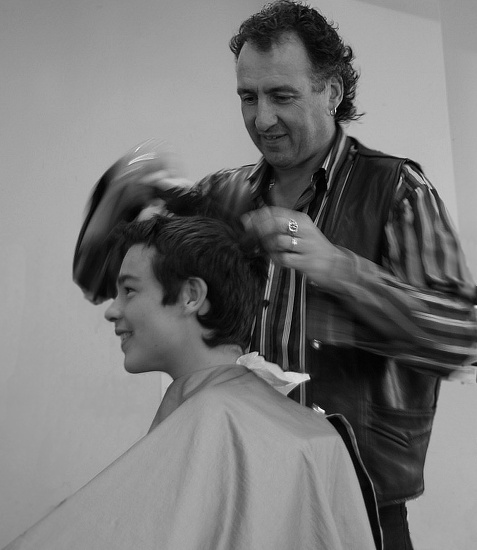
In “The Barber”, below, I have set my camera to capture the blur of his working hands. As with any movement shot, you want some of the shot blurred and some sharp. If it is all blurred it just looks badly taken.

The Barber

• The Barber By Netkonnexion in 365Project •
Click image to view large
The Barber By Netkonnexion in 365Project External link - opens new tab/page
The movement of the hands is blurred to simulate his hair cutting work. Types of blur created in-camera are most effective.

Movement of the subject is controlled by shutter speed. To get it right you have to practice with the speed of that subject. Try the subject at slow speed first. Once you have an idea of the settings, speed the subject up. As you develop a feel for the speed-of-movement versus the shutter-speed you will be able to get a sharp background but a blurred subject.

More types of blur… Camera movement

When a subject is moving pan your camera with it. I did that in the bike picture at the top of the page and got a sharp bike placed against a blurred background. That is not bokeh in the background. As the camera panned with the bike it captured a stationary background. However, as the camera was moving it created a movement blur on the background.

Movement blur of the background normally occurs when panning. If you hold a stationary camera out of a car window and take a long exposure and the same type of blur will result. However, nothing will be sharp in that case (unless something next to you is travelling at your exact speed).

Done right background blur from camera movement has great impact. In the motorbikes above it gives a race feel. It looks really fast.

Some blur is not so good

Hand movement during a shot causes all sorts of blur. You get blurred shadows, blurred faces, possibly jerky tracks… not good at all. However, you can have some fun with this sort of movement. Some famous pictures have been created by deliberate hand movements. There are lots of shots, like tree shots  External link - opens new tab/page, where the movement of the camera creates a surreal or abstract view of the subject. Some people have tried throwing their camera and triggering it in mid-air – some bizarre results can be obtained (including a smashed camera).

Out of focus types of blur

Of course it is possible to completely blur a shot quite deliberately. Some pleasant aesthetic effects can be achieved. Wedding and romantic photographers love the “soft focus” shot. This is a deliberate very slight lack of sharpness. It emphasizes the romantic, soft nature of something… kittens, brides, the first kiss, baby and so on. Google images of soft focus shots provides quite a good range of possibilities for this type of blur.

The soft focus shot can be created different ways. Each give slightly different types of blur. You can literally set the lens to manual focus. Then when properly focussed pull the focus slightly back. so as to create a small amount of blur. Another way to do it is to use a soft focus filter. These are simply screwed to the end of the lens and give the same effect. When I was first starting out in photography many wedding photographers carried a flesh coloured or white nylon stocking. Pulled tight over the lens while the photograph is taken it creates a soft focus effect. Others like a skylight (ultraviolet) filter with a tiny amount of grease smeared on it. All these work, but give you a slightly different soft focus effect. Experiment… have fun!

Zoom blur

One of the less well known types of blur – zoom blur. You need a steady hand or better, a tripod. It makes the picture look like the world is rushing toward you very rapidly.

Adjusting the zoom during exposure creates zoom blur. Set your camera to have a long exposure – around one second is good. Balance the shutter speed with the ISO and aperture to get a proper exposure. You will need to use manual focus to adjust the zoom in the shot. Press the shutter button and rotate the zoom focus ring. A short turn or through its full arc – the amount of turn gives different effects. With a bit of practice you can reduce hand-shake blur. A smooth zoom throughout the exposure creates some great effects. Look through this page of zoom blur images on Google for some ideas…  External link - opens new tab/page.

Artificial blur

Most image editors have software filters to create types of blur. In fact there are a variety of different software filtersavailable. Gaussian blur is one common type. It softens or smooths the image, but also causes loss of detail. There is also rotational blur (self explanatory); linear blur or movement blur – you choose the direction of the blur. Other editng packages will have other blur types too.

Artificial types of blur do not have the same effect as blurs created in-camera. Artificial blur tends to lack depth. Whereas, blur using depth of field gives depth to a picture. The bokeh and movement blurs both have the impact of realism and depth as they vary throughout the depth of the image. Applying a uniform artificial blur can affect the realism. Applied with care and artful work you can make artificial blur look real. It is all about care and attention.

Are there more blurs?

There are probably other types of blur. They may fit into one or more of the categories above. Why not let us know about others. I would like to hear of new ideas and types of blur.

Comments, additions, amendments or ideas on this article? Contact Us
or why not leave a comment at the bottom of the page…

Like this article? Don’t miss the next — sign up for tips by email.

By Damon Guy (author and Photokonnexion editor)

Damon Guy - Netkonnexion

Damon Guy (Netkonnexion)

Damon is a writer-photog and editor of this site. He has run some major websites, a computing department and a digital image library. He started out as a trained teacher and now runs training for digital photographers.
See also: Editors ‘Bio’.

A quick and simple method to make brilliant water droplet images

water droplet

• Water Splashes •
The most beautiful scenes in the world include water. Here you can make your own water droplet.
(Image taken from the video)

The close-up world of the water droplet – endlessly fascinating

The captivating thing about water is that it is ever changing and creates a sense of magic in every scene. When you get in close some simple techniques make wonderful images.

How to photograph water droplet impacts

Ever enthusiastic Gavin Hoey takes us through the simple process of creating wonderful water droplet photos. Colour, light/shade and magic water droplet sculptures are the result.

The best bit about this is that you can make these wonderful photos yourself. It is very easy and great fun. When I first did this I spent hours of time on it and got lost in a world of wonderful colours and effects. There are three things to remember that will help you make this a personal and effective shoot…

  • The more shots you take the more great effects you will see.
  • Background colour should be varied. I’ve used wrapping paper to brighten colours.
  • The angle of the camera can affect your shot (not mentioned in the video).
  • Try different camera heights with respect to the water.

After yesterdays blog, the way you see it is about your style. Don’t look for “new”, look for you!

This is a short video (six minutes 50secs), but one that will give you hours of fun and excellent images.
Gavin Hoey  External link - opens new tab/page

No removable flash? Read this: Off-camera flash. It’s a great introduction and recommends an affordable flash unit.

Comments, additions, amendments or ideas on this article? Contact Us
or why not leave a comment at the bottom of the page…

Like this article? Don’t miss the next — sign up for tips by email.

By Damon Guy (author and Photokonnexion editor)

Damon Guy - Netkonnexion

Damon Guy (Netkonnexion)

Damon is a writer-photog and editor of this site. He has run some major websites, a computing department and a digital image library. He started out as a trained teacher and now runs training for digital photographers.
See also: Editors ‘Bio’.