Tag Archives: Vocabulary

A simple introduction to backlight

• Introduction to backlight •

• Introduction to backlight •
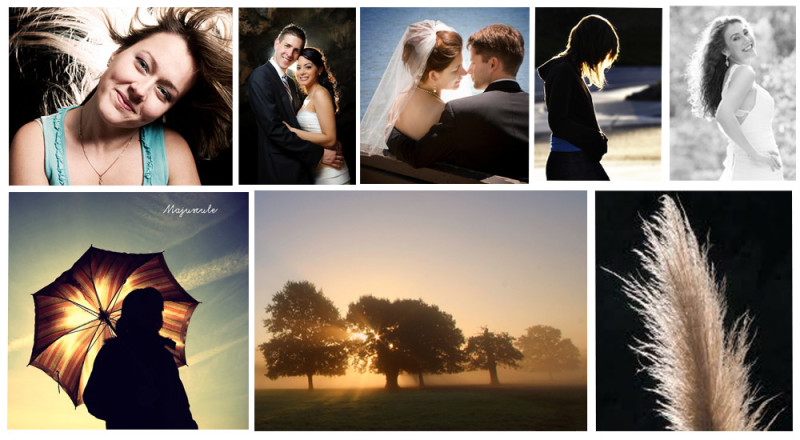
Various images showing backlight scenarios in the studio and outside.
Images from various artists – displayed on Google Images.

Backlight is a versatile light with great potential.

The term backlight refers to the use of a light which is projected from the back of the scene/studio onto the subject from behind. The camera is placed facing the subject. It captures the effect of the light as a highlighted rim or halo around the back edges of the subject.

The use of a backlight creates very distinct effects. The most important is the rim light around the edges of the subject. This highlighting effectively isolates the subject from the background. So it is a useful technique when the subject and background share similar colours or tones. The rim effect around the edges of the subject is especially useful for bringing out highlights and style in hair. Sometimes it is also used to imply purity or goodness after the manner of a religious halo.

Backlight can be produced either with artificial light, natural light or a combination. The sun is normally the most important light for back lighting and so in cases where sunlight is strong artificial light is often used to bring the foreground or the subjects front side out of shadow. This is fill light and provides sufficient light for a good shot of the subject without blowing out the effects of the back light.

In photographic scenes the backlight is often used to create an emphasis on the three dimensionality of the subject. Lights coming directly from the position of the camera tend to make a subject look flat because all the shadows are removed. Backlight has the opposite effect. The light halo effect at the back of the subject emphasises the depth of the subject. It can also be used to emphasis depth in the picture. By strongly highlighting the back of the subject the distance to the scenery behind the subject is revealed giving the image some depth.

Setting up an effective backlight requires some care. If the source of the light shines directly into the camera lens it will blow out and create a strong distraction for the picture viewer. Also a strong backlight can make the front side of the subject look very dark or even silhouetted. To prevent this it is normal practice to use a front light as well so the subject is bright enough to capture. Setting up a good backlight often requires getting the foreground light correct first, then putting in the backlight at around 2 to 3 stops brighter to create the emphasis.

The angle at which a backlight hits the subject can be critical. If the backlight is directly toward the camera the subject can be strongly blown out by and direct light passing around the subject. Normally backlight is applied at an angle. That way the lighting will provide a little texture on the subject and not be directed into the camera lens. It can also be used to more effectively show fashion elements like hair styles by picking out highlights, curls etc.

“Backlight” should not be confused with background lighting. The latter is where a light is used to light the background, the scenery or backdrop. Background lighting typically faces away from the camera. Backlights face toward the camera.

Backlights are used in such a large variety of ways that some practice and experimentation is needed to be able to work out the best way to use them. However, because of the intensity of the light from the back the foreground lighting is often important too. It is not unusual for multiple artificial lights to be needed in order to get the best out of backlights and to keep the balance of lighting good all around the subject.

Examples of “Studio backlighting” on Google  External link - opens new tab/page
Examples of general “backlight photography” on Google  External link - opens new tab/page

Backlight techniques are very important in photography as they have so many effective outcomes. It is certainly worth practising with your lights or even natural light to try out some of the effects.

By Damon Guy (author and Photokonnexion editor)

Damon Guy - Netkonnexion

Damon Guy (Netkonnexion)

Damon is a writer-photog and editor of this site. He has run some major websites, a computing department and a digital image library. He started out as a trained teacher and now runs training for digital photographers.
See also: Editors ‘Bio’.

Contribute A Definition?

Send us a definition of a photographic word or phrase...

Send us a definition for our list of photographic words and phrases. Simply write a clear definition and send it in. Include an original picture if you wish. Give us your name and a link to your website and we will credit your work.

Pure white featureless skys? How to tone them down…

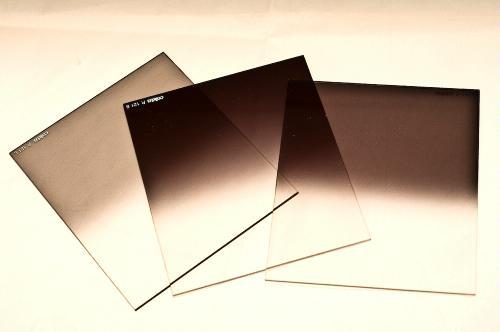
• Cokin neutral density filters (graduated) •

• Cokin neutral density filters (graduated) •
A quality set of filters that can be adapted to fit any lens size.
Buy: Cokin H250A ND Grad Kit

When your sky is too bright its a problem!

You lose all or most of the detail and your foreground is starkly highlighted by the blown out sky. The way to overcome blow out like this is to use various techniques with neutral density filters. All landscapers come across this problem at some time. The best way to overcome the issue is to tackle it head on in-camera. The best way to do that is to use “graduated neutral density (ND) filters”.

What are ND filters?

Neutral density filters are glass filters that you reduce the incoming light. They do this without affecting the colours in your shot. For blown out skies you want to reduce only the incoming sky light and allow the foreground to expose properly. The Graduated ND filter will allow you to achieve that.

In the picture above you can see the top half of each filter is dark. The bottom half is uncoloured glass. The trick is to place the filter in front of your lens. Place it in such a way that the line separating the dark and light lies on the horizon between the ground (proper exposure) and the bright sky which will be toned down by the filter.

If the sky is blown out in your picture the light is brighter than the camera can cope with. Normally that will be two stops of light or more above your exposure of the ground. The ND grads. normally come in three strengths. ND2 (two stops), ND4 (four stops) and ND8 (eight stops). Each stop of filtration is equal to half of the total light. An ND2 reduces the light by a quarter. An ND8 will cut down the incoming light to 1/16th of the light.

Video – Graduated ND filters for Landscape Photography

In this short video Tony Sweet demonstrates how he balances the dynamic range of a landscape composition using a graduated ND grad. filter working in a wooded valley. He wants to brighten the foreground with a long exposure. This would lead to the distant trees being too bright and would show burnt out spots. He uses a great technique to make the right light conditions…

Recommended purchase

I have been using Cokin filters for years. They are high quality filters that fit into a filter mount screwed onto the front of your lens. I prefer this type of fitting. It is simple to change filters and you can adapt graduated filters to the position you want quite easily. Round filters are far less adaptable and tend to be much more expensive.

If you want to buy an ND grad set of filters here is the kit I recommend…
Cokin H250A ND Grad Kit

You will also need to buy an adaptor for your lens to fit the filter mount. You can buy them singly…
Cokin filter mounts and lens adaptors

You can also buy a complete adaptor kit so you can adapt your filters to fit any one of your lenses…


If you feel like going the the whole way you can buy a kit that will cater for all your filter needs (including mount and adaptors) try this great kit…


By Damon Guy (author and Photokonnexion editor)

Damon Guy - Netkonnexion

Damon Guy (Netkonnexion)

Damon is a writer-photog and editor of this site. He has run some major websites, a computing department and a digital image library. He started out as a trained teacher and now runs training for digital photographers.
See also: Editors ‘Bio’.

Can you write? Of course you can!
Write for Photokonnexion...

We would love to have your articles or tips posted on our site.
Find out more…
Write for Photokonnexion.


Why pro-photographers insist on using lens hoods

Lenses

Lenses

Lens hoods are all about control.

The control of your lens, control of difficult light and control over lens damage. Yes, believe it or not even pros make mistakes with flare and break or damage lenses. Lens hoods provide cover for you and perform a specific and important control function over the light that can create ugly flare or the sheen of overexposure.

In the video Phil Steele looks at the way that lens hoods help your shots get properly exposed. Remember, the best shots are taken by the photographer finalising every last detail in the chain of events that lead to releasing the shutter. Knowing about lens hoods is one of those shot makers-or-breakers. Get it right and the blacks in your picture will show just that little extra saturation and contrast that intensifies the shot bringing out depth and realism.

Lens Hoods – Why, When, and How to Use Them

SteeleTraining

By Damon Guy (author and Photokonnexion editor)

Damon Guy - Netkonnexion

Damon Guy (Netkonnexion)

Damon is a writer-photog and editor of this site. He has run some major websites, a computing department and a digital image library. He started out as a trained teacher and now runs training for digital photographers.
See also: Editors ‘Bio’.

Can you write? Of course you can!
Write for Photokonnexion...

We would love to have your articles or tips posted on our site.
Find out more…
Write for Photokonnexion.

Simple portrait lighting for anyone to try (pt.2)

Video

Video from the “Slanted Lens”

Making a portrait is a process.

A great portrait says something about the subject. It will capture something of the essence of the person in the shot. Achieve that level of artistry and you will have arisen above the technical process. However, if you cannot do the basic photographic capture well, all the artistry in the world will not save your shot.

In Simple portrait lighting for anyone to try (pt.1) I looked at the background layout for the one light set up in portraiture and explained the components involved. Today we will see a video for the same set up so you can put into context my diagram from yesterday.

The Basics of a One Light Setup: A Lighting Tutorial

TheSlantedLens

By Damon Guy (author and Photokonnexion editor)

Damon Guy - Netkonnexion

Damon Guy (Netkonnexion)

Damon is a writer-photog and editor of this site. He has run some major websites, a computing department and a digital image library. He started out as a trained teacher and now runs training for digital photographers.
See also: Editors ‘Bio’.

Can you write? Of course you can!
Write for Photokonnexion...

We would love to have your articles or tips posted on our site.
Find out more…
Write for Photokonnexion.

When is a tripod not a tripod?

Tripods & Bean Bags

Tripods & Bean Bags are great alternatives to a full sized three legged contraption. And there is one other option too!

A tripod is not a tripod when it’s another stabiliser!

I suggest everyone use a tripod for the sharpest image. Of course they are not always practical. However, there are alternatives. Here are ideas for stabilised working without tripod.

Working alternatives

Working with a tripod is perhaps evidence for careful attention to detail. After all the use of a tripod does require some persistence. They can be heavy, they certainly take up space and take a little time to put up when you want to take a shot. On the other hand, they definitely increase the sharpness of the shot and allow longer exposures. They also provide a firm platform to work with when working a scene, giving the photographer flexibility to walk around. They also provide a vantage point for the camera during the shot – a solid holding point for the camera in difficult situations.

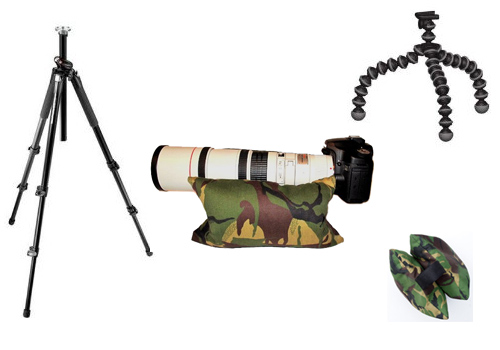
Using different versions of tripods extend their usefulness. The Joby Gorillapod  External link - opens new tab/page series of tripods are excellent. They provide a solid platform for taking photos which can be adapted to almost anything as a holding point. So instead of a long set of three legs, the existing bendy legs can be used to grip fences, poles, furniture, walls… well pretty much anything you can think of using. They are light and practical and can be used in most situations as long as you can find a place to anchor them. They do not work at their best with a very heavy camera and lens setup. So they do have their limitations. However, for most entry level DSLRs, medium sized DSLRs and most normal lenses they are great.

The other possible tripod-alternative product to consider is the bean bag. There have been a number of different types of bean bags made over the years. The idea is that you can use a bean bag to bed down your camera on a variety of surfaces. Wall tops, rocks, the ground, cars, even furniture are all perfectly acceptable for using the bean bag. The one that I recommend is the Maxsima – Professional Camera Bean Bag – ‘twin bags’ 262×162. Lens support Bean Bags for Wildlife photography etc.. also Designed for use on a Vehicle / Car door  External link - opens new tab/page. It provides a solid and adaptable way to put your camera on a hard surface to prevent damage to the camera (from abrasion, chips and dirt). This is, in effect, a cheap and efficient way to make a solid stand-point from which to make a shot. It is not as accurate as a tripod – you may have to massage the bean bag into the right shape to get the camera pointing exactly where you want it. In general however, it is a great way to work when you have limited options, especially at ground level or when working with other surfaces.

Another, simple option!

The final option you have is somewhat surprising. Its simplicity is also its flexibility. And because it is so simple, a lot of photographers forget to use it as an option. Try rolling up your jumper, jacket or even your coat! If you make a ball or cushion on which to put your camera you have a way to protect it from the ground or abrasive surfaces. But it provides a simple and solid surface for your camera. Lots of photographers forget the simple answer. They often think of the high-tech solution. But sometimes it pays to work smart when you are in a situation and you are caught out.

By Damon Guy (author and Photokonnexion editor)

Damon Guy - Netkonnexion

Damon Guy (Netkonnexion)

Damon is a writer-photog and editor of this site. He has run some major websites, a computing department and a digital image library. He started out as a trained teacher and now runs training for digital photographers.
See also: Editors ‘Bio’.

Can you write? Of course you can!
Write for Photokonnexion...

We would love to have your articles or tips posted on our site.
Find out more…
Write for Photokonnexion.

Do you make these three style mistakes?

• Soaring •

• Soaring •
If you want to develop your style – see the world a different way.
Click image to view large
• Soaring • By Netkonnexion on Flickr External link - opens new tab/page

Your personal style defines your photography.

When you start out in photography your style takes time to develop. However, you can easily stifle your photographic style if you don’t develop your photographic skills. You can avoid the problem by paying attention to these three key issues.

1. Little photographic experience

You can take thousands of pictures and still have little photographic experience. It is easy to do lots of pictures about the same type of thing. After a while this becomes boring and your pictures will become mundane or clichéd. It is easy to get into a rut and find your personal style stops developing. This happens even if you are photographing something you really find interesting.

Solution: Find new techniques to take photographs of your interest. To break out of a style rut you can easily change your technique. Here are some ways to do it…

  • Try a different lens… keep using it to force yourself to take new perspectives
  • Develop particular themes – Colour, shape, size, distance, angle
  • Use online tutorials to develop a new approach
  • Do a Google search on your image interests to see how others approach the subject
  • Discuss your interests with another photographer with different interests to get a new perspective
2. Limited range of photographic techniques

Lots of photographers beginning to develop their style are limited by the range of techniques they know. To take a different perspective it helps to extend your photographic skills. Here are some examples of techniques you can use change your photographic viewpoint…
Learn to manipulate Depth of Field – try these links to start you off:
Depth of field – a powerful photographic tool
An easy lesson in beautiful bokeh
One big change – one easy step forward (depth of field)
Controlling the Depth of Field (DoF) – Three Tips
Learn about action shots and panning – check out the resources here: Action shots – how to…
Try out night photography of your subject. Here is a resource page: Night Photography
There are lot of other resources on Photokonnexion. Check out the “Articles” section in the menu on the top of each page. Also you could try the “Categories” section up there too. They both offer different perspectives for resources on this site.

3. Poor understanding of composition and light

Both composition and light have a key role to play in your photographic style and how you approach your subject. You can follow up on some easy lessons in understanding light and compositional techniques from this site too. Here are some suggestions to get you started.
Key lessons in composition are:
Rule of thirds
Lines
Perspective
Key lessons in understanding light:
Six things to know about light
Three little known facts about shadows
Light, a Little Difference Makes a Big Impact (Hard and soft light example).
There are further links on the bottom of each page to help you follow up on more ideas.

Developing your style and skill go together

If you want to develop your own style, change your style if you are in a rut or just have wider experiences in photography – then learn more. As you develop your skills and take into account wider perspectives you will broaden your experience. You will have more fun too!

By Damon Guy (author and Photokonnexion editor)

Damon Guy - Netkonnexion

Damon Guy (Netkonnexion)

Damon is a writer-photog and editor of this site. He has run some major websites, a computing department and a digital image library. He started out as a trained teacher and now runs training for digital photographers.
See also: Editors ‘Bio’.

Focus On Imaging NEC Birmingham 3 – 6 March 2013

Focus On Imaging 2013

Focus On Imaging 2013  External link - opens new tab/page
National Exhibition Centre Birmingham 3 – 6 March 2013

A broad range of new equipment.

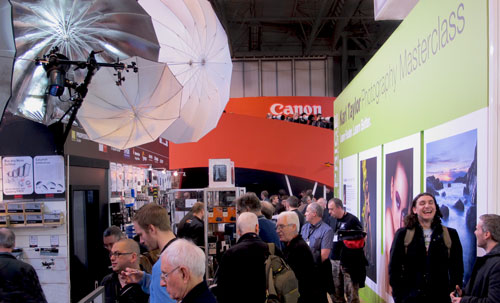
It appeared from busy aisles at this years Focus On Imaging Exhibition External link - opens new tab/page that photographic business is actively fighting off the economic depression, possibly even in rude health. With around one hundred and sixty exhibitors there was plenty to see. There was a whole range of new developments as well as the old favourites.

A Key aspect of the show this year was the new ranges of cameras. Leading manufacturers were actively promoting mirrorless cameras. The gradual shift away from the point-and-shoot market also seemed to continue. The camera market appears to be changing. Heavy duty technologies from the top-of-the-range DSLRs are being used in the lower end cameras. The market seems to be shifting in favour of high resolution processing right through the full range.

The economic climate is obviously still impacting. A predominant theme on retail stands was deals and offers. There was plenty on offer too. In previous years many of the accessories available in the UK seemed to be expensive compared to current prices. Today imported goods appear to be impacting the market. Exhibitors were showing equipment which appeared robust and very competitively priced. The shift in the camera market also appears to be creating deals. There were very good prices offered on cameras in all segments of the market. Many of these deals reflect depressed prices in the market in general but the many of the stands were offering greater reductions than even shop prices.

The show organisers unfortunately failed to publish the event list this year. Show goers were left to pick up what information they could about various talks and demonstrations from stands themselves. It made choosing how to spend our time was a little difficult. However, I managed to see three interesting demonstrations. There was a lot of emphasis on lighting techniques this year. Some very good models and backdrops were shown and lots of people were taking photographs. If you are going to go to the show take your camera for some additional fun.

Aside from impressive stands by Canon and Nikon, Sigma had an impressive spread of lenses available. There were some excellent tripods on show this year on several stands. Despite the reluctance of beginners to buy them, the tripod market is both competitive and innovative. Tripod heads are getting smoother and there are some very interesting new ideas, particularly in the high-engineering end of the market. However, the top tripod head units were weighing in at around £500… not a price to be taken lightly.

Other stands of interest included the extremely active Disabled Photographers’ Society. That society fosters a wonderful camaraderie and energy among its members. The Royal Photographic Society were also at the exhibition showing continuous short events which were well attended. They also are in active recruiting mode.

My overall impression of the exhibition this year was one of great energy. There was a lot of business being transacted and show-goers were being dynamic on all the stands. It was an enjoyable day, and one that will help to keep me informed about products and trends in this business.

By Damon Guy (author and Photokonnexion editor)

Damon Guy - Netkonnexion

Damon Guy (Netkonnexion)

Damon is a writer-photog and editor of this site. He has run some major websites, a computing department and a digital image library. He started out as a trained teacher and now runs training for digital photographers.
See also: Editors ‘Bio’.