Tag Archives: light and lighting

Using the sun to create shafts of light

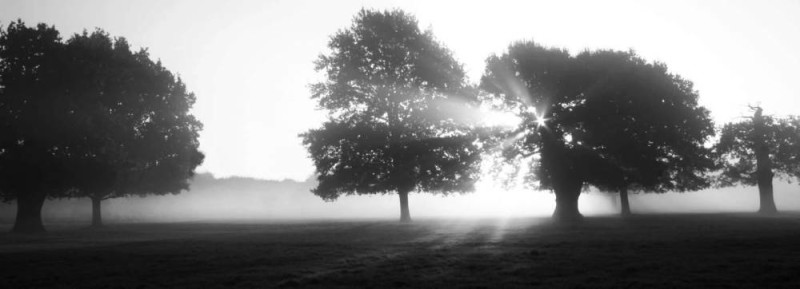
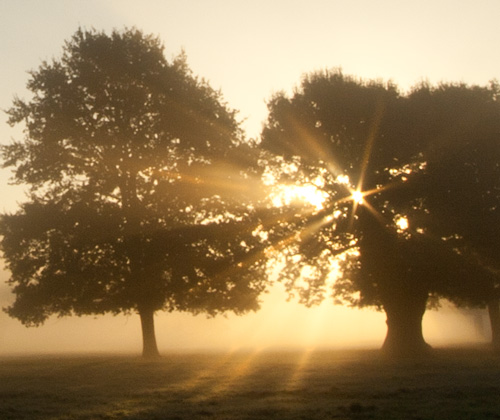
Golden Morning - Light shafts pierce the mist

Golden Morning – Light shafts pierce the mist

Atmospheric shots – look for light shafts

Look out for the early morning or evening mist that creeps across the landscape. If the mist is with a clear sky, you are in for a photographic treat. This is one of the most atmospheric shots you can take.

What are light shafts?

We are talking about those lovely rays that pass through the air highlighted by the mist. They often pick up the golden colours of morning or the wonderful oranges/reds of dusk.

Misty conditions can arise in lots of ways. Early morning or evening chill after a warm day often creates mist. It’s best as a ground mist. Up above the rising or falling sun is bright, golden and low. Under these conditions you have the perfect situation for light shafts. It is the shafts of light falling through the mist that create the effect. Although often there does not need to be much more than a hint of mist. Sometimes only a moist air is enough. This is especially so if you are in a dark forest with bright light penetrating deep between the dense canopy. The strong contrasts will often pick out the light shafts.

Misty Morning • Look for light shafts

• Misty Morning •
Look for the way the shafts of light cut through the mist

How do you capture light shafts

Actually, very easily. Be careful however, because you can damage your eyes or camera. Here is what you do…

Look for the shafts of light you can see with your eyes. If you can see them then you can often bring them out in-camera by slightly over exposing the light shafts. Set your camera focus to measure light using only the centre point of the viewfinder. Check your manual to find out how. Then, make sure you point it at a dark spot – like the trunk of a tree. The camera will measure for the darker areas of scene. This will brighten the scene and light shafts will stand out strongly. You will need to use one of the manual modes to do this.

You can also look for very bright spots coming through tree cover. This is often only the case if your camera is pointing directly at the sun. This can be dangerous so only do it if tiny points of light are coming through. NEVER look directly at the sun with your eyes or through your lens. If you can, use live view. Then you will not be looking directly at a bright light. If you are able to see a place where most of the light is blocked you could capture a few rays. Powerful as they are, they will cause strong lens flare. Often this will emphasis light shafts coming through the mist.

Light shafts – examples

You can check on this search on Google Images to see a whole page of light shafts. There are so many around the web that you cannot fail to be inspired…
Google Images :: Light shafts  External link - opens new tab/page about light shafts

Getting there on time

This is one of those techniques that work best with the Golden Hours of morning or evening. So you might need to get up early. Looking out for the right conditions is crucial. So is making sure you are in the right light/dark conditions. Forests and woodland are best. Most of all, be at one with nature. These shots make exciting images to look at. They are wonderful to experience too.

Comments, additions, amendments or ideas on this article? Contact Us
or why not leave a comment at the bottom of the page…

Like this article? Don’t miss the next — sign up for tips by email.

Damon Guy - Netkonnexion

Damon Guy (Netkonnexion)

Damon is a writer-photographer and editor of this site. He has run some major websites, a computing department and a digital image library. He started out as a trained teacher and now runs training for digital photogs.
See also: Editors ‘Bio’.
By Damon Guy see his profile on Google+.

Portrait context is about the artist as well as the subject

Portrait context is important in photography

• Portrait context is important in photography •
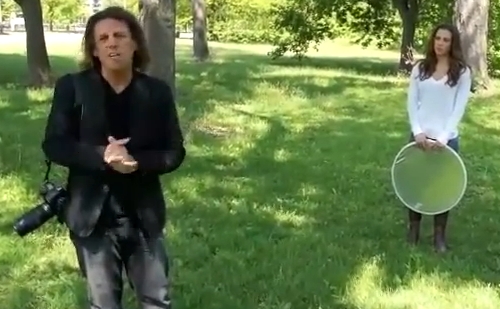
[Image taken from the video].

Art in a portrait…

…includes much more than meets the eye. Photographers taking their first steps with portraits often see only the person in front of them. But the portrait context also includes the scene, the artist and their culture.

Portrait context – a historical boundary

Portrait art historically reflected the fashions and ideas of the time. For example early civilisations tended to depict people in profile. These flat two dimensional portraits were a mark of early Egyptian art. Much later, in the 14th century, the Renaissance masters did portraits as a three dimensional rendering on the canvas. They used artistic tools the Egyptians did not have.

Today the portrait context is still related to the knowledge and experience of the artist. And, they are partly bound by the conventions of their time, culture and so on. You can never fully be divorced from your context. But, we are free to take a wider, more context-free view of portraits. Artists and photographers are trained to take a broad, imaginative outlook. Art and photography schools give the imaginative freedom of students a wide scope. Breaking the bounds of traditional portraiture is a part of that freedom.

Breaking the bounds of portrait context takes careful thought

Portraiture starters often only see their subject through “everyday” eyes. Most of us are not trained in the ways of imaginative scene setting. So we tend to take portraits that represent our every day view of people. There is nothing wrong with that. Family, friends and others make a fun photograph. The images can be pleasing and satisfying.

Great portraiture goes deeper than that day-to-day view. To push the boundaries of your portraits, think in a different way. The portrait photog should consider their own vision and experience. They also need to think of the environment, cultural context, story and location of the shot. The photographer should understand who they are as well as knowing something of the portrait subject.

Of course knowing these things does not produce a great image. What makes a great portrait is pre-vision. It is how you bring out something in the subject, the scene or the portrait context that is remarkable. This takes a unique perspective.

The art of portrait photography

A strong portrait steps out of the everyday view. In the video we get the perspective of a number of portrait photogs. Each has looked into the portrait context in which they are working. With forethought and insight they have constructed artful portraits. They have also made driven and powerful images of their subjects. Each has a clear understanding of the portrait context. Each has a clear view of what they want to say.

The lesson is, look for a point to make. Understand both what you are working with and what you are working to express.
PBSoffbook  External link - opens new tab/page

Comments, additions, amendments or ideas on this article? Contact Us
or why not leave a comment at the bottom of the page…

Like this article? Don’t miss the next — sign up for tips by email.

Damon Guy - Netkonnexion

Damon Guy (Netkonnexion)

Damon is a writer-photographer and editor of this site. He has also run some major websites, a computing department and a digital image library. He started out as a trained teacher and now runs training for digital photogs.
See also: Editors ‘Bio’.
By Damon Guy see his profile on Google+.

Tripod myths – why are amateurs tripod shy?

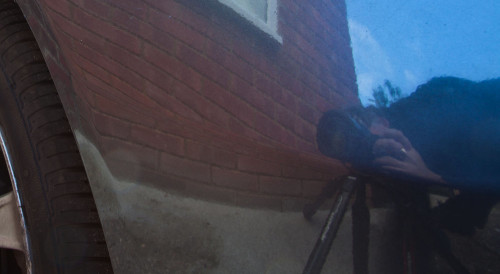
Me and my tripod - reflected in paintwork - tripod myths

• Me and my tripod – reflected in paintwork – tripod myths •
I use a tripod most days in some pretty tight situations. They are
quick, effective and give great results!
[Image by Damon Guy • Click to view large]

Tripods improve your results – fact!

Tripod myths can be heard regularly. Actually they make life a lot easier and faster. So, why are amateurs tripod shy? Why buy cheap? Why is simplicity apparently so difficult for tripod starters? Read on…

What are the tripod myths?

Over the years I have heard all the excuses. Here are some things I have heard…

  • I’ll miss the moment!
  • Tripods are too much bother.
  • I can shoot great shots hand-held.
  • It slows me up.
  • I like to walk the scene…
  • They are cumbersome, get in the way and heavy.
  • It’s not possible or easy to use it all the time.

I am sure there are other issues. But let’s look at these in detail.

Tripod myths: Missing the moment?

Every photographer gets lucky sometimes. They happen to point the camera pointing right and, snap, they got it.

Let’s be honest. How many times does that lucky capture happen? “Journalists?”, I hear you say? Actually, they rarely get lucky either. Photo-journalists train in preparation, planning and investigation. Being there and aware when the event happens is not an accident. They get the story time and time again.

If you plan for your tripod you will get the shot too. You won’t miss the shot getting your DSLR out either.

Forethought and planning are good photographic habits. Cultivate and develop these skills. You get the shot, and it’ll be sharper. If you are going to shoot, do it properly. Have both camera and tripod ready. Don’t be a victim of tripod myths, be in control of your photography.

Too much bother? One of the tripod myths that is just silly

What can be too much bother about getting a sharp, properly framed image? Loading a tripod is no more trouble than putting your camera in the car. It takes only 15 seconds to set up. The tripod will also give you time and scope to take a great shot. It holds your camera for lens changes and while scouting the next shot. Bother? Not really.

Bothered people think tripods are hard work. Do they realise how much the picture is improved? Attention to detail over your shots is what makes excellent images. Taking a quick snap may be no bother. Its unlikely to yield a great image either. This is one of the tripod myths that does not stand up!

Tripod myths: Great hand held shots

There are lots of situations where great light and a steady hand can get a sharp result. Congratulations. The time and effort you put into your photography is paying off. However, of all the situations I take pictures in, only about a third can be hand held. High ISO might help. More likely digital Noise would spoil the image. Better to take a longer exposure and use, say, ISO100. Quality is important.

Tripod myths will limit you to one third of your potential as a photog. It makes you a limited photographer. Tripods extend your shooting time, flexibility and quality of image.

Tripod myths: It slows me up

Yes, finally, a fact! Tripods make you think about your photograph. Perhaps not one of the tripod myths, more of a tripod mistake.

Since digital cameras became common I see a lot of machine-gun photography. A keen photog arrives, sprays off a hundred shots… Then, off they go. Wow.

Spend the first few minutes considering options. Proceed with a plan and with care. Cover all the shots you need. Sometimes you will get new ideas. Great, get more shots.

Once, at an aircraft museum with a keen photographer I was alone in minutes. My friend shot out of sight. We met up later. He had over 1000 pictures. He was elated. I had less than seventy shots. “Ah!”, he said. “You should’ve left the tripod at home!”

Later that week things turned around. He had eleven fair shots and one really good one. He had spent hours and hours in post-processing and missed lots of sleep. My more careful approach paid off. I had more than 40 quality images. As he looked at them he kept saying, “I took a picture of that too, but it didn’t come out”. And, “How did you get that one to look so good?”. My care, quality and composition paid off. The tripod helped me think about my photography and take care. I only spent about two hours in post-processing too. Most on simple tweaks. I had plenty of time for other shoots that week.

One question… Who was really slowed up here?

Tripod myths: Working the scene

One of my regular jobs involves 15 – 20 finished pictures of a scene. Picture order and camera height is important. We often work in low light. Space is restricted at many sites. We are not allowed to do any post-processing.

This is fast work. In 15 minutes I make up to 35 shots at a high enough standard to meet the needs of a court case.

Does a tripod hold me up or prevent me working the scene? Does it prevent my shots? On the contrary. I could not do the job without it. I would have to take many more shots. My shots would be less flexible. I would not achieve court-ready sharpness and detail. Without a tripod I could not work the scene properly.

Tripod myths: Cumbersome, heavy, intrusive?

Sometimes. A tripod can be badly adapted for what you are doing. So, if you are going to do something a lot, buy the right tripod. Travel a lot? Get a light one. Work on beaches a lot? Choose sealed feet to keep the sand out. Working special scenes? Get a special tripod. General photography? Buy general.

If you have the wrong equipment you can rightly claim it’s no good! So, buy the right equipment for the job. Make sure you get a quality piece of equipment. You spend thousands on your camera and lenses, so there is little point in spending only ten on your tripod. Quality workmanship and materials are important to producing quality images. You would not accept less with your camera so why with your tripod? This is one of the tripod myths that does stand up – if you have the wrong equipment. Get it right and you have a friend for life.

Sometimes ya gotta go with the flow…

I am not saying tripods are everything. In fact there are many situations where they are not suitable or you can’t use them. Also, we all enjoy the freedom and creativity of hand-held shots sometimes. If we fall prey to tripod myths we will never get past auto settings and bright daylight shots.

All I am saying is, don’t limit yourself. Get past the tripod myths. Buy a tripod and make sure you know how to use it. Your photography will improve if you use it a lot. Use it only a little and you’ll pay a penalty.

Why not look at some of the options now…

General tripods for DSLRs  External link - opens new tab/page
Manfrotto – Quality tripods for committed photographers  External link - opens new tab/page.

Also check out this post and recommendation…
Buy a good tripod – nothing beats it
Manfrotto 055XPROB Tripod Legs Only – Black External link - opens new tab/page

Comments, additions, amendments or ideas on this article? Contact Us
or why not leave a comment at the bottom of the page…

Like this article? Don’t miss the next — sign up for tips by email.

Netkonnexion

Damon Guy (Netkonnexion)

Damon is managing editor of Photokonnexion.com with professional experience in photography, writing, image libraries, and computing. He is also an experienced, webmaster and a trained teacher. Damon runs regular training for digital photographers who are just starting out.
See also: Editors ‘Bio’
By Damon Guy :: Profile on Google+
Using the command dial to pick the right Mode

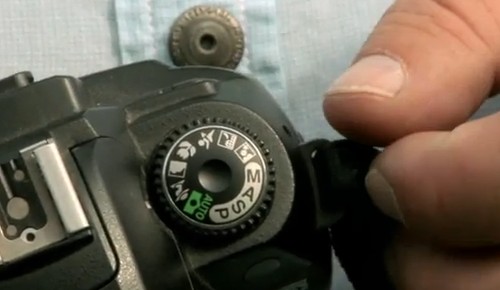
The Command or Modes dial

• The Command or Modes dial •
(Image taken from the video)

Setting up your shot.

The settings you use when taking a photograph affects the shot outcome. Before choosing camera control settings, first choose the camera mode. Here is an explanation on the ‘Command’ or ‘Modes dial’ where you make that choice.

Getting into manual mode

In “The Exposure Triangle” I looked at how you should balance…

These settings, when balanced, create an optimal exposure. You need to understand these settings to go manual with your camera.

What the dial offers

The Command or Mode dial sets the camera to use particular controls. You see a typical example of the command dial above.

‘Auto-mode’ or ‘Auto’ – the camera does everything for you. This setting is sometimes called the “green square” or Green mode. It’s normally green on the command dial. Using Auto you hand over full control to the camera. It provides a set of fairly average exposures. It’s used to snap basic shots in everyday situations.

To make your photography really effective you want full creative control. Learn to use the semi-manual modes and ‘Manual’ Mode. These give control to the three exposure factors. The picture shows these settings as ‘M’, ‘A’, ‘S’ and ‘P’ in a silver band.

  • M – the full Manual setting. You have full creative control over exposure.
  • A – Aperture – you set the aperture (f number) and the camera finds the right shutter speed for you.
  • S (or Tv) – the shutter speed setting or Time value. It sets the shutter opening time. The camera finds an aperture setting to match.
  • P – ‘Program’ allows some menu settings that ‘Auto’ will not allow. This auto setting gives only limited artistic control.
  • Also… B (not shown) means ‘Bulb’. It’s a setting for long exposures of more than 30 seconds. Bulb may not be available on all cameras.
Other modes

There are often other modes available. But these are really pre-sets. They do the same thing as manual and semi-manual modes. However, they give you less than full control over your shot. So I am not going into them here.

Camera Controls (intro) – command dial

Mike Browne goes through these settings (except ‘Bulb’). He explains the ideas and points out each mode. Remember, the command dial only sets the exposure controls for Auto-modes. The manual and semi-manual modes allow you to change the exposure factors from other controls.
Mike Browne  External link - opens new tab/page

Comments, additions, amendments or ideas on this article? Contact Us
or why not leave a comment at the bottom of the page…

Like this article? Don’t miss the next — sign up for tips by email.

Netkonnexion

Damon Guy (Netkonnexion)

Damon is managing editor of Photokonnexion.com with professional experience in photography, writing, image libraries, and computing. He is also an experienced, webmaster and a trained teacher. Damon runs regular training for digital photographers who are just starting out.
See also: Editors ‘Bio’
By Damon Guy :: Profile on Google+

The Exposure Triangle – An aid to thinking about exposure

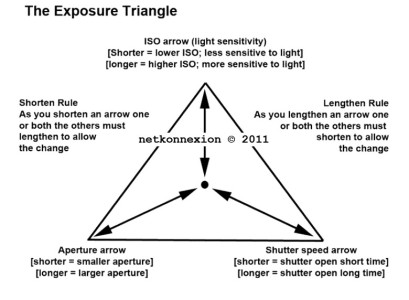
The Exposure Triangle

• The Exposure Triangle •
Click the image to download an A4 *.pdf version to print.

Going manual with your DSLR.

For many people exploring manual settings is a challenge. There is a lot to learn. Without guidance it is difficult to work it out for yourself. Here is my approach to the subject.

Why the exposure triangle

The “Exposure Triangle” is a memory aid to help us balance light for a good exposure.

One thing you should remember. The exposure triangle is NOT a calculator. The aim is to help you get used to using the settings. The ‘Triangle’ loses its importance once you understand the settings. Instead you will see your visualisation of the shot as more important.

Beyond auto-settings

“Auto settings” in modern cameras are average types of shot. They are pre-set in the camera programming. Sports mode freezes the action; landscape mode gives deep focus in the shot; portrait mode promotes close focus and so on. The pre-sets make credible pictures but take creative decisions away from you. Controlling exposure gives you artistic control over our photos.

It’s all about control

Photographs capture light reflected from objects in the scene. Too much light – the object is over-bright, or worse, blown out (completely white). Too little light and the light does not excite the sensor enough. Thnthe object is dark, sombre, or worse – black. At the extremes we have blown out or black. In between are a whole range of capture intensities.

The trick is to balance the incoming light so the sensor can make the picture as we wish it to come out. the idea is to control the light in-camera to create optimal light conditions for the sensor.

Three essential elements

There are three critical elements that control the incoming light…

  • ISO: controls the sensitivity of the sensor and how we capture the light brightness. A sensitive sensor allows a shot in lower light conditions (example: ISO100). High sensitivity to light is referred to as High ISO (example: very high ISO = 3000). The penalty is the picture becomes noisy (Definition: Digital Noise) as the ISO gets higher. Noise affects the quality of the picture. The lower you keep the ISO, the better quality the final image will be.
  • Aperture: controls the amount of light allowed through the lens. It also controls the depth of field. As the aperture increase the amount of light entering the lens also increases. However, as the aperture gets bigger the lens loses the ability to focus at infinity. As the focus shortens part of the picture is not so clearly defined. Taking a photo at F4 means you might be able to focus on a face beautifully and with sufficient light. But you may not be able to discern any detail behind the head. The depth of field has been shortened by the wide aperture.
  • Shutter value or Time value: How long the sensor is exposed to light affects the amount of light you collect. Leave the shutter open too long and the shot is too bright, blowing out parts of the picture. Close the shutter too quickly – the result is underexposed. Long exposures tend to exaggerate movement introducing blur. Fast shutter speeds tend to freeze an object in place.
What is exposure?

There is no right or wrong for achieving the outcome we desire. But there is only ONE point at which the exposure (all three elements combined) is right for your picture. That is the one to make your photo come out the way you want. You must find the correct exposure balance for your visualisation of the picture using all three elements.

Exposure is the right balance of ISO, Aperture and Shutter speed which provides for your intended depth of field, movement blur, brightness and representation of the scene. It is a unique response to the sensor settings you think will make your shot come out right.

The Exposure Triangle is a concept to help you adjust the balance to get the exposure right. The key to using the exposure triangle is that the three elements of exposure: ISO, aperture and shutter speed, must always balance.

It teaches us to understand how the three exposure elements play off one-another. Shorten one arrow the others will need to accommodate by adjusting their length. You can increase one or both of the other elements to accommodate the change.

If you increase one element you will need to decrease one or both of the other elements to accommodate the change.

Full Manual Control

Our exposure settings aim to balance the three elements in the camera. This needs to be done on the ‘Manual’ setting or ‘M’ setting to get the desired result. To gain full creative control we must do two things…

  • First we must have a clear idea of what we are going to achieve for each shot. Do we want the water blurred in our stream or not? Do we want the final picture to look bright and breezy or dark and sombre? Do we want movement blur or sharp, frozen action… and so on. So look at the scene and determine what you want.
  • Secondly, on the basis of what we want we must adjust the camera settings to achieve the desired result.

How do we adjust the settings to get the optimal exposure? Simple. The camera light-meter indicates when exposure is optimal.

The DSLR light sensor is the key

Inside every DSLR is a digital sensor. It detects light intensity. If the light is correctly optimised it will be indicated on the exposure meter.

With the camera set to “M” look through the eye-viewer. At the bottom of the screen you will see a scale. There should be a needle above the scale. This is the indicator of the current exposure. The centre of the scale is the correct exposure level for most shots.

If the needle is off to the right the sensor is getting too much light. If it is off to the left there is insufficient light. The trick is to balance ISO, aperture and shutter speed so the needle is centred.

Your camera manual will show you how to change each of the three settings. There are normally three controls somewhere on the DSLR body to change each of them. Again, your camera manual should have a diagram of the readings in your viewer screen when you look through it. Check out that diagram. You will see the location of the settings on the screen that will change when you alter the controls.

A trick to get you started…

Put the camera on full automatic (the ‘green square’ setting). Take a shot like the one you want. Now look at the settings for that picture on your camera screen. Your camera manual will show you which setting you can look at on the screen. This gives you a guide to what your manual settings should be for this shot.

Now switch to ‘M’ or manual to vary the results. If you want movement blur then slow down the shutter speed (longer exposure, more light let in) and/or decrease the aperture (reduce incoming light) to keep the needle in place. One click of longer shutter speed needs one ‘f-stop’ less of aperture to keep the exposure optimal. But now you get the movement blur!

The aim here is to balance a change in one element by changing one or both of the other elements. In the process you try to keep the needle over the centre of the scale in your viewer. The centred needle tells you you have an optimal exposure that your sensor can use.

Experience…

If you practice regularly with your camera on ‘M’ you will get control of your shots. Try to relate the settings to the type of results you get. Relate shutter speed to the resulting blur/sharpness. Similarly, relate depth of field to aperture size. Relate ISO to balancing light sensitivity to achieve the correct sensitivity for your intended exposure. Gaining experience with these attributes will help you remember settings to use in particular situations.

Comments, additions, amendments or ideas on this article? Contact Us
or why not leave a comment at the bottom of the page…

Like this article? Don’t miss the next — sign up for tips by email.

Netkonnexion

Damon Guy (Netkonnexion)

Damon is managing editor of Photokonnexion.com with professional experience in photography, writing, image libraries, and computing. He is also an experienced, webmaster and a trained teacher. Damon runs regular training for digital photographers who are just starting out.
See also: Editors ‘Bio’
By Damon Guy :: Profile on Google+

Rare black and white pictures – great examples

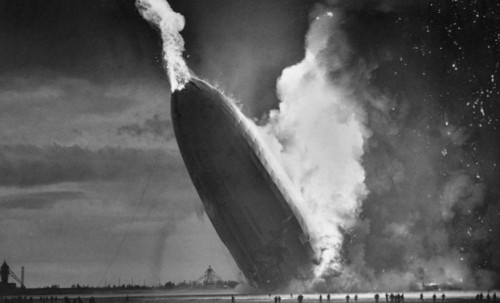
Rare historical pictures in black and white

• Rare historical pictures in black and white •
Great pictures go beyond the capturing of great events…
These are excellent examples of monochrome photography too.
[Image from the slide presentation]

Quality black and white photography is an art.

Early photography taught us there is more to an image than conveyed by colour. Black and white Photography can be emotionally powerful and visually satisfying. Sometimes colour reduces that impact.

Why is there so much impact in black and white?

The use of colour has seduced the eyes of the users of modern media and screens. The realism is amazing and the quality excellent. What people forget is that colour can reduce your awareness to the meaning in a picture. It is all too easy to lose the impact of a story when the picture is so vivid.

The underlying impact of an image is more powerful with simple presentation. Black and white or monochrome images simplify the message beautifully. They create a stark reality in an image. That reduces distractions and focusses the eye on the story.

This is a great lesson for modern photographers. Reduce the image down to a simple, powerful message. Make sure it also has great visual impact. Add a great story and you have captured the attention of the viewer.

What makes black and white visually powerful?

Here are some things to consider when thinking about making a black and white image…

  • Try to use a wide contrast range from darkest blacks to whitest whites.
  • Make sure that the darkest and brightest areas of the picture are not too large or they will distract from the greyscale in between.
  • Try to ensure there is a good spread of different greys between the darkest and brightest.
  • Using only deepest black or whitest white will tend to be too harsh for the eye except where there is a good pattern for the eye to follow.
  • Harsh shadows from hard light will distract the eye. Look to use soft light and graduated shadows.
  • Try to include as much detail as possible to bring out the subject of the image.
  • Work hard to bring out textures. This will throw up the subject without distracting the eye. It will help develop depth too.
  • Be especially sensitive to layers in the image (foreground, mid-ground and distance). Low levels of texture and poor layering will make the image look flat and lifeless.
Some great examples of successful black and white images

As you go through the great images in the slide show below consider the points above. You will find food for thought for your own black and white images.

Want to see regular historical black and white images?

As a lover of black and white pictures I signed up to Retronaut  External link - opens new tab/page. This great site is not exclusively about black and white images, but most of the historical material there is of that type. I get a daily email with some great images. It’s pretty instructive because black and white images are a personal interest. Why not give it a try? Enjoy.

Comments, additions, amendments or ideas on this article? Contact Us
or why not leave a comment at the bottom of the page…

Like this article? Don’t miss the next — sign up for tips by email.

Netkonnexion

Damon Guy (Netkonnexion)

Damon is managing editor of Photokonnexion.com with professional experience in photography, writing, image libraries, and computing. He is also an experienced, webmaster and a trained teacher. Damon runs regular training for digital photographers who are just starting out.
See also: Editors ‘Bio’
By Damon Guy :: Profile on Google+

Background check – simple is best, then check it

Creating Perfect Backgrounds

• Creating Perfect Backgrounds •
Bryan Peterson looks at one of the simplest lessons in outdoor photography – but one that gets effective results.
[Image taken from the video]

Perfect backgrounds…

It’s easy to spoil a great subject by picking the wrong background or using one with distractions. Taking the time to look around is worthwhile – then do a background check. Here are some pointers to help.

Great images include great backgrounds

A wonderful subject is not the only thing that makes a successful image. It is the whole image that the eye sees. With a great subject but a distracting background you will lose the viewers eye to the background. Equally if the background is too cluttered it will draw attention away from the subject. Strong contrasts, clashing colours, peculiar events or something ugly in the background all take their toll.

Simplify, simplify, simplify…

Try to find interesting textures, colours and scenes for the background. Keep the contrasts to a minimum. Make sure no one is going to walk into the shot or create another type of distraction. In other words make it as easy as possible for your viewer to concentrate on the subject. It is all about showing off the best – and that is what you want the subject to be.

What to look for at the back of your shot

A certain amount of uniformity helps. If what lies in the back of the shot is too diverse the eye looks to see what the background is all about. Therefore, it becomes a distraction. Then the subject is lost to the eye.

If it is too consistent the same is true. You risk losing the viewer because there is no background interest to off-set your subject. So there is a balanced artistic decision required. But with practice your eye will begin to see when something draws the eye once you become alerted to the impact of the background.

The background check

No, it’s not about identity papers. The background check is all about looking around your viewfinder to see what you think of the back of the scene. When you frame up the shot it is easy to think of the composition and placing the subject in an interesting position. But forgetting to check the quality of the background is fatal. Parked cars, flying balls, litter blowing in the wind – a whole range of distractions – can all suddenly appear. Worse, they can be there all along and you have just not seen them.

The background check is simple. Look around the edge of the frame. Make sure no odd items are sticking into the shot. Look for an interesting texture and colour range. Make the colours complementary and well defined, but not too contrasting. Check to see there are no very bright or dark zones. Brightness drags the eye off the subject. Darkness tones down the interest in the shot.

Clean, tidy and well composed…

When you have checked everything, the back of the shot should be clean, tidy, well composed and not distracting. Then you can do one last quick check on your subject. If all is well press the Definition: Shutter Button. Presto – a great shot.

Creating the Perfect Background with Bryan Peterson

By way of example Bryan talks us through a situation in a park where he makes the best of the back of the shot – checking for problems and emphasising his subject.
Adorama Photography TV  External link - opens new tab/page

Comments, additions, amendments or ideas on this article? Contact Us
or why not leave a comment at the bottom of the page…

Like this article? Don’t miss the next — sign up for tips by email.