Tag Archives: Camera

How to buy a new camera…

Buying a new digital camera

Buying a new digital camera

Buying is a big decision.

Photographers should be wary of the simple answer. Buying a camera is a deeply personal matter and a big investment. You live with the consequences for a long time. Look carefully at considerations that really matter to you and your performance as a photographer. Impulsive buys may spoil your photography. If you’re comfortable with your buy you will be more likely to get to know it, use it and have fun with it.

1. Work out what you need

Impulsive buying means something will not match your need, then you won’t get the use you want. The points below will help refine your thoughts. Write down your ideas to ease your research later.

Budget: Fix a budget – it may define the type of camera you can buy. So write down what you want to spend before starting. Change your mind later, but start with an idea to guide initial research.

Usage: What type of photography will you do? There are broadly two types of photographer…
The ‘point-and-shooter’:

  • Interested in recording fun, family, events and memories.
  • Love things they do when they have a camera around.
  • Take pictures as reminders. (Holidays, family, fun, action, friendship).
  • The camera is an accessory to the activity.
  • The camera is easy to use, probably in auto mode.
  • Simple controls – lighter, lifestyle-type design.
  • Less interested in the art of photography, more the style of life.

The ‘photographer’:

  • Take pride in every shot.
  • Indulges other passions through photography.
  • Wants more equipment.
  • Interested in “functions” and “controls” – technical cameras/DSLRs.
  • Camera is an essential part of the activity. (Landscapes, macro, action, nature, still-life, fine art…).
  • Loves photography for its art, technology, skills and techniques.
  • Documents passions and communicates interests through photography.
  • Take pride in camera control.
  • Enjoys the technical aspects of the capture as much as the images.

Each has an associated type of camera. A heavy DSLR is not well suited to the carefree life of the point-and-shooter. A compact, colourful, wrist-strap camera is not suited to landscape shots and large prints. Preferences and lifestyle should be shorted out early on. Are you are a point-and-shooter or a committed photographer (DSLR style)?

Conditions: Indoors/outdoors, weather, underwater, holiday, abroad, air travel? The situations in which you use the camera affects what you buy. Consider protection, travel, camera size and special equipment needs.

Experience: Skill level affects purchase – your aspirations for your future photography will too. If you’re just starting out, buying a camera with a bewildering range of functions is daunting. Take simple steps. Entry level DSLRs provide for years of growth into your hobby and produce great images. This allows you to develop skills without confusion.

Features/flexibility: Spending more on a camera means more features and flexibility. However, while this gives more control it increases cost for relatively little increase in picture quality for starters. Don’t waste your money. Focus on what you need, not “feature bloat”.

Physique/fitness: When buying you don’t get a feel for using a camera. Little, disabled, or not very fit people may find big cameras unusable. Fit, but not shooting daily? You might struggle to hold up a big camera for long periods. Buy a camera you can hold steady and use all day (if necessary). I know people who bought great cameras and had to sell them again to buy another great, but lighter, camera. Also ensure you can grip it properly and comfortably. Can you reach all the buttons easily?

Size of prints: More megapixels is NOT a better camera today. Good quality cameras have sensors to produce great images. High megapixels are only necessary for high resolution pictures – mostly for large prints. You pay a lot of money for top-megapixel cameras. Only buy them if you frequently do big prints in high definition. Don’t worry about megapixels in the market mid-range.

Lenses: To a committed photographer lenses are key. Buying the right lenses is more important than a camera body. Lens investment pays you back for a lifetime, or many camera bodies. Spend less on the body than you intended and save money for better quality lenses (not more lenses). Consider retaining at least half your budget for lenses.

Other equipment and accessories: New cameras require other items affecting your budget. Consider…

  • Lenses (Wide angle, Zoom, macro etc)
  • Camera/equipment bag
  • Tripod
  • Spare batteries (two)
  • Light modifiers (diffusers), filters, reflectors
  • Specialist equipment for specific interests
  • Memory cards (at least two – eg. 2×16 Gb not 1×32 Gb – cheaper and more secure)
  • Off-camera flash (pop-up flash is rarely useful)
  • Remote trigger to fire the flash/camera

There may be other things too.

Compatibility: Is your existing equipment compatible? Buying a camera could mean buying those extras again, straining your budget. Consider the camera brand you want to buy. That may affect the other equipment you buy later. Lenses are a particular consideration. Top brands make good lenses, but other brands may not. That could be important for your buying strategy.

Picture quality: Quality digital cameras produce great picture quality. However, large, high resolution images (especially for printing) may need larger digital-sensor size (cropped or full frame?) and type of lens and lens quality. Buy up-market lenses as far as you can. For a point-and-shoot camera consider the quality of zoom. ‘Optical zoom’ is best, the lens does the enlarging. The quality will be better with a good optical zoom. With a large digital zoom component expect lower quality prints. Digital zooms crop the picture in-camera to make the picture appear bigger. You will see more detail, but the picture may be a lower definition/resolution.

More after this…

find out more...Photokonnexion tips by email
Enjoying this article? Please sign up for our
daily email service.
                                                Find out more
#11030#

2. Research

Now look at what is available. examine a range of reviews on different websites. Check out what’s popular around the web and get a “best fit” camera to your specification from above. Talk to experienced photographers. Join a club. Leave questions on Internet forums. Ask in shops.

Be prepared for this stage to take quite a long time. You may be committing to a brand for a quite a few years, or your career. Take it slowly so you can understand all implications. Keep notes and be prepared to check definitions and learn about features.

3. Try it out

Once you have identified your dream machine, see if you can try one out. Beg, borrow or hire. You will be unlikely to try everything but spend a weekend or week with it to really get a feel for it. That will help you to feel confident about your ideas or start new research. Ensure you are on the right track.

4. The purchase

From a shop: Local camera shops often have deals and committed staff. They will have knowledge and experience too. Remember they are on commission and a different focus to you. So go to a shop with a really good knowledge from the above before you buy.

Online: There are some great deals but also a lot of scam artists. Consider…

  • Who you are buying from.
  • Does the site cover losses?
  • Is delivery and packaging good?
  • Delivery times?
  • Are there proper cancellation and returns procedures?
  • Transit/purchase insurance (the company or your credit card)
  • Is the online store reputable and well known?
  • Do not click from email ads to the site – insecure.
  • Check with friends to see which online stores they used.

If it sounds too good to be true, it probably is. A reputable company will have protections built into the purchase and made clear on the site.

When you are ready consider negotiations. Lots of websites will do deals. Shops will too. Make sure you get the right deal, but don’t compromise security or safety.

5. After purchasing

Check your purchase properly – has everything arrived? Retain all paperwork and orders for future reference, returns and insurance. Test to see that it works properly. Get signed receipts and correct paper work for returns, delivery shortages or damage.

Satisfied you have the correct equipment and it works? Put it through its paces in a logical way. In Getting started with a new lens I show how to work through testing and getting to know new lenses. Many of the principles apply to the purchase of a camera and help you get to know your camera properly.

Other ideas?

Please share your other ideas, tips or experiences on buying a camera with us below in the comments…

By Damon Guy (author and Photokonnexion editor)

Damon Guy - Netkonnexion

Damon Guy (Netkonnexion)

Damon is a writer-photog and editor of this site. He has run some major websites, a computing department and a digital image library. He started out as a trained teacher and now runs training for digital photographers.
See also: Editors ‘Bio’.

A hidden compositional element to pull the eye into your images

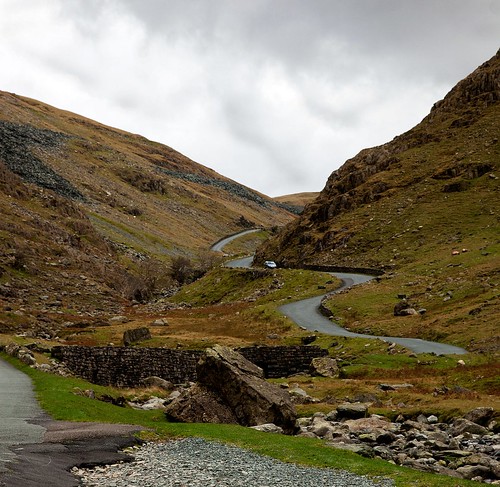
• Honiston Pass in the English Lake District •

• Honiston Pass in the English Lake District •
Overlapping elements in the picture promote a strong sense of distance.
Click image to view large
• Honiston Pass in the English Lake District • By Netkonnexion on Flickr External link - opens new tab/page

Add depth to your images.

Look at the scene and find ways to show depth. If you want a scene to be convincing you should consider all the compositional angles. In particular the depth. A flat image is not convincing. One of the ways to achieve depth is to incorporate overlap in the scene elements.

What is overlap?

In composition overlap is where one element of the scene is partially obscures another. It is a simple concept and one that creates a marker for the eye. If we see something that is obscured by another thing we have learned from experience that there is a distance between them. The relative sizes of the objects help us to guess what distance separates them.

We cannot immediately tell the relationship between far away or small objects if objects don’t overlap. We don’t have a reference point between them. We can project some sort of guessed perspective and under some circumstances we can guess by the effect of atmospherics (like haze, fog or dust in the air). However, in most cases that takes thinking and time to do. When a viewer is looking into an image they will not take the time to do that sort of guesswork. We need to make the depth immediately obvious, or we will lose the viewer.

The picture above is an example. There are several overlaps. The foreground road and grass verge slightly overlaps the large foreground rock. The latter forms a strong overlap with the wall. The mountain pass disappears into the distance around three spurs that inter-space with one another giving a strong sense of overlap right to the horizon.

Overlap is the key to the immediate recognition of depth in a lot of situations. Landscapes, and often in strange environments like tiny-scale close-ups, are good examples. When you are looking to help the viewer understand the image try and find ways to provide some overlaps so that the image clearly shows relative distance between objects throughout the distance into the shot.

Overlap the villain

Overlap is not always the good guy in an image. There are occasions when it is a source of confusion. For example the image below…

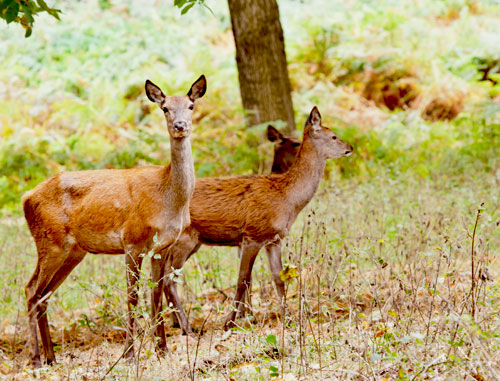
• Overlapping - the deer problem •

• Overlapping – the deer problem •


The picture shows three deer. You might need to take a second look. I did, and I took the picture. You see? Overlap has killed the image.

The most difficult overlaps you will find are the ones where there is little distance between the overlapping elements. In the case of the deer above the merge effect is almost absolute and the resolution of the second deer is spoiled. Its outline merges with the third one at the back. The legs are completely visually entangled. This is a clear confusion for the viewer.

The general rule with overlaps that do not work is clear…
         Avoid overlapping objects that are similar and close.

Unfortunately that often includes people. When they overlap there is frequently confusion. This is especially the case when the clothing is similar (say, all black suits). Another example of problematic overlaps is with silhouettes. The outlines have to be very clear to carry a true sense of character. Otherwise, you cannot tell where one person ends and another begins.

Judgement call

As with so many good things there is a bad side. While overlap is a great help in establishing distance for the eye it can also be the villain. The trick is in understanding how much the eye interprets the similarity of the overlapping element and how much distance lies between them. Your judgement call, as a photographer, is to look at your composition and ask yourself if the viewer will interpret the overlap as help or confusion.

By Damon Guy (author and Photokonnexion editor)

Damon Guy - Netkonnexion

Damon Guy (Netkonnexion)

Damon is a writer-photog and editor of this site. He has run some major websites, a computing department and a digital image library. He started out as a trained teacher and now runs training for digital photographers.
See also: Editors ‘Bio’.

Can you write? Of course you can!
Write for Photokonnexion...

We would love to have your articles or tips posted on our site.
Find out more…
Write for Photokonnexion.

Simple portrait lighting for anyone to try (pt.2)

Video

Video from the “Slanted Lens”

Making a portrait is a process.

A great portrait says something about the subject. It will capture something of the essence of the person in the shot. Achieve that level of artistry and you will have arisen above the technical process. However, if you cannot do the basic photographic capture well, all the artistry in the world will not save your shot.

In Simple portrait lighting for anyone to try (pt.1) I looked at the background layout for the one light set up in portraiture and explained the components involved. Today we will see a video for the same set up so you can put into context my diagram from yesterday.

The Basics of a One Light Setup: A Lighting Tutorial

TheSlantedLens

By Damon Guy (author and Photokonnexion editor)

Damon Guy - Netkonnexion

Damon Guy (Netkonnexion)

Damon is a writer-photog and editor of this site. He has run some major websites, a computing department and a digital image library. He started out as a trained teacher and now runs training for digital photographers.
See also: Editors ‘Bio’.

Can you write? Of course you can!
Write for Photokonnexion...

We would love to have your articles or tips posted on our site.
Find out more…
Write for Photokonnexion.

Do you make these three style mistakes?

• Soaring •

• Soaring •
If you want to develop your style – see the world a different way.
Click image to view large
• Soaring • By Netkonnexion on Flickr External link - opens new tab/page

Your personal style defines your photography.

When you start out in photography your style takes time to develop. However, you can easily stifle your photographic style if you don’t develop your photographic skills. You can avoid the problem by paying attention to these three key issues.

1. Little photographic experience

You can take thousands of pictures and still have little photographic experience. It is easy to do lots of pictures about the same type of thing. After a while this becomes boring and your pictures will become mundane or clichéd. It is easy to get into a rut and find your personal style stops developing. This happens even if you are photographing something you really find interesting.

Solution: Find new techniques to take photographs of your interest. To break out of a style rut you can easily change your technique. Here are some ways to do it…

  • Try a different lens… keep using it to force yourself to take new perspectives
  • Develop particular themes – Colour, shape, size, distance, angle
  • Use online tutorials to develop a new approach
  • Do a Google search on your image interests to see how others approach the subject
  • Discuss your interests with another photographer with different interests to get a new perspective
2. Limited range of photographic techniques

Lots of photographers beginning to develop their style are limited by the range of techniques they know. To take a different perspective it helps to extend your photographic skills. Here are some examples of techniques you can use change your photographic viewpoint…
Learn to manipulate Depth of Field – try these links to start you off:
Depth of field – a powerful photographic tool
An easy lesson in beautiful bokeh
One big change – one easy step forward (depth of field)
Controlling the Depth of Field (DoF) – Three Tips
Learn about action shots and panning – check out the resources here: Action shots – how to…
Try out night photography of your subject. Here is a resource page: Night Photography
There are lot of other resources on Photokonnexion. Check out the “Articles” section in the menu on the top of each page. Also you could try the “Categories” section up there too. They both offer different perspectives for resources on this site.

3. Poor understanding of composition and light

Both composition and light have a key role to play in your photographic style and how you approach your subject. You can follow up on some easy lessons in understanding light and compositional techniques from this site too. Here are some suggestions to get you started.
Key lessons in composition are:
Rule of thirds
Lines
Perspective
Key lessons in understanding light:
Six things to know about light
Three little known facts about shadows
Light, a Little Difference Makes a Big Impact (Hard and soft light example).
There are further links on the bottom of each page to help you follow up on more ideas.

Developing your style and skill go together

If you want to develop your own style, change your style if you are in a rut or just have wider experiences in photography – then learn more. As you develop your skills and take into account wider perspectives you will broaden your experience. You will have more fun too!

By Damon Guy (author and Photokonnexion editor)

Damon Guy - Netkonnexion

Damon Guy (Netkonnexion)

Damon is a writer-photog and editor of this site. He has run some major websites, a computing department and a digital image library. He started out as a trained teacher and now runs training for digital photographers.
See also: Editors ‘Bio’.

Focus On Imaging NEC Birmingham 3 – 6 March 2013

Focus On Imaging 2013

Focus On Imaging 2013  External link - opens new tab/page
National Exhibition Centre Birmingham 3 – 6 March 2013

A broad range of new equipment.

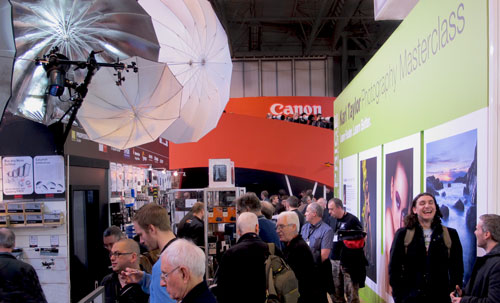
It appeared from busy aisles at this years Focus On Imaging Exhibition External link - opens new tab/page that photographic business is actively fighting off the economic depression, possibly even in rude health. With around one hundred and sixty exhibitors there was plenty to see. There was a whole range of new developments as well as the old favourites.

A Key aspect of the show this year was the new ranges of cameras. Leading manufacturers were actively promoting mirrorless cameras. The gradual shift away from the point-and-shoot market also seemed to continue. The camera market appears to be changing. Heavy duty technologies from the top-of-the-range DSLRs are being used in the lower end cameras. The market seems to be shifting in favour of high resolution processing right through the full range.

The economic climate is obviously still impacting. A predominant theme on retail stands was deals and offers. There was plenty on offer too. In previous years many of the accessories available in the UK seemed to be expensive compared to current prices. Today imported goods appear to be impacting the market. Exhibitors were showing equipment which appeared robust and very competitively priced. The shift in the camera market also appears to be creating deals. There were very good prices offered on cameras in all segments of the market. Many of these deals reflect depressed prices in the market in general but the many of the stands were offering greater reductions than even shop prices.

The show organisers unfortunately failed to publish the event list this year. Show goers were left to pick up what information they could about various talks and demonstrations from stands themselves. It made choosing how to spend our time was a little difficult. However, I managed to see three interesting demonstrations. There was a lot of emphasis on lighting techniques this year. Some very good models and backdrops were shown and lots of people were taking photographs. If you are going to go to the show take your camera for some additional fun.

Aside from impressive stands by Canon and Nikon, Sigma had an impressive spread of lenses available. There were some excellent tripods on show this year on several stands. Despite the reluctance of beginners to buy them, the tripod market is both competitive and innovative. Tripod heads are getting smoother and there are some very interesting new ideas, particularly in the high-engineering end of the market. However, the top tripod head units were weighing in at around £500… not a price to be taken lightly.

Other stands of interest included the extremely active Disabled Photographers’ Society. That society fosters a wonderful camaraderie and energy among its members. The Royal Photographic Society were also at the exhibition showing continuous short events which were well attended. They also are in active recruiting mode.

My overall impression of the exhibition this year was one of great energy. There was a lot of business being transacted and show-goers were being dynamic on all the stands. It was an enjoyable day, and one that will help to keep me informed about products and trends in this business.

By Damon Guy (author and Photokonnexion editor)

Damon Guy - Netkonnexion

Damon Guy (Netkonnexion)

Damon is a writer-photog and editor of this site. He has run some major websites, a computing department and a digital image library. He started out as a trained teacher and now runs training for digital photographers.
See also: Editors ‘Bio’.

Three “laws” of street photography that will help you

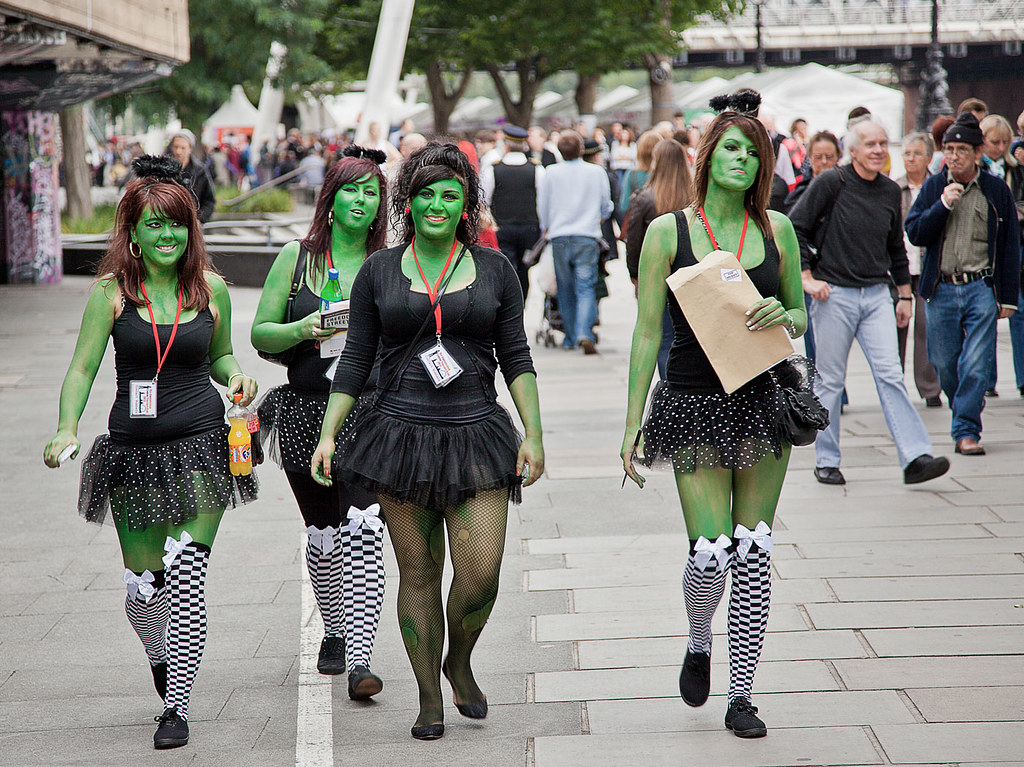
• Green Girls •

• Green Girls •
Click image to view large
• Green Girls • By Netkonnexion on Flickr External link - opens new tab/page

Street photography is not as chaotic as you imagine.

Most people behave in predictable ways in public. Understanding the general “laws” of street photography can really help you get the shots you want and capture the most interesting characters. Here are three ways that you can get ahead as a street photographer.

Outrageous people

When people are out and about enjoying themselves, especially in groups, they love to be photographed. The more outrageous they are presenting themselves, the more they love to be in the frame. They have made the effort to be “stand-outs” and so they are! More to the point they love to have photos taken because it shows they are the centre of attention. Groups like the green girls above just love to show off. And, don’t we love it too! So, for a bit of carnival fun, our first law is…

The photographers law of street stand-outs: The more outrageously dressed someone is, the easier it is to get a street photograph.

Hiding in plain sight

Be obvious, better still, be official looking. Nobody will question you taking photos. At lunchtimes I used to go out taking street shots. I wore a suit, had a tripod, and a Canon 5D. Sometimes I even wore a fluorescent jacket. I would put my tripod up in the middle of the pedestrian precinct and take photos of anything I wanted – nobody asked questions.

When hiding in plain sight, never look at someone directly. There are three little tricks to this:

  • When you are looking through the camera people cannot tell what you are looking at. If you use a wide angle lens you get a general view. Keep the camera pointing in the general direction of interest. You don’t even need to have the lens pointing directly at individuals. As people walk in and out of view you can snap them and they never know you are doing it.
  • Spend a long time looking through the lens – poised. People will walk in and out of the field of view and never guess you are watching them. All the while you are snapping away. Crop them into position later. With a wide angle shot you have plenty of scope to change the composition on-screen later.
  • If you are doing some spotting, not looking through the camera, make a big effort to “look past” people. Make it look like they are just in the way. People soon lose interest. Bingo – you have the shot and they are none the wiser.

So, for our every day photography in the high street our second law is:

The photographers law of sticking out like a sore thumb: If the photographer is obvious, the subject will be oblivious!

Candid or “can, but didn’t”?

The candid shot is a part of the business of being out on the street. However, not every shot has to be a candid. Interacting with people, getting in close and watching them pose, work or play is also a part of the scene. You probably think it’s difficult to stroll up to strangers and ask to invade their privacy with a camera. Its not as difficult as you imagine. Most people are pretty flexible. If you show an interest in them, generally they like to show cooperation. The problem is with the photographer. I have heard photographers say, “yeah, I could of spoken to them, but I couldn’t be bothered”. What they really mean is: “I would love to have chatted with them and got some shots, but I was worried about rejection”.

Here is some news. It is not as bad as you think. If you do get rejected just walk away. Try someone else. Actually, rejection does not happen very often. Most of the characters you want to photograph are quite pleased to be involved. Be polite, chatty, fun, complementary and respectful and most of the time you will get what you want. Pick your subjects for their character, presence and interest and you will probably find that they are pleased to share with you. Get in close and personal, be enthusiastic and involved. You will be a part of the behaviour, and a part of their lives. If they want copies, send them some. Then you have given them something in return for their posing. This is the third law:

The street photographers law of proactive interaction: If you don’t ask you won’t get!

If you want to be a street photog…

You have to develop and practice a number of strategies. Street photography is a fast and fun activity. Sometimes the direct action approach works best. Other times the candid approach works. However you choose to do it you will find it’s not that difficult. Actually the most difficult thing is starting… and only you can sort that out.

find out more...Photokonnexion tips by email
If you enjoyed this article please sign up for our
daily email service.
                                                 Find out more
#11030#

By Damon Guy (author and Photokonnexion editor)

Damon Guy - Netkonnexion

Damon Guy (Netkonnexion)

Damon is a writer-photog and editor of this site. He has run some major websites, a computing department and a digital image library. He started out as a trained teacher and now runs training for digital photographers.
See also: Editors ‘Bio’.

Easy bird pictures in your own back yard

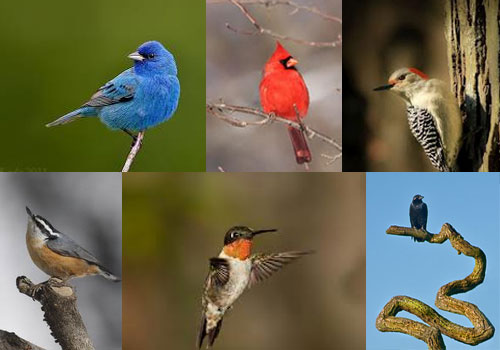
• Bird Compilation •

• Bird Compilation •
You can have a great time with these simple tips – a world of birds in your own back yard.

Birds offer endless photographic opportunities.

I’ve been fascinated by birds since boyhood, particularly birds of prey. Recently I’ve followed some keen bird photographers. I find that the small birds in my back yard are facinating too. Lets get started on some backyard photography. This will be a fun project for starting over the weekend.

This video gives down to earth, simple advice about working with birds close to home. Getting started in Feeding and attracting the birds mid-Winter gives a lead for the birds nesting in the spring. I am going to get started now. It’s Winter here and I am looking forward to spring.

How to Photograph Garden Birds


How to Photograph Garden Birds – RandoMnBest  External link - opens new tab/page – Uploaded on 28 Jan 2011

find out more...Photokonnexion tips by email
If you enjoyed this article please sign up for our
daily email service.
                                                 Find out more
#11030#

By Damon Guy (author and Photokonnexion editor)

Damon Guy - Netkonnexion

Damon Guy (Netkonnexion)

Damon is a writer-photog and editor of this site. He has run some major websites, a computing department and a digital image library. He started out as a trained teacher and now runs training for digital photographers.
See also: Editors ‘Bio’.

Can you write? Of course you can!
Write for Photokonnexion...

We would love to have your articles or tips posted on our site.
Find out more…
Write for Photokonnexion.