Author Archives: Damon (Editor)

Conservation photography – keeping nature alive in our thoughts

Conservation photography can help us to connect to nature.

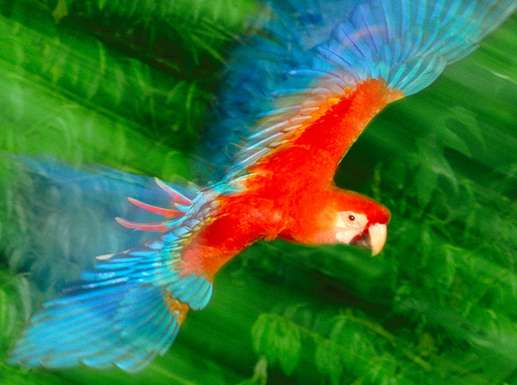
If you capture colour and movement and an eye catching event you have a vibrant image. Through conservation photography, we can keep alive our connection with nature.
(Image from the video).

Wonderful world

Life itself is an awesome thing. Here, in this tiny corner of the universe we both celebrate life and destroy it. All life is self-centered. Just surviving is a feat for most forms of life. But humans also have a wider world view. At least, some humans do. Most of us go about our lives at the expense of the environment. We are oblivious to the impact we have on this wonderful world. Conservation photography can help that change.

Our connection to the world around us

Human we may be, but inside we are still animals. We still connect to the world. Every mouth full of food, every breath, we connect. But these things are not as immediate as they once were. In our man-made world we rarely struggle for breath or go short of food. The loss of those imperatives has made us forget our roots. We still need to remember our place. Conservation photography helps us connect.

Conservation photography is about…

Through our images we can help people connect with nature. Even if it is in a small way. As photographers we have a duty to help people see the world, as does any artist. We are well placed to show people the reality, the harshness, the wonder and the loss. Conservation photography is about being an advocate for nature. We should find ways to show our images so people appreciate nature and want to conserve its wonders.

Even a few pictures can have an impact. If you take images of plants, animals or landscapes you can help others connect with nature. Our images can help to keep nature alive and vibrant in people’s minds. If you can, even with a few images, try to explain to people what is right, wrong or dangerous about environmental things and events.

Motivating people to get involved is difficult. Conservation photography helps people to see what is being done. It also helps them see the tragedy of the natural world today. It can help us show people those wonders that are worth conserving. From those pictures people become aware. Awareness is the root of motivation. Any way we can help people connect is a good thing.

Wonderful nature

I was prompted to write this piece on conservation photography after seeing this video. The photographer, Frans Lanting, uses vibrant images to take us into the animal world. His lyrical, almost poetic approach is captivating. His images show a vibrant and emotive connection with nature. The video is a short piece, but the images are amazing.

Video provided by TED.com

Comments, additions, amendments or ideas on this article? Contact Us
or why not leave a comment at the bottom of the page…

Like this article? Don’t miss the next — sign up for tips by email.

Damon Guy - Netkonnexion

Damon Guy (Netkonnexion)

Damon is a writer-photographer and editor of this site. He has run some major websites, a computing department and a digital image library. He started out as a trained teacher and now runs training for digital photogs.
See also: Editors ‘Bio’.
By Damon Guy see his profile on Google+.
Family photography – a shared interest refreshes family life

Family photography can stimulate the family unit.

Family photography can stimulate the family unit.

Losing sight of things

Often family life can cause a couple to lose touch with each other. They settle down together and ‘life’ takes over. The interests that bought them close in the first place get side-lined. Careers, mortgages and children become the focus instead.

I see so many couples in my sessions where the focus has been lost. Ordinary life ‘things’ get in the way of fun and growth for the couple, as a couple. Now they begin to wonder why they’re together. They can also begin to question their future union.

Family photography – a new beginning

Taking up a new hobby can bring the whole family back together. A new shared interest involves everyone. Each can easily progress at a pace which suits them.

I’m a great believer in family photography to bring a new focus into the family unit. Age is not a barrier. Great digital cameras are cheap too. Everyone can become involved at their level of skill, and in any weather or season.

Trips out for other activities can be enhanced with family photography. Everyone can take part in finding interesting photos to take. There is also the added bonus that days out are captured from several stand-points. Even a walk on a dull day can be made much more exciting. Try setting mini competitions for the most unusual photo!

Education through family photography

Educational benefits for the children are huge. Their horizons expand. They learn to really look at what is around them. They stop taking their surroundings for granted. But they gain so much more than this. The children learn about harmony and contact away from the distractions of home. They soak up the importance of family time. They see how to take time over an activity. They find out how to get the best results. Later, back at home, the post-processing is another lesson where you can all learn. At the end of it they have images to show for their efforts. Family photography brings all sorts of benefits.

Family photography benefits for parents

For parents the benefits can be immense but be very subtle.

To begin with, the parents create time and space to be together. Family photography is the new focus. They also learn to use their eyes more. By doing so they begin to know each others body language better. It is accepted that 55% of communication is via the body. Expressions, gestures and posture are important. The deeper the parents understand each other the more they can grow and help each other.

Grow together

You can open your eyes to the world around you with family photography. You will become so much more adept at understanding the human beings too. And, that is a focus to knit you into a tighter family unit. In the future you will also have an enduring record of your family growing together.

Comments or ideas on this article? Contact Us
or why not leave a comment at the bottom of the page…

Like this article? Don’t miss the next — sign up for tips by email.

Post contributed by :: Linden Porter

Linden Porter is a professional relationship coach in Buckinghamshire, UK. She is also a keen photographer. ().

Photography hacks – adapting your equipment

Seven photography hacks :: adapting your equipment

Seven photography hacks

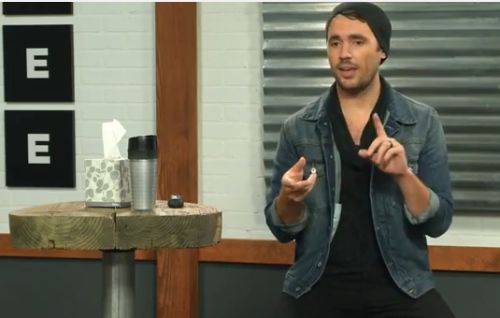
Photography hacks- making something work differently

In most shots our standard equipment does what is required. Yet, the standard shot is not always what we want. Sometimes we want to make some special effort to provide a different effect, a new view. There are many thousands of photography hacks. Each one can give us something different. Some are more radical than others. But what it really comes down to is making our equipment fit our need to get a specific type of outcome.

Regular readers will know that creative work often involves visualisation. Seeing a hoped-for image outcome in your head helps you to have ideas. Such pre-thinking can help you plan how to use or adapt your equipment. To get the desired result you may have to do all sorts of small adaptions. Walk into any working studio and you will see, card, boards, gaffer tape, clamps, flags. They are all there to help jury-rig things into a new way of creating an effect for the shoot.

These photography hacks are the mainstay of studio work and important on location too. You can do lots of simple things to change the light, the colours, the shadows, the effects of light on your lens, and so on. All that is required is to try and think ahead about what you want to achieve. Then, find ways to change your equipment to get the effect. Familiarity with your equipment helps. As you get creative, then other ideas will come to mind. Look around for ways to change things, or to get new effects.

Photography hacks video

In the video, “7 Simple Photography Hacks” you can get an insight into some of the basic ideas. These are a good start for some examples you can develop yourself. Spend a little time thinking about things you have around you. See if some of them could be used in your own photography hacks.
Provided by COOPH Photography hacks video | External link - opens new tab/page

Messy

The “Vaseline” photography hack in the video can be a bit messy. Only do it on a filter, not the lens. And, try to keep any of the “Vaseline” off the rest of the camera. It is difficult to clean up too. So use an old filter.

Another photography hack for you to try

Here is another idea you can use. It is less messy and gives some satisfying results too…

  • Cut a section out of a fine quality pair of ladies tights (psst… make sure they are surplus first!).
  • Pull the piece tight across the end of your lens.
  • Fix it in place by securing it with elastic bands tight enough over the end of the lens to hold it taught.
  • Take your photo through the material of the tights.
  • To vary the effect, you can make a central hole in the material.
  • Try different colours, try different types of tights knit.

This one is a very old photography hack. It used to be used a lot in wedding shoots years ago. It is just as effective today. Have a go. It is fun.

Let us have some of your shots. We would love to put up a few for others to see.

Comments, additions, amendments or ideas on this article? Contact Us
or why not leave a comment at the bottom of the page…

Like this article? Don’t miss the next — sign up for tips by email.

Damon Guy - Netkonnexion

Damon Guy (Netkonnexion)

Damon is a writer-photographer and editor of this site. He has run some major websites, a computing department and a digital image library. He started out as a trained teacher and now runs training for digital photogs.
See also: Editors ‘Bio’.
By Damon Guy see his profile on Google+.

Expression in your photography is you

Expression :: Put you into your portfolio

• Expression :: Put you into your portfolio •
[Image taken from the video below].

Let go of other peoples expectations

Photographers often say about their work that they “should” be doing this or that. Or, maybe they say they would be “better” doing this instead of that with their work. Often that just adds up to a statement about their aspirations. Often these aspirations are reactions to what they think people want. They are not true expressions of who they really are.

It is all too easy for us to fall foul of fashion and social pressure in our photography. Amateur and professional alike, photogs are artists. True expression is really about what we feel. Not what we do to meet the expectations of fashion or popular interest.

Expression – understanding our inner selves

When we are truly satisfied with a photo it’s not because we think everyone else is going to think it’s great. It is because we know we have done something good. We’ve done something that really expresses how we feel about the shot we have just made. Expression is our inner artist coming out.

I met a photographer once who thought, when he got started, that it was all about glamour and glory. He tried hard for four or five years to be “be a professional photographer”. He did everything his boss told him. He took the pictures his boss said would make him successful. He worked continually to meet the goals set by the photographic fashions and the aspirations his boss had for him. He even did a part time college course and learnt all the academic and background ideas. He did as he was told, learnt the trade – and failed.

Twenty years later, when I met him, he was working as a local government officer. I asked him why he had given up photography. He told me he had not. He gave up being a pro-photographer and for a long time did not pick up a camera. Then, one day, years later he did. And, he discovered what photography was really about. It is about expression.

What he’d not seen in those heady days when learning the trade was his own inner artist. Everything he did was for others. All his pictures were motivated by external influences. Then, years later, when the pressure was off he discovered something. Actually photography is a very hands on, gritty sort of profession. There really is not much glamour. But there is a lot you can say about the world. A photographer, like any artist needs to let themselves out. The expression of what they feel about a scene is what they should be working on. Not what everyone else thinks should be said about a scene.

Expression IS photography

Make sure your pictures say something. Let people know who you are through your pictures. Tell them what you are interested in. Communicate with them through your images. Make pictures in their minds. Expression is everything in photography. It says “I love this”, or “that is important”, or “my heart was in this scene”… or whatever. Expression IS photography.

Who you are goes deeper than your portfolio

Here is a short video clip with a famous photographer, Jeremy Cowart Expression :: Jeremy Cowert | External link - opens new tab/page. It shows something many photographers forget. When your pictures reach out to someone, the influence is more profound than the talent of technical excellence. Telling people who you are and what you are thinking through your pictures is a powerful expression.
Uploaded by CreativeLive


What’s Your Mark? Every Moment Counts Expression :: Book review - What's Your Mark?: Every Moment Counts | External link - opens new tab/page | External link - opens new tab/page
In this extraordinary book Jeremy Cowen delivers amazing photography. With it he tells some equally extraordinary stories. The book breaches the boundaries of ordinary coffee-table photography books. The stories cut straight to the heart. Human interest and art do live together. This book brings that out.
What’s Your Mark? Every Moment Counts by Jeremy Cowart (Photographer) and Brad Davis (Designer), Expression :: Book review - What's Your Mark?: Every Moment Counts | External link - opens new tab/page | External link - opens new tab/page

Comments, additions, amendments or ideas on this article?
Contact Us or leave a comment at the bottom of the page…

Like this article? Don’t miss the next — sign up for tips by email.

Damon Guy - Netkonnexion

Damon Guy (Netkonnexion)

Damon is a writer-photographer and editor of this site. He has run some major websites, a computing department and a digital image library. He started out as a trained teacher and now runs training for digital photogs.
See also: Editors ‘Bio’.
By Damon Guy see his profile on Google+.

File format types – editing is different in each one

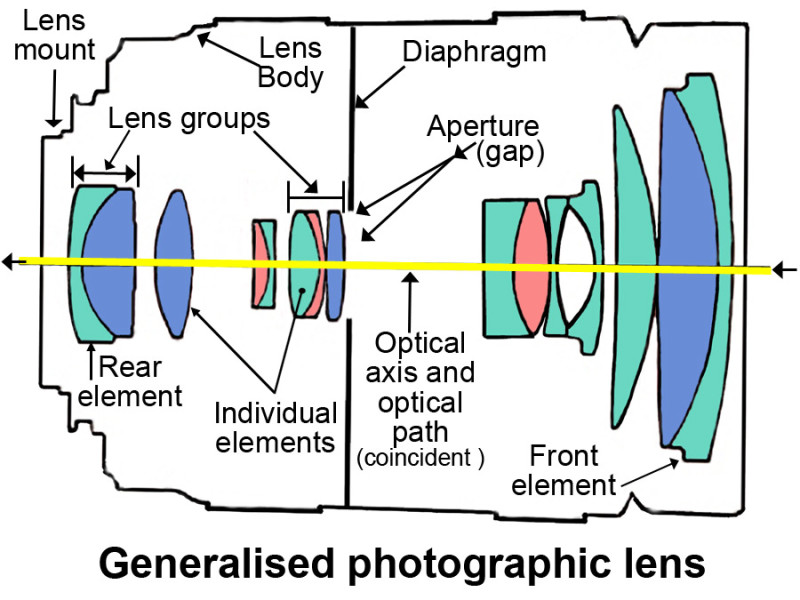
File format types :: Photographic Lens Diagram.

• Theoretical Lens diagram •
Diagrams are different to photographic images. This diagram is drawn using a vector image editor. Another sort of editor is used for an image or photo file. These editors each have their own file format types.
(Click image to see a definition of a photographic lens.)

What is in a file format?

All files have extensions that tell us what they are. In photography file format types tend to be either compressed, lossy files (*.jpg, *.GIF, *.PNG files etc.) or RAW files (CR2, NEF, TIFF etc). Actually these are both of the same generic file type – Bit Maps or Raster Images.

File format types – Vector images

The image above is the type of diagram used on this website for showing more technical ideas. It was drawn in a vector image editor and saved as a vector image file for later update or re-use.

The vector file format types are useful for creating precise diagrams. The lines and shapes are each produced with editing tools that make mathematical models for them. The pixels which display the lines are under the control of the math-models and display colours (black, white, red etc) so you see the shapes they make. The diagram is precise, crisp and clean.

The precision, measurement and scalability of the model comes from the predictable formulae. However, to save the file for use on the Internet requires another of the File format types. Vector files need to be converted to raster files.

File format types – Raster images

The mathematical-model type of diagram is more difficult to produce in an image editor for processing photographic files. For photo edits we use an image editor for painting, cloning and shading and erasing and so on. These types of image editors create what is known as a raster image or bitmap image. These raster images use file format types suited to art, free hand drawing/painting and image processing.

The raster files are ‘bitmaps‘. These are created from arrays of sensors. Each tiny sensor spot on our cameras’ digital image sensor is a ‘photosite‘. It’s a collection point of data (bits of data) for the light coming into the camera. There are millions of these sensors (mega-pixels of them).

Add up all that data and display it on a screen and the pixels on the screen show us an image (a bitmap). Each tiny bit of data collected at a photosite is translated to a bit of data that represents it on screen in a pixel. The image reproduces the real world.

Editors can do both raster and vector processing

The two file format types, ‘raster’ and ‘vector’, are not inter-changeable. They have to be converted from one to the other. This needs to be done using one of the tools in the editor you are using. It may mean saving the file in the new format and then re-opening it. It may need to be re-opened in another editor for further editing.

Some editors can create both File format types. But the two types of image data need to be kept separated. In most editors this is done by creating “layers” for each format type. Some layers form vector lines and graphical objects. In other layers the data the makes up raster objects. This means they can retain the special properties that make them useful. For example, precise lines in vectors and, say, variable hue/tone for brush strokes in a raster image.

Mixed editing allows us to do artistic work or process photos. And, within the same image, we can put in precise graphical and geometric components.

In the final display…

In the end both file format types give up most of their editing properties. The full format of each type tends to have very large files. Too large to use easily on the Internet. When we save these files for display we reduce the editing ability. This reduces the file size.

In vector files we “rasterize” the vector components to convert to image files. These in may still be too big for Internet use. They may need to be made smaller.

Raster files in full format can be reduced by taking out a lot of editable data in the file. That reduction (compression) makes them easier to use on the Internet. So in the end the file format becomes the *.jpg, *.GIF, *.PNG files etc. that we know so well. The reduced data means the new format, (eg. *.jpg) is not easily edited without affecting the visible quality of the image.

A comparison…

If all this seems a little technical think of it this way…

A spread sheet program is suited to doing maths, processing numbers and doing statistics. On the other hand a word processor is suited to writing text, manipulating words, using natural language and laying out pages. Both use numbers and letters. Both use mathematical tools and writing tools.

The unique forms of the word processor and spread sheet make each suitable to a particular purpose. A spread sheet works in a mathematical way (with some wordage). Word processors are more about language but use of number when needed.

Vector graphics and raster graphics have almost the same distinctions. They do it with art (in say, ‘PhotoShop’) and draughtsmanship (in say, ‘Illustrator’ or other draughting or drawing editor). Spread sheets and word processors have their own file format types too.

Glossary entries about file format types

Entries in our Glossary explain file format types in more detail…
Definition: Raster Image :: artistic and photographic images.
Definition: Vector Image :: precise diagrams, graphs and geometric pictures.
Rastor images vs. Vector images – a comparison table.

Comments, additions, amendments or ideas on this article?
Contact Us or leave a comment at the bottom of the page…

Like this article? Don’t miss the next — sign up for tips by email.

Damon Guy - Netkonnexion

Damon Guy (Netkonnexion)

Damon is a writer-photographer and editor of this site. He has run some major websites, a computing department and a digital image library. He started out as a trained teacher and now runs training for digital photogs.
See also: Editors ‘Bio’.
By Damon Guy see his profile on Google+.
Images should make a point… photographic meaning

No Image Today - put photographic meaning in every image you make.

• No Image Today •
There should be a point to every image you make. An image is a communication. Without meaning it is just a picture.

What is a true image?

If your picture has succeeded it has to conjure an image in the mind of the viewer. But if your picture is just that, a picture, it will not succeed. For the genuine photographer, nice is not good enough. A picture should have a meaning, a point, something that makes it a communication. It should have something that makes it an image in the viewers mind.

Photographic meaning… the punch in the picture

Uncertainty about the validity of an image is a necessary part of creativity. Especially in the sense that you should always question, “Have I actually said anything in this picture?” Photographic meaning is an important idea. To really comprehend it, ask yourself if your picture says anything. Be sure you have really transformed it into an image.

I remember once sitting by an autumnal birch tree. It had lovely little yellow leaves and was a nice shape. I took a picture of it. But in the end that picture was simply a nice tree. It spoke to me because of the few minutes pleasure it gave me as I admired it. The picture had nothing to say to anyone else. I never showed it to anyone else, ever. It was about my feelings. It said nothing and was of no benefit to anyone else. It had no photographic meaning. It’s now lost in the obscurity of hundreds of thousands of my other images. ‘Nice’ is simply not good enough to achieve photographic meaning.

We could be picky and obtuse. “Well, it had a non-fatalistic statement to make about the environmental impact of an autumnal tree in its cardinal state, doing what birch trees do… etc.”. Actually, saying anything about it would be mere fluff on the wind. It was a non-picture. Devoid of photographic meaning, it satisfied nothing in the viewer.

You could say the picture now has a ‘raison d’etre’ following this blog. But that was not a necessary, or sufficient, reason for the picture. It’s a post hoc justification for its existence.

The Photographer’s Eye: Composition and Design for Better Digital Photos

When I first read this I wondered how useful it would be. But I learned the importance of photographic meaning. Composition in all its forms is critical to great image-making. Read this book. It is a visual treat as well as a great insight to the power of design and composition in your photography.
The Photographer’s Eye: Composition and Design for Better Digital Photos

Communication

Think of all photographs you make as a way to communicate something. That birch tree picture did not speak to an audience. I remember it now because I sat and stared at the picture for ages thinking, “What was I thinking about to take this picture?”. As an image it conjured nothing in the mind of the viewer. As a picture it failed to pass the photographic meaning test.

Nice is not good enough – images must carry photographic meaning

The ‘birch tree’ incident, not the picture, serves as a reminder. Creativity should have a point – be an actual communication. Otherwise it will have no photographic meaning and little else to commend its existence.

A dedication – Photographic Meaning

This is dedicated to my friend Alison. She struggles to understand her own significance as a communicator. Actually, her astute photo-observations convey a lot of photographic meaning.

Comments, additions, amendments or ideas on this article? Contact Us
or why not leave a comment at the bottom of the page…

Like this article? Don’t miss the next — sign up for tips by email.

Damon Guy - Netkonnexion

Damon Guy (Netkonnexion)

Damon is a writer-photographer and editor of this site. He has run some major websites, a computing department and a digital image library. He started out as a trained teacher and now runs training for digital photogs.
See also: Editors ‘Bio’.
By Damon Guy see his profile on Google+.
Settings for overcoming hand-shake blur

Balance your settings to avoid hand-shake blur in low light.

First dance
Low light photography needs a careful balance of settings to ensure a sharp shot and avoid hand-shake blur.

Hand-shake blur and sharp results.

Hand held shots often return blurred results. While using auto-settings the problem does not seem to arise. What is going on and how do you overcome hand-shake blur?

Manual settings and auto

Your digital camera is a sophisticated computer. It has access to a range of powerful programs that make decisions about each shot. When you use auto settings you are handing the camera over to the control of its programming. The auto setting is selected with the green square on the program dial. It makes all the decisions and you just point and shoot. This ‘auto’ strategy is limited. It leaves you unable to make creative decisions about your shot. Depth of field, movement blur and the light or dark emphasis in a scene is beyond your control.

With any of the manual settings on the program dial things are different. Shutter speed (S or Tv), Aperture (A or Av) and ISO settings allow you to get control of the exposure. Once you control these settings you are able to make creative decisions about your shot. But if you get it wrong you might allow hand-shake blur to creep in. Equally, with the right strategy, you can also set up to prevent the effects of hand-shake blur.

What causes hand-shake blur

Low light, long shutter opening or low ISO can all contribute. Hand shake-blur is caused by hand movement while the shutter is open. To prevent it you shorten the time the shutter is open. With a shorter shutter opening any hand movement is not given time to impact on the shot. Very fast shutter opening, say 1000th of a second, freezes the shot. The hand has almost no time to move in that short period. So, no hand-shake blur.

However, short shutter opening time means less light reaches the sensor. A good exposure requires sufficient light. A shutter speed of 1000th of a second would leave the picture under exposed in low light conditions. On the other hand, if you select a 15th of a second, the shutter is open for a long time. Hey presto! Enough light. But, (boo!) hand-shake blur. The shutter is open too long. Your hands have plenty of time to move.

Over coming hand-shake blur is about balance

If you raise the ISO setting, the sensor becomes more sensitive to light. So, raise the ISO until you can set the shutter to around 200th of a second. At that speed it is easier to hold the camera steady.

Of course, if you have to raise the ISO a lot to allow 200ths sec. you will get a grainy picture. Raising the ISO reduces the quality of the shot. Ideally an ISO setting of 100 will give you the best quality photographic result. On an average day you may have to set your ISO at around 200 or 400 to get a 200ths of a second shutter speed. Up to about ISO 800 the quality from most good DSLRs will be fine. After that, the quality of the image will be affected more and more by grain or “Digital Noise”.

Pictures taken in a dark church, or at an evening dance will have very low light. So, as an example, an ISO of 1600 would possibly give you enough sensitivity to work with a shutter speed of, say, 160th of a second. That would allow you to get a hand-held shot without hand-shake blur, if you have a steady hand. But you might also get a little digital noise in the final image.

Getting the right settings between the ISO and shutter speed is a fine balance. You need to raise the ISO the right amount to give you the shutter speed you need. Too much ISO and you get bad quality in the picture. Too little ISO and you will be forced to use a shutter speed that’s too low. Hand holding under these low light conditions may cause hand-shake blur.

Hand-shake blur and aperture

With ‘auto’ shots the camera program takes account of the light conditions. The program sets the ISO, aperture and shutter speed to values that allow shorter shutter opening. So far we have only discussed shutter speed and ISO. But aperture has a part to play too.

If you open the aperture wider it lets in more light. So, you don’t need to raise your ISO so high if you also open your aperture. In our church example above, an ISO of 800 (not 1600), shutter speed of 200th sec. and an aperture of f4 (wide) could create a good exposure.

If your aperture is set at say f11 (small) less light will get through. So, again you are going to need to have higher ISO or long shutter opening (or both), depending on your light conditions. A small aperture, like f11, will give you a sharp picture to infinity. But, you may have to sacrifice picture quality (high ISO) or suffer hand-shake blur (from longer shutter opening).

The wide aperture does have a penalty too. As the aperture gets wider the depth of field gets shallower. So once again we are back to a balance. To hand-hold a camera we must make decisions about all three basic settings – Shutter speed, aperture and ISO.

Other strategies for avoiding hand-shake blur

Camera movement or hand-shake blur can be avoided in a lot of different ways. Sometimes you must work in situations where hand-shake blur is inevitable without more radical solutions. Then there are other things you can do to reduce hand-shake blur. Here are some of them…

  • Lens anti-vibration: Many quality lenses have anti-vibration systems. These sophisticated systems detect hand-shake blur as it happens and counteract it. This might extend your safe shutter speed down to quite slow shutter speeds (say a 60th of a second). While this many not solve all your problems it can help in less extreme light conditions.
  • Tripod: A steady platform will prevent camera movement. If you need a long shutter opening then work from a tripod to eliminate hand-shake blur.
  • Flash: If you are working in a low light situation you may need to raise light levels. A flash unit, on or off the camera, is one answer. An intense flash of light can raise the light high enough for you to work with settings that prevent hand-shake blur.
  • Studio lights: More controllable, but more expensive, these lights can accurately raise light levels to enable you to reliably avoid hand-shake blur and get a good exposure.
  • Reflectors: You can use these to bring more light to where you are working by, say, reflecting from another artificial light or natural light source. Reflectors are particularly useful in reducing the darker areas of a shot. You can reflect the light to just raise light levels in some areas bringing the over all light level up. As the light level across the shot is raised the hand-shake blur can be reduced since shutter speed can be faster.
  • Improve your stance: A better stance is a great way to improve your steadiness.
  • Go to the gym: “What? This is about photography not fitness”, I hear you say. Well, here is a revelation. If your arms are stronger you can hold the camera steadier. A DSLR is a heavy object. Especially after a long session your arms will not hold the camera steady. If your camera is too heavy for you – well, strengthen up. Actually, more strength gives you much better motor control of your hands in any case. You will be able to hold even a point and shoot camera or phone with a steadier hand after regular exercise. Photography, like all other pursuits benefits from a fit body. Improved fitness will reduce hand-shake blur.
The answer to avoiding hand-shake blur

The auto program in your camera may give good results and reduce hand-shake blur. However, it will only do so in average conditions. In more extreme conditions, or where you want to exert some creative control over your shot you need to go manual.

The use of manual settings gives you control. You can control depth of field, subject movement-blur and light vs. dark emphasis in your shots. But, to get the best out of your camera you will need to set it up to avoid hand-shake blur. In this article I have tried to help you understand that the settings you pick can help you control hand-shake blur. Overall, the answer lies in creating a balance between the basic settings of aperture, shutter speed and ISO so that your hand held shutter speed is around 200ths of a second or higher. Lower than 200ths of a second and hand-shake blur is liable to creep into your shots.

Of course there are other things you can do to help raise your shutter speed. I have mentioned some of them. But they all have the same effect. They either stabilise the camera (tripod) or allow you to get the shutter speed high enough so you can steady the camera. So, now you know. Get out there and try to get your settings so you have around a 200th of a second when you take the shot.

Comments, additions, amendments or ideas on this article? Contact Us
or why not leave a comment at the bottom of the page…

Like this article? Don’t miss the next — sign up for tips by email.

Damon Guy - Netkonnexion

Damon Guy (Netkonnexion)

Damon is a writer-photographer and editor of this site. He has run some major websites, a computing department and a digital image library. He started out as a trained teacher and now runs training for digital photogs.
See also: Editors ‘Bio’.
By Damon Guy see his profile on Google+.