Author Archives: Damon (Editor)

Photographing windows from the inside

Photographing windows from the inside | Photokonnexion.com

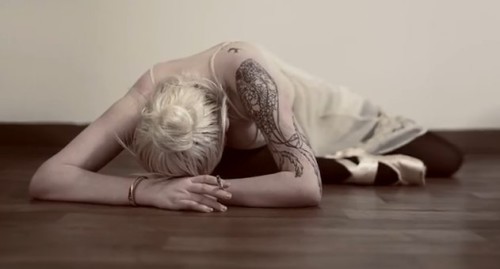
• The make-up artist •
Photographing windows from the inside creates a problem. The brighter light outside will create a silhouette inside – leaving your subject black or very dark.

Bright light outside overpowers the subject inside…

Photographing windows indoors you face a problem. The outside light is usually brighter than the inside light. It will probably overpower the light in the room. All the camera will see is a silhouette of the subject or the window frame.

Photographing windows to capture the scene outside, creates a problem with the big variation of light. From the inside to outside is a jump. Our eyes can cope with a big difference of light intensity from inside to outside. The camera cannot. This is a classic problem in photography.

What can the camera cope with?

Really good sensors in a modern DSLR can possibly cope with a range of around 12 stops of light, maybe a little more. But, a camera cannot see that range all at once. We have to change the sensitivity of the camera to light. Then it is able to see the extremes. We do this by changing the ISO.

However, if the difference between a dark and bright area in the lens is greater than about two stops we will lose detail somewhere. Some dark areas will be too dark. Some light areas will be blown out white.

Photographing windows can be done with a compromise. We could try to expose for the darker subject inside that is facing us. The subject will look fine, but, the outside will be bright white – blown out.

We could focus the camera out of the window on something in the brighter light. This creates the problem in the photo above (and in “Through the old window 1”, below). The inside will be too dark and the subject black, or with lost detail in the dark. But at least we can see the scene outside.

Photographing windows from the inside | Photokonnexion.com

• Through the old window 1 •
The big difference in light levels inside and out leaves the frame in silhouette. That is not how you would see it in real life.

The human eye can see around 20 stops of light. That’s a whole lot more than a camera. We do not see a silhouette like the camera does. In the top picture I was easily able to see the detail of make-up artist, her face and clothes. In the first window picture above I could see all the fine detail of the stonework. In addition, the human eye does not need to adjust our ‘ISO’ to achieve this miracle. We can, maybe with a little eye watering, cope with big differences in light levels.

When photographing windows from the inside…

So how do we photograph out of a window without creating that silhouette effect?

There are several things you can do…

  1. You can set the camera to use all the focus points on your viewfinder. Then the camera will take an average light reading across the lens. It will balance between the darker internal subject and outside light. This may help the camera cope. But between one and two stops brighter outside the camera will still begin to lose detail in the bright areas and the dark areas. It’s not a good compromise unless the light outside is only slightly brighter than inside (i.e. one stop, or less, difference).
  2. As you move back, photographing windows becomes easier. They get relatively smaller and less bright. However, it’s not an option in a small room, as in “The make-up artist” picture above. You may still have a problem if photographing windows where outside is still greater than two stops brighter than your subject.
  3. You could also close the curtains a bit. However, the point of the exercise is lost if you cannot see outside properly. Ideally, we want to see our subject and the view from the window.
  4. The only practical option in most cases is to raise the internal light levels. Then the subject will be brighter and the difference between inside and outside less than the two stops that will create a silhouette. This will allow the camera to make an exposure that will be balanced between inside and out.
Photographing windows – think about light levels

So, what do you do to raise the light levels? Simple, brighten the room…

  • Let light in through another door or window somewhere.
  • Use some of the light from the window itself by using a reflector to raise the light levels on your subject.
  • Turn on some lights. (Be careful of colour casts with artificial light).
  • Use a flash on your camera.

Using natural light is the best option. It will colour-match to the light coming through the window and not create funny colour imbalances.

Reflected light is great too. When you are using light reflected from the primary source of light it will never be brighter than that primary source. This means it will be both colour matched and look natural as the main source will not be overpowered. The slight variation will help sculpt the shadows and give a 3d effect too. So use a large sheet of white card or a photographic reflector to raise the light levels on your subject.

Lights in the room are more problematic. Artificial lights create odd colour variations. Fluorescent lights and tungsten lights both have strong colours that are different from daylight. Our eye compensates for them normally. In a picture the colours really stand out and can look very odd.

Flash has problems too. It tends to be a very bright, harsh light. If it is direct onto something the harsh, strong light tends to eliminate shadows. As a result things look flat and lifeless.

There is a place for flash. It is especially good if you can get it off camera and to the side a bit. It creates shadows and textures. This makes the subject more life-like and 3d.

Another technique is to bounce the flash from a wall or ceiling nearby. The light is spread around and appears more even on the subject. It is always best to try a few test shots. If the flash is very bright it looks artificial. Turn the power of the flash down. Also, bouncing it off nearby surfaces will lower the light intensity. Try to get the light in proportion to the expected light levels in a room.

And the trick is…

To get it right you need to even out the difference between the outside light levels and the inside. If there is less than one stop of light difference between inside and out – you have a solution. So, balance the light levels.

Photographing windows from the inside | Photokonnexion.com

• Through the old window 2 •
If you raise the levels of illumination inside the room, the silhouette is lost. Instead the frame becomes illuminated. You see it in the picture like you would in real life.

This is the bit where trial and error comes into play. Internal lights are often too dim for photography. So you might need to supplement them with more light or “fill-in flash“. Another possibility is to add a bit of light reflected back on the frame (or your subject). Again, this will supplement the natural light. In “Through the old window 2” I used flash which was bounced off a white ceiling. This lowered the power of the flash and spread the light around a bit. It looked a lot more natural than when I tried it with the flash directly at the stonework.

Comments, additions, amendments or ideas on this article? Contact Us
or why not leave a comment at the bottom of the page…

Like this article? Don’t miss the next — sign up for tips by email.

Damon Guy - Netkonnexion

Damon Guy (Netkonnexion)

Damon is a writer-photographer and editor of this site. He has run some major websites, a computing department and a digital image library. He started out as a trained teacher and now runs training for digital photogs.
See also: Editors ‘Bio’.
By Damon Guy see his profile on Google+.

Dear Editor, just starting photography…

Just starting photography | Photokonnexion.com

If you are just starting photography then an entry level DSLR is a great way to start. They offer a great range of functions and excellent quality.

Dear Editor

I am just starting photography and I’ve purchased a new entry level DSLR. I hope I have done the right thing for someone just getting started? Any tips on what I should do to get my photography going?

Entry Level Cameras – Including top sellers. xxxx | External link - opens new tab/page

Entry level – great for starting photography

There is no need to over extend yourself when starting photography. Modern entry level cameras are full of functions. They are also really adaptable. You will have a camera with scope for personal skill development and great results. If you are just starting photography for a hobby there is nothing better.

Nikon, Canon, Sony and others provide great options. They are reasonably priced so you can get to know your photographic interests for two or three years. After that you can upgrade with confidence knowing more about what you want to do. Many people stick with these cameras too. They have proved themselves appropriate for a wide range of interests.

An entry level camera will provide you with the functions you need in several ways. Modern entry level quality and digital image sensor size is far superior to even a few years ago. You will get great quality pictures. You also have all the functions and modes you need to learn photography properly.

These cameras are great for trying out different things. That’s important when starting photography. There is little point in buying a high end camera for lots of money. You will end up using few of the functions and may not be buying something suitable for you. It is better to start with a camera designed for your growing ability. You will find plenty of scope for extending your skills! So, well done on your new entry level purchase.

Entry Level Cameras – A wide range of great starters xxxx | External link - opens new tab/page

As to tips, here are ideas for starting photography…

There are a few simple things that will help you develop your photography. Try out these and other ideas and your hobby will be really engaging.

  1. Spend time with your camera every day. Your photography will not progress unless you do photography as much as possible. That means you must practice. The best way to do that is to take pictures and see how you can improve on them.
  2. When developing your skills it helps a lot to positive comments. If possible join a camera club near you. You will find they are pretty friendly and will help you learn new skills. Composition of a good photograph is important. Working with other photogs helps you get comments on essential composition skills.
  3. Initially you will just want to have fun making photos. Especially concentrate on things you have an interest or passion for already. Your photos will be more exciting to you (and others) if you focus on an existing interest. If you love flowers, get great at photographing them. If you love fashion do that. If you love something more obscure, don’t worry what other people think. It’s your interest, just do what you want. I have a friend who, when starting photography, spent a lot of time photographing chimneys. He had great fun!
  4. Making great images is something that comes with practice and thinking about what you are doing. So reading stuff online really helps. You will quickly find you learn the words and phrases that help you to develop an understanding. Use your reading to help you learn about various functions on your camera. Try to read your manual before using a new one. Then look up things you do not know on websites like Photokonnexion. Check out our Photographic Glossary for definitions, articles and resources.
  5. I often recommend that people starting photography join an online community. You get great feedback on your pictures and can share your fears and problems as well as your ideas and creativity. It helps you to learn and you will make new friends. I recommend 365Project.org. I post there as “Netkonnexion“. It is a great place to make friends and have a go. Put up a photo a day and let others comment. Follow other people and comment on their pictures. There are fun games, weekly “Top 20”, discussions and a “Recently Popular” page. People help you through getting started. Everyone there started like you. I have lots of friends there. I still post regularly and keep up with my friends. 365Project.org is free, with an inexpensive “pro” option that gives you extras. The Pro version includes an online photo-editor.
  6. When starting photography photogs often think they don’t need to learn the background to good photography. So they never progress beyond “auto-settings”. To produce great pictures learn about your camera settings. Find out about the Exposure Triangle too. Clubs and online community members will help you to use your settings properly. You can quickly get control of your camera. It’s more creative than just snapping pictures. It’s also worth thinking ahead about what you want your picture to be. Picture how you want the final image to turn out. Then set up the camera to achieve it. Don’t rely on the camera to make auto-choices. On “auto” you just end up with average shots.
  7. Owning a camera is about making pictures. It is also about getting the picture you want. So it is worth thinking about image editing. You will be able to remove an offending sweet wrapper you did not notice. Or improve the colour for the final print or screen shot. Most pictures need a little editing. So getting started on editing early is worth while. Then you can really make your pictures pop!
Starting photography is easy…

I have written these suggestions in the order you should think about them. You may not get to number seven straight away. but, you will learn a lot along the way. As you do, you will gain some wonderful insights. So have fun and enjoy your photography.

Entry Level Cameras On Amazon  xxxx | External link - opens new tab/page

Comments, additions, amendments or ideas on this article? Contact Us
or why not leave a comment at the bottom of the page…

Like this article? Don’t miss the next — sign up for tips by email.

Damon Guy - Netkonnexion

Damon Guy (Netkonnexion)

Damon is a writer-photographer and editor of this site. He has run some major websites, a computing department and a digital image library. He started out as a trained teacher and now runs training for digital photogs.
See also: Editors ‘Bio’.
By Damon Guy see his profile on Google+.

Broken Light Collective – Great work

The Broken Light Collective - inspiration beyond pictures

• Broken Light Collective •
Inspiring work from people who have a different viewpoint.
[Image from the video].

Inspiration that goes beyond the picture…

Over this weekend I was inspired by a number of things. A film I saw, a wonderful view and the “Broken Light Collective”. I was most inspired by the latter. The Broken Light Collective is one of those organisations that deserves to do well and to inspire people.

The Broken Light Collective

Broken Light’s main goal is to create a safe and accepting environment where photographers of all levels who are affected by mental health issues can display their work, as well as inspire one another to keep going and keep creating, despite the dark or scary places in which they may find themselves.
Broken Light Collective Broken Light Collective | External link - opens new tab/page

As a goal it is perhaps understated. I was inspired because of the high quality of the work and the wonderful range of subjects tackled. Modern life is hard enough without coping with additional difficulties. I know that living with a disability should not itself bring ‘hero’ status. Everyone gets on with their lives despite the obstacles we meet. But, a group like this deserves exposure. It is supportive and produces great art work. As such it is well worth noting and telling your friends about.

The Broken Light Collective video

This short video produced by the Broken Light Collective Broken Light Collective | External link - opens new tab/page is a little gem. Fine photography and great compositions are all composed in a beautiful show. If you have the time, take a browse around the website Broken Light Collective. Again, some wonderful work.
Broken Light Photography Collective Broken Light Collective | External link - opens new tab/page

Comments, additions, amendments or ideas on this article? Contact Us
or why not leave a comment at the bottom of the page…

Like this article? Don’t miss the next — sign up for tips by email.

Damon Guy - Netkonnexion

Damon Guy (Netkonnexion)

Damon is a writer-photographer and editor of this site. He has run some major websites, a computing department and a digital image library. He started out as a trained teacher and now runs training for digital photogs.
See also: Editors ‘Bio’.
By Damon Guy see his profile on Google+.

Ansel Adams – a photography legend

A documentary about Ansel Adams.

• Ansel Adams – a documentary •
[Image from the video]

Images that expressed the majesty in nature.

Ansel Adams became a legend in his own lifetime. He saw something special in landscapes. That “something” bought alive the majesty we feel when we are awed by natural landscapes. Yet he was much more than a photographer. He was a musician, thinker, energetic conservationist AND an extraordinary photographer.

Special talents defined Ansel Adams

From early in life Ansel Adams was fascinated by music. He taught himself to play the piano. His father saw an extraordinary talent emerging. He took him out of school to concentrate on his music skills. He was home educated using some of the best instructors and teachers available. His musical skill developed and he exhibited great talent. Then in 1916, he encountered a book which excited an interest in the big landscapes that became his life’s work. His father took him to Yosemite with the rest of the family. He later said of the this experience…

“…the splendour of Yosemite burst upon us and it was glorious… One wonder after another descended upon us… There was light everywhere… A new era began for me.”
Ansel Adams

During the first visit to Yosemite Ansel Adams was given a Kodak “Box Brownie” camera. From that moment his approach to the extraordinary landscapes that he loved so much was changed. He became transfixed by his photography. However, his love of music came first. For a number of years during his 20’s he pursued a career as a concert pianist.

Ansel Adams met the woman who later became his wife in a small studio where he was practising his piano while on his summer sojourn in the Sierra Mountains. The affair was on-and-off for a number of years. Ansel Adams struggled to reconcile the two passions of his life – music and the great landscapes of the Sierra Mountains.

In the summer of 1923 Ansel Adams, then 21, had, what he later described as, a “transcendental experience” while out in the mountains. He struggled for another seven years with his artistic inclinations and his ambition to become a musician. But finally the mountains drew him back and he had grown tired of the the petty politics of the life of a musician. From that time on he dedicated his life to trying to capture the wonder and sharp detail of his earlier transcendental experience.

Comments, additions, amendments or ideas on this article? Contact Us
or why not leave a comment at the bottom of the page…

Headshot poses – make your portrait right

Headshot poses :: Keep it simple.

• Headshot poses •
Keep the shots simple and try to reduce any distracting elements in the shot.
(Image from the video)

Your portraits need to be suitable for your subject…

When you want to do a portrait your subject will often not know what to do. Headshot poses are usually pretty simple. But the subject will look to you for direction. You will need to help them pick the right pose.

What inexperienced photogs forget is that male and female poses are different. So they tell their subject to pose how they do when feeling good. That may not be right for someone of the opposite sex to you.

Think about the gender of the subject in headshot poses

If you are a female, think carefully about your headshot poses for a male. Maleness tends to be angular, more aggressive in stance. Males are often better seen head on where their size seems a little more imposing. A hard, upright position indicates maleness. So does harder shadow lines on the face and angular light direction.

If you are a male photographer, you may think in male terms. Female headshot poses are better as more rounded poses than male shots. Inclined heads and slightly turned bodies are best – not looking directly at the camera. Find ways to pose your women subjects in a smaller more understated pose. Remember, shadows on a female face are more flattering when they are soft and give a more rounded appearance.

Circumstances may effect the headshot poses too

There are a lot of different reasons to take a headshot portrait. They may have particular poses attached to those circumstances. For example business poses still have a masculine and feminine aspect. However, they would tend to be more understated than a free posing session. The same might be said of guests at a wedding – and so on. So you need to consider why the headshot poses are being taken.

Clothing is important too. Headshot poses tend to include only the upper body. So if the clothing is distracting it can draw the eye away from your subjects face. Don’t try to get your subject to do a heavy make-up or high-quality hair do if you are trying for a natural shot. Let the inner person come out. Headshot poses are best done in as simple way as possible. There is going to be a high proportion of face in the shot. Overdoing other things will detract from that.

Setting the mood for your headshot poses

Here are a few extras for you…

  • Relax. Sometimes you can get very uptight when shooting portraits. This will get your subject uptight too. So before you start shooting, take a deep breath, breath out slowly. Then spend a few moments talking to your subject to put them at ease.
  • Jokes help to relax an uptight subject. If you tell a light-weight joke it will help set a light mood.
  • Subjects often have a very uptight face to start with. Sometimes all the expression goes of their face. It is fun and will lighten things up if you tell them to pull a few faces – do it with them. That will help get a few giggles and they will have more expression after doing it.
  • When doing the poses make sure you complement your subject. Headshot poses are best done with natural facial expressions. Reward those with a complement. “Lovely smile”, “Nice eyes”, “love that expression”, and so on. This builds a rapport with your subject. It helps them feel comfortable as they pose too.
How to Pose someone for Headshots

In this five minute “headshot poses” tutorial you are lead through a range of things to consider…
Tony Northrup

Comments, additions, amendments or ideas on this article? Contact Us
or why not leave a comment at the bottom of the page…

Like this article? Don’t miss the next — sign up for tips by email.

Damon Guy - Netkonnexion

Damon Guy (Netkonnexion)

Damon is a writer-photographer and editor of this site. He has run some major websites, a computing department and a digital image library. He started out as a trained teacher and now runs training for digital photogs.
See also: Editors ‘Bio’.
By Damon Guy see his profile on Google+.

Photography consumables tips… save money

Photography consumables - there are more to them than meets the eye.

• Photographic consumables •
There are more to them than meets the eye. We can waste a lot of money on cheap, poor quality imitations.

Photography consumables are more critical than you think…

Your photography is important to you. But if you fail on your photography consumables you may be wasting money or worse, messing with the quality of your final images. Here are some things to consider when buying…

  1. Number your batteries when you buy them so you can tell which is the newest. One day you’ll need to know which of them is likely to hold their charge longest, and which one to throw away. Use a manufacturer specified battery. These genuine photography consumables will also report reliably on remaining battery life to the camera. Cheap non-standard batteries often report unreliable use-profiles on your camera. You may run out of charge sooner than expected. They will not last as long either.
  2. Likewise number your memory cards. For safety you should be swapping them around and the oldest should be replaced every two years. They do break down, become damaged or develop faults. Most people don’t consider that memory cards are photography consumables until they lose a whole card of images when one fails.
  3. You may not buy many lens caps, but always have one spare. Sooner or later you will lose one. Then your lens will be unprotected in your bag until you can get another.
  4. Likewise, Have a spare body-plate and lens cap for the back of your lens. They may not be regular photography consumables, but they save a lot of hassle if you have spares on hand.
  5. Always use re-chargeable batteries for your off-camera flash. It’s environmentally friendly, and saves money.
  6. When you buy rechargeable batteries number them as a set and keep the set together. They will have more reliable characteristics if they are of the same type, age and use-profile. Rechargeable batteries are photography consumables with a finite lifespan. You will need to replace them eventually. If numbered as sets, you will be able to throw them away as sets too. This keeps your remaining stock of rechargeables in a predictable condition.
  7. Writeable DVDs and CDs have a reliable shelf life of about five years at room temperature. If you must use unreliable media for long term storage check out the manufacturers specifications before buying. Better quality ones will last longer (if looked after). Re-cut the discs to new media at the specified life-end. Don’t rely on them to be available for your grandchildren. Chances are they will be the wrong format or unreliable for archive storage and long term use. Formats have an effective lifetime of around 20 years. If you use DVDs or CDs for storage they are expensive photography consumables with unreliable results long term.
  8. Photo-paper types are critical photography consumables. The quality of it really makes a difference. If you want the picture to last use archive-quality, acid free paper which is matched to the printer by the manufacturer. Otherwise the paper will probably affect the print quality and life span of the print. If it is not a manufacturer recommended paper it will probably block the printer nozzle too. Cheap papers create dust that blocks print nozzles. Cleaning printer nozzles uses appalling amounts of printer ink wasting a lot of money.
  9. Surprise! The printer manufacturer advises you use their paper and ink photography consumables for your printer. Another surprise! They are right. They advise you use their consumables because they are all colour matched, absorption matched and colour profiled to give optimum results when working together. They may be more expensive, but they will give you more consistent results, longer picture life-span and a better colour match for your prints. Oddly you will probably save money too. You will throw away less sheets of failed print copies!
  10. Printer inks are expensive photography consumables. Most people don’t realise that inks are high-tech, chemical soups. They are specifically matched to the print head on the printer. They spray very precise measures of ink onto the profiled, manufacturers papers. Use the wrong quality paper or ink and the amount you use and the results you get on your photo-print will be unpredictable. Use the wrong paper and you will use more ink and get more nozzle blockages. Wrong ink? Even less predictable results.

Comments, additions, amendments or ideas on this article? Contact Us
or why not leave a comment at the bottom of the page…

Like this article? Don’t miss the next — sign up for tips by email.

Damon Guy - Netkonnexion

Damon Guy (Netkonnexion)

Damon is a writer-photographer and editor of this site. He has run some major websites, a computing department and a digital image library. He started out as a trained teacher and now runs training for digital photogs.
See also: Editors ‘Bio’.
By Damon Guy see his profile on Google+.

Insights into photographic portraiture

Photographic portraiture creates more than a simple picture...

• Portrait of a kindly man •
The humble portrait is one of the important arts.
Photographic portraiture creates more than a simple picture…
[Click image to view large].

There’s more to photographic portraiture than meets the eye…

The portrait photog must display the depth and character in the face of their sitter. Beyond that, the truly effective portrait shows some of the inner person pictured. There is no doubt that great photographic portraiture is demanding. It requires insight into the human spirit and character of the subject. In this post we look at some views of the portrait art.

The quotes below bring out some of the dimensions that photographic portraiture includes.

photographic portraiture – being in contact

It is often said, an essential part of photographic portraiture involves an intimate connection between the photographer and the sitter…

It is more important to click with people than to click the shutter.
Alfred Eisenstaedt Photographic portraiture | External link - opens new tab/page

Eisenstaedt, a German born portrait photographer and photo-journalist. His favourite working style was to take candid portraits. One of his most famous pictures is V-J Day in Times Square.

V-J Day in Times Square • By Alfred Eisenstaedt

• V-J Day in Times Square •
By Alfred Eisenstaedt
[1898 – 1995] American photographer

Eisenstaedt prided himself on his ability to put people at ease and to communicate with them. His photographic portraiture covered some of the more notorious world leaders (Hitler, Mussolini and Goebbles), as well as other world leaders (including Bill and Hillary Clinton and their daughter). In his writing he referred regularly to ways of behaving and dealing with his sitters. It was a part of his style to help people be comfortable in the photographic portraiture situation. He was acutely aware of its significance and capitalised on it.

Eisenstaedt was not alone in seeing the significance of the relationship between the photographer and the sitter…

A portrait is not made in the camera but on either side of it.
Edward Steichen Photographic portraiture | External link - opens new tab/page

I agree with this in every way. My best portrait work is done through that personal relationship. For me there are two aspects to success with a portrait shoot.

  1. Help the portrait subject relax and act naturally
  2. Use questions and suggestions to help draw out the character of the subject so we can pose them in ways they find natural.
  3. Polite posing, thank your subjects and complement them. If they feel comfortable and appreciated they will tend to pose naturally.

No doubt there are some people who feel they are in the wrong place and are uncomfortable sitting for a portrait. When someone is genuinely uncomfortable in front of the camera it makes things difficult for the photographer. Usually the discomfort people feel is because they don’t believe they are going to look good. They get uptight and stressed as a result. This extends to all walks of life. People experienced as portrait subjects Photographic portraiture :: Abraham Lincoln was an experienced portrait subject | External link - opens new tab/page are aware of the issue…

There are no bad pictures; that’s just how your face looks sometimes.
Abraham Lincoln Photographic portraiture :: Abraham Lincoln on Wikipedia | External link - opens new tab/page

But it does not help to tell your sitter that!

Despite the awareness of possible outcomes from a poor portrait, photographers are quick to point out the difficulties…

So many people dislike themselves so thoroughly that they never see any reproduction of themselves that suits. None of us is born with the right face. It’s a tough job being a portrait photographer.
Imogen Cunningham Photographic portraiture :: Imogen Cunningham on Wikipedia | External link - opens new tab/page

…but you still have to do the best you can!

Why do photographic portraiture anyway?

It is tempting to reply, “Why do any type of photo”? In reality, photographic portraiture says so much about the person you are depicting that we can pick out some dimensions that are of particular interest.

Photographic portraiture is a creative pass-time. Its been important throughout history. In former times it was only the rich and privileged who had access to it. Then it was as much about demonstrating personal importance as it was about recording the person themselves. Much of the great painted portraiture since the Renaissance period has been of this type. Much of it still hangs in the mansions and stately homes where the portrait subjects lived.

Since photography became cheap enough to appeal to wider segments of the population things changed. Photographic portraiture widened its scope as an interest. People responded to the spread of pictures and portraits by seeing the potential for many different ways to approach the subject. So during the 20th Century a much lighter attitude to portraiture prevailed…

My job as a portrait photographer is to seduce, amuse and entertain.
Helmut Newton Photographic portraiture :: Helmut Newton on Wikipedia | External link - opens new tab/page

Despite this, the deeper dimension of portraiture have always been there. To create a portrait that really captures the essence of the sitter we need something deeply recognisable. The attitude, demeanour and pose of our subject tell us who this person is inside. The emotional dimension in such a depiction cannot be dismissed…

A portrait is not a likeness. The moment an emotion or fact is transformed into a photograph it is no longer a fact but an opinion. There is no such thing as inaccuracy in a photograph. All photographs are accurate. None of them is the truth.
Richard Avedon Photographic portraiture :: Richard Avedon on Wikipedia | External link - opens new tab/page

To the extent that photographic portraiture depicts the inner person we really need to know what to look for when doing a portrait. Often catching someone doing something that is very characteristic of their normal behaviour will do the trick. This is especially so if it is a quirky expression or something unique to them. Bringing out the uniqueness in someone is a powerful portrait technique. Looking back at the last quote, by Richard Avedon, we are really looking for that gap between what we see and what we know to be the special “thing” that person exhibits. It is what makes that person who they are. I could not have put it better than this contemporary photographer…

It’s the difference between your wife’s passport photograph and the portraits you took when you got engaged. Both may have been created with similar technology, but what stands in that great gulf between them are the passion you have for your wife, the knowledge you have of her personality, and your willingness to use your craft, time, and energy to express that. One says, “She looks like this.” The other says, “This is who she is to me. It’s how I feel about her. See how amazing she is?
David duChemin :: Within the Frame: The Journey of Photographic Vision


The Visual Tool Box by David duChemin  David duChemin | External link - opens new tab/page
You can buy this ebook online now. The quality of the
advice and tips is excellent and the pictures
are nothing short of inspirational.
Just click to find out more…
The Visual Tool Box by David duChemin  David duChemin | External link - opens new tab/page

 
Ultimately of course we want a likeness. Our photo would hardly be in the spirit of photographic portraiture if we were unable to recognise the subject. Hence this is a guiding principle of the art…

A true portrait should, today and a hundred years from today, be the Testimony of how this person looked and what kind of human being he was.
Philippe Halsman Photographic portraiture :: Philippe Halsman on Wikipedia | External link - opens new tab/page

But we are creating the character of the subject in this two dimensional image. So that character is visible to the viewer, the photographer has licence to go beyond that “truth” mentioned above. Photographers who make the most success of portraits really stray into the realms of caricature. Mostly, this is achieved by getting the light on the face to sculpt the features. This brings us into the realms of emphasis. You will have to exaggerate the lines, curves, form, tones and colours enabling the viewer to see three dimensions on a flat surface. But you must do this emphasis delicately. Light on faces is something we spend a lot of time studying sub-consciously. If we get it wrong it is immediately noticeable – even if we cannot explain why. So be subtle in the light you use. Try to make it obviously directional from one side. Try also to make it soft. Soft light induces gentle graduations in colour tone and shadows, removing harsh lines from shadow edges. In creating shadow and tonal variation on the face we bring out its natural features. This is where our subject shows their inner selves. Get over your shyness. Stare at your subjects face really hard – for a long time. Study the light, shadow and contrasts between – really see them.

Photographic portraiture – getting it right

Behind many of the words above is a great deal of experience. Getting a start in photographic portraiture is hard because many photogs just starting out simply cannot see the light. They literally do not see the tonal changes, shadow/dark transitions and play of light on the curves and forms of the face. However, once you have seen faces as a complex interplay of colour/tones, shadow and light zones you will be able to see how to place and pose the subject to bring out their inner self through their expressions and facial position.

Getting started is a question of working with what you know…

The dog is the perfect portrait subject. He doesn’t pose. He isn’t aware of the camera.
Patrick Demarchelier Photographic portraiture :: Patrick Demarchelier on Wikipedia | External link - opens new tab/page

Well, perhaps not your dog, but work with your subjects when they are not aware of it, or are oblivious to your stare. Candid photography enables you to catch people going about their lives as they would if you were not there. But it allows you, through that, to look for those endearing, unique, special features we all have. Of course all that is made easier if you pay heed to this…

The portrait I do best is of the person I know best.
Nadar Photographic portraiture :: Nadar on Wikipedia | External link - opens new tab/page (Gaspard-Félix Tournachon)

…Yup! Work with your family. Develop your sensitivities with people you know and soon you will be able to recognise the special little tell-tales that show you the inner person you need to depict.

Comments, additions, amendments or ideas on this article? Contact Us
or why not leave a comment at the bottom of the page…

Like this article? Don’t miss the next — sign up for tips by email.

Damon Guy - Netkonnexion

Damon Guy (Netkonnexion)

Damon is a writer-photographer and editor of this site. He has run some major websites, a computing department and a digital image library. He started out as a trained teacher and now runs training for digital photogs.
See also: Editors ‘Bio’.
By Damon Guy see his profile on Google+.