Tag Archives: Tripods

Buy a good tripod – nothing beats it

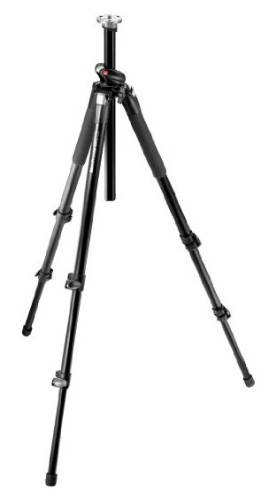
Good tripod as an all-rounder - Manfrotto 055XPROB Tripod

A quality, versatile and robust tripod is essential. Buy a good tripod – you will not regret it! The result will be seen in every image.

A good quality tripod?

Nothing beats a good tripod. Most people don’t use them until they have struggled with sharpness problems for a long time. Then, without thinking, they buy a cheap tripod. Later they have to think again. That’s because cheap tripods fail, wobble and don’t give you the shot flexibility you need. To save problems later, I suggest you buy a good tripod now.

Why buy a good tripod?

Too many of my students and colleagues have told me tales of three legged woes. Remember, it is a common mistake to think any old ‘three legs’ will make your camera stable. This is simply not true. In all cases, a quality tripod really will help stability – and other things.

So, here are some reasons to go for a quality purchase from the start…

Quality Tripod:
Cheap & cheerful:
 Solid, stiff at the joints and stable.  Limited by poor engineering. Variable stability.
 Reliable, highly engineered and robust fittings.  Fittings regularly break.
 Quality, hard wearing paint or specialist coatings.  Poor or no paint – highly reflective aluminium. Liable to corrosion/wear.
 Quality footings seal the legs to stop water/dirt entering tubing.  Legs left unsealed let dirt in and grit quickly wears the joints.
Strong enough for a specific DSLR size and lens. Check the tripod specifications. Wobbly with anything larger than a bridge camera. No specifications available.
Quality materials used in construction. Materials matched to designed use and weight needs. Unknown quality aluminium/plastic.
 Top platform precisely engineered – no movement and good fitting for the tripod head/camera.  Wobbly platform, poor clip, loose fitting. Screws sometimes damage the camera. No interchangeable head option.
Quality joints on legs for long life and stable grip. Leg joints quickly wear and become wobbly with poor materials.
 Multiple leg positions to allow adjustment on uneven ground/tight spaces.  Fixed leg position.
 Fully adjustable top column to allow multiple height/angle adjustments.  Wobbly top column. Only up and down adjustment available.
 Legs can be adjusted to many wide/varied angles.  One angle for legs.
Stiff tripod legs to prevent movement when the legs are fully extended. Wobble increases as the legs extend to full length because joints are poor fit.
 Reversible top column – so you can under-sling your camera to get near the ground.  Not reversible.
 Proper hand grips.  No hand grips.
Quality Tripod head:
Cheap & cheerful head:
 Well engineered, interchangeable tripod head option available.  No interchangeable head fitting – or low quality flip-up with low quality quick release.
Well engineered, camera safety lock on the tripod head to prevent camera unlock/drop off. No camera safety catch.
Strong, accurately engineered, wear resistant, quick release plate on the tripod head for fast camera fitting/removal. Fixed camera position – or low quality/breakable flip-up with plastic quick release.
Manufacturer has a range of well engineered tripod heads and other accessories available. Manufacturer not committed to market and does not make tripod heads or non-interchangeable tripod head fitted.
A cheap tripod will not be your friend

There are other reasons to buy a good tripod, but you get the idea. A cheap tripod will do little for camera stability. The engineering quality is reduced to keep the price down. I am not one to advocate gear lust or spending money where it is not worth it. However, I have come across each of the design and quality flaws above. From personal choice and experience it’s clear only the best is good enough when making your camera stable.

Adaptability

While a quality tripod is great, you normally need to buy a good tripod head too. Cheap tripods usually without them, or have poor quality ones. A good tripod head is an investment for life. Inter-changeable heads are very useful. I have five heads for different purposes: for macro work; small cameras; panoramas; and one for precise adjustment. My most versatile head I use every day for general purpose work. The Manfrotto 322RC2 Heavy Duty Grip Ball Head External link - opens new tab/page is precise robust, reliable, versatile and has never let me down.

Buying a tripod

Buying a tripod is not simple. There are many online advertisements and many brands. How do you choose the right one for you? Largely it is about personal requirements. Look closely at the type of photography you normally do. Try to isolate the important aspects of your photography that will influence the way you use a tripod. Find the properties that best fits the purpose for your tripod. For example, if you do a lot of beach photography you should look for a tripod that has good seal caps on the legs to keep seawater and sand out of the legs. If you do macro photography in the field then you might want a tripod that will turn your tripod head upside down to hang your camera just above ground level.

You should also consider the tripod head. That is the part of the tripod that the actual camera is mounted upon. It gives you flexibility to point your camera without moving your tripod around. Good quality tripods are usually sold only as a set of legs. The tripod head is purchased separately to ensure a good match to its intended use. Reputable tripod manufacturers normally also have a range of heads to match their tripod products.

Weight is a big issue in the field

Many photographers forget about weight. A heavy tripod is great in a studio. It is stable and floor vibration is reduced. However, when you are out and about the studio tripod is just too much to lug around.

I have one tripod model with a steel frame I use in my studio. Also, I have a nearly identical model in carbon fiber. I keep the latter in the car for field work. The difference in weight is just over a Kilo. For practical field use the studio tripod is useless. Unfortunately, it is simply too heavy to carry far.

On the other hand, my carbon fibre tripod is a delight to use in the field. It is easily carried and it performs as well as my studio tripod. However, there can be shortcomings.

Near a road or in windy conditions, vibrations are a problem. So, I hang my camera bag under the tripod platform. The additional weight cuts down vibration and keeps the tripod feet stable. In fact, that is a small price to pay for the reduced weight. Furthermore, it keeps my camera bag off the ground.

The camera bag trick is only possible because carbon fibre is really stiff. Remember, flimsy (but light) aluminium frames are vibration prone. They cannot perform well in windy field conditions or where vibration is found. Moreover, cheap tripods often do not have an under-slung hook to hang your bag.

What should you pay?

Almost certainly, the cost of a tripod indicates its quality. Good tripods use quality materials and tend to be highly engineered. Good engineering and good materials are not cheap. So, if the price of a tripod is in the range £15 – £30 it is unlikely to be long lasting. Further, it will be of limited stability – especially after a little wear under field conditions. Tripods can actually transmit vibrations to your camera from the ground and wind. So, good stability and properly engineered joints are really important.

In the UK good quality tripods start at around £40. You can pay many hundreds of pounds, especially for a professional grade tripod. So, setting yourself a budget is important. Don’t overspend.

Balance quality and cost

The over-riding factor is what type of photography you will be doing with the tripod. Remember, the properties you need are your guide. However, as we said above, pay attention to the tripod quality you need too. There is a balance between good quality and cost. You have to be the final arbiter in how much you pay. Think about it, err on the side of quality with a tripod. A bad quality decision will impact the image quality of your shots.

The manufacturers

So, buying the right tripod is about knowing your own needs. It is also about knowing what type of properties your photographic interests demand of your tripod. Going direct to the manufacturers site and look at their explanations for each of their tripods. You will find more detail there. Moreover, make sure you look up the specifications. There lies the answer to many of your questions about the quality and performance of a tripod. Also, beware of the claims made for ‘general purpose’ or ‘light weight’. Without detailed specifications those terms indicate poor quality engineering or materials.

There are a good range of quality tripod manufacturers. Some names worth checking are listed below as a starting point…

    • Manfrotto – High quality engineering, wide range of accessories and designs for many purposes. Many models meet the needs of professional photographers.
    • Manfrotto on Amazon (associate link).
    • Benro – Strong, very robust, many designs for many different environments and purposes.
    • Benro on Amazon (associate link).
    • Gitzo – Quality engineering, some innovative ideas. Considered by both amateur and professional.
    • Gitzo on Amazon (associate link).
    Where to buy

    It is worth considering where you buy your tripod too. Manufacturers with proven reputations tend to have wide distribution networks. However, they often do not sell their products on their own websites. If they do have their own web shop, the products are often expensive.

    Reputable manufacturers depend on their agents and distributors world wide. If they undercut those agents they would not sell their products overseas. So, check their sites. Find what you want. Then, find a dealer near you who can supply it. Alternatively, go online to a dealer who sells the products. You will often get much better prices for shopping around. Another point, reputable manufacturers often have a list of dealers on their site you can contact who are local to you.

    Specialised tripods

    The range of quality tripods has become very broad. Today tripods are available for nearly every type of camera. Small point and shoot cameras, smart phones, bridge cameras, mirrorless and other cameras all have their own tripod requirements. Likewise, they also have their own quality requirements.

    I recently bought a cheap plastic smart phone clip to mount on a small tripod. It cost me very little. Because it was so cheap, I thought nothing of quality issues. It also broke the third time I used it. My phone dropped to the ground. Luckily the glass did not shatter. It could have been an expensive mistake. The replacement good quality, lockable smartphone clip cost about 25% more. However, there is no way my phone is going to fall out of the clip now! It was still cheaper than £20 (bought 2020).

    I have also benefited from buying good quality ‘Joby’ or ‘GorillaPod’ flexible tripods (associate link). They are quite expensive. However, you can do great things with them. Flexibility and adaptability are really useful in a tripod.

    The point is this…

    The lesson is, think carefully, find out everything you can. Then, make a quality purchase – get the best you can afford.

    Nowadays, I take my time making a tripod purchase. Consequently, my new tripod suits the purpose I have in mind. But, more important, my camera is safe. In addition, I have the flexibility I need to make the critical shot and I get sharp results. Taking care to seek out a quality tripod helps a photographer get stand out results.

    Comments, additions, amendments or ideas on this article? Contact Us
    or why not leave a comment at the bottom of the page…

    Like this article? Don’t miss the next — sign up for tips by email.

    Damon Guy - Netkonnexion

    Damon Guy (Netkonnexion)

    Damon is a writer-photographer and editor of this site. He has run some major websites, a computing department and a digital image library. He started out as a trained teacher and now runs training for digital photogs.
    See also: Editors ‘Bio’.
    By Damon Guy see his profile on Google+.

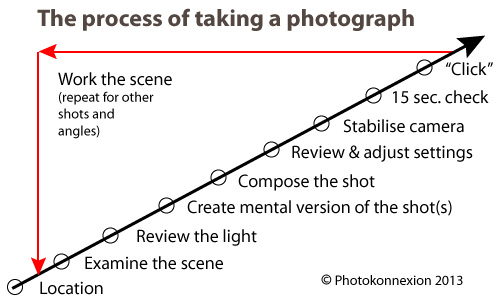
How to take photos – each important step in making a photograph

Infographic download - How to take photos

• Infographic showing the various steps in how to take photos •
A guide to what you should doing to make great images.
• Click to download printable full page version

Getting down to the detail…

Yesterdays article was How to take photos – each important step in making a photograph. Today I want to share the detail behind each step. Be warned! You might need to think again about your existing knowledge. Unlearning old ideas will help you to move forward and improve.

How to take photos – The location

Lots of people think you can just turn up and take pictures. Well you can, but often they are not good ones. Getting the best out of your location involves understanding what you’ll find there. Find out about the weather on the day. An idea of light levels and times of sunset and sunrise etc. is useful too. There have probably been lots of visits by others at popular destinations. Check “Google Images” for that site. Google will help with other details too.

When you arrive don’t just fire off loads of shots. Settle down and get into the location. Don’t make photography mistakes that mean you miss great shots. The first time you do this consider a variety of shots. Think about more than one shot, think about the whole shoot.

How to take photos – Examine the scene

Considering the scene is an important part of the work-flow on site. Unless you have been there before you need to get to know it. Use all your knowledge about camera angles, composition, lighting, camera settings and so on. Take the time to examine your location while thinking of these things. Consider your feelings about the scene too. How you feel will help your shot be an impassioned response to the location. What you feel about the scene is the best guide on how to take photos at that location.

How to take photos – Review the light

Most photographers forget this step. They are too wrapped up in the scene and the camera settings or the passion of it all. This step will make or break your shot. Look at the light. If you don’t know what I mean read these:

Ask yourself some simple questions about the light…

  • Is it hard or soft?
  • Is it coloured or more neutral?
  • Is it at the right angle to best capture the location/scene?
  • What is the best time for the right light?
  • Is it very bright and intense or dull and diffused?
  • Do I need any artificial illumination (flash, diffusers etc)?
  • Is the shadow hardly defined (sun up high) or strongly defined (sun to the side)?

Lean about the properties and vocabulary of light. It helps give you a greater understanding of photography. These questions, and others, help you make decisions about lighting for your scene. For more on “How to take photos – Light and Lighting” see the resource page in the SUBJECTS/ARTICLES menu at the top of every page.

How to take photos – Create a mental version of the the shot

If you want to make a great image – have a great picture in your head of your intended outcome. Visualisation has helped athletes, artists, thinkers, inventors and others to achieve amazing things. Train your mind to visualise in detail. If you see what you want to achieve it will guide you when setting up your camera. Take the time to create that mental picture – in detail. Consider how you are going to make the best of the light when you consider how to take photos. More about visualisation… 80 year old secret of world class photographers revealed.

How to take photos – Compose the shot

By now you have an intimate photographic knowledge of your scene. Composing the shot is about realising that potential. Long-time followers of this blog already know something about composition. For first-timers you can get lots of information from our Composition resources page in the SUBJECTS/ARTICLES menu at the top of every page. Composition is a skill that evolves as you develop as a photographer. Knowing more about composition helps your awareness and skill develop. Read about it to gain insight. Think about it every shot.

How to take photos – Review and adjust the camera settings

Now you have a picture in mind, composed, and are ready to set up your exposure. The exposure is defined by your camera settings. Camera makers will have you believe that the auto-setting on your camera is the perfect exposure. The fact is they made informed guesses to arrive at that exposure. It is different for every model of image sensor. Modern cameras do make a good representation of the scene. It is not always what you want however. You can change the exposure by under-exposing, over-exposing and by using different apertures, ISO levels and shutter times. That is your interpretation of the shot. When you think about how to take photos, plan how you want the image to come out.

Having a visualisation in your head helps you set the camera up to make that mental image. You do it using ISO, Aperture and Shutter speed. Even using one of the ‘mode’ settings is still a way of regulating your exposure. They all adjust those three basic facets of the exposure.

Here are some other links to pull together ideas about exposure:

How to take photos – Stabilise the camera

You want the photo to be sharp, crisp and clear. The faster the shutter speed the easier it is to get a sharp shot. But often, especially for a good quality shot, longer exposures are better. You need a good stance to hand-hold the camera. You will need a tripod (or other method) to steady it for longer exposures.

Stance is down to basic technique and comfort. The stance you use will be a personal thing for you. I have found many photogs have to relearn their stance after many years of a poor stance. It is best to learn a good one early. Here is my recommendation: Simple tips for a good stance

The use of tripods or other supports is a wide subject. It is also one that many learners tend to ignore- at least at first. When learning how to take photos sharpness is vital. Become acquainted with a tripod (preferably a good one) as early as you can. Your images will improve a huge amount. Here is some advice about tripods:

And, here is some basic advice about improving sharpness overall – The Zen of sharpness – 12 easy ways to improve

How to take photos – 15 second check

OK, that may seem like a long time. However, it is actually the time you need. You can get faster at it, but if you are taking a serious attitude to your shot then give it the time. You can find out all about the the 15 second check by reading these in order:

  1. An old sailors trick to improve your photography
  2. The fifteen second landscape appraisal
How to take photos – “Click”

This is where you press the shutter button. How you press that button can make a difference to your sharpness. Earlier, I mentioned this link, Simple tips for a good stance. It also gives advice on pushing the button without affecting sharpness.

An essential element of your shot is about confidence in what you have done. Today we are lucky. We just look at the back of our camera. Your first “click” may be a test shot. If your settings need adjustment then a simple technique called “Chimping” will help. Chimp and adjust. You will only need to do it a few times to get the shot right. You will not need to machine-gun the site with hundreds of “just in case” shots.

How to take photos – Work the scene

Chimping helps you set up for the shot and compose it. To get other possible shots you visualised earlier, you should work the scene. Repeat all the steps you have just done for each of the shots you foresaw. Working the scene is a skill and takes practice.

How to take photos – Time line

What is not obvious from the diagram is that the diagonal arrow is also a time-line of the shot. Of course it is a different length for every shot. You will have different problems to solve and ideas to consider for every shot. That’s fine. You have just learned a more careful, precise method for how to take photos. As you practice will quickly get faster at taking shots. But you will also make better images.

A promise

I can guarantee that if you follow the steps on this page you will…

  • Take less shots;
  • Get a better hit-rate (more usable shots per shoot);
  • Spend less time in post-processing;
  • Have better composition;
  • Improve your photography overall.

What is less obvious is that you will also save a lot of time.

By Damon Guy (author and Photokonnexion editor)

Damon Guy - Netkonnexion

Damon Guy (Netkonnexion)

Damon is a writer-photog and editor of this site. He has run some major websites, a computing department and a digital image library. He started out as a trained teacher and now runs training for digital photographers.
See also: Editors ‘Bio’.

When is a tripod not a tripod?

Tripods & Bean Bags

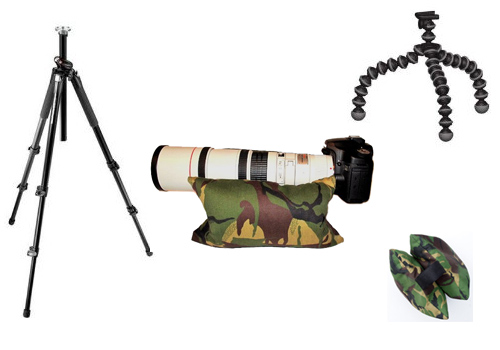
Tripods & Bean Bags are great alternatives to a full sized three legged contraption. And there is one other option too!

A tripod is not a tripod when it’s another stabiliser!

I suggest everyone use a tripod for the sharpest image. Of course they are not always practical. However, there are alternatives. Here are ideas for stabilised working without tripod.

Working alternatives

Working with a tripod is perhaps evidence for careful attention to detail. After all the use of a tripod does require some persistence. They can be heavy, they certainly take up space and take a little time to put up when you want to take a shot. On the other hand, they definitely increase the sharpness of the shot and allow longer exposures. They also provide a firm platform to work with when working a scene, giving the photographer flexibility to walk around. They also provide a vantage point for the camera during the shot – a solid holding point for the camera in difficult situations.

Using different versions of tripods extend their usefulness. The Joby Gorillapod  External link - opens new tab/page series of tripods are excellent. They provide a solid platform for taking photos which can be adapted to almost anything as a holding point. So instead of a long set of three legs, the existing bendy legs can be used to grip fences, poles, furniture, walls… well pretty much anything you can think of using. They are light and practical and can be used in most situations as long as you can find a place to anchor them. They do not work at their best with a very heavy camera and lens setup. So they do have their limitations. However, for most entry level DSLRs, medium sized DSLRs and most normal lenses they are great.

The other possible tripod-alternative product to consider is the bean bag. There have been a number of different types of bean bags made over the years. The idea is that you can use a bean bag to bed down your camera on a variety of surfaces. Wall tops, rocks, the ground, cars, even furniture are all perfectly acceptable for using the bean bag. The one that I recommend is the Maxsima – Professional Camera Bean Bag – ‘twin bags’ 262×162. Lens support Bean Bags for Wildlife photography etc.. also Designed for use on a Vehicle / Car door  External link - opens new tab/page. It provides a solid and adaptable way to put your camera on a hard surface to prevent damage to the camera (from abrasion, chips and dirt). This is, in effect, a cheap and efficient way to make a solid stand-point from which to make a shot. It is not as accurate as a tripod – you may have to massage the bean bag into the right shape to get the camera pointing exactly where you want it. In general however, it is a great way to work when you have limited options, especially at ground level or when working with other surfaces.

Another, simple option!

The final option you have is somewhat surprising. Its simplicity is also its flexibility. And because it is so simple, a lot of photographers forget to use it as an option. Try rolling up your jumper, jacket or even your coat! If you make a ball or cushion on which to put your camera you have a way to protect it from the ground or abrasive surfaces. But it provides a simple and solid surface for your camera. Lots of photographers forget the simple answer. They often think of the high-tech solution. But sometimes it pays to work smart when you are in a situation and you are caught out.

By Damon Guy (author and Photokonnexion editor)

Damon Guy - Netkonnexion

Damon Guy (Netkonnexion)

Damon is a writer-photog and editor of this site. He has run some major websites, a computing department and a digital image library. He started out as a trained teacher and now runs training for digital photographers.
See also: Editors ‘Bio’.

Can you write? Of course you can!
Write for Photokonnexion...

We would love to have your articles or tips posted on our site.
Find out more…
Write for Photokonnexion.

Focus On Imaging NEC Birmingham 3 – 6 March 2013

Focus On Imaging 2013

Focus On Imaging 2013  External link - opens new tab/page
National Exhibition Centre Birmingham 3 – 6 March 2013

A broad range of new equipment.

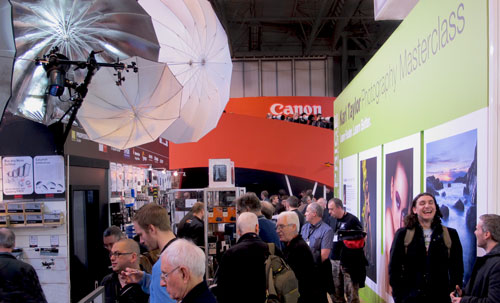
It appeared from busy aisles at this years Focus On Imaging Exhibition External link - opens new tab/page that photographic business is actively fighting off the economic depression, possibly even in rude health. With around one hundred and sixty exhibitors there was plenty to see. There was a whole range of new developments as well as the old favourites.

A Key aspect of the show this year was the new ranges of cameras. Leading manufacturers were actively promoting mirrorless cameras. The gradual shift away from the point-and-shoot market also seemed to continue. The camera market appears to be changing. Heavy duty technologies from the top-of-the-range DSLRs are being used in the lower end cameras. The market seems to be shifting in favour of high resolution processing right through the full range.

The economic climate is obviously still impacting. A predominant theme on retail stands was deals and offers. There was plenty on offer too. In previous years many of the accessories available in the UK seemed to be expensive compared to current prices. Today imported goods appear to be impacting the market. Exhibitors were showing equipment which appeared robust and very competitively priced. The shift in the camera market also appears to be creating deals. There were very good prices offered on cameras in all segments of the market. Many of these deals reflect depressed prices in the market in general but the many of the stands were offering greater reductions than even shop prices.

The show organisers unfortunately failed to publish the event list this year. Show goers were left to pick up what information they could about various talks and demonstrations from stands themselves. It made choosing how to spend our time was a little difficult. However, I managed to see three interesting demonstrations. There was a lot of emphasis on lighting techniques this year. Some very good models and backdrops were shown and lots of people were taking photographs. If you are going to go to the show take your camera for some additional fun.

Aside from impressive stands by Canon and Nikon, Sigma had an impressive spread of lenses available. There were some excellent tripods on show this year on several stands. Despite the reluctance of beginners to buy them, the tripod market is both competitive and innovative. Tripod heads are getting smoother and there are some very interesting new ideas, particularly in the high-engineering end of the market. However, the top tripod head units were weighing in at around £500… not a price to be taken lightly.

Other stands of interest included the extremely active Disabled Photographers’ Society. That society fosters a wonderful camaraderie and energy among its members. The Royal Photographic Society were also at the exhibition showing continuous short events which were well attended. They also are in active recruiting mode.

My overall impression of the exhibition this year was one of great energy. There was a lot of business being transacted and show-goers were being dynamic on all the stands. It was an enjoyable day, and one that will help to keep me informed about products and trends in this business.

By Damon Guy (author and Photokonnexion editor)

Damon Guy - Netkonnexion

Damon Guy (Netkonnexion)

Damon is a writer-photog and editor of this site. He has run some major websites, a computing department and a digital image library. He started out as a trained teacher and now runs training for digital photographers.
See also: Editors ‘Bio’.