Tag Archives: color

Avoid funny colour casts in your holiday pictures

White balance - grey card

White balance – grey card

Unnatural indoor colours?

Holiday time – out comes the camera and most daytime shots are great. However, indoor shots often get a funny colour cast. Odd yellowish, greenish or blue tones have appeared. The reason? Auto-white balance problems. The condition is curable.

Auto-white balance problems

Outdoors the auto white-balance function works reasonably well. But not in all cases. Auto-white balance aims to iron out colour casts in your photography. The problem is that the camera frequently gets it wrong. There are two main places that can happen…

  • Out of doors when there is a lot of one particular colour around (eg. lots of sky blue; orange/red sunsets or snow)
  • Indoors when there are artificial lights illuminating the scene (ordinary domestic lights, fluorescents and bulbs).

When a lot of one colour appears in your shot. The camera assumes that too much of one colour is a problem. So, it shifts something called the colour temperature toward a neutral grey colour. This takes out the colour cast.

Intentions ruined

If you intended to capture that colour cast (from a sunset for example), the auto-white balance mechanism will ruin your shot. Typically blue skies and white snow tend toward grey. And, the real classic, lovely orange and red sunsets look pink, cartoon-like and flat instead of saturated. Orange and reds are particularly badly affected. So if your sunsets look cartoon pink/grey instead of saturated fire-orange you need to adjust your auto-white balance.
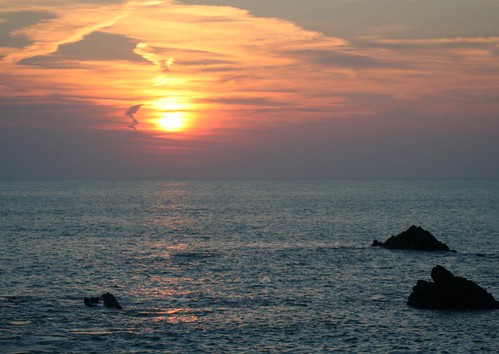
Auto white-balance fail!

• Auto white-balance fail! •

Cartoony pink-grey skies. The auto-white-balance function has colour shifted the orange/red tones toward greys.
Click image to view large
• Auto-white-balance fail! • By Netkonnexion on Flickr External link - opens new tab/page

Artificial light also creates a colour cast. Often the auto-white balance cannot properly adjust for this. The result is odd yellowish, blue or greenish tones in the picture where you did not see them yourself at the time. These also require an adjustment to your white-balance.

Why is there a problem?

Mainly the problem arises because we have made an adjustment in our heads without noticing. Most of the time we compensate for these colour casts and don’t see them. In fact, once we realise there is such a thing as a colour cast we can train ourselves to see it. We certainly see the heavy red colour casts of evening and early morning light. If we look carefully we can also see the yellows and blues from domestic lights – although less strongly.

Remedies

There are two possible ways to tackle the situation…

  • Compensate for colour casts by using a camera pre-set.
  • Correctly set the white-balance so it records the natural colours.

DSLRs have reasonably good pre-sets to tackle well known colour cast issues. On most cameras you will find white balance settings something like these below. The notes explain details…

  • Auto – The cameras best-guess colour match for what it senses. OK most of the time. Poor when there is a predominance of a strong colour.
  • Tungsten – (bulb icon) indoor, tungsten incandescent lighting using bulbs. Cools the colours – often bluish. This setting helps remove blues to warmer tones.
  • Fluorescent – for use under fluorescent lights – will tend to warm up the colours.
  • Daylight/Sunny – (sun icon) indicates the ‘normal’ white balance (may not be present if this is the default setting).
  • Cloudy – (cloud icon) Adds a warmer, yellowish colouration.
  • Shade – This light is cooler (bluer) than sunlight. Shade mode warms the colours a small amount.
  • Flash – (lightening icon) Stark and cool, flash desaturates towards blue. Flash setting compensates with a slightly warmer yellowish tone.
  • Custom – You do a little procedure to get an accurate setting to suit the situation.
Accurate colours

Colour accuracy is important. You really do want a bright blue sky or white snow or saturated red sunsets. The problem is that the pre-sets are averaged out for the “types” of situations encountered. The pre-sets will change the colours from dull flat colours to more representative ones. For example more saturated sunsets will be captured if you use the cloudy setting. However, to get it right you need to adjust the custom white balance.

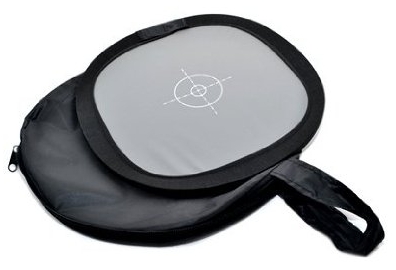
Setting the custom white balance is simple. The camera does most of it. You need a “neutral grey card”. This is simply a card or piece of material set at an average grey colour, normally at 12% grey, which matches the cameras accurate shade for neutral. You can buy these quite cheaply at most camera stores. (See: Range of photographic grey cards).

• The Lastolite Ezybalance •

  • collapsible; durable
  • wipe clean; very light
  • 12% grey; 30cm wide

An easy to use grey-card system. White on one side, grey on the other. The card doesn’t crease, the sprung border stretches the material tight. The card collapses into the supplied case, slipping easily into your camera bag. A great accessory to ensure colour accuracy in your pictures. You should not be without one.Spacer image

To set custom white-balance

It’s easy to set the white balance. However, there are lots of variations for how different cameras do it. Therefore it’s essential to use the right procedure from your manual. To get ready…

  • Place the card about 30cm/12 inches in front of your camera.
  • Zoom in or out to make the grey card fill the frame.
  • Now follow the camera manual “custom white balance” instructions.

To ensure complete accuracy you must do this procedure in the ambient light in which you will be shooting. This is the light the camera will sense and compare to the grey on the card.

More after this…

find out more...Photokonnexion tips by email
Enjoying this article? Please sign up for our
Tips by email service.
                                                Find out more

Shooting with RAW vs. *.jpg

I am sure lots of you are saying, “But I shoot with RAW and this is unnecessary”. OK, that is partly true. You can, with RAW format files change the white balance in the post-processing. Here are two reasons you should NOT do that…

  1. It is time saving to get as much right in the camera as possible. I like to spend my time shooting not computing!
  2. I have rarely met anyone who can remember colours so accurately that they get the post-processing colour and temperature balance right. I like to get them right in-camera as accurately as possible. Then I can safely change them later if necessary.

RAW format is excellent – you have complete control over colour temperature and hues. However, if the picture is wrong from the start, RAW is only as good as your own memory or colour awareness. Artists of many years may be able to remember colours accurately. Very few others can. Beginners especially have very poor colour memory/accuracy. So, use RAW, get it right in-camera – then do your artistic processing from a solid colour-base you know is accurate.

Compensation and accuracy

While both compensation for colour casts, and accurate representation of colour casts both rely on white balance there are differences in how they are treated. Strong colours or a strong colour bias through the picture needs some special treatment. Think about the two different methods above and practice them.

Comments, additions, amendments or ideas on this article? Contact Us
or why not leave a comment at the bottom of the page…

By Damon Guy (author and Photokonnexion editor)

Damon Guy - Netkonnexion

Damon Guy (Netkonnexion)

Damon is a writer-photog and editor of this site. He has run some major websites, a computing department and a digital image library. He started out as a trained teacher and now runs training for digital photographers.
See also: Editors ‘Bio’.

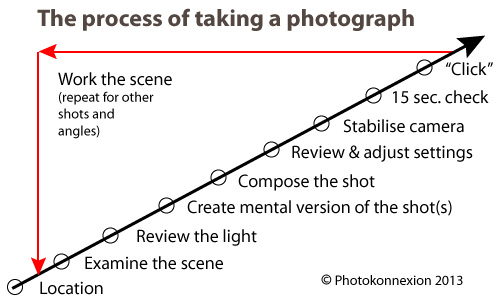
How to take photos – each important step in making a photograph

Infographic download - How to take photos

• Infographic showing the various steps in how to take photos •
A guide to what you should doing to make great images.
• Click to download printable full page version

Getting down to the detail…

Yesterdays article was How to take photos – each important step in making a photograph. Today I want to share the detail behind each step. Be warned! You might need to think again about your existing knowledge. Unlearning old ideas will help you to move forward and improve.

How to take photos – The location

Lots of people think you can just turn up and take pictures. Well you can, but often they are not good ones. Getting the best out of your location involves understanding what you’ll find there. Find out about the weather on the day. An idea of light levels and times of sunset and sunrise etc. is useful too. There have probably been lots of visits by others at popular destinations. Check “Google Images” for that site. Google will help with other details too.

When you arrive don’t just fire off loads of shots. Settle down and get into the location. Don’t make photography mistakes that mean you miss great shots. The first time you do this consider a variety of shots. Think about more than one shot, think about the whole shoot.

How to take photos – Examine the scene

Considering the scene is an important part of the work-flow on site. Unless you have been there before you need to get to know it. Use all your knowledge about camera angles, composition, lighting, camera settings and so on. Take the time to examine your location while thinking of these things. Consider your feelings about the scene too. How you feel will help your shot be an impassioned response to the location. What you feel about the scene is the best guide on how to take photos at that location.

How to take photos – Review the light

Most photographers forget this step. They are too wrapped up in the scene and the camera settings or the passion of it all. This step will make or break your shot. Look at the light. If you don’t know what I mean read these:

Ask yourself some simple questions about the light…

  • Is it hard or soft?
  • Is it coloured or more neutral?
  • Is it at the right angle to best capture the location/scene?
  • What is the best time for the right light?
  • Is it very bright and intense or dull and diffused?
  • Do I need any artificial illumination (flash, diffusers etc)?
  • Is the shadow hardly defined (sun up high) or strongly defined (sun to the side)?

Lean about the properties and vocabulary of light. It helps give you a greater understanding of photography. These questions, and others, help you make decisions about lighting for your scene. For more on “How to take photos – Light and Lighting” see the resource page in the SUBJECTS/ARTICLES menu at the top of every page.

How to take photos – Create a mental version of the the shot

If you want to make a great image – have a great picture in your head of your intended outcome. Visualisation has helped athletes, artists, thinkers, inventors and others to achieve amazing things. Train your mind to visualise in detail. If you see what you want to achieve it will guide you when setting up your camera. Take the time to create that mental picture – in detail. Consider how you are going to make the best of the light when you consider how to take photos. More about visualisation… 80 year old secret of world class photographers revealed.

How to take photos – Compose the shot

By now you have an intimate photographic knowledge of your scene. Composing the shot is about realising that potential. Long-time followers of this blog already know something about composition. For first-timers you can get lots of information from our Composition resources page in the SUBJECTS/ARTICLES menu at the top of every page. Composition is a skill that evolves as you develop as a photographer. Knowing more about composition helps your awareness and skill develop. Read about it to gain insight. Think about it every shot.

How to take photos – Review and adjust the camera settings

Now you have a picture in mind, composed, and are ready to set up your exposure. The exposure is defined by your camera settings. Camera makers will have you believe that the auto-setting on your camera is the perfect exposure. The fact is they made informed guesses to arrive at that exposure. It is different for every model of image sensor. Modern cameras do make a good representation of the scene. It is not always what you want however. You can change the exposure by under-exposing, over-exposing and by using different apertures, ISO levels and shutter times. That is your interpretation of the shot. When you think about how to take photos, plan how you want the image to come out.

Having a visualisation in your head helps you set the camera up to make that mental image. You do it using ISO, Aperture and Shutter speed. Even using one of the ‘mode’ settings is still a way of regulating your exposure. They all adjust those three basic facets of the exposure.

Here are some other links to pull together ideas about exposure:

How to take photos – Stabilise the camera

You want the photo to be sharp, crisp and clear. The faster the shutter speed the easier it is to get a sharp shot. But often, especially for a good quality shot, longer exposures are better. You need a good stance to hand-hold the camera. You will need a tripod (or other method) to steady it for longer exposures.

Stance is down to basic technique and comfort. The stance you use will be a personal thing for you. I have found many photogs have to relearn their stance after many years of a poor stance. It is best to learn a good one early. Here is my recommendation: Simple tips for a good stance

The use of tripods or other supports is a wide subject. It is also one that many learners tend to ignore- at least at first. When learning how to take photos sharpness is vital. Become acquainted with a tripod (preferably a good one) as early as you can. Your images will improve a huge amount. Here is some advice about tripods:

And, here is some basic advice about improving sharpness overall – The Zen of sharpness – 12 easy ways to improve

How to take photos – 15 second check

OK, that may seem like a long time. However, it is actually the time you need. You can get faster at it, but if you are taking a serious attitude to your shot then give it the time. You can find out all about the the 15 second check by reading these in order:

  1. An old sailors trick to improve your photography
  2. The fifteen second landscape appraisal
How to take photos – “Click”

This is where you press the shutter button. How you press that button can make a difference to your sharpness. Earlier, I mentioned this link, Simple tips for a good stance. It also gives advice on pushing the button without affecting sharpness.

An essential element of your shot is about confidence in what you have done. Today we are lucky. We just look at the back of our camera. Your first “click” may be a test shot. If your settings need adjustment then a simple technique called “Chimping” will help. Chimp and adjust. You will only need to do it a few times to get the shot right. You will not need to machine-gun the site with hundreds of “just in case” shots.

How to take photos – Work the scene

Chimping helps you set up for the shot and compose it. To get other possible shots you visualised earlier, you should work the scene. Repeat all the steps you have just done for each of the shots you foresaw. Working the scene is a skill and takes practice.

How to take photos – Time line

What is not obvious from the diagram is that the diagonal arrow is also a time-line of the shot. Of course it is a different length for every shot. You will have different problems to solve and ideas to consider for every shot. That’s fine. You have just learned a more careful, precise method for how to take photos. As you practice will quickly get faster at taking shots. But you will also make better images.

A promise

I can guarantee that if you follow the steps on this page you will…

  • Take less shots;
  • Get a better hit-rate (more usable shots per shoot);
  • Spend less time in post-processing;
  • Have better composition;
  • Improve your photography overall.

What is less obvious is that you will also save a lot of time.

By Damon Guy (author and Photokonnexion editor)

Damon Guy - Netkonnexion

Damon Guy (Netkonnexion)

Damon is a writer-photog and editor of this site. He has run some major websites, a computing department and a digital image library. He started out as a trained teacher and now runs training for digital photographers.
See also: Editors ‘Bio’.

Easy introduction to ‘visual elements’ in photographs

Look into your photograph, go deeper than it’s content.

Examine the composition of your image. Go beyond it’s immediate pictorial display. Look into the basic structure and you will be able to break your picture down into its component parts. Consequently, understanding individual “Visual Elements” in an image can help you to capture the eye of the viewer too. It’s these simple elements that make the eye work to absorb the content of an image.

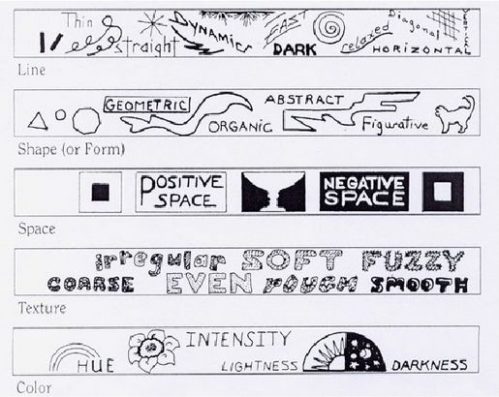
Visual elements shown in a slide show.

Image taken from the slide show below shows how the visual elements work.

What are the ‘Visual Elements’?

We make sense of the world by building a picture of it in our heads. Objects in our environment are visible to us because our eye/brain system is able to see and analyse the edges, contrasts, light/shadow/dark, colours and perspectives we see. Subsequently, our ability to analyse these patterns gives us an understanding of the world around us. So, if we can isolate these simple visual elements it will help our composition.

To make an image, photographers should look for strong visual elements through the lens. A great deal of the creative work in photography is to remove content that doesn’t contribute to the point of an image – these are distractions. So, to make the image effective we should also seek a point of view that isolates elements that we want to show.

Having isolated distractions the next job is to ‘see’ the subject in the ‘best possible light’. This English idiom is not just waffle (especially for photogs). It is really about using the edges, contrasts, light/shadow/dark, colours and perspectives mentioned above. Finding ways to use these effectively is what will draw the eye into our images. As a result, we should be finding simple, eye-catching features that make the scene realistic and easy to understand.

The Elements of Art

Research in art shows, that we can pin-point specific ‘visual elements’ in a photograph as powerful, but fundamental parts of our images. Artists have isolated these visual elements. They are called, “The Elements of Art”. There are seven of them…

  • Line (The path of a point, or implied path of a point, through space or over a surface.)
  • Shape (A two dimensional enclosure created by a single line – may be geometric or freeform.)
  • Form (A three dimensional object which has a ‘mass’ or ‘weight’; a shape with depth; physical width/height/depth.)
  • Space (Positive space: the subject or dominant object in the picture plane; Negative space: the background area. Space can occupy the outside, inside or surrounds in a depicted object.)
  • Value (The relative brightness/lightness/darkness/colour intensity. Photographers usually refer to Value as ‘Tone’.)
  • Colour (Light of particular wavelengths in the visible light spectrum.)
  • Texture (The presence of an apparent surface that would have a touch/feel character of its own.)
Examples – a slide show!

Perhaps, some of my definitions above are difficult to understand. If you can put them into context it will help. Here is a short slide show by Kelly Parker. The examples really show the visual element of colour well. Click the bottom arrows to move back or forward on the slides. Furthermore, you can find examples of the other ‘Elements or Art’ available in many other articles. Search “Elements of Art“.

The Elements of Art – A glossary Entry

To follow up, the Photokonnexion Glossary has an extended article on the Elements of Art. You can see that here… Definition: Elements of Art


Download a Presentation Transcript of the slide show.

Damon Guy - Netkonnexion

Damon Guy (Netkonnexion)

Damon is a writer-photog and editor of this site. He has run some major websites, a computing department and a digital image library. He started out as a trained teacher and now runs training for digital photographers.
See also: Editors ‘Bio’.
See also: Profile on Google+.

CD Play – Fun with Light and Reflections

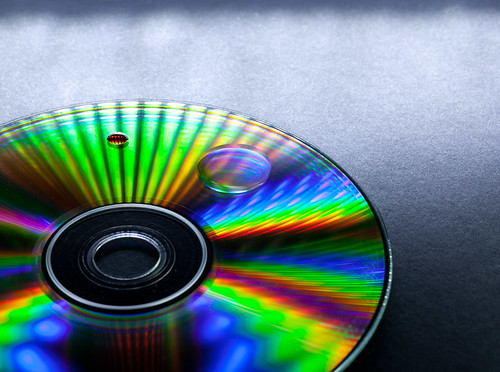
Compact Disks provide great opportunities with light and colour

Compact Disks provide great opportunities with light and colour

An opportunity to do abstract photography

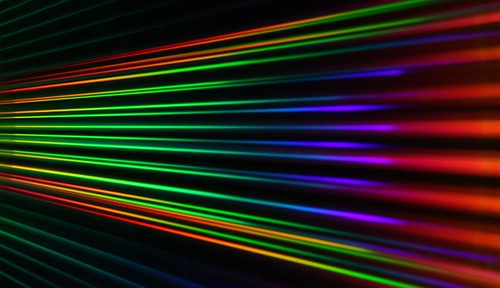
The back side of a CD has wonderful light properties. View it from an angle towards a bright light. You will see great reflections. CDs provide flashes of multi-coloured light. The image above shows a range of different types of light on this CD. They each cause different types of reflection. In this tutorial I am going to show you how to get some interesting abstract light shots using a CD.

What you need

To do light abstracts you need…

  • A clean, unscratched CD or DVD (disposable in case you damage it)
  • A light source
  • White tissue paper
  • white and black cardboard
  • Various liquids
  • Camera
  • Tripod
  • Lens of your choice
  • Macro lens (optional)
  • A darkened room
The aim

My aim of was to get some abstract light shots with great colours. All abstracts are something of a personal taste. To get what you like will take some experimentation. However, it is also about making the best use of your materials. I am going to get you started. From there try out a few ideas of your own.

The camera set up

Still life is best done working toward high quality. I recommend you use a tripod. Hand-held shots get poor results in low light. You need low light for your beams of light. I use a darkened room for this exercise.

I normally work in manual mode for best control. I decided the shot should be sharp all the way through so used f16. ISO 100 will yield a good quality leaving me free to vary the shutter speed. By checking the camera light meter in the view finder I found with ISO 100 and F16 the exposure needed a half second exposure with the light I was using.

The table top set up

I tend to use sheets of white, black or coloured cardboard as a base. The photograph above used black card. It is almost textureless and light works well upon it. I propped black cardboard sheets as backdrops, reflectors or light dampeners. I am sure you can be inventive.

The light

I purchased a multi-point LED light source for this shoot. It’s an LED camping torch with a handy hook and magnets on the back. A very successful purchase – I bought a second one so I have two light sources for still life’s. It is cheap, providing a lovely soft light. Just cover up part of the lighted area to reduce the light output. It’s not ‘daylight balanced’, but it’s close. You can modify the colour with coloured gels, tissue paper or translucent polythene. The long thin shape makes it easy to change the light angle – upright or lying down. The batteries seem to last ages. It is a great addition to your table-top kit.

I found the LED to produce the best light beams for this shoot. However, you could use other light sources or create beams with slitted cardboard.

The shoot

Work with the CD flat on the black card on the table. Before shooting play around with a few light angles to so you know how to create the reflections. It is best to work in a darkened room with just your light source. Leave a low light on so you can see where you are stepping. Set up your tripod close to the table. I usually work with it on the table suspending the camera upside down. This works well if your tripod can do that. Otherwise experiment for the right angle.

I find three essential things make your table top scene go well. They are:

  • Be really, really, really clean and dust free! Your shots will show every dust-spot, mark, finger print and scratch. clean the CD and everything a lot. Wipe with fine grained quality cloths.
  • To save time in post-processing, wear white cotton gloves
  • Clean your lens. Close work shows-up dust spots on your lens.

For me, the abstract is spoilt by knowing it is a CD. I work close in to the CD. You only want to photograph part with the reflections. Get as close as you can and crop the shot later so the edges and centre are out of the shot. The effect is more abstract and dramatic.

To get really close I’ve used macro lenses. The whole frame can be filled with the segment of the CD you are shooting. Remember macro depth of field is very shallow. For sharpness your lens must be centered on the shot area with the lens glass parallel with the CD surface. Otherwise, anything goes. You can use the shallow depth of field too. Try out different effects. Experiment with other lenses. Remember, try to fill the frame to maximize the reflections you shoot.

Creative lighting

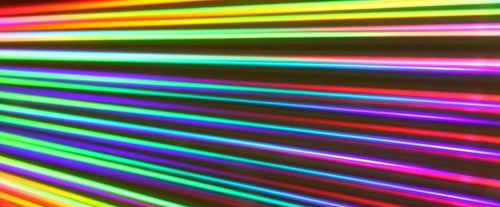
Use your light creatively to make your reflections. In the shots below my LED torch was on its side. It was placed about 50mm from the CD – just out of shot. The width of the light revealed all the LED beams to the CD creating an array of multi-colour reflections. You can cut the number of beams by using black card to blank out LED beams. Experiment to get your light the way you want it.

Creative lighting is all about experimenting. Work the scene as much as possible. Get different angles, heights, colours – try everything. Once you get some shots you like then work with your camera settings to get them just right.

Extension work

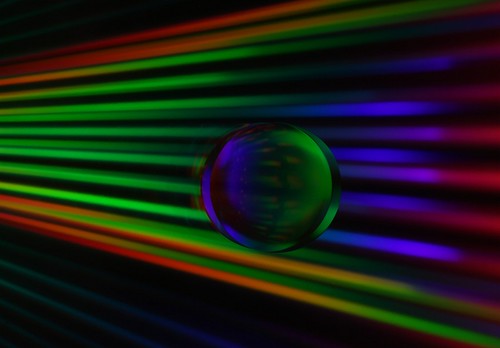
After getting some great reflection shots I tried out a few other ideas. I wanted to interrupt the straight reflection lines to provide a point of interest. I tried small objects and liquids. The best results were obtained with clear vegetable oil drops. Water tended to run. I added some gelatin to stabilize it and got some better results, especially with colours in the water. For me the oil drops were the most interesting and successful shots.

Try out some different small objects and liquid drops. I would like to have tried some clear objects like marbles, or small lenses to distort the reflections. All sorts of other ideas might work. See what you come up with.

My lighting scheme was themed around multiple LED beams from the torch. However, lots of other types of light could be used. You could try an unfocussed single beam, a few beams, say two or three or other light. Vary the light beam width – that might be fun. A range of beams from different angles would provide a set of wide spaced effects. I have used black cards (either side of the light beam) to create dark rims. I have also used reflecting coloured paper (wrapping paper?) to introduce random colours in the reflectance.

Let your imagination run wild. Have fun.

The results

My shots below might interest you. Some interesting ideas of your own may make all the difference. Give the project a go. Why not send us some of your pictures or a URL where we can link to them.

CD light art

'CD light art'

Focused Light - CD light lazers

'Focused Light' - CD light lazers

Lazer War - Super beams reflected from a CD

'Lazer War' - CD Super beams

Dark Light Speed - Traveling on CD light beams

'Dark Light Speed' - Traveling on CD light beams

By Damon Guy (author and Photokonnexion editor)

Damon Guy - Netkonnexion

Damon Guy (Netkonnexion)

Damon is a writer-photog and editor of this site. He has run some major websites, a computing department and a digital image library. He started out as a trained teacher and now runs training for digital photographers.
See also: Editors ‘Bio’.