Tag Archives: Lighting

Using flash in daylight

Flash can be used at any time of day.

Many people, especially starters, don’t think to use flash in daylight. Flash is good for low light conditions but many other circumstances too. There are lots of reasons to light a subject during the day. However, to make it effective the use of flash in daylight takes a bit of thinking around.

In the video we see an interesting combination of dealing with failing light, use of flash and the settings that help to make a great exposure. The video shows how to think around the settings and to set up flash for the situation. While the photographer is not just using the on camera flash, the same principles apply. See if you can apply this type of thinking to your own exposure control when using flash. Remember, the best photographs come from a carefully thought out exposure.

[youtube http://www.youtube.com/watch?v=dTrS-0v-BLg&w=500&h=281]

Balancing Strobes with a Setting Sun: A Lighting Tutorial!
TheSlantedLens

Simple positions for classic portrait work

The essence of portrait work lies in just five simple positions.

Nearly all the shots you take will be based on these simple set ups. All photography students learn to do these positions. The video today is all about how these sets are put together. It really is simple.

The five positions

The five simple positions are…

  • The Short: Often used to help rounder people have slightly longer faces. The face is angled so that the shadows are on the side of the face nearest to to the camera. The lighted side is on the side furthest from the camera.
  • The Broad: The subject faces the camera nearly straight on. The light comes in from the side. The shadow of the nose and the face on the other side of the nose are lit, but only softly.
  • The Rembrandt: A classic position – it is intended to show a triangle of light on the face on the side away from the light. The lighting is set high so that one side of the face is lit, and only the top of the cheek is lit on the other side.
  • Split lighting: one side of the face is lit. The other side is in soft shadow. This lighting technique is often used as a way of stopping shadow from a hat falling on the face.
  • The butterfly: The light is full on to the face. Generally this one is done slightly higher than the subjects head to ensure that the underside of the nose is slightly dark, but there should be no triangle of shadow on the space under the nose to the top lip. This gives a nice broad light to the face and shows off the eyes to an advantage.

More after this…

In the video these positions are shown off with a good measure of advice on how to set up the lights. A great video with a comic twist at the end. Enjoy!


Portrait Lighting for Photography and Video!
TheSlantedLens  External link - opens new tab/page·50 videos

In the near future I will be doing more on portraits. This post is a way of getting that going. If you have any questions or want me to tackle a specific portrait question let me know in the comments or via our Contact Us page.

By Damon Guy (author and Photokonnexion editor)

Damon Guy - Netkonnexion

Damon Guy (Netkonnexion)

Damon is a writer-photog and editor of this site. He has run some major websites, a computing department and a digital image library. He started out as a trained teacher and now runs training for digital photographers.
See also: Editors ‘Bio’.

Ten obvious reasons to change your approach and how to do it

Your photograph is not perfect.

You see good quality photographs every day. Why does your photo not match up to the photographic quality in a publication? What can you do? The answer is simple. You need to look at your overall technique.

Things add up…

Assuming a great idea and composition – what can go wrong? In photography every step of the process counts. The more you get right the better the result.

Professional photographers often repeat a shot tens of times to get it right, sometimes more. They aspire to excellence. Care, dedication, persistence and attention to detail add up to technical quality.

What can go wrong?
  1. Bad lighting: There’s no substitute for suitable, interesting light that’s sympathetic to the subject. If the light is wrong, your shot will not work either.
    Solution: Learn everything about the quality of light, hard light, soft light, the colour of light and the properties of light.
  2. The whole picture is soft: You moved the camera while shooting.
    Solution: Pros use tripods – good ones. They use them fast and efficiently because they practice.
  3. The whole picture is soft: You had to hand-hold the shot.
    Solution: Professionals know how to set up a manual exposure that suits the light. Learn to shoot in manual modes. Know what shutter speed/ISO combinations you can use without movement.
  4. The exposure is too dark/light: Common when learning manual camera control.
    Solution: Use RAW, then you can compensate. With RAW you can deliberately manage your exposure too. There is no ‘perfect exposure’ – there is only the result you want. To get the result you want you have to adjust your exposure. (Hint: you can’t adjust your exposure effectively in *.jpg unless you use exposure compensation).
  5. Colours off: If you are shooting in *.jpg you deserve all you get. The white balance is probably wrong. The manufacturers settings are limited. You can’t fix it in processing. Remember, *.jpg is a RAW file developed in-camera to manufacturers settings, not yours. The settings are applied to your shot blind. No wonder they are not what you want.
    Solution: Get it right. It’s easier to shoot in RAW and develop the shot yourself. It gives you fine control and you can develop your shot work the way you want. Something *.jpg cannot do.
  6. Poor focus: Focus is critical to the right technical and artistic result.
    Solution: Learn about: Depth of Field; aperture, Bokeh, Circle of confusion and how they relate to your lenses. Pros know these things intuitively. You can too with practice.
  7. Poor or soft focus from movement: Focus mode is on the wrong setting.
    Solution: Learn to use the correct focus mode (eg. single shot or continuous etc). Also, learn to focus manually. There are situations where auto-focus is poor (eg. in poor-contrast light). Switch off auto-focus to get better results.
  8. The shot is not sharp: A suspect, poor quality or broken lens.
    Solution: Buy decent lenses. All lenses have sweet and sour spots – even professional ones. Cheap lenses have a poorer optical quality and have more sour than sweet spots.
    Solution: Quality costs money. However, look after a good lens it will last longer than your camera. If you choose right, it’ll fit your next camera. It pays to buy the best quality lens you can afford.
  9. Great lens and tripod! My shot’s still not sharp: Sharpness requires attention to the above and these specific details too…
    Solutions:
    one: Turn off vibration reduction functions. On a tripod motors cause vibration, not stop it.
    two: Turn off auto-focus (another motor), or at least the continuous-focus setting (use the ‘one-shot’ setting).
    three: Use ‘mirror lock-up’ (DSLRs). Mirrors clunk up causing tripod vibration.
    four: Keep out of wind, away from vibration and keep your tripod low (don’t fully extend legs).
    five: Use a remote shutter trigger. Button pushing causes vibration.
  10. I did all this and it’s still not right!
    Solutions:
    one: Practice – putting this together takes time and effort.
    two: Return to locations many times to get the right light and conditions.
    three: Post processing! RAW users, this is where you polish the shot up. Since the earliest photography developing the shot has been a key process. RAW processing is another skill to learn. It’s essential, so learn it. Only *.jpg’ers should worry because they have disabled files. If you used *.jpg there is no hope of properly completing the job.

There is a lot to do! Follow the links and keep at it – you WILL succeed.

By Damon Guy (author and Photokonnexion editor)

Damon Guy - Netkonnexion

Damon Guy (Netkonnexion)

Damon is a writer-photog and editor of this site. He has run some major websites, a computing department and a digital image library. He started out as a trained teacher and now runs training for digital photographers.
See also: Editors ‘Bio’.

Simple techniques for photographing yourself

Most people want to have a go at a ‘selfie’.

You are a good model for trying out shots and poses. You can have lots of fun doing innovative shots of yourself. Here’s some simple techniques for self portraiture which are fun and useful.

In this video Mark Wallace shows easy ways to set up and take self portraits.

Uploaded by snapfactory on Aug 31, 2010

How to take quick and easy photographs of fire

There is something deeply compulsive about fire.

It is almost a primal urge to be fascinated by it. Yes, it is fun to photograph it too. Fire provides all sorts of patterns, colours tones and light intensities. Here are some quick tips and tricks with a method to help you start experimenting with fire.

Three problem with fire…

1. Of course there is an issue with health and safety. Any bare flame is a danger. So try to be very careful to isolate your fire work area so you are not likely to catch anything alight near were you are working. I would advise working outside, or at least on a concrete-floored outhouse so you do not threaten your home, or set off alarms. Do not allow children near you when working with bare flames.

2. The main problem with fire for a photographer is that the fire creates its own brightness. You need to expose your shot for the direct brightness of the flame itself. This will allow the fire to be exposed correctly. However it leaves the surroundings very dark as they are not a light source. So, normally we would not point our camera directly at a light source. Ideally, we need to create a situation where the surrounding of the fire is actually dark, with no detail that we want in the picture. Then we can set our camera to take an exposure using only the brightness of the flame. No additional lighting is needed.

3. Fire spreads! So make sure that you have a fire extinguisher available if you try this exercise. Better safe than sorry.

On with the video

While I am a great believer in using your camera in manual mode most of the time there are ways you can use auto-mode too. In this video watch how he uses the ‘P’ mode (program mode). He takes a few exposures using the program setting so that he can get a reasonable idea of the settings the camera considers appropriate. Then, once the camera has helped him set a base line he can start working with manual to get the exposure he wants.

One other point before we get to the video. It is darkness which makes this shot work. Make the room completely dark while doing the shot. You will notice that the photographer has set up the background with black matte board. It is possible to use other subdued colours. However the black creates a very high contrast which is ideal for shooting a light source like fire.

Enjoy the video…

Video provided by LearnMyShot on Apr 22, 2010 [http://learnmyshot.com] Presented by Robert Grant.

Can you write? Of course you can!
Write for Photokonnexion...

We would love to have your articles or tips posted on our site.
Find out more…
Write for Photokonnexion.

Five easy ways to learn about the light/shadow relationship

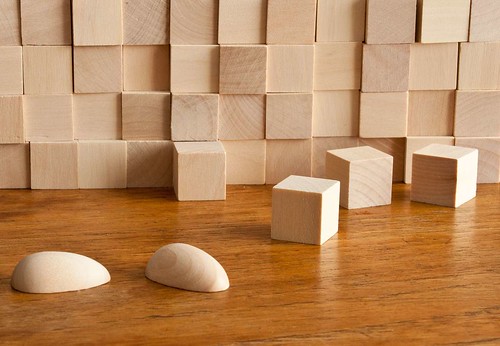
Practice blocks provide a great way to understand light/shadow relationship.

Practice blocks provide a great way to understand light/shadow relationship.
View large About the light/shadow relationship :: External link - opens new tab/page

Our first priority is light – second is shadow.

The relationship between them is one of the great pillars of photography. Learning about them is essential. The key to understanding the use of light is seeing the effect of shadow. In this article I am offering some ways to learn about the light/shadow relationship. If you have not already done so I recommend you read Three little known facts about shadows External link - opens new tab/page first.

The light/shadow relationship – a transition

When looking for a scene the right light and shadows can make or break a shot. We are looking at the light/shadow relationship so we can convey the right message to the viewer. Things with harsh and sharp shadow-lines tend to indicate hard, masculine, tight, dark, angular, tough, solid, artificial, technical. Things with soft shadow-lines showing gradual light-to-dark change are the opposite. They tend to be gentle, mild mannered, lighter, soft, rounded, meek, curved, natural and feminine in appearance. Using the wrong light sends conflicting messages to the viewer. The right light will help your message. The defining aspect of this relationship is the transition from light to dark. The shades between light and shadow are the definition of form. “Form” being the three dimensional shapes we see. The harsh sharp shadows of hard light are great for angular forms. The soft rounded and gradual shadows of a softer light are great for showing rounded three dimensional forms – like faces, eggs and balls.

Creating the right light

Creating light of the right sort is the quickest way to understanding the different types of light and the shadows they create. So, we are looking to bring out the transitional light/shadow relationship through the use of different types of light. This will help us define form in our images and bring out the 3D feel that makes pictures appear to have depth.

You need to be able to create two types of light for these experiments. Hard light – created with an intense beam from a relatively small light source. A torch like this one is excellent for this purpose…

 
The ‘Lenser’ LED Torches

The ‘Lenser’ LED range of torches External link - opens new tab/page is available on Amazon. I personally recommend the excellent LED Lenser 8407 P7 (Black) External link - opens new tab/page torch (advert – left). It is excellent for all types of photography. At night you want a rugged and powerful torch for safety, lighting and to prevent losing equipment. Lenser also sell a coloured filter set for it making this torch great for light painting External link - opens new tab/page too. It’s the top seller (5 star) in the range. Experience has shown it to be an exceptional piece of technology.

You also need soft light – usually generated from a large light source like a window, softbox or photographic umbrella.

Make sure you are using only one light source for your tests. Multiple lights confuse the shadows. The hard and soft lights are best used at the same intensity so you can compare results between them later. If you have one, an off-camera flash with the appropriate modifiers would do the same work. Use a honeycomb or snoot to get the tight beam of a hard light. Use a diffuser or bounce the light off reflectors or walls to create a soft light.

For your first experiments with soft and hard light try out your different light sources. Place a simple object of your choice on a table. For the subject see a small vase, a simple ornament, a small box or something similar. Take a few photographs with both hard and soft light. Then open them on your computer and compare them. What you are looking for is the quality of the shadow. How intense is it – light or dark. How quickly does the light change from light to dark. Is it an abrupt, sharp change? Or, is it a slow, gradual transition? Study your shots to see which you prefer. The light/shadow relationship is best shown in gradual steps. So your shots should show very hard light right through to very soft light.

Experimenting with curves

The use of curved subjects is going to create gradual transitions of light anyway. But curves can also have quite hard shadow-lines if the light is also hard. Using something rounded will show the point. A small ball, an egg or something similar are great for testing the hard or soft light effects. I have several wooden eggs for this purpose. They make test subjects for thinking through individual or group portrait shots. They help in planning shoots and lighting set-ups. They are a very cheap way of making your mistakes before the shoot! Give them a try.

Using a rounded subject, try your hard and soft tests again. This time take shots from at least eight light-positions in a circle round your egg. You must stay in the same position to take each shot. That way you will see all the different angles of the light/shadow relationship as a graduation as you move the light round for each shot.

In your computer ask the same questions about the hard edges and soft graduations of light through shadow. Imagine the eggs are faces. Which will work best on a face – those hard sharp lines or the soft graduations?

Experimenting with lines

For working with more hard-edged objects I have 50 wooden children’s building blocks. I use these in the same way as the eggs. They help me plan lighting and sets/props positions for shoots.

Use one block to start. Repeat the exercise as you did with the eggs. Take eight shots using different light positions around the cube. Keep the camera and cube in the same position from the start. Just move the light to each of the eight positions around the cube. Repeat the exercise for the hard and soft light sources. You will see that the results for a hard edged object is very different to the soft edged eggs in the previous experiment. Concentrate on how the light transitions in the light/shadow relationship shown by each shot.

This time, you are asking the same types of questions… about the quality of the shadow. How intense is it? How quickly does the light/shadow relationship transition, and so on. Again, study your shots to see which you prefer. You will have a different type of result because the edges are much harder than the rounded eggs. The shadow shapes will be very different too.

The wooden blocks are useful. The set I use for this purpose is advertised to the left. It has rounded blocks and a variety of shapes. This gives you the opportunity of trying out a whole range of effects and test lighting set-ups.

Experimenting with specifics

You have experimented with rounded subjects and hard edged ones above. Now it is time to look at the other possibilities.

Try mixing rounded and square edges. Try out a few scenes using the blocks to map out props. If you have other toys around use the blocks to create little still life scenes with the toys or other objects. The idea is to try and creatively use the toys, blocks and egg to make a scene. But you must concentrate on creating sympathetic shadows. Look always for the way you can understand the balance in the light/shadow relationship and make it complement your theme.

Suppose you depict a robot war. Your best light will be hard and very direct. The harsh sharp curves will help create a chaotic and harsh environment. Try depicting a love scene between two figures. You want to use soft, diffused light to carry the romantic mood.

You see my point. You are trying out in miniature what you want to do in the real world to emphasis your message.

I used to use several action figures for testing out scenes with people. But the kids broke them eventually. These days I use cheap wooden artists dummies. They are fun to use and give a very good idea how to set up lighting for poses. The one I use is advertised to the left. It is really great for lighting tests.

The Importance of Eggs

Finally, here is a video which I posted earlier this year. It focuses on the angles of light in the light/shadow relationship. It will show you the point of the eggs exercise. So you can see how it is all done. He shows you the principles. However, you will need to try out for hard and soft light and hard and soft edges – which the video does not show… Enjoy!

The Importance of Eggs (a previous post on Photokonnexion).

Simple photography in the bath – high key shots

Use a bath for quick and effective high key shots.

Here’s a quick tip. High key shots, with brilliant white backgrounds, are popular. With a white bath you can do high key shots without setting up an infinity wall.

If you would like to do high key shots here is a way to get started if you are doing individual or small items. I have previously covered the subject of high key photography with these two articles… A simple way to make and use a seamless white wall and How to shoot bright white backgrounds. Also there is a definition for high key from our Photographic Glossary: Definition: High Key lighting/photography. If you have read these articles you should have a pretty good idea of how to go about this type of work. Here are some examples of high key images from Google…
High Key lighting/photography images on Google External link - opens new tab/page.

The quick tip

A white bath is, in photographic terms, an infinity wall. It’s a seamless white background. The object of the exercise is to create a distance between the subject and the white background of the bath. If you can find a way to suspend items into the bath, or hold them above it, you have a way of holding your item for the shot. Then you can illuminate the bath around your subject, or below it, without lighting the subject itself. Using a bath is simply an extension of the same principles in the articles mentioned above.

In essence, all you need to do is to create a little distance behind the subject so you can light the bath (within that distance) to about two stops more than the subject. Then you will create a white seamless background behind your subject. There are two main ways to do this…

  1. Suspend the subject above the bath and illuminate behind it into the bath from each end. Shoot directly down on the subject.
  2. Place the subject in the bath bottom about half way down the length of the bath. Illuminate the back end wall of the bath from above the subject and shoot from the tap end down the length of the bath.

You will need to consider the same principles in the bath as those in the article “A simple way to make and use a seamless white wall“.

Some things to consider…

  • DO NOT USE ELECTRIC MAINS LIGHTS in the bath! The proximity to water is a health and safety hazard. Please be sensible.
  • Make sure the bath is clean and dry. That will preserve your equipment.
  • Place thin wood strips across the bath from which you can use fine white sewing cotton to suspend your subject. I am working on a frame to do this so I can photograph between the wooden crossbars directly at the suspended item.
  • It is best to shoot downward into the bath and illuminate along the length of the bath.
  • If shooting an object that is standing in the bath, shoot along the length of the bath and light the bath from above.
  • The bath technique is great for small items, but you get side-shadows if you try to photograph large items. A large item is too near the side and cuts down the illumination around the object.

It is fair to say the high-key bath technique is limited in its usefulness to small items that you can easily suspend. Having said that, the set up is easy and the results are good. Why not give it a try. Like any photographic techniques, experiment until you become good at it. I have had some fun with this today. Enjoy!

By Damon Guy (author and Photokonnexion editor)

Damon Guy - Netkonnexion

Damon Guy (Netkonnexion)

Damon is a writer-photog and editor of this site. He has run some major websites, a computing department and a digital image library. He started out as a trained teacher and now runs training for digital photographers.
See also: Editors ‘Bio’.

Can you write? Of course you can!
Write for Photokonnexion...

We would love to have your articles or tips posted on our site.
Find out more…
Write for Photokonnexion.