Tag Archives: Lighting

This one peculiar idea can transform your photography

Compositional elements :: Look at a large number of photographs every day

Everything you see in a photograph is a composition. Looking at lots of photos every day, particularly good ones, helps you appreciate good images. The article shows you how to identify simple Compositional elements.

Involve yourself to improve

Every day, expose yourself to great images. The mind soaks up the goodness. But to make it effective you should also be seeing into the image. It is surprising, but the the good things about a photograph are seen with the first glances. Compositional elements in a photo jump out at you, even if you can’t tell me about them. I am going to show you how to find them with a simple exercise.

What is in an image? Compositional elements

When we look at an image it is often difficult to see what is good about it. Obviously our personal taste plays a part. Often however, other people who do not share our taste, also like it. The common appeal comes from the compositional elements of the image. Often these elements are very simple structural lines or edges. They help the eye through the image or lead the eye to the key subject. Composition is all about helping the eye to appreciate the main point of the image.

How do we pick out the compositional elements?

Knowing about composition is important. The “Rule of Thirds” and other simple rules help you to analyse a scene. You can use them to understand ways the eye uses compositional elements in a scene. Find out more about composition from our page: “Composition resources on Photokonnexion”. There are lots of posts there to help you with composition.

You can already spot basic compositional elements

The main compositional elements can be picked out by eye. Anyone can do it. This is what you do…

  1. Take a small piece of paper – postcard size is ideal.
  2. You are going to draw on the small piece of paper…
  3. Pick out a photo – any picture.
  4. Study it for five seconds.
  5. Put the picture out of sight.
  6. Using simple curved and straight lines make a skeleton sketch of the picture. Do it from memory take no more than thirty seconds.

That’s it. You have simply isolated the elements of the compositional structure.

Here is an example. Click this link and follow the short procedure above. to create the skeleton sketch.
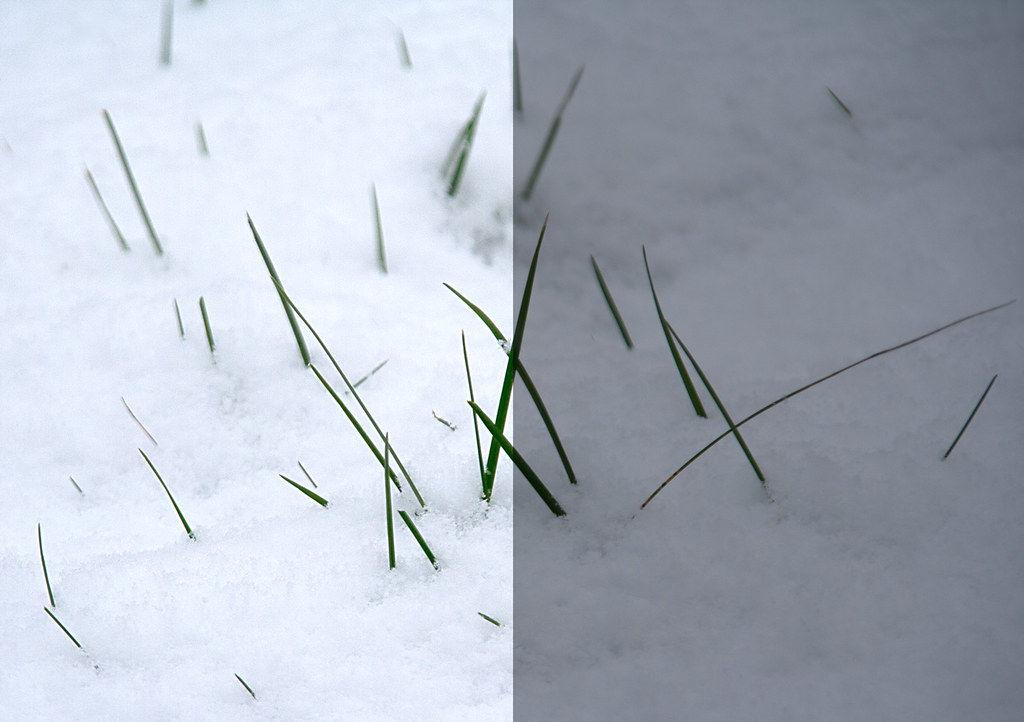
Test Picture

Here is a good example of what you should see when you have finished your sketch: Test Picture Compositional Skeleton. It was done by my wife, who is not a photog or artist. Despite that, she has successfully isolated the major compositional elements in the picture. It shows how effectively this exercise can work

More after this…

find out more...Photokonnexion tips by email
Enjoying this article? Please sign up for our
daily email service.
                                                Find out more
#11030#

Analysis

The test image is of Honister Pass in the English Lake District. All the lines lead the viewer to one point. The exit in the hills in the distance is dynamically off-centre. That keeps your search for symmetry. You feel like you know where the road is going. It draws the eye into the picture. Your eye does not exit upward – the clouds hold the eye into the valley. You are drawn along the road into the image, giving it depth. The picture has a 3d structure and a strong mood.

The strong lines and balance of this picture make it simple to pick out compositional elements. With practice this procedure will help you analyse complex examples. With a few practice examples you will be able to pick out compositional elements by eye. If you do this in your head you’re on the way to doing compositional analysis through the viewfinder.

As you learn new compositional ideas you will pick out more compositional elements. Use them as tools of analysis. They will help you understand and compose in the frame while taking a shot. Soon you will compose to draw the viewer into the picture.

Rules don’t make things beautiful

Rules of composition are limited in many ways. They are more guidelines than rules really. So do not fear to break them. Instead, know the things that work well for the eye. Develop harmony and balance, learn to appreciate beauty. Look at as many great images you can every day. Knowing a little about why they are attractive will help you to create more beautiful and effective images of your own.

By Damon Guy (author and Photokonnexion editor)

Damon Guy - Netkonnexion

Damon Guy (Netkonnexion)

Damon is a writer-photog and editor of this site. He has run some major websites, a computing department and a digital image library. He started out as a trained teacher and now runs training for digital photographers.
See also: Editors ‘Bio’.

Can you write? Of course you can!
Write for Photokonnexion...

We would love to have your articles or tips posted on our site.
Find out more…
Write for Photokonnexion.

The simplest light set up – a reflected light technique…

Lighting Techniques

Lighting Techniques

The simplest techniques are often the best.

It is true we need to take time to get the lighting right. Equally true, we need to think about the simple way to do it. Too often photographers want to set up complex lighting. Actually with some very simple techniques we can make the light as simple and full as the light of day. If it looks natural nearly anything will benefit from simple lighting.

A great way to light your portraits

The technique shown in the video below develops ideas in these posts from earlier in the week…
Simple portrait lighting for anyone to try (pt.1)
Simple portrait lighting for anyone to try (pt.2)

If you are working with a home set-up, or you have a sophisticated studio, this technique is equally as useful. It simply uses a very large reflector – a white wall. That’s something nearly everyone has access to somewhere nearby.

One Light & White Wall

AdoramaTV  External link - opens new tab/page

By Damon Guy (author and Photokonnexion editor)

Damon Guy - Netkonnexion

Damon Guy (Netkonnexion)

Damon is a writer-photog and editor of this site. He has run some major websites, a computing department and a digital image library. He started out as a trained teacher and now runs training for digital photographers.
See also: Editors ‘Bio’.

Can you write? Of course you can!
Write for Photokonnexion...

We would love to have your articles or tips posted on our site.
Find out more…
Write for Photokonnexion.

Nine simple guidelines for great interior shots

• Dining Room • For great interior shots follow the guidelines

• Dining Room • For great interior shots follow the guidelines
Click image to view large
• Dining Room • By Netkonnexion on Flickr External link - opens new tab/page

Photographing interiors is easier with simple rules.

We have all taken interior shots at some time. Indoor subjects are wide ranging. What about when you want to take a picture of the room itself? Here are some simple rules to help you get it right.

Why would you want to take a picture of the room?

Actually there may be many reasons. In the picture above the shot was taken because of the historical interest. It is a record shot. Of course there are lots of other types of shots you might want to take in an interior. Here are some examples…

  • Historical interest
  • Insurance record
  • Design interest
  • Before and after shot
  • House or room for rent
  • Hotel room for holiday snap
  • Hotel room for advertising
  • Colour and décor sampler for decorating plans
  • Sales and marketing photo for building sale purposes
  • Comparison with other places
  • Artistic impressions or interpretation

You get the point. Rooms can have a lot of reasons to be the subject of a photograph.

Some simple guidance…

1. Give yourself a clear purpose for the shot(s): Without such a purpose how will you know the best approach, what to include and exclude and how much of the room to take in. So know why you are doing it and what you hope to gain from the photograph. It helps to write it down.

2. Minimise distractions: As with any type of photography your primary purpose can be affected by distractions in the shot. Think carefully about the purpose of the shot. Remove anything that is discordant or will not add value to that purpose or will distract the eye. Take out objects that are too bright, nothing to do with the shot; something that may confuse the purpose of the shot.

3. Work on the brightness: Remember, the normal lights in a room will probably have a colour cast which will have an impact on the overall colour. If possible use daylight adjusted lights or off camera flash units. Use the flashes to light up specific areas of the room. Highlights like that add to the atmosphere in a room. Be consistent with the natural lighting and any artificial lights that may be in evidence as permanent fittings so the lighting does not look out of place. If you only have the on-camera flash make sure you have it set to a sufficient power to light the whole room. Arrange the furniture so that the light coming from the camera does not leave harsh shadows on the floor in front of you. Flash is inclined to leave such shadows which make the room look very angular and uncomfortable. Rooms that have soft, bright and well lit aspects are more welcoming and give an air of comfort.

4. Windows and doors: These are important parts of a room. Depending on your purpose you may need to show them. If they are looking out onto a bright exterior, or directly to the outside you may have a problem. The outside is quite likely to be much brighter than inside. More than two stops of brightness will almost certainly burn out. This creates a very bright white area of the shot. That’s very distracting. It will take the viewers eye straight away from the subject. One way to counter-act that is to raise the internal light levels so the contrast from inside to out is not so large. That will probably require some additional flash units or other lighting around the room. Alternatively, you could lower the incoming light by closing curtains or the door. However, you light the room remember to use the appropriate white balance settings on your camera. Colour casts can spoil the shot. It is also better to shoot in RAW so you can adjust the colour balance in post processing.

5. Straight lines and verticals: Rooms and interior spaces often look odd in pictures because the straight lines are not straight and the verticals are converging. You must prevent this if your purpose for the shot is to make the room look normal. Use a lens that minimises distortion and set your camera on a level for the shot so it minimises convergence in the upright lines. If you are unable to prevent the lines from bending or converging then make sure you can straighten them in an editing application in post processing. Of course if you are making this photograph for artistic reasons, anything goes.

Langley Library

Use furniture to give the impression of depth.
Place pieces so they look like there is a succession into the depth of the room.

6. Impart depth to the room: Taking just any old shot you will find that the room often looks flat, or lacking in depth. The effect of zoom lenses and maybe an on-camera flash will exaggerate that effect. You can do three things to off-set that effect…

  • Use lines in the room to give the impact of depth as they trend away from you (eg. the table in the top shot above).
  • Create a foreground, mid-ground and far point of the room. Taking a shot with a piece of furniture directly in front of you, something mid-way into the room and something on the far wall will do the trick.
  • Strategic placement of lights down the length of the room will draw the eye down the room too.

7. Adjust comfort levels to suite your purpose for the shot: Every room has what I call a comfort level. It the room is cold and uninviting the comfort level is low. If you intend your room to look like a medical clinic then find ways to give it a low comfort level. Harsh lights, angular furniture, sparse layout… anything that will make it look uncomfortable.

If you want to sell a new home to a home-loving family then you need to raise the comfort level in the room. Soft lights, soft furnishings, rounded corners, bright and inviting cushions… these things help people to feel comfortable. Your pictures should reflect the reason you are taking the picture.

8. Use appropriate lenses: Different lenses have different effects. If you use wide angle lenses they will distort the long dimensions. Use it in portrait view and the lens will appear to make the room look high. If you use a wide angle lens down the length of the room it will make it look long and thin. If you use a zoom lens it will have the effect of foreshortening the room. A 50mm lens will tend to show the room much as the eye would see it. Every room or interior space is going to be interpreted in different ways. The best guidance is to look for a lens that will best exaggerate sizes, or complement dimensions to suit your stated purpose for the shot.

9. People: The inclusion of people in a room can be either a good or bad thing. It all depends on how you want to portray the space and the purpose of the shot. In an entertainment space lots of people enjoying themselves will make the shot good. In a warm, homely room one or two people chilling out and enjoying the comforts will also sell the shot. On the other hand, a record shot should really be about the room, factual and un-distracted.

If it is solely the room you intend to show then it is probably better not to include people.If you do include people then make sure it complements the purpose for the shot.

Interiors are satisfying to photograph

There may be lots of reasons to take pictures of rooms, but that makes it important that you think about what you are trying to portray. If you have a clear purpose for the shot then you can match the layout, furnishings, lighting etc to meet the purpose you have set. Think about layout, depth and finishings. Think about people. There is a lot to consider. However, interior shots can be very satisfying indeed. Practice makes perfect, so work on the points above.

find out more...Photokonnexion tips by email
If you enjoyed this article please sign up for our
daily email service.
                                                 Find out more
#11030#

By Damon Guy (author and Photokonnexion editor)

Damon Guy - Netkonnexion

Damon Guy (Netkonnexion)

Damon is a writer-photog and editor of this site. He has run some major websites, a computing department and a digital image library. He started out as a trained teacher and now runs training for digital photographers.
See also: Editors ‘Bio’.

Easy ideas for controlling your flash unit

Specular highlights

Bath toy
Specular highlights are distracting and draw the eye which spoils the shot.

Flash is a great benefit and a problem all at once!

Most people don’t realise two things about flash. First, the standard setting is nearly always too powerful. Second, the highlights resulting from flash are very distracting.

Working with flash power

Like all things in photography you need to think carefully about using flash. It is not simply click and move on. Most improving photographers are just beginning to make shots rather than snaps when they begin to see the quality and colour of light. So it is easy to miss some of the impacts that flash has on a subject. Here are a few consequences of a flash shot…

  • An over-bright subject.
  • Strong highlights with a tendency to wash out colours.
  • Specular highlights that create sharp, bright spots that distract the eye.
  • Bright foreground, dark background.
  • Flesh tones strongly whitened giving a sick look to the face.

Each of these is almost always down to using too much power in the flash. So, the way to over come these issues is to do two things. Turn down the power of the flash and diffuse the flash so it scatters the light.

Turning down the flash is simple. You must find the setting that adjusts the flash power level. This is easy if you are using an off camera flash because the unit usually has a display and a dial or buttons to change the settings. On-camera (pop-up) flash is usually adjusted by finding a menu setting that turns the power up or down. You may need to consult your camera manual to find where that setting is found.

The key to getting the right setting for your flash is to understand how to change it. Most off-camera flash units are marked up so there is two stops of light on the flash. Normally if the flash is marked 1:1 then that is full power, and more often than not this is the default setting. You can usually turn this down by one third of a stop of light at a time. Each time you stop down the setting one stop you are halving the light it emits.

Pop-up flash units may not be marked so clearly. Some are marked [low – medium – high], others, particularly point and shoot cameras, may just have “full | half”. More sophisticated pop-up units may also be marked in the same way that off-camera flash units are marked. Which ever your flash is, you should practice with it so you have an idea of how powerful it is and how much the settings can change the impact of the flash.

Flash diffusion

The best way to get used to using flash and controlling the power is experimenting. However, the issue of nasty highlights is the other problem the inexperienced user often does not spot at first. Strong highlights raise the light levels so you can see the tonal changes in the colour of the surface the light hits. This helps to define the shape of an object. So, for example, a brighter top on a ball and dark shadows under it help to define the spherical shape.

If the light intensity is too high, particularly on reflective surfaces, the reflected light level will exceed the level the camera can cope with. The highlight then becomes blown out. The light is so bright in that area that it becomes a bright spot where all the detail is lost to pure white. Unfortunately such strong, blown out areas, are severe distractions. In the picture above, the small reflective points, called specular highlights, are also strongly distracting. So what can you do to avoid these nasty effects?

If your power adjustments are not working and you still have blown out spots or highlights then you should consider diffusing the flash. This makes a difference in two ways. The diffused light will scatter the light from the flash over a wider area. This effectively lowers the light intensity even further in the area of the highlight since the light is not hitting it from a direct focused hard light from the flash.

Secondly, diffused light spreads the effect of the light. This makes it more likely to bounce off other surfaces nearby. These surfaces then become multiple mini-light sources. All these sources hitting your subject create a soft light which is much less likely to create specular highlights or very strong colour-destroying highlights.

So how do you do this diffusing? I just love this great flash diffuser. Designed to fit your off-camera flash unit it is an ingenious design and easily adaptable to any flash unit. Check out the Rogue FlashBender 2 – off camera flash. If you have an off-camera flash this is the best. It is the most adaptable diffuser I have ever used. You attach it to the flash with a wrap around grip. The big diffuser stands up above the lens of the flash. It is tough, flexible and creates a lovely daylight-white light. It is superb for portraits and still life work. Coupled with adjustments to the power settings on your flash it gives you excellent control and helps reduces highlights and the effects of hard light direct onto the subject.

For off camera flash there are a range of diffusers available. They are based on various different mounting or reflector principles too. So, you need to look around to see if you can find a diffuser that suits you.

For pop-up flash the options are not as easy. However, I recommend one of two options. I have successfully used ordinary white tissue paper sticky taped over the pop-up flash to both reduce and diffuse flash. However, while this works well, reducing the light by about a full stop, it is a temporary solution. Also, if you use the flash a lot the extra insulation may cause the flash to over heat. So, not for regular use.

My favoured options for pop-up flash diffusion are one of these three methods…

Professor Kobre’s Lightscoop, Standard Version Bounce Flash Device, Universal Model, fits over the Pop-up Flash of most SLR Cameras This diffuser produces a very effective ceiling bounce for the diffusion. However, make sure that in rooms where you use it there is no strong colours on the ceiling or it will cause colour casts.


Gary Fong Puffer – Pop-Up Flash Diffuser for Canon / Nikon / Pentax / Olympus / Panasonic- Lumix pop-up flashes A well reviewed unit, and has the advantage of an easy fit. The other advantage is that it diffuses the light moving forwards. The other two units here bounce the light which puts you slightly at a disadvantage in controlling the flash light direction.


Cateye LETS Flash Reflector/Diffuser Hybrid, for use with DSLR pop-up flashes Although I have not used this one personally, I know some people who have. I have had some very good feedback on this unit and it seems to work effectively in a wide range of situations.


Great shots with flash…

Yes, like everything else in photography, to get good with it, you have to practice use of flash. However, first you need to make sure you can spot the highlights, specular highlights and over-powered flash. Once you know what you are looking for you can adjust your flash power.

The best way to gain control of your flash is reducing the power, or at least adjusting it. Also, the more you soften the harsh, hard flash light the less distracting and natural the highlights will be.

Whatever you decide to do to make your flash manageable do plenty of experimenting to gain control of the light. Don’t forget to Examine Shots Before Shooting Again – “Chimping” to check for highlights. The practice will pay you back in great, well lit shots many times over.

find out more...Photokonnexion tips by email
If you enjoyed this article please sign up for our
daily email service.
                                                 Find out more
#11030#

By Damon Guy (author and Photokonnexion editor)

Damon Guy - Netkonnexion

Damon Guy (Netkonnexion)

Damon is a writer-photog and editor of this site. He has run some major websites, a computing department and a digital image library. He started out as a trained teacher and now runs training for digital photographers.
See also: Editors ‘Bio’.

Entering competitions is easy… here’s how

Air Display Montage

• Air Display Montage •
Entered in a competition as three projected digital images today
Click image to view large
• Air Display Montage • By Netkonnexion on Flickr External link - opens new tab/page

Competition is fun and improves your photography.

The essence of improvement is getting feedback and learning from it. Photography is no different. Competition provides feedback and helps you streamline your technique. Improve for competition and you will improve for your viewers.

Is there a problem?

You would think so. I know lots of people who are really rather reluctant to enter competitions. The reasons for this reluctance tends to fall in to three categories:
I am waiting for the perfect picture to enter…
• Ever heard the saying, “Excellence is the enemy of good”? You can waste your whole life waiting for the right circumstance, picture, money, gift, break, whatever. In most cases excellence is only achieved by practice, application, focus and persistence. And, of course, lots of mistakes along the way. If you don’t start now you will never get to a position where you can consistently create excellence. To work toward something excellent in the long run work with the “good” now and test out your skills. If you work at it excellence will follow.

I’m worried someone may say something horrible about my work…
• No one likes to be criticised. Except that is when it is positive and a learning experience. In photography clubs the world over competitions happen all the time. Yes, they are competitive, but they are also learning experiences. Photographers go there to learn what they can do to match up to future competitions. Judges have no investment in crushing people. Judges try to enable more competitors to enjoy photography and improve their skills. When they talk about a picture they want to emphasise the good points and highlight the things that need to be considered in the light of experience. A good judge will make you feel great about successful aspects of your picture and help you learn about the less successful ones.

I worry my effort is shamefully bad and I will be a laughing stock…

• Children are cruel to each other. The playground is a hell of a place to learn tact and diplomacy. Yet, most of us do learn it. We are grown up now and this excuse does not hold water. Most of us have been through the university of hard knocks. Really this is just a throwback to childhood. There is nothing like just doing it… have a go! There is really nothing to be afraid about.

Who will I be up against?

• One of the great things about competitions is they are usually graded. If you are a beginner then get into the novice or starter class. If you have been doing competitions for years then go for it, enter into the advanced competition class. But exercise common sense. If you have never entered a competition, swallow your pride and enter the novice class. You need to know the way these things are played and the gentle approach will allow you to learn and do well. Get the lay of the land before your all out attack! joining a local photographic club is a good start.

Of course you may want to enter a national or international competition right out. Well, feel free. However, the stakes are higher and so is the field of entry. The “Veolia Wildlife Photographer of the Year”, now in its 49th year, usually has more than thirty thousand entries. It is a revered world-wide competition with big prizes. Of course there are far too many entrants to give feedback on them all. So my advice is to start small. Enter club or local competitions. You will be up against people who have similar talent levels. Even if your picture is not commented upon you can often find feedback on the winners photos that will help you see your own errors.

What is expected of me in a competition?

• Competitions are great at putting people on the same level. Everyone is treated the same. There is only one real expectation…
Enter your best picture that matches the brief for the competition

You would be surprised at how many people fall at that simple hurdle. Most beginners simply do not read the brief and provide a photograph to match it. If you want to win, you have to provide a photograph that the judges are looking for when they judge. Sounds simple. It does take some thinking about. The rules (example) and the guidance documentation (example) are essential reading. You should know them inside out. What you think about the rules is irrelevant. No mercy will be shown for people who do not fulfil them and the brief. The image will just be excluded. If you do everything the rules and the competition brief asks, then your picture will be reviewed.

find out more...Photokonnexion tips by email
Enjoying this article? Please sign up for our
daily email service.
                                                Find out more…
#11030#

What will the judges be looking for?

The answer to this varies from competition to competition. Normally you can get a feel for it from the guidelines for the competition. However, as a general rule, the judging will cover the following sorts of criteria:
Fit to the brief
• Does the photo actually meet the competition requirements
Presentation: Overall Impression of the photograph…
• Editing, mounting (if mounted on something), printing (if a print)
Camera Work Technique: (photographic skill)
• Choice of viewpoint or angle taken to the subject
• Choice of lighting (should be appropriate for the subject)
• Accurate focusing
• Appropriate quality and choice of exposure
• Suitable depth of field (aperture)
• Appropriate use of shutter speed for the subject
• Highlights and shadows (ensuring detail is retained)
Technical Quality: (of prints or editing, finish etc)
• Absence of processing faults, dust spots, processing artefacts, image damage by sharpening etc.
• Appropriate tonal use and control of the range of tones
• Good image finishing
• Appropriate use of levels, curves and colour management (post processing)
Visual Awareness, Visualisation and Seeing:
• Composition, design and cropping of the images (aesthetic considerations)
• Appropriate simplification (minimising irrelevant complications)
• Distractions and intrusions should not divert the viewers eye
• Good use of light, mood, texture and colour
• Good use of masking and manipulation where appropriate (or where allowed) depending on the rules of the competition
Communication and meaning:
• Personal input, understanding of, and connection to the subject
• Appropriate communication of any message, mood, ideas, and information
• Complementary use of the photographic medium to suit the subject (mounting, projection, printing, texture of print substrate etc)
• Appropriate imagination and creativity as well as suitable timing for the shot

That is quite a list. It is a lot to take in. Some of the terms may not be familiar to you either. That is why you are advised to go through club channels to learn what is involved in these different processes.

What if I win?

• Congratulation are in order. However, there are usually some post competition issues to consider. For example often competitions put restrictions on what you can say to the press about the competition. You may also be required as a condition of entry to allow the competition organisers to be able to use your image in some way. Be sure that this use is compatible with your use of the image. Some commercial photographers have fallen foul of competition restrictions in the past. Again, the only guidelines you should follow are those of the competition. As to awards and prizes you will normally be told in the instructions for the competition what those are. They differ widely.

Finally…

I can only wish you luck. Competitions are great fun and I have learnt a huge amount from competing over the years at club and other levels. I think if you enter a competition you will learn too. It is all about improving your photography and having fun. If you join a club it will also be about doing it with your friends and with their help too.

By Damon Guy (author and Photokonnexion editor)

Damon Guy - Netkonnexion

Damon Guy (Netkonnexion)

Damon is a writer-photog and editor of this site. He has run some major websites, a computing department and a digital image library. He started out as a trained teacher and now runs training for digital photographers.
See also: Editors ‘Bio’.

Correct snow scenes using exposure compensation

Bright snow scenes create a problem with the auto-settings for exposure

Bright snow scenes create a problem with the auto-settings for exposure
Click image to view large
Green shoots through the snow By Netkonnexion on Flickr External link - opens new tab/page

Snow reveals a problem with auto-modes.

The brightness of a snow scene throws off exposure. Cameras in auto-modes work to a “normal” type of scene. When unusually bright scenes are encountered the camera cannot compensate. It leaves the scene grey. This is because the camera is calibrated to work with a mix of colours, light and darks that represent the sort of scene we encounter every day. It senses the luminance levels in the scene and sets exposure to the middle of the range between light and dark.

If the camera senses an unusually bright scene, like the snow scene above, it is unable to compensate properly. The brightness is outside its normal range of compensation. The camera responds by underexposing the shot, and the snow turns grey. The photograph above shows the scene as shot in the right hand panel. It is grey. The left hand panel shows the correct exposure after the underexposure is compensated by an exposure compensation of 1.66 stops (one and two thirds stops). (See: Definition: f-stops)

Photographers are more accurate than camera auto settings

In these bright (or dark situations) we can dial in exposure compensation to manually set the scene to be brighter. Using the exposure compensation we can increase the exposure to brighten the scene (+ settings) or even darken the scene (- settings) as appropriate. Then, we take another picture. By looking at the screen on the camera (“Chimping”) we can get the exposure correct by adjusting the exposure compensation to correctly whiten the scene.

This exposure compensation principle applies to the camera modes which are automatic or semi-automatic. In full auto, the camera calculates the exposure by balancing the ISO, shutter speed and aperture settings. However, in the semi-automatic modes the photographer changes one of the settings while the camera changes the other. In these modes, as in full-auto, the camera can still make the mistake of under-exposing (or over-exposing). Only the photographer can judge the exposure correctly.

When using aperture priority mode, you the photographer, makes the decision on the aperture size (f-stop setting). The camera calculates the appropriate shutter speed. If your camera cannot correctly interpret the scene, as with snow for example, then you will need to dial the exposure compensation to correct for the under-exposure. If you are using shutter priority, same again, the camera calculates the aperture (f-stop) setting. If the camera makes a wrong exposure decision, you can manually set the exposure compensation to over-ride the f-stop setting the camera would set.

Full manual mode, where the photographer sets all the settings directly, cannot use exposure compensation. In this mode the photographer makes all the decisions. The camera does not interfere with the exposure settings. In this case the photographer is free to make decisions to fix the exposure setting for all three factors of exposure – ISO, aperture and shutter speed. There can be no element of compensation for a failed camera decision. The photographer stands by their own settings and has full discretion to control the exposure as they wish. Deliberate over or under-exposure as well as accurate exposure are all possible. It is for this reason that I urge you to work in full manual where you can. You have far more control over the outcome of the shot. You also as a consequence have more artistic control over your image.

If you are working in RAW, the native data mode of image files in camera, it is possible to correct for camera exposure errors in post-processing. As I have argued elsewhere it is better to try and get all the settings correct in camera than to spend time processing afterwards for a number of reasons. So, no matter what file type you are using, try to set the shot up correctly from the start.

There you have it. Exposure compensation is a camera setting which is wholly dedicated to compensating for the mess-ups that the camera makes with its exposure calculations in auto or semi-auto modes. But when using auto-modes, and/or using *.jpg files, it is essential to be able to compensate for the cameras’ failings by using exposure compensation – otherwise your snow will be grey!

find out more...Photokonnexion tips by email
If you enjoyed this article please sign up for our
daily email service.
                                                 Find out more…
#11030#


By Damon Guy (author and Photokonnexion editor)

Damon Guy - Netkonnexion

Damon Guy (Netkonnexion)

Damon is a writer-photog and editor of this site. He has run some major websites, a computing department and a digital image library. He started out as a trained teacher and now runs training for digital photographers.
See also: Editors ‘Bio’.

Long exposures are easy… here’s how

Milky water shots produce fine art results

The effect of a long exposure on a moving object is to blur it. The classic long exposure photo taken with water produces a blurred milky effect on the moving water. Here is how it is done.

What will these long exposures produce?

First, here are three examples of the type of shots this technique will achieve…

Here is one that is a bit different…

76 - Milky Water by Bob Lawlor, on Flickr

76 – Milky Water by Bob Lawlor, on Flickr
76 – Milky Water by Bob Lawlor, on FlickrExternal link - opens new tab/page

Here is a long exposure more in the traditional format. The water is photographed against non-moving subjects they come out in clear detail while the water becomes frosty/smooth…

Minimalist tidal Long Exposure or just a Seagull perch by Bus_ter, on Flickr

Minimalist tidal Long Exposure or just a Seagull perch by Bus_ter, on Flickr
Minimalist tidal Long Exposure or just a Seagull perch by Bus_ter, on FlickrExternal link - opens new tab/page

What you will need

You will need a dense ND filter. This will be what will enable you to keep the shutter open for a long period to blur the water surface. You will also need a camera that can be operated in full manual mode. You need to also have a “bulb” setting available. Other than that you will need all your normal photographic equipment.

Long exposure tutorial with Scott Kelby

To explain the technique here is a video from Scott Kelby which show you how to do the actual shots…

Long exposure tutorial with Scott Kelby
Weekly Photo Tips’s Video Channel

By Damon Guy (author and Photokonnexion editor)

Damon Guy - Netkonnexion

Damon Guy (Netkonnexion)

Damon is a writer-photog and editor of this site. He has run some major websites, a computing department and a digital image library. He started out as a trained teacher and now runs training for digital photographers.
See also: Editors ‘Bio’.