Tag Archives: ISO

How to take a test shot

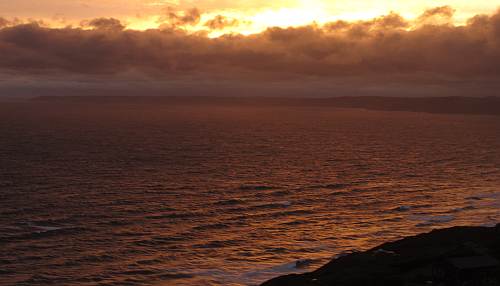
Cornish Dusk - Test shot

• Cornish Dusk – Test shot •
Underexposed, over bright at the top, over dark in the foreground, poor focus… the test shows a need to do some work…

Click image to view large final version with corrections
• Cornish dusk • By Netkonnexion on Flickr External link - opens new tab/page

Ever taken a shot without thinking?

…And regretted it later. We all have. Yet it’s simple to run through a simple check list and do a few test shots. In this article we look at setting up that procedure.

What needs doing?

I will assume you are in the right place and have your camera out of the bag, ready to go. The first thing to do is work the scene and try to see what sort of shots will serve your subject best. Find which angle looks the best through the viewfinder. Your subject is the critical item to focus on, so walk all around to get a full range of ideas of how best to frame it. Then, when you have composed and decided on your shot, you need to start considering your settings.

Approaching the settings

You will be working with the idea of ‘chimping’ now. If you don’t know what that is then read this first.

Here is the list of adjustments you need to make…

  • The first thing to consider is focus. If that is wrong you are in trouble from the start. So make sure that you can get a good focus.
  • White balance – It helps to have your white balance correct even if shooting raw.
  • ISO – Set your ISO for the light levels you are experiencing as your ambient light. If you don’t know about setting the ISO correctly then read ISO: get control of your sensitive camera!
  • Next select the mode you want to work in. You should select for…
    • Shutter speed if you want to adjust exposure length.
    • Aperture if the critical issue is depth of field (DoF).
    • Full manual if you want to work with both, or have more control overall.

Next you need to decide if you are going to work with the DoF or the shutter speed as your main consideration…

  • If working with DoF set the aperture you want to work with now. DoF is one of the primary considerations when composing a shot. Where you want your image to be sharp and where you want it to be unsharp. So play around with aperture for a while. Take a shot, chimp it, adjust the aperture, take another and so on. Once your DoF is correct.
  • If you are working with shutter speed as your main control then you need to adjust this instead of your DoF first. Again, shutter speed is a primary consideration in your shot. A long exposure will get more blur if there is any movement in the field of view. The shorter the shutter speed the more the shot will appear frozen, movement blur will tend to be eliminated.

As you set up each setting you can take a test shot of your subject. Then, by doing a bit of chimping, you can work out if you have your setting correct. You may need to take one, two, or maybe three shots to get your setting correct.

Once you get experienced working with these settings you will do them in seconds. Two things helps to achieve that. First, you will become familiar with which settings are appropriate for the conditions you are working with. Secondly you will be more sensitive to what you need to think about as you set up your shot. In particular the type of light is the main consideration. That in turn leads you to get a feel for what settings you need.

Some issues to note…

If you are working with landscapes you will need to do a bit of ranging to get your focus right. When working with longer distances the DoF and the focus vary. As your focus point gets further away from you the distant edge of acceptable sharpness rapidly goes into the distance. It is not always easy to determine DoF control precisely at long distances. There are methods but I will discuss them in another article. Just remember that from f11 you will effectively get sharpness right through the shot.

If you are working with an on-board (pop-up flash) then the camera will sync automatically to your camera settings. When working with off-camera flash, adjust that at the same time as the shutter speed. Normally your camera will have a ‘sync-speed’ to work with your flash – it maybe 200ths sec or 250ths sec depending on the camera. So you will need to consider that too.

Working with a tripod? Make sure you turn off all electronic motors in your camera to prevent tripod vibrations (Vibration compensation, auto-focus). This means you will have to manually focus the lens.

By Damon Guy (author and Photokonnexion editor)

Damon Guy - Netkonnexion

Damon Guy (Netkonnexion)

Damon is a writer-photog and editor of this site. He has run some major websites, a computing department and a digital image library. He started out as a trained teacher and now runs training for digital photographers.
See also: Editors ‘Bio’.

Don’t get lucky, get great photographs

Random or 'splatter' tactics when shooting are not going to make you lucky.

Random or ‘splatter’ tactics when shooting are not going to make you lucky.

Ever taken a few more shots, just for luck?

I think we all have if we are honest. We know that approach is really about random shooting and not about getting good shots. Here are some ways to help you get over blasting off shots just for luck.

The tell-tail signs

You always come back from a shoot with hundreds of shots. A high percentage of them are throw-aways. It’s difficult to know what to point your camera at when shooting. Your shots appear to be random. It is difficult to know what settings to use… feel uncertain while out shooting. You suffer photographic stress. Simple, you need to get organised about your shoots.

Here’s a plan…

To move forward, you need work on a plan to get past the randomness and work toward taking consistent shots.

Increase your confidence: Low hit-rates are pretty demoralising. You need to find ways to increase the successes. Go back to basics. BUT, you need to do it in a way that will help you move on. When in a new situation set your camera to auto-settings. Take a few test shots. Note what settings your camera uses. Once you have the measure of things, swap back to the settings that give you creative control. You will be more confident – you know what settings to return to if your settings don’t work out on a shot.

Learn about light: Light is a very fickle entity. Just when you want great light it’s not there. Other times it’s there but you are not sure how to use it to best effect. Well, here are two pieces of advice. First, shoot late or early – long shadows help define your subject and with better colours in the light. Second, learn the difference between hard light and soft light. Hard, harsh light will tend to be less forgiving and less aesthetically pleasing. Once you know these things, you are on the path to improvement. Check over our other Light and Lighting resources on light to continue your improvement.

Learn about settings on your camera and exposure: The most important ideas in photography rest on getting a good exposure. Start with simple shots, simple light. Learn the settings on your camera, in particular about ISO, Aperture and Shutter speed. Together these form a golden triangle for photographers. Read your manual so you know how to control them. Then read up on exposure. Here are a range of links to get you started on exposure…
Definition: Exposure
Definition: Aperture
Definition: f number
Definition: ISO
Definition: Shutter Speed

Portraiture: Friends or family expect you to do it right and you are under pressure. To make the situation more controlled ask a supportive member of your family, or a good friend, to try out a few poses. There are quite a few posing guides in books. Here are a list of books on Amazon that I have found particularly useful to get you started…

Start simple and work on a set of poses to commit to memory. Memorise about five or six poses for a male and the same for a female. These will let you get a session going. After that you rely on your intuition while working with your subject – work out what will suit them. Watchwords here are: Keep it simple; keep it well lit. To get under way read this article to get you thinking about portraiture… Simple positions for classic portrait work.

Finger off the trigger: I know it is easy to punch away at that button and hope something comes out. Take it from me you need to do just the opposite. Stop. Consider. Compose. Frame. Fire. Make sure you get into the habit of thinking each shot through before you push the button. Visualise your shots so you have a good idea for your picture before you even raise the camera to your eye. Pre-visualisation in most pursuits is how you can focus your energy and skill. It is no different in photography. Try improving your stance too. Most people improve their shots a huge amount if they take time to get the stance right. I have a system I teach my students. Read about it in: Simple tips for a good stance.

Composition: There are simple things you can do to improve immediately. Here are three posts on the fundamentals:

  1. Rule of Thirds
  2. Golden Hour; Magic Hour;
  3. Don’t Stick the Horizon Line in the Middle!

Follow up with more composition reading: Composition – resource pages on Photokonnexion.

Planning your shoot and being productive: It is best to do a bit of planning. Get some ideas going before you start shooting. Read about planning a shoot without the scatter-gun approach: Shoot Less – Keep More.

Putting it all together…

That is the fundamental plan. To do it you need to work on one bit at a time. Practice the simple principles above, work with the camera, make sure you look at good photographs daily. Oh! And, one further thing… you are not alone. We all went through this stage. With practice you will soon be making great images regularly.

By Damon Guy (author and Photokonnexion editor)

Damon Guy - Netkonnexion

Damon Guy (Netkonnexion)

Damon is a writer-photog and editor of this site. He has run some major websites, a computing department and a digital image library. He started out as a trained teacher and now runs training for digital photographers.
See also: Editors ‘Bio’.

New verses the old – photography in flux

The photographs of the past have suffered from lack of contrast depth, but they are still precious.

Photographs of the past are still precious. Old style photography has given way to the great technology of today. We should want more for the future of photography. However, we should not forget the roots of our skills.

Photography has changed a lot in a short time.

As a result there has been a global image revolution. Photography is the latest form of communication that has moved into the public realm. Sometimes we need to be careful about what we have lost as well as what we have gained.

Contrast depth

For many years I waited for digital to become a reality. I have been doing computerised image editing since 1988 and photography for much longer. Waiting for digital camera technology became frustrating. Today, digital is here to stay, but it still suffers from its problems. Readers of this blog will know that I am concerned about the poor contrast depth in digital cameras. Digital image sensors are getting better. Nevertheless the eye is still better than the camera for seeing into the depth of a scene.

Today manufacturers want to keep selling on the basis of real improvements in the technology. They sell the latest upgrades on the basis of technical steps forward. In my opinion most of the technology upgrades in the last two years have been about tweaks, not real technology leaps. What we need the manufacturers to do is tackle the real problems. More realistic photographs will have to come from getting pictures that more closely resemble what the eye sees. for that reason contrast depth is something that will have to improve. It is one of those problems never solved by film, it is still weak in digital images.

Great new technology

We have seen some wonderful leaps forward. Night-time photography has seen the biggest improvement over film. The digital sensor is a great improvement over early photographic night work. The ability to produce images using incredibly low levels of light is a real leap forward. Its a pity that most people don’t do more night photography.

Another great leap forward in modern photography equipment is auto-focus. While I personally enjoy using manual focus it is not very often that I have to resort to doing so. In the main macro photography is best done with auto-focus. When you are working with a very shallow depth of field you should be careful to ensure that what you want in as the subject is where the focus is centred.

Auto-focus has its problems. On a tripod the action of the auto-focus motor actually creates movement and vibration. The vibrations reverberate up and down the tripod and cause movement-softness while the shutter is open. So beware of this issue and work with manual focus on a tripod.

In general auto-focus, for me, beats manual focus for most things. It is with the thorny issue of poor contrast that forces me to use manual focus. Sensors are so poor at reading contrast in a scene (which the eye can see easily) they often hunt for a focus match in twilight. Of course that is prime shooting time. So the issue is something of a problem.

Often forgotten from past photographic experience is the single focus point in old film SLRs. The big round circle where the focus point lay has now been replaced by a range of pinpoints where we can arrange the focus to be placed. This has been a revelation for the improvement of composition, especially for amateur photographers. Being able to focus off centre and control the focus to meet the need of the shot in that area is excellent. Many digital photographers without the experience of the old SLRs may not recognise this issue, so just rejoice in the AF points array.

What have we lost?

I am for learning and changing with the technology if it improves the shot, but definitely go for the old school where digital cannot cope. Are there places where we can still be better off using the old skills?

Once upon a time photographers were limited by their equipment so they could control only three things. The depth of field, the length of exposure and the sensitivity of their film. Keen photographers know these today as Aperture, Shutter Speed and ISO. They are the key components of exposure. Despite those being so important in the past, today the vast majority of people taking pictures have probably never heard of them. If they have they do not know what they mean. I am talking here of your average happy snapper. They will probably never read this blog or any like it. They just get pictures they like from a camera that is pretty automatic. People are right to be happy with that if that is as far as they want to go.

For me, the expression of my photography is in the power of the images I produce. If I enrich my viewer through an image, then I have succeeded in communicating. I personally don’t feel that using the automatic functions of a modern camera can help me much. I believe they are set up to please the person who expects a picture to be representative. I want my images to go beyond representative. I want them to be individual, the result of what I see, an expression of the way I see the world.

To meet my personal aspirations for an image I want to have control over the elements of exposure. That means falling back on those old settings… Aperture, ISO and Shutter speed. If I succeed in mastering these essentials of exposure then I can make my image fit the vision I have for it. I don’t want to ‘snap’ and get just a picture. I want to breath life into an image so it tells a story. Only the old skills can really do that.

By Damon Guy (author and Photokonnexion editor)

Damon Guy - Netkonnexion

Damon Guy (Netkonnexion)

Damon is a writer-photog and editor of this site. He has run some major websites, a computing department and a digital image library. He started out as a trained teacher and now runs training for digital photographers.
See also: Editors ‘Bio’.

How to do night photography when starting out

Night shots capture the imagination and the eye.

It is all about making sure that your viewer is drawn into your photograph. The rich colours and strong contrasts are really great for attracting the eye. In this post we will look at doing great night photography.

Night photography is simple

A lot of starters think night photography is difficult. Well it is not difficult, it is different. There is less light – obviously. There is also more light in some ways. This is because the difference between the light and dark portions of your picture are more extreme. In A quick tip to help you see the light (or darkness) we saw that the camera is not as good as the eye in distinguishing wide differences between light and dark. When shooting at night that is something we should remember.

We should not point our camera at a very bright light source at night. This is because it will over-expose quickly and the rest of the scene will remain dark. The darker parts expose slower. Try to find ways to expose your scene where the spread of light is of less extreme whites and blacks.

The concept of night photography is about exploiting light when the rest of the environment is dark. The aim therefore is to make sure you are exposing for the light you want to bring out in your picture. Almost certainly that will mean you need to do longer exposure than for the daytime. As you will see in the video this is not complicated to do. You will need to explore some settings you may not have used before. But photography is all about learning – right? OK…

Here is one idea that will simplify the thinking behind all sorts of exposure situations…

  • Picture a bucket in your mind.
  • Now picture filling it up with a hose.
  • At first you turn the tap a very little.
  • The water trickles out.
  • The bucket takes a long time to fill to the brim, but does get there.
  • Now repeat with the tap turned up more (twice as fast).
  • The bucket fills faster. In half the time in fact.
  • Now repeat again filling the bucket to the brim – tap open fully (speed x4).
  • The bucked fills half as fast again.

The bucket of water is like an exposure. To get the picture light enough you need to fill the camera with the right amount of light (to the bucket rim). At night you have to wait a long time for your exposure to fill to the brim (water at a trickle) because there is less light around. In early evening/dusk you have to wait for the exposure to fill in half the time (tap at half speed) because there is more light before sundown. During the day all that light pretty much zaps the bucket (sorry camera) full of light in double quick time.

OK, now you know all there is to know about exposure. That’s it. All you have to do is practice with the camera settings to wait for a while to fill up at night, wide aperture, long shutter opening to let in as much light as possible.

In the video the CameraLabs team have described the types of setting you might use and how to set them up. The explanation is clear and the settings simple. I think you will learn a lot.

DSLR Tips: Night Photography by CameraLabs
As an aside…

You notice in my bucket analogy how we tested fills? In photography each time you go up or down a stop of light you are halving or doubling the amount of light. Of course, in the bucket situation the timing and change-of-fill speed are not accurate – its only a thought experiment. But you get the idea. I am trying to show you how an exposure builds up over seconds (at night) or thousandths of seconds (during the day). And, the rate it fills is related to the amount of light around. That is measured in stops. Consider reading this article: Definition: f number; f stop; Stop. It will help you to understand the relationship between stops of light and exposure.

Ten obvious reasons to change your approach and how to do it

Your photograph is not perfect.

You see good quality photographs every day. Why does your photo not match up to the photographic quality in a publication? What can you do? The answer is simple. You need to look at your overall technique.

Things add up…

Assuming a great idea and composition – what can go wrong? In photography every step of the process counts. The more you get right the better the result.

Professional photographers often repeat a shot tens of times to get it right, sometimes more. They aspire to excellence. Care, dedication, persistence and attention to detail add up to technical quality.

What can go wrong?
  1. Bad lighting: There’s no substitute for suitable, interesting light that’s sympathetic to the subject. If the light is wrong, your shot will not work either.
    Solution: Learn everything about the quality of light, hard light, soft light, the colour of light and the properties of light.
  2. The whole picture is soft: You moved the camera while shooting.
    Solution: Pros use tripods – good ones. They use them fast and efficiently because they practice.
  3. The whole picture is soft: You had to hand-hold the shot.
    Solution: Professionals know how to set up a manual exposure that suits the light. Learn to shoot in manual modes. Know what shutter speed/ISO combinations you can use without movement.
  4. The exposure is too dark/light: Common when learning manual camera control.
    Solution: Use RAW, then you can compensate. With RAW you can deliberately manage your exposure too. There is no ‘perfect exposure’ – there is only the result you want. To get the result you want you have to adjust your exposure. (Hint: you can’t adjust your exposure effectively in *.jpg unless you use exposure compensation).
  5. Colours off: If you are shooting in *.jpg you deserve all you get. The white balance is probably wrong. The manufacturers settings are limited. You can’t fix it in processing. Remember, *.jpg is a RAW file developed in-camera to manufacturers settings, not yours. The settings are applied to your shot blind. No wonder they are not what you want.
    Solution: Get it right. It’s easier to shoot in RAW and develop the shot yourself. It gives you fine control and you can develop your shot work the way you want. Something *.jpg cannot do.
  6. Poor focus: Focus is critical to the right technical and artistic result.
    Solution: Learn about: Depth of Field; aperture, Bokeh, Circle of confusion and how they relate to your lenses. Pros know these things intuitively. You can too with practice.
  7. Poor or soft focus from movement: Focus mode is on the wrong setting.
    Solution: Learn to use the correct focus mode (eg. single shot or continuous etc). Also, learn to focus manually. There are situations where auto-focus is poor (eg. in poor-contrast light). Switch off auto-focus to get better results.
  8. The shot is not sharp: A suspect, poor quality or broken lens.
    Solution: Buy decent lenses. All lenses have sweet and sour spots – even professional ones. Cheap lenses have a poorer optical quality and have more sour than sweet spots.
    Solution: Quality costs money. However, look after a good lens it will last longer than your camera. If you choose right, it’ll fit your next camera. It pays to buy the best quality lens you can afford.
  9. Great lens and tripod! My shot’s still not sharp: Sharpness requires attention to the above and these specific details too…
    Solutions:
    one: Turn off vibration reduction functions. On a tripod motors cause vibration, not stop it.
    two: Turn off auto-focus (another motor), or at least the continuous-focus setting (use the ‘one-shot’ setting).
    three: Use ‘mirror lock-up’ (DSLRs). Mirrors clunk up causing tripod vibration.
    four: Keep out of wind, away from vibration and keep your tripod low (don’t fully extend legs).
    five: Use a remote shutter trigger. Button pushing causes vibration.
  10. I did all this and it’s still not right!
    Solutions:
    one: Practice – putting this together takes time and effort.
    two: Return to locations many times to get the right light and conditions.
    three: Post processing! RAW users, this is where you polish the shot up. Since the earliest photography developing the shot has been a key process. RAW processing is another skill to learn. It’s essential, so learn it. Only *.jpg’ers should worry because they have disabled files. If you used *.jpg there is no hope of properly completing the job.

There is a lot to do! Follow the links and keep at it – you WILL succeed.

By Damon Guy (author and Photokonnexion editor)

Damon Guy - Netkonnexion

Damon Guy (Netkonnexion)

Damon is a writer-photog and editor of this site. He has run some major websites, a computing department and a digital image library. He started out as a trained teacher and now runs training for digital photographers.
See also: Editors ‘Bio’.

How good is your exposure?

There is no such thing as the perfect exposure.

The manufacturers might have you believe there is a perfect exposure for every shot. They invest a lot in their cameras and the programming. What should you look for when trying to produce a great shot? Is it about relying on camera auto-settings or is there something else?

The three pillars of exposure

You are probably aware of the three main controls for exposure

  1. ISO – Controls how sensitive your camera image sensor is to light.
  2. Shutter speed – Controls how long your sensor is exposed to light.
  3. Aperture – controls how much light is allowed to reach the sensor.

These essential elements in exposure are inter-related. Each has an impact on the others. They relate to each other in two ways. As each varies it has an impact on the amount of light which reaches the sensor. And, as each varies, they have a special impact on the quality of the photograph…

  1. Low ISO gives a high quality result. High ISO introduces digital noise.
  2. Shutter speed – movement blur introduced at long exposure; movement frozen at short shutter speeds.
  3. Aperture – Wide aperture, shallow depth of field; small aperture gives a deep depth of field.
Control

Controlling these elements to get a final exposure is essential. Highest ISO, widest aperture and a long shutter speed all together is likely to allow too much light into the camera in daylight. The shot will be over-exposed. The opposite is also true. A low ISO, tiny aperture and very fast shutter speed will allow very little light to enter the camera; result underexposure.

Exposure is about a balance. We must work at getting the three pillars to create the right light for the scene we envision. This is the key – creating the right light in the camera to make the scene come out the way we want. Yes, make the scene come out as we want. A photographer makes the picture that they want by controlling the exposure. A snapper captures the scene they see by relying on the camera to make the exposure for them. The difference between the photographer and the snapper is learning to control the camera.

Genius at work

By way of example I want to show you a short documentary video. Stanley Kubric made a period film, released in 1975, called Barry Lyndon. “Lyndon” was set in the 1750’s. It was a ground breaking work.

Kubric envisioned a cinematic experience which was as close to the way the eye would see life by the light of the time. He procured special lenses for his cameras and had them modified to work together. These lenses were F/0.7 Zeiss lenses made for NASA. They allowed the aperture to be open very wide – much wider than most modern lenses will go. As a result Kubric was able to use these fast lenses to film entire scenes only by candle light. This created an atmosphere which paralleled indoor light in the 1750’s. The costumes and set pieces were also of high quality. The overall effect is one of extreme authenticity.

A lot of pictures as dark as shots in this movie would be considered as under-exposed in the eyes of many photographers. Yet the gloom is the essence of the success of the shots. The exposure is correct for these scenes. Kubric went to extreme lengths to get the exposure he wanted. With the proper approach and control you can do the same in your photography.

The one consequence of shooting at such wide apertures is an extremely shallow depth of field. When you see the candlelit scenes you will see how much bokeh there is behind the heads of those in focus. What a gorgeous result.

This video is actually a commentary on “Barry Lyndon” the movie. I have started the video at the scene where the exposure and special lens set up is discussed. Despite this being a movie, the same internal camera conditions apply as in a DSLR. ISO, Shutter speed and aperture still have the same effect on each frame taken. Kubric showed true genius in marrying the camera and the lens into a unique synthesis that recreated the prevailing light conditions of the time. He literally controlled the exposure to emulate life in the 1750s. That is the genius of the man. It is also the supreme insight in photography.

How to take quick and easy photographs of fire

There is something deeply compulsive about fire.

It is almost a primal urge to be fascinated by it. Yes, it is fun to photograph it too. Fire provides all sorts of patterns, colours tones and light intensities. Here are some quick tips and tricks with a method to help you start experimenting with fire.

Three problem with fire…

1. Of course there is an issue with health and safety. Any bare flame is a danger. So try to be very careful to isolate your fire work area so you are not likely to catch anything alight near were you are working. I would advise working outside, or at least on a concrete-floored outhouse so you do not threaten your home, or set off alarms. Do not allow children near you when working with bare flames.

2. The main problem with fire for a photographer is that the fire creates its own brightness. You need to expose your shot for the direct brightness of the flame itself. This will allow the fire to be exposed correctly. However it leaves the surroundings very dark as they are not a light source. So, normally we would not point our camera directly at a light source. Ideally, we need to create a situation where the surrounding of the fire is actually dark, with no detail that we want in the picture. Then we can set our camera to take an exposure using only the brightness of the flame. No additional lighting is needed.

3. Fire spreads! So make sure that you have a fire extinguisher available if you try this exercise. Better safe than sorry.

On with the video

While I am a great believer in using your camera in manual mode most of the time there are ways you can use auto-mode too. In this video watch how he uses the ‘P’ mode (program mode). He takes a few exposures using the program setting so that he can get a reasonable idea of the settings the camera considers appropriate. Then, once the camera has helped him set a base line he can start working with manual to get the exposure he wants.

One other point before we get to the video. It is darkness which makes this shot work. Make the room completely dark while doing the shot. You will notice that the photographer has set up the background with black matte board. It is possible to use other subdued colours. However the black creates a very high contrast which is ideal for shooting a light source like fire.

Enjoy the video…

Video provided by LearnMyShot on Apr 22, 2010 [http://learnmyshot.com] Presented by Robert Grant.

Can you write? Of course you can!
Write for Photokonnexion...

We would love to have your articles or tips posted on our site.
Find out more…
Write for Photokonnexion.