Tag Archives: Flash

Some quick tips for still life inspiration and shots

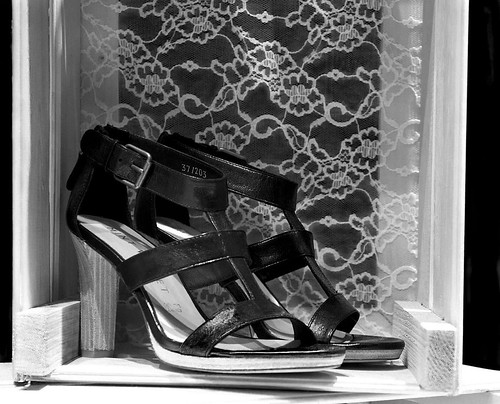
You can find some surprisingly artistic displays in shop windows.

You can find some surprisingly artistic displays in shop windows. It is easy to get some great ideas for still life work later. Or, you can just photograph them in the shop.
Click to view this image in full size.

Get some easy but creative still life shots

I love shop windows. I especially like those boutique type shops where the owner has a sense of art. Shop window displays are by nature well designed, artistic and attractive. Well, they are if the owners want to entice people into the shop. Here is an idea to help you out with your still life shots.

Still life inspiration

Window displays are usually simple and attractive. The shop owner doesn’t want to spend a lot of money on the display. They do want it to draw customers into the shop. Take advantage of this artful situation. Look at the the picture above. It’s a simple box constructed from rough wood, lined at the back with a scrap of net curtain. Wow. Effective. You could display all sorts of things in this. There are also dozens of ways to light it. Here is a simple and effective way to really emphasize your product, your still life, your collection… you name it. Great inspiration. So, take a walk up the high street and see what still life shots you can think of from peering into shops. (More after the jump…)

Display photography

The shot above, ‘Shoes in a box’, was actually taken in a shop window. I do quite a lot of these. The shots are easy to do. They give you great ideas too. More to the point, if you take them after dark they are usually under pretty good lighting too. One walk up the high street after dark about every month and you will come back with a crop of great still life photographs. Everyone will think you have great creative skills. In fact you are getting ideas from shops and getting some great practice.

Here are some points to help you and some things to consider…

  • Remember to be properly prepared for night photography.
  • Turn off auto-focus – focus manually. Auto-focus will focus on the window glass if reflections get in the way.
  • If you use a flash make sure that you know how to turn it’s power down. Shop window shots are quite close-up and flash is pretty intense. It is possible to overpower the shops’ display lights. This will seriously change the character of your shot.
  • Use a diffuser on a flash to make sure you don’t get hard light flashes off the shop window.
  • Reflections from street lamps on the glass? Hang your coat on a tripod to block the light beams or get your friend to hold the coat up.
  • Use off-camera flash. It is best when shooting through glass. You can angle the flash away from the axis-of-light to your camera. Camera mounted flash tends to give a strong flash-reflection right in front of you.
  • Shoot from the side (at an angle), not straight at the glass. You will be less likely to see your own reflections in your shot.
  • If you do this at night make sure you have a friend for safety and help.
  • Don’t look suspicious. If you work openly and tell people what you are doing if asked everyone will laugh and be on their way. I have done this for a number of years and never had an ‘incident’.
  • If you are accosted or you appear to have upset someone then stop what you are doing, apologise and move on.
  • No-one, including the police can make you delete a photograph. See: The Right to Take Photographs (UK relevant).

I have had some great fun and some great ideas with window-shooting over the years and you will too.

By Damon Guy (author and Photokonnexion editor)

Damon Guy - Netkonnexion

Damon Guy (Netkonnexion)

Damon is a writer-photog and editor of this site. He has run some major websites, a computing department and a digital image library. He started out as a trained teacher and now runs training for digital photographers.
See also: Editors ‘Bio’.

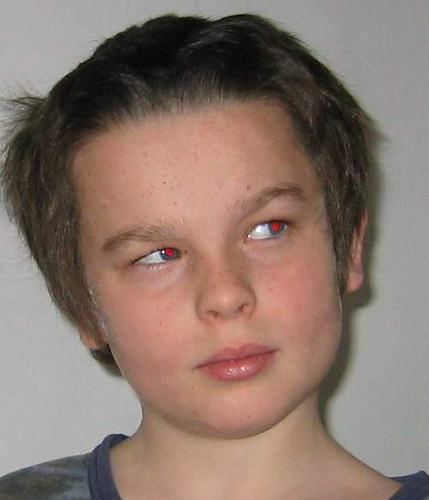
The red eye effect

The 'red eye' effect gives the subject an unfortunate bright red colour in the pupils.

The 'red eye' effect gives the subject an unfortunate bright red colour in the pupils.

Red-Eye And How To Stop It

Just occasionally photographers are presented with an image showing the ‘red-eye’ effect. This strange effect introduces a new dimension into the photograph, often ruining it. It’s caused by a beam of light from a flash being directed into the eye and reflected out, directly into the camera lens. You can find out more about how it is caused in our glossary entry, Red eye Effect (definition).

The reflected light off the back of the eye (called the retina) is red because of the blood rich tissue found there. The strong red tones colour the reflected light. This lights up the pupil and makes the eye glow red.

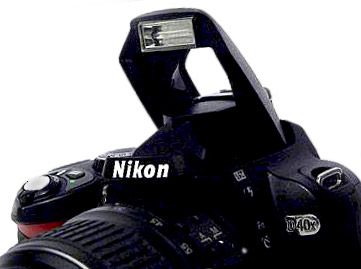
The root cause of the red eye effect is the flash being too close to the lens. Red eye is a common problem in studios and portraiture photography. It is under these conditions that the effect is most likely to show up. Smaller point-and-shoot cameras are much more likely to cause the effect because the flash is so close to the lens. Using a DSLR may help. However, pop-up flash on DSLRs is also a cause of the problem.

The Remedy

Many recent cameras including point-and-shoot cameras and DSLRs have red eye correction facilities built in. Some cameras generate a diffused but direct light before the flash goes off. This causes the pupil to reduce in size unconsciously before the shot is taken. It is an effective remedy, but may cause people with sensitive eyes to blink or squint which can affect the shot. Some cameras ‘recognise’ an incidence of red eye and auto-correct the redness in-camera processing of the image after the shutter has closed.

Experienced photographers prefer real-world methods of red eye reduction. In-camera processing systems don’t always prevent red eye. Furthermore, small pupils look unnatural and harsh. Also, direct lighting from flash close to the lens is unflattering. See Does pop-up flash ruin your shots.

The most effective prevention of the red eye effect is to move the flash further from the lens. It is common for professional photographers to use off-camera flash, or flash brackets to move the flash away from the lens. This increases the angle between the flash beam to the eye and the reflection from the back of the eye. The wider angle stops the red eye effect since the reflection is not directly back out of the eye.

The red-eye effect is found more frequently in low light conditions as the eye opens the pupil to let in more light. It is more likely to occur in these conditions because there can be a wider angle of light and still get a viable reflection out of the wide pupil. One way to reduce red eye is therefore to increase the ambient light. The eye will react so the pupil closes to a smaller hole. This reduces the possibility of a reflection.

Often red eye is less detectable if you move further away. Close use of a hard light source or close-up use of the camera can both make the effect brighter. If you take the shot further away the camera may not even see red eye if it occurs.

Another way to reduce red eye is to bounce the flash light off a wall, ceiling or reflector so there is no direct flash beam entering the eye. This is more effective since the light is even and less directed.

The best way to prevent red eye is not to use flash or bright directed lights at all. In this case, lower light conditions may require the use of a tripod for a longer exposure. However, I accept that longer exposures or a tripod may not be practical or helpful.

The only other practical way to prevent red eye is to ask the subject to look away from the flash and lens slightly. Again, that my spoil the pose. And, as you can see from the picture above may not work anyway.

Software removal

Usually, one or a combination of the above, are sufficient to stop the problem in-camera. However, as a last resort many software editors can be used to remove the effect in post-processing. Adobe Photoshop has several ways to remove red-eye. Adobe Elements has a tool as well. Gimp External link - opens new tab/page, the open-source image editing suite has a red-eye tool which is included in the core system in more recent versions. Irfanview is a respected and free download image viewer. The application has gained some editing tools over the last few years. It has a basic red eye tool too. Other software suites provide various options as well. The actual methods of using these tools vary according to the software, but in most cases the process is simple.

If you don’t have your own software suite to do your red eye processing there are a number of online solutions. Google provided this page of ‘Red Eye Correction External link - opens new tab/page‘ links.

Animals

The red eye effect is also found in most animals aside from humans, although the red colour can vary in intensity and tone according species. The red eye effect should not be confused with the ‘eyeshine effect‘ found in some nocturnal hunting animals. Although the cause is the same, the reflecting membrane in the eye is different. The colours vary and are usually silvery, not red. Animals like dogs and cats can exhibit both the red-eye effect and eyeshine at different times and various light conditions. Eyeshine is prevented in much the same way as red eye.

By Damon Guy (author and Photokonnexion editor)

Damon Guy - Netkonnexion

Damon Guy (Netkonnexion)

Damon is a writer-photog and editor of this site. He has run some major websites, a computing department and a digital image library. He started out as a trained teacher and now runs training for digital photographers.
See also: Editors ‘Bio’.

What is a softbox?

New Information on Softboxes

Softbox fitted with off-camera flash

Softbox fitted with off-camera flash

Here on we have looked closely at different light situations. To help you further we have drawn up a definition of the softbox. It’s simple. They are very useful as a quick and easy way to produce soft light. You can see the new entry in the photographic glossary for reference… Soft box; softbox; soft-box


Contribute A Definition?

Send us a definition of a photographic word or phrase...

Send us a definition for our list of photographic words and phrases. Simply write a clear definition and send it in. Include an original picture if you wish. Give us your name and a link to your website and we will credit your work.

Make soft light work for you…

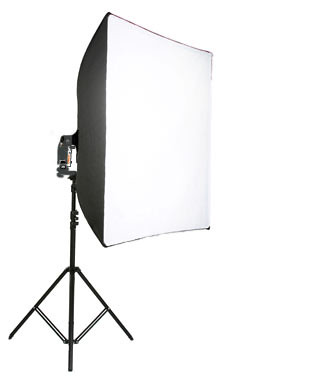
The softbox is the best way to diffuse light from an off-camera flash as shown here.

The softbox is the best way to diffuse light from an off-camera flash or studio strobe light.

Use a Softbox to diffuse your light

The use of flash is the the best way to produce your own artificial lighting if you want to work with faster exposures. The light intensity of a flash unit allows you to capture a person, for example, fast enough so that they do not have time to move. You can use long exposures but they give time for things to move. The downside of flash is that the light is very harsh. As it is also a point-source of directed light. That means it casts hard shadows (more about hard light). To get away from the hard shadows, which are particularly unflattering on peoples faces, you need to soften the light. The best option is to use a softbox and an off-camera flash. This will give you diffused light and control over the angle of shadows.

A softbox is normally a square fabric box which is held in shape by some sort of wire frame. The flash unit pokes through the back into the softbox. On the front of it is a white translucent fabric which lets the light through from the flash (See the picture above). However, the translucent fabric bounces some of the light back into the box and diffuses some out. The light bounces around inside and eventually emerges re-diffused. This produces a wide angle of light from the front of the softbox which is diffuse and from a broad-width source. Where a small home-softbox may be, say, 40cm x 40cm, the flash unit (if it’s a speedlight from a camera mount) will be less than 5cm x 3cm. So the light emitting face of the softbox is many, many times larger than the flash emitting face. The resulting diffusion is very effective, producing a soft light on the subject (see more on Soft Light here).

To set up a softbox for your off-camera flash you will need the following equipment…
1. A softbox with suitable mounting for a speedlight off-camera flash (and a standard light mounting fitting – female part).
2. A light stand with a standard studio light mounting on top (male part).
3. The off-camera flash unit itself.
4. Some means of connecting the flash to the camera (radio flash trigger or a wire connector).

There are some really good softboxes available at reasonable prices. Buying the big brand names does not add much to the functionality. It does add to the price! So, look to get exactly what you want rather than buy for the brand name.

You will notice that the design of softboxes fall into two broad categories…

  • Stand-mounted softboxes for speedlights (off-camera flash units)
  • Softboxes for studio strobes (large dedicated/professional flash units)

Most starters in photography are not interested in full scale studio strobes. They are powerful tools for big studio spaces. The first option gives the most flexibility for the best price for the starter photographer. The stand-mounted softbox is of the type shown in the picture above. An off-camera flash unit is mounted on top of the stand and fires into the softbox. The unit can be connected by a long wire to the camera directly. Or, as is more often the case these days, the flash can be mounted with a radio unit. This gives wireless contact and firing to the camera. A Radio Flash Trigger Control can be purchased at reasonable prices.

Buying a softbox is easy. They are available online in many of the camera web-shops. Some high street camera shops stock them too. There is a whole range of them on Amazon – Softboxes for Speedlight flash.

Some softboxes come with a stand supplied complete with fitting bracket to marry the softbox, flash and stand together. Check the inclusion list to make sure there is an appropriate stand and mounting bracket for the softbox and flash. If there is no stand included you will need to factor in the cost of a stand as well. Stands are quite cheap to buy. The more expensive branded ones cost a lot so make sure you buy to suit your budget. Lighting stands have a standard fitting on top. It will fit most softbox brackets and a range of other light accessories. You can therefore find lots of ways to make different units work together as long as the fittings are standard. There is no need to spend a lot on a stand for an off-camera flash. Expensive stands are used more often for heavy studio strobes.

You can find out more about buying off-camera flash units here.

I have assembled a complete set of purchases below that work well together and will not bust the budget. They will provide you with a complete softbox kit ready to use.

By Damon Guy (author and Photokonnexion editor)

Damon Guy - Netkonnexion

Damon Guy (Netkonnexion)

Damon is a writer-photog and editor of this site. He has run some major websites, a computing department and a digital image library. He started out as a trained teacher and now runs training for digital photographers.
See also: Editors ‘Bio’.

Can you write? Of course you can!
Write for Photokonnexion...

We would love to have your articles or tips posted on our site.
Find out more…
Write for Photokonnexion.

Going Off-Camera with the Latest Flash…

The new innovative Canon flash - new dimensions...

The new innovative Canon flash - new dimensions in flash technology. Click to see the article on the Canon website.


Off-camera flash is one of the most liberating aspects of flash technology. The idea is to get your camera to capture light that is controlled by you. You set up the flash so you can design how viewer sees your shot. In recent years flash units attached to DSLRs have become very sophisticated. This latest release from Canon has a range of high quality control features and in-built radio technology.

Syl Arena is a well known author in the field of flash technologies. In this article he reviews the latest offering from Canon. It is a rounded and informed view.

Contribute A Definition?

Send us a definition of a photographic word or phrase...

Send us a definition for our list of photographic words and phrases. Simply write a clear definition and send it in. Include an original picture if you wish. Give us your name and a link to your website and we will credit your work.

Does Pop-Up Flash Ruin Your Shots?

Pop-up flash needs careful use...

Pop-up flash needs careful use... it can be harsh and unforgiving.


Camera manufacturers will try to convince you that pop-up flash units are great. The truth is that they are pretty difficult to use. Here is what goes wrong and two solutions that will help…

Problems – Harsh Highlights, Washed-Out Colours and cut-throat shadows

Highlights are those bright spots that are complete white spots. Flash, pop-up flash in particular, is prone to create these highlights. The very small and direct light source creates harsh or hard light. Particularly on faces, highlights are ugly. The appearance of bright white areas on a face spoils shots and distorts the looks. Flash also tends to give faces a slightly blue/white tinge, making the flesh look washed out. People with faces affected by this flash effect look as if they need several good nights’ sleep. In addition, Pop-up flash is direct onto the face and in-line with the lens. This often causes a harsh under-chin shadow that slices across the neck.

Bouncing the Light

So what can you do about it? One solution is to ‘bounce’ the light from the flash. Bouncing light from your pop-up flash is easy! You need to find a way to deflect the light coming out of the flash lens. With pop-up flash it is easiest to deflect the light to the ceiling. This takes the direct light off your subject. When it hits the ceiling the deflected light bounces, which spreads it all around. This raises the light in the area you are shooting. Your shot will be brighter, but without harsh highlights. There are lots of ways to deflect the pop-up flash. However, the simplest is to buy an economical deflector. There are a number available here are two…
Professor Kobre’s Lightscoop, Standard Version Bounce Flash Device, Universal Model, fits over the Pop-up Flash of most SLR Cameras

Cateye reflector for SLRs (not Canon) Cateye LETS Flash Reflector/Diffuser Hybrid, for use with DSLR pop-up flashes

Cateye reflector for Canon: Cateye LETS Flash Reflector/Diffuser Hybrid, for use with DSLR pop-up flashes. Canon specific version

There is another, less expensive way. It is often more effective too…

Diffusing the Light

The second way to improve your image is to use a diffuser on your pop-up flash. A simple device, the diffuser is a way to spread the light out so it fills the area with light. This causes the light to bounce off a lot of nearby surfaces. The soft light that results from using a diffuser is particularly flattering. It softens shadows allowing gradual shading of the face without harsh lines or ugly highlights. The soft light from diffusers also overcomes a problem from reflectors – colour casts. With a reflector light bouncing from a coloured ceiling may pick up the colour. This can sometimes affect your picture. Diffusers are less likely to create colour casts. Nevertheless, it is important to check your LCD carefully to ensure a good colour result. Again, diffusers come in many forms. However, they are quite cheap and very easy to fit. Here are two different types – they perform equally as well and fit on most pop-up flash units. Here are two that I have been impressed with – they fit any camera…
Three Colour Diffuser: Pop-up Flash Diffuser for Nikon, Canon, Olympus, Pentax, Panasoic Lumix, Fuji FinePix, Sony Alpha, Sigma and general DSLR Cameras (with white, blue, orange)

White General Diffuser: Pop-up Flash Diffuser for Nikon, Canon, Olympus, Pentax, Panasoic Lumix, Fuji FinePix, Sony Alpha, Sigma and general DSLR Cameras

Off Camera Flash Units

An alternative is to consider buying an off-camera flash unit. These are much more controllable than pop-up flash units. They also give you a great deal of flexibility in what you can shoot and how you do it. Find out more about off-camera flash.

By Damon Guy (author and Photokonnexion editor)

Damon Guy - Netkonnexion

Damon Guy (Netkonnexion)

Damon is a writer-photog and editor of this site. He has run some major websites, a computing department and a digital image library. He started out as a trained teacher and now runs training for digital photographers.
See also: Editors ‘Bio’.

Can you write? Of course you can!
Write for Photokonnexion...

We would love to have your articles or tips posted on our site.
Find out more…
Write for Photokonnexion.


Hard Light

Hard light gives harsh, well defined shadow lines

Hard light gives harsh, well defined shadow lines as you can see in this rugby scrum taken in bright, direct sunlight.

Hard light

The idea that light is hard is not immediately clear from the term. Hard light is not the very brightest light. Actually the reference ‘hard’ points to the transition from dark to light where shadows fall. Where there are sudden and clear lines which make out well defined shadows the light is said to be hard. In the picture above, the men in the rugby scrum are under direct sunlight. There were no clouds and the sky was bright blue. The light is coming from one single direct source of light, the sun. Hence the shadow-lines are strong and the transition from the dark of the shadow to the lighter areas is abrupt and well defined.

How Hard Light is Formed

Hard light comes from a direct single-point source of light. It is not intercepted, reflected or diffused in any way and falls on the subject in a direct beam. This direct source of light causes the hard shadow-line. In a blackened room, one light bulb will cause this hard-light effect. The hardness of the shadow-lines is unaffected by the brightness of the light.

Creating Hard Light

Hard light is best produced using one point source. In a studio one, very direct, light will form the strongest shadow/light division. However, if your studio is white walled it is more difficult. Light bouncing from the walls comes back at the subject and causes the shadow-lines to be less well defined. Try to make sure there is as little reflectance as possible. More than one light will create softness too. Keep your light sources minimal and the shadow sharpness will be increased.

The radiance of the light coming out from all sides of a large source close to the subject can cause softness. The rays of light are not parallel and can cross each other creating an ill-defined line in the shadow. To make such a source create hard shadow-lines move it away from the subject. As it moves further away the rays of light tend to become parallel. It is this attribute of light, the parallel nature of its travel, which causes the sharp shadow-lines. Or, you could use a grid over your light source. Light grids force the light to go only in the direction of the grid. This will be very strongly directional, creating the hard light.

Opteka Honeycombe Grid

Opteka Honeycombe Grid, creates a strongly parallel form of light giving a hard light on the subject.

Out of doors there is less control over hard light. In direct sunlight, with no clouds, shadows are sharp. In general, the more cloud cover there is the softer the light becomes. So to get hard light you will need to wait for the sky to clear. Remember, that even a few clouds in the sky can diffuse the light. Clouds reflect light from wherever they are, acting as multiple light sources through their reflectance. You may be in direct sunlight but the reflectance from clouds in other parts of the sky can still soften the light.

Using Hard Light

Hard light on a face is not flattering. The lines and forms that we know of the human face are best seen softened and gentle. So using hard light to bring out the lines and features of a face is harsh and unforgiving. The eyes feel deeply set, the nose is strongly defined by shadow and the nose shadow-line is very harsh on one side of the face when hard light is used. Nevertheless, there are times when the use of hard light can be effective on the face. Villains, monsters, Dracula and countless other threats have been photographed or filmed in such light. It is sinister and heavy to have such strong lines. And, they appear in moonlight as well as in strong sunlight… as long as the light is direct and undiffused.

Strong shadow-lines are often useful when you are trying to define a texture in something. Bark on a tree trunk often looks flat and uninteresting in soft light. However, a hard light from an angle will create a myriad of light and dark areas which gives the bark its texture. The strong variation of light in a small area gives the bark contrasts that make it look three dimensional.

Often man-made objects, especially those with a hard and angular appearance, are well presented in hard light. The sharpness of the lines and geometry is accentuated by the harsh shadow-lines. Steel bridges, railway lines, pylons, concrete structures and buildings – all these and more can excite the eye in hard light.

Of course, because hard light is so harsh and unforgiving, you often want to soften it. So, you can introduce more light sources, wait for the clouds to come over, move into shadow, put up a diffuser… in short find any way to reflect, diffuse or widen the source of light. Then you will make the light on your subject softer.

Can you write? Of course you can!
Write for Photokonnexion...

We would love to have your articles or tips posted on our site.
Find out more…
Write for Photokonnexion.