Tag Archives: Software

The secret to world travel – but staying at home!

• Winchester Cathedral Chroma key image•

• Winchester Cathedral •
Chroma key work is quite easily done in Adobe PhotoShop and a range of other quality photo-editors.

When you want to be somewhere else…

There are places we would rather be than where we are now. I would like to be on an island paradise …not going to happen! But you can do it photographically. The secret is something called Chroma Key photography or green screening.

Chroma Key Substitution

In chroma key, often known as “green screen” photography, the subject is photographed against a uniformly lit green background. Then, in post production the subject is easily selected out from the green background. The selection can then be pasted into any other photographic background.

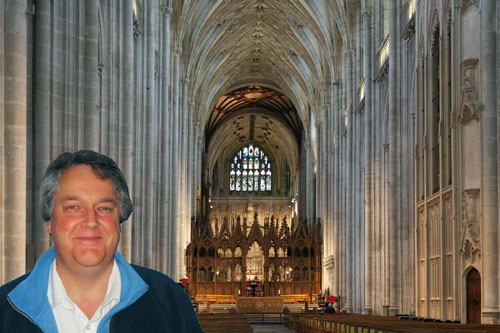
Any uniform colour can be used as a backdrop for the chroma key shot. The picture above is selected from a blue background and pasted into a picture of Winchester Cathedral in SE England. The two pictures were taken on different days.

To make the selection of the subject from the background it is important to light the background evenly. When the colour is even the selection is easy and can be completed in one operation. Colour variations from uneven light make it more technical to isolate the subject.

Green is the most frequently used colour in chroma key photography. The colour is very easily separated from human skin tones. Where the subject has green tones, blue is often used as the chroma key alternative. Blue is a common colour for clothing. It is therefore less suitable than a strong bright green which is not so popular as a fashion colour. However, green does have other advantages. The human eye is able to see more shades of green than any other colour. This makes it easy to see variations in the green when setting up the lighting. Green sensitivity is also built into software applications to match the abilities of the eye. This helps us to work with the background when doing awkward selections.

Fun and games

The substitution of a subject into any other photographic background provides great opportunities for doing fun things. Film stars can be placed in your garden. You can apparently travel the world without leaving your front room. Just find the right pictures and substitute yourself into the background of your choice.

Of course there are also opportunities for advertising, graphic art, product photography, still life, portraiture, action shots and many other false situations. Of course we should be careful not to be immoral about such things! Feel free to have fun though. You can really make it look like you have traveled the world.

How is it done?

Basically you need a chroma key background, lighting to illuminate it evenly, a camera and a subject. On a small scale this is easy to do. A lot of people doing chroma key work for the first time start with still life or table-top photography to get the technique right. Probably the most common use of the technique is for portraiture. Take a picture of yourself or your friends and then start playing. For this you need a larger screen…

The video is a complete introduction to the use of chroma key photography. You can take the same techniques and scale them to any size. The video introduces the ideas you need to grasp and shows how to set up the lights and the equipment. It also shows one of the software applications. After the video I will briefly look at that software for you.

How to Green Screen (Chroma Key) with Photography!

markapsolon  External link - opens new tab/page

Software

There is a whole range of software that is capable of doing chroma key. In essence chroma key software has two jobs. The first is to select the subject off the green background (or whichever colour you are using). The second is to successfully blend the abstracted subject with the new background.

The software from the video is called PhotoKey from FXHome  External link - opens new tab/page. It has been produced specifically for chroma key compositing. It is not alone in the market. However, there are not many applications specifically aimed at this work. Instead there are plenty of applications that do chroma key blending as part of a general suite of editing tools. There are also plugins for the same process to go into your favourite image editor.

The actual process for producing the final blended image is relatively quick and easy in most of these chroma key applications. The tools are usually quite self explanatory if you have some editing experience. As with any editor, you normally find the blending tools manage colours, contrasts, edging and so on. Ultimately you are creating a blend of the two images, but the best chroma key tools go further. At the end of working through the blending process you can make further changes in a good software suite or plugin. If you are satisfied with it you should be able to export your image to make a .png, .jpg or .tiff image.

The way to do it in Adobe PhotoShop

The general photographer is most likely to have use of a quality image editor like PhotoShop, Elements, GIMP, PaintShopPro and others. All these are able to do the type of work that PhotoKey can do. Admittedly it takes longer. But for beginners it is better to save your money for more general photography kit. For those who are interested, here is a short video explaining the Photoshop method of doing a chroma key composite. It is a simple technique using standard photoshop tools.

Isolating with a Chroma Key Background

This tutorial is aimed at Photoshop intermediate level users.

Overall…

Chroma key work is fun. There is quite a lot to learn, but it adds flexibility to your photographic work and post processing. The use of up to date quality image editors is probably better than splashing out on expensive specialist applications. Nevertheless specialist applications do a great job, saving time in post processing.

Can you write? Of course you can!
Write for Photokonnexion...

We would love to have your articles or tips posted on our site.
Find out more…
Write for Photokonnexion.

find out more...Photokonnexion tips by email
If you enjoyed this article please sign up for our
daily email service.
                                                 Find out more
#11030#

Shooting tethered… easy control, excellent shots

Battery On Lens

Battery On Lens
Taken using Canon tethering software to accurately capture the battery terminal and leave the rest of the shot out of focus
Battery On Lens By Netkonnexion on Flickr External link - opens new tab/page

Photography phactoids number 003.

When you are trying to get it right a high resolution screen is a great support. A significant development in photography is the screen on the camera. How would you feel about seeing your picture even larger? Tethered shooting allows you to use a screen off-camera to display your shot immediately. Tethered shooting is the way you can get greater camera control and see your shot in a large display immediately.

Tethered shooting involves plugging your camera into your computer (laptop, tablet – PC or Mac. etc). Then you can control the camera from the software and as soon as you take the shot it is displayed on your large screen. It is the ideal way to increase your screen resolution so you can see how effective your shot was a soon as it is taken. The camera control is also excellent. From your keyboard you can focus, change the settings and see the live view version of your intended shot too.

Canon supply tethered shooting software free with their cameras. Nikon charge extra for their software. There are also a range of third party software packages to do the same as the manufacturers own software. Install the software on your computer then simply connect up your camera. If you have the appropriate equipment you can even use wireless connections.

The control of your camera from the keyboard of your computer gives great accuracy for taking the shots. The precise control off settings and focus allows you to do close-ups and macros with certainty that you have the shot you want. Because the picture is direct to the screen the shot is easily verified directly.

Tethered shooting can be used for all sorts of shots. Its great for those shots where you will use a tripod. Portraits, macros, close-ups, landscapes and technical or product shots are all great examples. The technique is less useful for shots where you are on the move or where you would need to hand-hold. The latter are still achievable however, if you use a wireless connection.

Tethered shooting is really useful for accuracy, verification of shots and precise control of the camera settings. Every photographer should all have a go at this. The experience is worth the small amount of effort it takes to set up.

By Damon Guy (author and Photokonnexion editor)

Damon Guy - Netkonnexion

Damon Guy (Netkonnexion)

Damon is a writer-photog and editor of this site. He has run some major websites, a computing department and a digital image library. He started out as a trained teacher and now runs training for digital photographers.
See also: Editors ‘Bio’.

Converting your image to black and white

The mill on the Rye. Taken in a local park this mill presented a wonderful opportunity to capture the early morning sunlight. However, I think it might look good in black and white. Nice contrasty subject matter makes a good conversion.

The mill on the Rye. Taken in a local park this mill presented a wonderful opportunity to capture the early morning sunlight. However, I think it might look good in black and white. Nice contrasty subject matter makes a good conversion.

Converting properly to black and white gives you greater control

I argued previously that you should not photograph your pictures in black and white. While you might get a credible picture it is not necessarily going to yield the best result. In my experience black and white, as processed by the camera, tends to be flat and lifeless. So how should you do it?

First look to your shot

Not every shot will work best in black and white (B&W). Some shots look flat and lifeless regardless of how you treat them. To get a good B&W shot try to look for pictures where the tones vary widely. Big contrasts in the colour and the texture of a subject will show big differences in the B&W ranges. Some colours convert better than others too.

The second point to look for is to shoot in RAW. If you are shooting with *.jpg files you will restrict the ability to post-process your shot effectively afterwards. The whole point of shooting in colour and converting to B&W is that you are able to fully manipulate the process to draw out the best that B&W can offer. RAW provides the depth of tones with which you can do that.

The conversion to Black and White

Converting to B&W is not difficult. However, you need to know the most effective process. In most editing applications there are two methods. These are…

Desaturation:
Photoshop: [ Click – Image menu | Adjustments | Desaturate ] Or [ Hold down Shift + Control + U ]
All colours resolve to a grey colour if mixed correctly with another colour. The tendency to create a grey from a specific colour is to desaturate it. However, all colours will resolve into the same grey if it were not for variations in brightness/lightness. The standard desaturation option in image editors is a program for reducing the colours to greys leaving the variations in brightness to create the grey tones. The ‘Desaturate’ option is limited. It does the same as a camera when shooting in black and white. Using this option you have no control over the conversion.

Adjustment:
Photoshop: [ Click – Image Layer | New Adjustment Layer | Black & White ]
This option allows you full control over the colour brightness before the conversion to grey. As the brightness determines the grey tones this gives you the opportunity to vary the intensity of the grey in the final conversion. In Adobe PhotoShop you are presented with a dialogue box that provides a slider for each available colour. As you slide them back and forth you will see the grey tones change. These changes are what allows you to adjust the strength and depth of the blacks and whites in your picture. The adjustment brings out subtle variations to emphasis the depth and three dimensionality of the picture. In addition, colours, tones and brightness/lightness varies for every picture. Using the sliders you will be able to adjust these variables to suite your scene. This is something your camera or your ‘Desaturate’ option cannot do. As a result you will be able to create a subtle variation that brings out the best in your picture.

Although I have used Adobe PhotoShop as the example here most applications have two options for the creation of B&W pictures. You can access your help files to see which you want. The most effective is the adjustment option – so look for a term that describes that sort of control.

To see what the difference is between the methods I include two B&W conversions of the picture above. The first uses the ‘Desaturate’ version…

The Mill on the Rye - Desaturated version. Not bad, but a little flat

The Mill on the Rye – Desaturated version. Not bad, but a little flat


The second picture uses the ‘Adjustment’ method. The colours have been adjusted to create a greater contrast in the black and white range of the picture. This gives a better grey tonality and creates a greater sense of depth in the picture…
The Mill on the Rye - created using the 'Adjustment' process for converting to black and white.

The Mill on the Rye – created using the ‘Adjustment’ process for converting to black and white. There is a greater range of tones.

More on EXIF Data

Data in your photograph tells you about your shots

EXIF data helps you analyse your shots and improve your photography

EXIF data helps you analyse your shots and improve your photography.


Information in your image files is a great way to improve your shot. You can look up the EXIF data and find ways to improve your photography. A previous posting on this subject provided ways to investigate your EXIF files… EXIF Data – Understanding Your Shots. Today we have published more definitions in the Photographic Glossary providing more on EXIF data.

Three more articles are available here…

EXIF (Exchangeable Image File Format)
Photo Metadata External link - opens new tab/page
Definition: Metadata

By Damon Guy (author and Photokonnexion editor)

Damon Guy - Netkonnexion

Damon Guy (Netkonnexion)

Damon is a writer-photog and editor of this site. He has run some major websites, a computing department and a digital image library. He started out as a trained teacher and now runs training for digital photographers.
See also: Editors ‘Bio’.

EXIF Data – Understanding Your Shots

Image files hold hidden data about the file and the image itself


'The Kick' - an image file has EXIF data stored inside

'The Kick' - image files store EXIF data about the file itself. See below for data in this image file.
 
Make - Canon Model - Canon EOS 5D Mark II
Orientation - Top left
DateTime - 2011:04:09 11:04:14
Artist - Damon Guy (Netkonnexion)
Copyright - Photokonnexion 2012
ExposureTime - 1/640 seconds
ISOSpeedRatings - 100
ApertureValue - F 4.00
Flash - Flash not fired
FocalLength - 280 mm
ExposureMode - Manual
White Balance - Manual
SceneCaptureType - Standard

In your image files is information about your photos. The aperture value, shutter speed and ISO settings are three important pieces of data. However, there is a whole lot more.

The stored data is called EXIF. It stands for Exchangeable Image File Format. The EXIF data is stored by a number of image formats including JPEG, JPG, Tiff, RIFF and WAV files. It’s also found in many camera RAW formats. EXIF data is not supported by JPEG2000, PNG or GIF image formats.

EXIF is a great source of information. Once you understand it you can find out how the shot was make. Look at images by other people. It is an insight into the way they made a that image. When you see a picture you like view the EXIF data. You can tell from the values what settings were for that shot. Bear in mind EXIF data can be removed from a photo. So, it may not always be there.

EXIF data is a great learning aid. You can look at the EXIF data in your own image files. Check out the settings at the time your shot was taken. If the shot did not go well you can analyse what went wrong. Next time you will know better.

Getting the EXIF data

EXIF data is available in a number of ways. You can get it from most image editors when you open your file. Irfanview, an image viewer and editor, has a dialogue box for reading and copying EXIF {press ‘altgr’ & ‘e’ together}. Photoshop and Elements have read and edit tools for EXIF data. GIMP External link - opens new tab/page has the same facility. To use these editors to see EXIF data consult the help pages for your version.
More after the jump…

You can also get the EXIF data using Windows Explorer…

  • Windows XP: Right click the image file; left click “Properties”; click the ‘Summary tab’; click the ‘Advanced button’
  • Windows Vista/Windows 7: Right click the image file; left click “Properties”; click the ‘Details tab’
  • Mac OS X: view EXIF data with ‘Finder’. Do a ‘Get Info’ on a file; expand the ‘More Info’ section

In some versions of Windows you can edit the EXIF data as well as read it. However, the data about the file itself remains in the file. You can remove the private data and edit the camera data. Although you can edit the information in Windows XP it is inadvisable as a bug sometimes corrupts the data in JPEG/JPG files.

Editing your EXIF data

Data from EXIF files includes camera settings data stored when the shot was taken. There is also copyright data you can edit in-camera or add while editing.

Being able to edit your EXIF file is useful. You might want to put extra data into the file that’s not collected by your camera. For example you may want to save contact and copyright details. Or, you might want to remove some of the data. Some photographers do not publish EXIF data to prevent publishing information about the shot.

Not all cameras support all fields. The EXIF format is supported by at least the Japanese camera makers. There are many other cameras supported too.

EXIF data – many ways to use it

There are many ways to use the EXIF information. The first stage is to look at the data in your own image files.

You can also set up your camera to create EXIF data. It will store your copyright information and other data in your images when you make a photo. You can also add other types of data beyond the pure EXIF data. See your camera manual for instructions.

Have fun with your EXIF data!

Post Processing Defined

The growth of a multi-billion Pound industry worldwide in software and post-processing work has been phenomenal in recent years. However, the camera manufacturers are in rude health. The mobile industries are active and growing. The Internet is hosting more and more online facilities for processing. Websites that are using images, photographic processing and social networking in images are growing daily. The post-processing industry is quite possibly one of the largest computer industry interfaces with the public.

Find out more about post-processing in our new article in the Photographic Glossary.

By Damon Guy (author and Photokonnexion editor)

Damon Guy - Netkonnexion

Damon Guy (Netkonnexion)

Damon is a writer-photog and editor of this site. He has run some major websites, a computing department and a digital image library. He started out as a trained teacher and now runs training for digital photographers.
See also: Editors ‘Bio’.


The red eye effect

The 'red eye' effect gives the subject an unfortunate bright red colour in the pupils.

The 'red eye' effect gives the subject an unfortunate bright red colour in the pupils.

Red-Eye And How To Stop It

Just occasionally photographers are presented with an image showing the ‘red-eye’ effect. This strange effect introduces a new dimension into the photograph, often ruining it. It’s caused by a beam of light from a flash being directed into the eye and reflected out, directly into the camera lens. You can find out more about how it is caused in our glossary entry, Red eye Effect (definition).

The reflected light off the back of the eye (called the retina) is red because of the blood rich tissue found there. The strong red tones colour the reflected light. This lights up the pupil and makes the eye glow red.

The root cause of the red eye effect is the flash being too close to the lens. Red eye is a common problem in studios and portraiture photography. It is under these conditions that the effect is most likely to show up. Smaller point-and-shoot cameras are much more likely to cause the effect because the flash is so close to the lens. Using a DSLR may help. However, pop-up flash on DSLRs is also a cause of the problem.

The Remedy

Many recent cameras including point-and-shoot cameras and DSLRs have red eye correction facilities built in. Some cameras generate a diffused but direct light before the flash goes off. This causes the pupil to reduce in size unconsciously before the shot is taken. It is an effective remedy, but may cause people with sensitive eyes to blink or squint which can affect the shot. Some cameras ‘recognise’ an incidence of red eye and auto-correct the redness in-camera processing of the image after the shutter has closed.

Experienced photographers prefer real-world methods of red eye reduction. In-camera processing systems don’t always prevent red eye. Furthermore, small pupils look unnatural and harsh. Also, direct lighting from flash close to the lens is unflattering. See Does pop-up flash ruin your shots.

The most effective prevention of the red eye effect is to move the flash further from the lens. It is common for professional photographers to use off-camera flash, or flash brackets to move the flash away from the lens. This increases the angle between the flash beam to the eye and the reflection from the back of the eye. The wider angle stops the red eye effect since the reflection is not directly back out of the eye.

The red-eye effect is found more frequently in low light conditions as the eye opens the pupil to let in more light. It is more likely to occur in these conditions because there can be a wider angle of light and still get a viable reflection out of the wide pupil. One way to reduce red eye is therefore to increase the ambient light. The eye will react so the pupil closes to a smaller hole. This reduces the possibility of a reflection.

Often red eye is less detectable if you move further away. Close use of a hard light source or close-up use of the camera can both make the effect brighter. If you take the shot further away the camera may not even see red eye if it occurs.

Another way to reduce red eye is to bounce the flash light off a wall, ceiling or reflector so there is no direct flash beam entering the eye. This is more effective since the light is even and less directed.

The best way to prevent red eye is not to use flash or bright directed lights at all. In this case, lower light conditions may require the use of a tripod for a longer exposure. However, I accept that longer exposures or a tripod may not be practical or helpful.

The only other practical way to prevent red eye is to ask the subject to look away from the flash and lens slightly. Again, that my spoil the pose. And, as you can see from the picture above may not work anyway.

Software removal

Usually, one or a combination of the above, are sufficient to stop the problem in-camera. However, as a last resort many software editors can be used to remove the effect in post-processing. Adobe Photoshop has several ways to remove red-eye. Adobe Elements has a tool as well. Gimp External link - opens new tab/page, the open-source image editing suite has a red-eye tool which is included in the core system in more recent versions. Irfanview is a respected and free download image viewer. The application has gained some editing tools over the last few years. It has a basic red eye tool too. Other software suites provide various options as well. The actual methods of using these tools vary according to the software, but in most cases the process is simple.

If you don’t have your own software suite to do your red eye processing there are a number of online solutions. Google provided this page of ‘Red Eye Correction External link - opens new tab/page‘ links.

Animals

The red eye effect is also found in most animals aside from humans, although the red colour can vary in intensity and tone according species. The red eye effect should not be confused with the ‘eyeshine effect‘ found in some nocturnal hunting animals. Although the cause is the same, the reflecting membrane in the eye is different. The colours vary and are usually silvery, not red. Animals like dogs and cats can exhibit both the red-eye effect and eyeshine at different times and various light conditions. Eyeshine is prevented in much the same way as red eye.

By Damon Guy (author and Photokonnexion editor)

Damon Guy - Netkonnexion

Damon Guy (Netkonnexion)

Damon is a writer-photog and editor of this site. He has run some major websites, a computing department and a digital image library. He started out as a trained teacher and now runs training for digital photographers.
See also: Editors ‘Bio’.