Tag Archives: Art

Using a neutral density filter

ND filters can be used to produce some great images

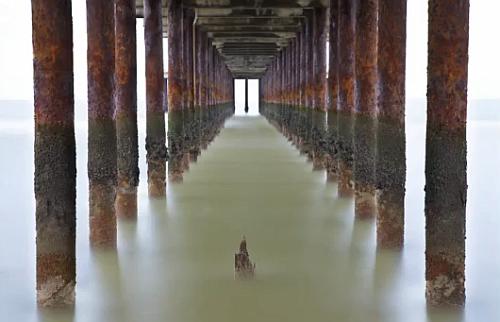
Lee Filters – Big stopper neutral density filter reduces the light by ten stops. You can produce great images like this one from the video.

Sometimes you need a long exposure…

However, to take a very long exposure in daylight will mean too much light will burn out your picture. So you need to turn down the incoming light. For that you use an ND Filter. Here is how they are used.

Remind me, why do I need this?

Remember, shutter speed controls movement blur. If you want to show a car looking blurred as it goes past you might set the shutter speed to about a fifteenth or thirtieth of a second. But what if you want to capture a much less obvious movement or a really slow movement? Say two minutes? Well, normally the amount of light coming in will burn out the shot. Of course you can use a really small aperture (eg: f22) and let less light into the camera. But on a bright day two minutes will still burn out the shot. This is where Neutral Density (ND) filters come in. They are specially darkened filters that cut the light down allowing you to extend your exposure. With one of these you can do some awesome effects.

10 stop Neutral Density Filter (video)

In the video we see the making of a picture (above) by using the Lee Big Stopper Neutral Density Filter. This ND filter is very dark, which takes down the light by 10 stops. It creates a great effect on of the water swirling under the pier. This is the darkest type of ND filter.

ND filter strengths

ND filters can reduce the light entering your camera for up to 10 stops. This allowed 2 minute exposures in the video. However, there is also ND2, then ND4 and ND8. Other strengths exist, but these are the most common. They allow you to have shorter exposures so you can adjust the exposure to the needs of your shot. You can also put them together so an ND8 + ND2 gives you an effective ND10 – the strength in the video.

ND Grad.

Another of these type of filter is the graduated Neutral Density, or ND grad. The use of an ND grad is quite specific. It is used to reduce the incoming light from the sky when you have a bright sky and dark ground. If you expose for the ground the sky burns out. If you expose for the sky the ground is too dark. The ND Grad. helps prevent the sky burning out.

The ND Grad. is dark at one end and clear at the other. The two zones meet in the middle where the clear graduates into grey. Put the filter over the lens so the line of clear/grey graduation lies on the horizon, darkening the sky. Now, you can expose for the scene and get even light distribution. The next video will show you how this type of ND is used.

Mike Browne  External link - opens new tab/page
Problems?

No, filters are simple and easy to use. There are some important things to remember…

Always use a tripod. It is impossible to hold a camera steady for more than about half a second. After that your image will start to get blurry.

You need to be quite precise about lining up ND Grads with the horizon. Take a little practice before going out to do the BIG shot.

The darker the ND Filter the more there is a tendency to impact on the white balance. Sometimes you get a blue colour cast, sometimes a red one. You can remove this in post production if you are using the RAW file format. Alternatively you can test the filter with your camera and adjust the white balance setting in-camera to correct for the aberration. Most of the stronger ND filters have this colour-shift tendency. it is exaggerated by the sensor type. CMOS sensors tend to magnify the effect.

Sometimes getting the exposure right is a matter of experimentation. Take a few test shots and make sure you do some “Chimping”.

If you are buying ND filters, especially ND Grads buy square ones. You can buy adaptors for these to fit any lens and it allows you get creative in more ways than round, screw-on filters that only fit one lens.

There are many different kinds of filters which produce a huge range of fun effects in-camera. Many of these effects cannot be processed into the shot later. The square filter system shown in these videos allows you to expand your collection and develop a new set of skills without buying an expensive filter for each lens.

ND Filter set…

3 full ND filters
3 graduated ND filters
Full fitting kit for a range of camera
and lens sizes.
10 Adapter Set + 6 Filter ND2 ND4 ND8 G.ND2 4 8 For Cokin P Canon Nikon Sony LF6

Please leave any questions or comments you have about these in the comments below.

find out more...Photokonnexion tips by email
If you enjoyed this article please sign up for our
Tips by email service.
                                                 Find out more
#11030#

By Damon Guy (author and Photokonnexion editor)

Damon Guy - Netkonnexion

Damon Guy (Netkonnexion)

Damon is a writer-photog and editor of this site. He has run some major websites, a computing department and a digital image library. He started out as a trained teacher and now runs training for digital photographers.
See also: Editors ‘Bio’.

The secret to world travel – but staying at home!

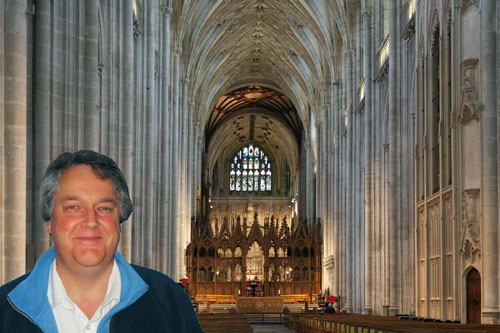
• Winchester Cathedral Chroma key image•

• Winchester Cathedral •
Chroma key work is quite easily done in Adobe PhotoShop and a range of other quality photo-editors.

When you want to be somewhere else…

There are places we would rather be than where we are now. I would like to be on an island paradise …not going to happen! But you can do it photographically. The secret is something called Chroma Key photography or green screening.

Chroma Key Substitution

In chroma key, often known as “green screen” photography, the subject is photographed against a uniformly lit green background. Then, in post production the subject is easily selected out from the green background. The selection can then be pasted into any other photographic background.

Any uniform colour can be used as a backdrop for the chroma key shot. The picture above is selected from a blue background and pasted into a picture of Winchester Cathedral in SE England. The two pictures were taken on different days.

To make the selection of the subject from the background it is important to light the background evenly. When the colour is even the selection is easy and can be completed in one operation. Colour variations from uneven light make it more technical to isolate the subject.

Green is the most frequently used colour in chroma key photography. The colour is very easily separated from human skin tones. Where the subject has green tones, blue is often used as the chroma key alternative. Blue is a common colour for clothing. It is therefore less suitable than a strong bright green which is not so popular as a fashion colour. However, green does have other advantages. The human eye is able to see more shades of green than any other colour. This makes it easy to see variations in the green when setting up the lighting. Green sensitivity is also built into software applications to match the abilities of the eye. This helps us to work with the background when doing awkward selections.

Fun and games

The substitution of a subject into any other photographic background provides great opportunities for doing fun things. Film stars can be placed in your garden. You can apparently travel the world without leaving your front room. Just find the right pictures and substitute yourself into the background of your choice.

Of course there are also opportunities for advertising, graphic art, product photography, still life, portraiture, action shots and many other false situations. Of course we should be careful not to be immoral about such things! Feel free to have fun though. You can really make it look like you have traveled the world.

How is it done?

Basically you need a chroma key background, lighting to illuminate it evenly, a camera and a subject. On a small scale this is easy to do. A lot of people doing chroma key work for the first time start with still life or table-top photography to get the technique right. Probably the most common use of the technique is for portraiture. Take a picture of yourself or your friends and then start playing. For this you need a larger screen…

The video is a complete introduction to the use of chroma key photography. You can take the same techniques and scale them to any size. The video introduces the ideas you need to grasp and shows how to set up the lights and the equipment. It also shows one of the software applications. After the video I will briefly look at that software for you.

How to Green Screen (Chroma Key) with Photography!

markapsolon  External link - opens new tab/page

Software

There is a whole range of software that is capable of doing chroma key. In essence chroma key software has two jobs. The first is to select the subject off the green background (or whichever colour you are using). The second is to successfully blend the abstracted subject with the new background.

The software from the video is called PhotoKey from FXHome  External link - opens new tab/page. It has been produced specifically for chroma key compositing. It is not alone in the market. However, there are not many applications specifically aimed at this work. Instead there are plenty of applications that do chroma key blending as part of a general suite of editing tools. There are also plugins for the same process to go into your favourite image editor.

The actual process for producing the final blended image is relatively quick and easy in most of these chroma key applications. The tools are usually quite self explanatory if you have some editing experience. As with any editor, you normally find the blending tools manage colours, contrasts, edging and so on. Ultimately you are creating a blend of the two images, but the best chroma key tools go further. At the end of working through the blending process you can make further changes in a good software suite or plugin. If you are satisfied with it you should be able to export your image to make a .png, .jpg or .tiff image.

The way to do it in Adobe PhotoShop

The general photographer is most likely to have use of a quality image editor like PhotoShop, Elements, GIMP, PaintShopPro and others. All these are able to do the type of work that PhotoKey can do. Admittedly it takes longer. But for beginners it is better to save your money for more general photography kit. For those who are interested, here is a short video explaining the Photoshop method of doing a chroma key composite. It is a simple technique using standard photoshop tools.

Isolating with a Chroma Key Background

This tutorial is aimed at Photoshop intermediate level users.

Overall…

Chroma key work is fun. There is quite a lot to learn, but it adds flexibility to your photographic work and post processing. The use of up to date quality image editors is probably better than splashing out on expensive specialist applications. Nevertheless specialist applications do a great job, saving time in post processing.

Can you write? Of course you can!
Write for Photokonnexion...

We would love to have your articles or tips posted on our site.
Find out more…
Write for Photokonnexion.

find out more...Photokonnexion tips by email
If you enjoyed this article please sign up for our
daily email service.
                                                 Find out more
#11030#

Art in photography has old roots

Is there art in photography? •  The debate has raged for as long as there has been cameras.

• Is there art in photography? •
The debate has raged for almost as long as there has been cameras.
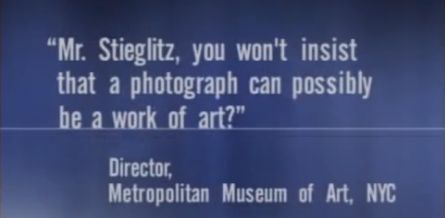
[Image from the video below].

Today photography appears more realistic

Perhaps that is more true than at any time in the history of photography. Modern cameras give a very powerful reflection of the scene. Yet, today the artistic element in photography is as alive as the art in say, the history of painting. What is not so clear is just what we mean by “art in photography”.

Much of the modern wave of photography is about snapping the ‘picture’; just capturing what you see and moving on. However, the committed, artistic photographer, sees more in the frame than just the picture. The images we capture show form, shape, expression, balance – lots of intangible things that are not necessarily about just getting the picture and moving on. They saw the art in photography.

The art in photography debate

Early in the history of photography this very same debate raged. Some saw photography as being “realistic” and therefore not containing artistic elements. Anxious to establish photography as an art form in its own right the Pictorialists worked with the raw elements of the medium. That is particularly with lenses and negatives. They manipulated them to make the picture resemble the hand-made craftiness of paintings and drawings. They tried taking away the “realistic” look of the final picture. They were almost converting it to some sort of hand-drawn picture or a painting. They were turning the picture into an art form. They deliberately tried to create art in photography.

Perhaps this manipulation did make an art form out of some pictures. However, the basic point was missed by the Pictorialists. The underlying picture still needed an artful arrangement to carry off the translation into a ‘crafty’ final image. What the photog saw needed to be artfully seen in the frame.

Abstracts and the art in photography

This short video shows the arrival of an alternative school of photographers. The school of “Straight Photography” acknowledged the power of the camera to represent the world with a realism other art forms did not have. At the same time, Straight Photography revealed that through capturing reality you can see through the artists eyes. They went to great pains to retain the element of reality, clarity and sharpness in the pictures. Much of their work would today be recognised as abstract.

The Pictorialist emphasis was on shape, form and expression rather than the every-day and mundane view of the world we see with almost every blink of the eye. They went to great lengths to see things the ordinary picture did not show. They emphasised beauty in simplicity. The shape and form in the abstract was an important focus. It was about a new way of seeing detail by careful framing of every day objects. They created images that showed the ordinary reality by an extraordinary interpretation. True art in photography.

Pictorialist and Straight Photography


Debbi Richard

Damon Guy - Netkonnexion

Damon Guy (Netkonnexion)

Damon is a writer-photographer and editor of this site. He has run some major websites, a computing department and a digital image library. He started out as a trained teacher and now runs training for digital photogs.
See also: Editors ‘Bio’.
By Damon Guy see his profile on Google+.

A hidden compositional element to pull the eye into your images

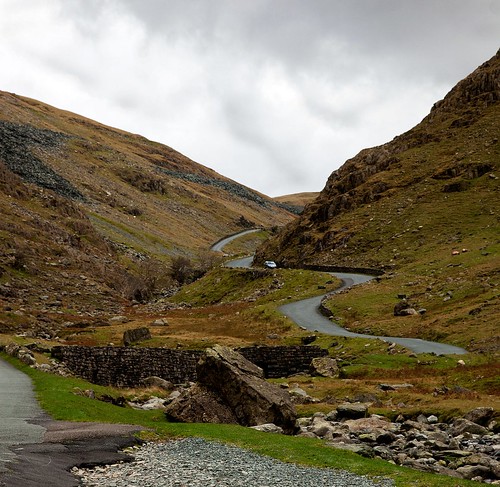
• Honiston Pass in the English Lake District •

• Honiston Pass in the English Lake District •
Overlapping elements in the picture promote a strong sense of distance.
Click image to view large
• Honiston Pass in the English Lake District • By Netkonnexion on Flickr External link - opens new tab/page

Add depth to your images.

Look at the scene and find ways to show depth. If you want a scene to be convincing you should consider all the compositional angles. In particular the depth. A flat image is not convincing. One of the ways to achieve depth is to incorporate overlap in the scene elements.

What is overlap?

In composition overlap is where one element of the scene is partially obscures another. It is a simple concept and one that creates a marker for the eye. If we see something that is obscured by another thing we have learned from experience that there is a distance between them. The relative sizes of the objects help us to guess what distance separates them.

We cannot immediately tell the relationship between far away or small objects if objects don’t overlap. We don’t have a reference point between them. We can project some sort of guessed perspective and under some circumstances we can guess by the effect of atmospherics (like haze, fog or dust in the air). However, in most cases that takes thinking and time to do. When a viewer is looking into an image they will not take the time to do that sort of guesswork. We need to make the depth immediately obvious, or we will lose the viewer.

The picture above is an example. There are several overlaps. The foreground road and grass verge slightly overlaps the large foreground rock. The latter forms a strong overlap with the wall. The mountain pass disappears into the distance around three spurs that inter-space with one another giving a strong sense of overlap right to the horizon.

Overlap is the key to the immediate recognition of depth in a lot of situations. Landscapes, and often in strange environments like tiny-scale close-ups, are good examples. When you are looking to help the viewer understand the image try and find ways to provide some overlaps so that the image clearly shows relative distance between objects throughout the distance into the shot.

Overlap the villain

Overlap is not always the good guy in an image. There are occasions when it is a source of confusion. For example the image below…

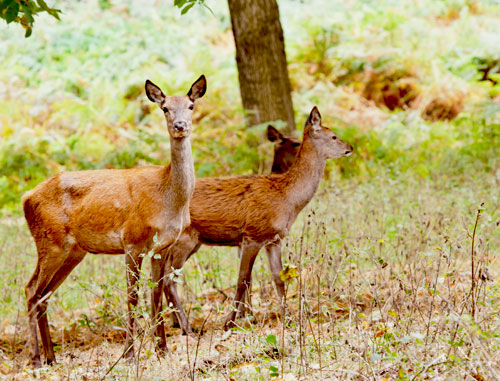
• Overlapping - the deer problem •

• Overlapping – the deer problem •


The picture shows three deer. You might need to take a second look. I did, and I took the picture. You see? Overlap has killed the image.

The most difficult overlaps you will find are the ones where there is little distance between the overlapping elements. In the case of the deer above the merge effect is almost absolute and the resolution of the second deer is spoiled. Its outline merges with the third one at the back. The legs are completely visually entangled. This is a clear confusion for the viewer.

The general rule with overlaps that do not work is clear…
         Avoid overlapping objects that are similar and close.

Unfortunately that often includes people. When they overlap there is frequently confusion. This is especially the case when the clothing is similar (say, all black suits). Another example of problematic overlaps is with silhouettes. The outlines have to be very clear to carry a true sense of character. Otherwise, you cannot tell where one person ends and another begins.

Judgement call

As with so many good things there is a bad side. While overlap is a great help in establishing distance for the eye it can also be the villain. The trick is in understanding how much the eye interprets the similarity of the overlapping element and how much distance lies between them. Your judgement call, as a photographer, is to look at your composition and ask yourself if the viewer will interpret the overlap as help or confusion.

By Damon Guy (author and Photokonnexion editor)

Damon Guy - Netkonnexion

Damon Guy (Netkonnexion)

Damon is a writer-photog and editor of this site. He has run some major websites, a computing department and a digital image library. He started out as a trained teacher and now runs training for digital photographers.
See also: Editors ‘Bio’.

Can you write? Of course you can!
Write for Photokonnexion...

We would love to have your articles or tips posted on our site.
Find out more…
Write for Photokonnexion.

How to improve your photography by talking about it

Mum - the loving supporter

♥ Mum – the loving supporter ♥
The problem is loving feedback is not honest Joe advice…

Sometimes we should ignore the love option.

The people you love are wonderfully supportive but probably won’t give the appraisal of your photography that you need. An informed, impartial and analytical opinion will help you understand what you need to improve.

It seems hard, but your family or great friends are probably going to like your work or conceal that they don’t like it. They don’t want to offend you or spoil their relationship with you. If you want to improve your photography you need an objective assessment of your work. You want someone to sensitively point out the good, the bad and the potential.

So just how do you find people who can help you. Here are some ideas…

  • Join a photography club and ask other members to look at your photos.
  • Enter competitions at a club, the judges often give a technical appraisal.
  • Find a professional/semi-pro who is prepared to do a little mentor work.
  • Find someone on a photography website or forum who is prepared to swap candid appraisals with you.
  • Find an artist who would be able to give you composition help and advice.
  • Get to know an art or photography graduate who understands the principles of photography.

What you should look for from these people is advice that…

  • is sensitive and supportive – with your best interests at heart.
  • objective, trustworthy, honest and informed.
  • will not belittle or trash your work.
  • will be positive and upbeat about the successes and good points.
  • won’t pull any punches – will tell you if there is a problem or issue.
  • will give you ideas about how to tackle your mistakes/problems.
  • is able to command your respect.

It may not be easy to find these people. So you should get to know a range of people in photography. You will find people who fit these profiles in lots of places. You just need to be determined and interested in developing your photography. They will help you because they want to, you will both be of like mind, and ultimately it is to the benefit of photography if we all share. Besides, it is fun if we help each other.

The broad approach

Your family and friends opinions are valid and useful. So are the opinions of those you work with and even people you do not know. Everyone is entitled to have likes and dislikes about photographs they see. However, these are people who may not understand photography is an art. They…

  • may not be positive about your work.
  • might say upsetting things without realising the impact they are having.
  • might not like your photograph, but may not be able to tell you why.
  • come out with erroneous reasons for their dislikes.
  • may not be supportive or may even be openly hostile.
  • might make silly or inappropriate suggestions about how to improve.

Yet, despite these shortcomings they have a valid opinion. You need to make your own judgement about how much attention to pay to them. You also need to make up your mind about how valuable it is to have uninformed opinion. In short, if you want to improve your photography you need to understand that opinion in art (photography) is a broad spectrum. And, it is your call as to how much criticism or support you will take from the different people on that spectrum.

With time…

In the long run you will make up your own mind about the opinions you hear about your work. Other peoples’ opinions help you – no matter what their background. It is also important to understand the diversity of opinion how that impacts on you, the photographer. Learning about varied opinions helps you to pick out the good advice form the less useful. Understanding the different types of people and opinion involved is not something you will understand any time soon. It is something that artists and photographers think about every time they meet someone with an opinion. How you handle those opinions is a personal approach and one you develop with experience. Actively seek opinions and you will get the experience quicker.

find out more...Photokonnexion tips by email
If you enjoyed this article please sign up for our
daily email service.
                                                 Find out more
#11030#

By Damon Guy (author and Photokonnexion editor)

Damon Guy - Netkonnexion

Damon Guy (Netkonnexion)

Damon is a writer-photog and editor of this site. He has run some major websites, a computing department and a digital image library. He started out as a trained teacher and now runs training for digital photographers.
See also: Editors ‘Bio’.

Can you write? Of course you can!
Write for Photokonnexion...

We would love to have your articles or tips posted on our site.
Find out more…
Write for Photokonnexion.

Depth of field – a powerful photographic tool

20130224_DepthOfFieldHeader

An important aspect of camera control and composition

We all know the value of getting control of your camera. It is of course equally important to have a good command of the elements of composition. In this video we are taken through the impact of the Depth of Field, both as a controlled factor of the shot, and how that is seen as a compositional feature. It is a simple video. The aim is to show the different ways that depth of field manifests itself with different f-stops, and different focal lengths. There are some good comparisons to look at.

Photography tutorial – depth of field
A photography tutorial on depth of field with Shelton Muller of Total Image magazine (www.total-image.com.au)
Uploaded on 1 Aug 2006

Can you write? Of course you can!
Write for Photokonnexion...

We would love to have your articles or tips posted on our site.
Find out more…
Write for Photokonnexion.

Creative block – how to overcome seven types

Break your creative block

• Break your creative block •

It happens to us all…

Everyone gets a creative block now and then. Photographers often find themselves in a down period, apparently unable to pick up the camera, somehow stuck. I have identified below seven common ways your creativity can be blocked and how to get past them.

Creative block 1: Mental stagnation

Symptoms: No matter what, new ideas do not come out. You feel lacking in energy and you cannot see past your last piece of work. Your thinking goes round and round and does not seem to embrace anything new.
Solution: This form of creative block is largely about lack of energy and too much inward looking. Here are some things that will help…

  • Get some sleep. Lots of sleep.
  • Go and meet some new people, listen to them. Forget your situation.
  • Renew your past projects – associate them with other photographers similar projects.
  • Do some exercise, regular, challenging and rigorous exercise.
  • Do something creative that is not photography – drawing, painting, sculpture, writing…
  • Get lots more sleep.
Creative block 2: The knowledge block

Symptoms: Procrastination, slow to start your photography, reluctance to try something new, constantly distracted by low priorities.
Solutions: Allocate short periods of your time to doing research into the area you are lacking in knowledge. If you do too much you will make things worse. At the other times work on something that is different to take your mind off the problem area. You will get past this creative block by tackling it directly.

Creative block 3: Emotional blockage

Symptoms: Fear, embarrassment, emotional confusion, lack of focus, lack of commitment, self doubt. These all lead to crippling procrastination.
Solution: Facing emotional blockages is never easy. The very thing that motivates your creativity, your passion, is overcome. There is always pain in confronting your emotional blocks, but you have to face them head on. Any attempt to side-step will leave you with a lasting impact. Write down all the things that are affecting your emotional situation. Then actively look for solutions and tackle them. You will only be able to create again once you have cleared this creative block.

Creative block 4: Overwhelmed

Symptoms: This is when everything is on top of you, you are over-committed, over stretched and pushed to the limit. There is so much that appears to suck out your energy that creativity is the last thing on your mind. We all have this type of block at some time. There is just too much that demands our attention and it stops everything else dead. Attempting to forge ahead despite the overwhelming issues will just mean more distraction.
Solution: Prioritise. If your time for creativity is limited then you must clear the things that are demanding your attention. Deal with them in a methodical way, one thing at a time. Take one step at a time and sort them out. You will be overwhelmed for a while. If you keep in mind where you want to be you will eventually get passed the issue. You will get past this creative block by working through the issues.

Creative block 5: Your methods

Symptoms: We often find that what we once did is very different to what needs to be done now. I have often found that my students become unproductive because they find that their methods early methods are no longer right for them.
Solution: Examine what you are currently doing. See if you can find a better way to do it. Photographers often get to point where they know they can produce sharper images, but are not doing it. Try writing down your process, what you do when taking photos. You will probably find it is a bit chaotic. Lack of discipline is a classic issue for sharpness. Working out a new approach and an appropriate procedure to ensure quality shots will help. This new approach takes time and practice, but it will help you get past your existing poor methods. It will allow you to get back to your creativity.

Creative block 6: Personal issues

Symptoms: If you are a creative person your personal life can often get in your way. The exact problem or reason may not be clear. You need to think about what prevents you thinking creatively.
Solution: Once you have the issue clearly fixed you have also defined your solution. Write a plan for overcoming your problems. Some things are not going to go away easily. Divorce, poverty, ill-health and many other persistent problems need to coped with. So try to give yourself space to be creative and space to be able to work on your plan. If things that are problems for you are going to be there for a long time having some creative space will also help you come to terms with the problem itself. Your personal life is a part of your creative life. You cannot separate them. But you can try to deal with them separately. Your creativity can then be a refuge from the problems. Get passed this creative block by putting parts of your life into their own compartments.

Creative block 7: Lack of creativity options or stimulus

Symptoms: Sometimes what you have been doing to stimulate your creative thinking no longer works. There are many things you can do to change that. Quite simple ideas often help. But, they may take a bit of work. Our creativity is a complex thing. To change our creative approach can be complex too.
Solution: Here are some ideas to help you get new creative angles…

  • Research a completely new area of interest. Start taking photos in that interest.
  • Read a book that’s a new interest. Think about taking photos as scenes from the book.
  • Start to learn a new language.
  • Research jobs you have never done. Try to understand the perspectives or drives.
  • Do something you have always wanted to do but never had time for in the past.
  • Turn some of your pictures on display upside down. Look at them frequently.
  • Review past photographic projects – consider doing them differently now.
  • Take some unrelated ideas and try to combine them – thought experiments.
  • Pick 30 random words from a dictionary. Spend 30 days expressing them photographically.
  • Buy a magazine on a subject you want to know about. Look at the photos. Can you do any?
  • How would a pilot, doctor, or fireman take your previous pictures? What would they see?
  • Sleep a lot. Creativity is very taxing for your mind and sleep helps a great deal.

Each of these ideas are a guide for you to think in new ways. Aim to change your approach. To pick up new creative ideas. Think differently about your photography. Let in new concepts. Try new perspectives. What you are doing here is renewing your photographic interests. Open up your mind to get past this creative block.

The creative block is…

Learning to recognise you are stuck in a rut is not easy. It may be just a case of tiredness. It may be something deeper. One of these creative blocks above, or another type of block may come at any time. These ideas are a tool to open up the issue for you. They can help you to find a way out the next time a creative block strikes.