Tag Archives: Accessories

Make soft light work for you…

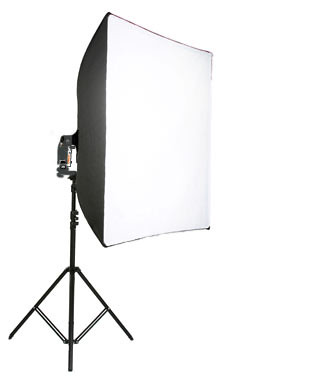
The softbox is the best way to diffuse light from an off-camera flash as shown here.

The softbox is the best way to diffuse light from an off-camera flash or studio strobe light.

Use a Softbox to diffuse your light

The use of flash is the the best way to produce your own artificial lighting if you want to work with faster exposures. The light intensity of a flash unit allows you to capture a person, for example, fast enough so that they do not have time to move. You can use long exposures but they give time for things to move. The downside of flash is that the light is very harsh. As it is also a point-source of directed light. That means it casts hard shadows (more about hard light). To get away from the hard shadows, which are particularly unflattering on peoples faces, you need to soften the light. The best option is to use a softbox and an off-camera flash. This will give you diffused light and control over the angle of shadows.

A softbox is normally a square fabric box which is held in shape by some sort of wire frame. The flash unit pokes through the back into the softbox. On the front of it is a white translucent fabric which lets the light through from the flash (See the picture above). However, the translucent fabric bounces some of the light back into the box and diffuses some out. The light bounces around inside and eventually emerges re-diffused. This produces a wide angle of light from the front of the softbox which is diffuse and from a broad-width source. Where a small home-softbox may be, say, 40cm x 40cm, the flash unit (if it’s a speedlight from a camera mount) will be less than 5cm x 3cm. So the light emitting face of the softbox is many, many times larger than the flash emitting face. The resulting diffusion is very effective, producing a soft light on the subject (see more on Soft Light here).

To set up a softbox for your off-camera flash you will need the following equipment…
1. A softbox with suitable mounting for a speedlight off-camera flash (and a standard light mounting fitting – female part).
2. A light stand with a standard studio light mounting on top (male part).
3. The off-camera flash unit itself.
4. Some means of connecting the flash to the camera (radio flash trigger or a wire connector).

There are some really good softboxes available at reasonable prices. Buying the big brand names does not add much to the functionality. It does add to the price! So, look to get exactly what you want rather than buy for the brand name.

You will notice that the design of softboxes fall into two broad categories…

  • Stand-mounted softboxes for speedlights (off-camera flash units)
  • Softboxes for studio strobes (large dedicated/professional flash units)

Most starters in photography are not interested in full scale studio strobes. They are powerful tools for big studio spaces. The first option gives the most flexibility for the best price for the starter photographer. The stand-mounted softbox is of the type shown in the picture above. An off-camera flash unit is mounted on top of the stand and fires into the softbox. The unit can be connected by a long wire to the camera directly. Or, as is more often the case these days, the flash can be mounted with a radio unit. This gives wireless contact and firing to the camera. A Radio Flash Trigger Control can be purchased at reasonable prices.

Buying a softbox is easy. They are available online in many of the camera web-shops. Some high street camera shops stock them too. There is a whole range of them on Amazon – Softboxes for Speedlight flash.

Some softboxes come with a stand supplied complete with fitting bracket to marry the softbox, flash and stand together. Check the inclusion list to make sure there is an appropriate stand and mounting bracket for the softbox and flash. If there is no stand included you will need to factor in the cost of a stand as well. Stands are quite cheap to buy. The more expensive branded ones cost a lot so make sure you buy to suit your budget. Lighting stands have a standard fitting on top. It will fit most softbox brackets and a range of other light accessories. You can therefore find lots of ways to make different units work together as long as the fittings are standard. There is no need to spend a lot on a stand for an off-camera flash. Expensive stands are used more often for heavy studio strobes.

You can find out more about buying off-camera flash units here.

I have assembled a complete set of purchases below that work well together and will not bust the budget. They will provide you with a complete softbox kit ready to use.

By Damon Guy (author and Photokonnexion editor)

Damon Guy - Netkonnexion

Damon Guy (Netkonnexion)

Damon is a writer-photog and editor of this site. He has run some major websites, a computing department and a digital image library. He started out as a trained teacher and now runs training for digital photographers.
See also: Editors ‘Bio’.

Can you write? Of course you can!
Write for Photokonnexion...

We would love to have your articles or tips posted on our site.
Find out more…
Write for Photokonnexion.

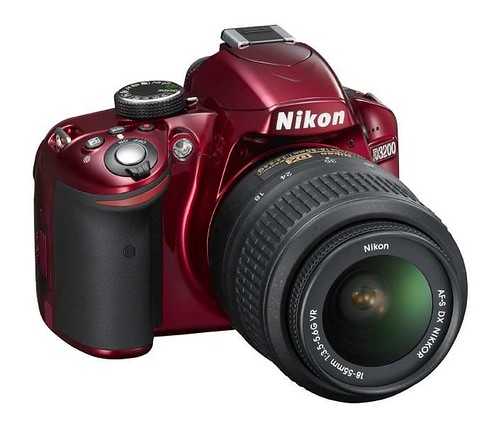
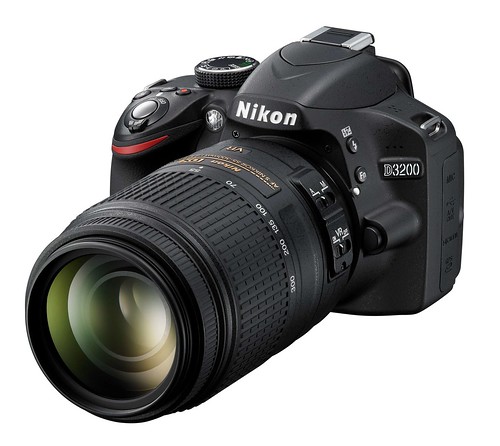
Nikon Release a Stunning New Model… The D3200

The new Nikon D3200...

New full featured DSLR sets a new standard

Today Nikon announced the release of a new model. It is an advance on the popular D3100. While it is primed for the family and amateur market the D3200 is no lightweight. Boasting a 24 megapixel sensor it matches the ‘pro-photography’ market and could fulfil a niche as a light and flexible camera for the photographer on the move. It is priced to meet the same market that the Canon Rebel/D550 series cameras fill. However, it looks to leave the Canons standing.

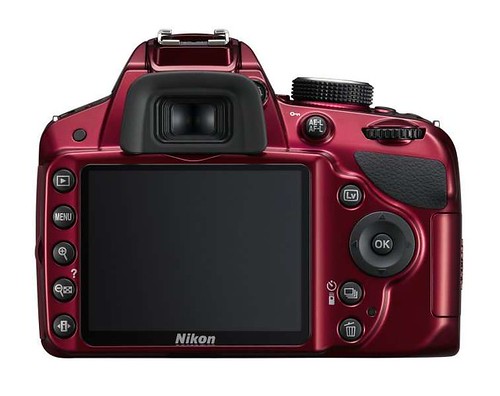
The stylish design comes in two colours – Red and black. The advances are not skin deep. Below the surface is a slick imaging machine. The sensor is a 24.2MP DX-format CMOS with great colour fidelity, sharpness and tonal variation. The EXPEED III image processor provides a range of in-camera image manipulation facilities as well as superb picture quality and HD 1080p video. There is a large, 3inch LCD screen which allows bright clear framing, playback, menus and controls as well as ‘Guide Mode’ settings. The menu navigation is intuitive and clear as well as friendly.

The lens mount is suitable for a wide range of Nikkor lenses. The bundled ‘glass’ is the versatile AF-S NIKKOR 18-55mm 1:3.5-5.6G (Vibration Reduction) lens – a mid-range lens with superb optical quality and stabilization. The camera houses an eleven point auto-focus system using phase detection to ensure the quick focus response.

Modern cameras have great ISO and noise reduction systems. The D3200 is no exception. The top level of the ISO range is 12800 and the noise processing is reported to be of high quality. This looks like a great system to meet the full range of light conditions any photographer will encounter.

While the camera is probably best suited to the amateur and family market the large sensor size, excellent video specifications and ease-of-use make it a great opportunity for entry-level users to buy a camera they can grow into. On top of that there is the added bonus of wireless.

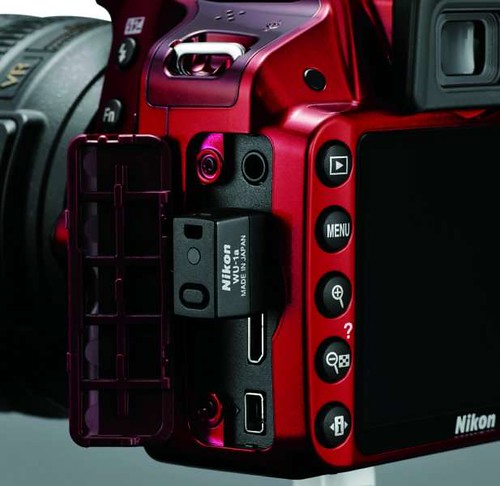
The D3200 looks like being the first truly mobile enabled DSLR. A small plug-in accessory is going to be available that will enable the camera as a mobile device. Called the WU-1a wireless mobile adapter the unit will automatically connect with your smartphone for upload. It will even let you use your phone to control the camera to take shots and video. There is an intuitive app. to help the process along on your phone. Get the shot and share it all in one! That beats hands down the limited and geeky Canon wireless offering on the Canon IXUS.

Combined with the other features of this camera, the wireless will be a big boost for sales. In the mobile world of today the camera manufacturers have lagged behind. Nikon have obviously decided to take a leap with this camera and it is aimed at the right end of the market. Great news. Lets hope the likes of Canon and others will follow suit. At the moment the camera manufacturers are looking decidedly behind the times in terms of wireless access and facilities. Nikon is clearly determined to break the barriers.

Another feature that will excite the mobile generation is the in-camera editing features. Mobile phones have got streets ahead of cameras on editing. Well the D3200 is fighting back. The camera features a ‘Retouch Menu’. It offers a whole range of post processing features… Resize, Color sketch, Selective colour and other process tools. The traditional ‘red-eye‘ correction, and Monochrome (Black-and-white, Sepia and Cyanotype), is available along with Filter effects (Skylight, Warm filter, Red intensifier, Green intensifier, Blue intensifier, Cross screen and Soft). Other features include: Color balance, Image overlay, RAW processing, Quick retouch, Straighten, Distortion, Fisheye, Color outline, Perspective control and miniaturisation. It is also possible to edit your video clips in the camera too.

It is looking like European distribution and sales will begin sometime in May/June. Of course we will keep you posted on that and ensure that you get the latest on this camera as we know more. In the meantime this looks like being the most forward looking DSLR to come out for some time and it smashes the preconceptions of recent times about DSLRs. if you are looking to get your first DSLR and love to share your pictures this could be the mean machine you are looking for to do the right thing!

The Nikon D3200... stylish and a new standard in size and power!

The Nikon D3200... stylish and a new standard in size and power!

The Nikon D3200... A new standard in wireless connectivity.

The Nikon D3200... A new standard in wireless connectivity.

The Nikon D3200... High resolution and 24 megapixel

The Nikon D3200... High resolution and 24 megapixel - A market breakthrough for the amateur, family and mobile generations. The camera has pretentions to the professional photographer market too. The 24 megapixel sensor will allow large print sizes.

The Nikon D3200... great facilities and intuative menu navigation and use.

The Nikon D3200... great facilities and intuative menu navigation and use.

Contribute A Definition?

Send us a definition of a photographic word or phrase...

Send us a definition for our list of photographic words and phrases. Simply write a clear definition and send it in. Include an original picture if you wish. Give us your name and a link to your website and we will credit your work.

Tripod Sharpness – Three Tips for Pin Sharp Shots with a Tripod

Tripod sharpness – Making sure you get pin sharp results

Sharpness is the ultimate goal for your shots. However, a pin sharp shot takes care to get right. You will gain sharpness by using a tripod. But beware, even with a tripod you can still get movement. Photographers use the term ‘pin sharp’ to describe well defined and clean edged shots. However, tripod sharpness involves thinking about both your tripod and the environment where you are shooting.

Use only what you need

Here is a quick tip for tripod sharpness. If you extend the legs of your tripod fully you will notice that the lower sections of the tripod are thinner than the upper leg sections. This is so they can slide into each other when packed away. Unfortunately the thinner sections on the lower legs are more flexible. So, if you want your tripod to be steady then try not to extend the legs out fully. Instead extend the upper, stiffer leg parts before extending the lower leg parts. Use the thinnest sections last and only if you have no choice. In fact, most shots do not demand a full height. And, you will get a more interesting shot if it is not taken from eye height like everyone else will take it. Instead, go lower – bend down a bit to get your tripod sharpness.

You should put on weight

Another way to tripod sharpness is to weigh it down. Tripods move or vibrate easily. Slight breezes create a slight vibration. Stronger breezes might even cause the tripod to move. Both affect your photograph because of tripod movement. You can minimize this using a little extra weight. There is often a hook on the bottom of the central column of your tripod. This hook is for the purpose of hanging a weight. You can use a plastic bag with a rock in it. If your tripod is a sturdy model, hang your camera bag between the legs. The weight will create a downward force keeping the tripod steady on the ground. The free-swinging weight also helps dampen vibrations caused by movement. This will not work in very strong wind. You will need to get out of the wind or come back another day.

A moving experience

Many people are surprised by how much movement there is in the ground. Ground movement is a significant force working against tripod sharpness. Consequently, if you put your tripod near vibrating ground you will not get pin-sharp pictures. This vibration can be quite significant. So, here is a possible list of sources of ground vibration…

  • Bridges (very high vibration levels possible).
  • Artificial mounds or features like railway elevations.
  • Near railways while trains are passing, railway stations.
  • Underground stations/railways while trains are passing through tunnels below you.
  • Tall buildings – vibration and movement increases the higher up you are.
  • Tall buildings, bridges etc. in a wind also cause ground vibration/movement around them.
  • Family houses often magnify vibrations – nearby main roads, railways etc. affect tripod sharpness.
  • Wooden floors in houses – almost any movement on the floor will affect the shot.
  • Motorways/freeways – or any busy road, especially if used by commercial traffic.
  • The ground over subways, underground roads or underground traffic.
  • Landing places (airports) – aircraft noise and landings both cause tripod vibration.
  • Road works – especially hammer action tools and diggers.
  • Heavy machinery in nearby factories, heavy road machinery create long distance vibration.

As you see from the list any place where there is loud noise can create ground vibration. It also creates vibration in the air. You may have felt that horrible deep vibration in your chest when a low-flying aircraft passes over-head. Yep, that sort of vibration will affect your tripod sharpness and ultimately your picture.

Beware everything to get tripod sharpness

Don’t assume the tripod will protect you from movement. Consequently, think how it is being used and where. Getting pin sharp pictures is about developing awareness of how to use your tripod properly. However, it is also about where you shoot, the prevailing conditions as well as other equipment and activities nearby.

Comments, additions, amendments or ideas on this article?
Contact Us or leave a comment at the bottom of the page…

Like this article? Don’t miss the next — sign up for tips by email.

Have fun with your camera!

Damon Guy - Netkonnexion

Damon Guy (Netkonnexion)

Damon is a writer-photog and editor of this site. He has run some major websites, a computing department and a digital image library. He started out as a trained teacher and now runs training for digital photographers.
See also: Editors ‘Bio’.

20 Ways to Protect Files on Memory Cards (Part 1)

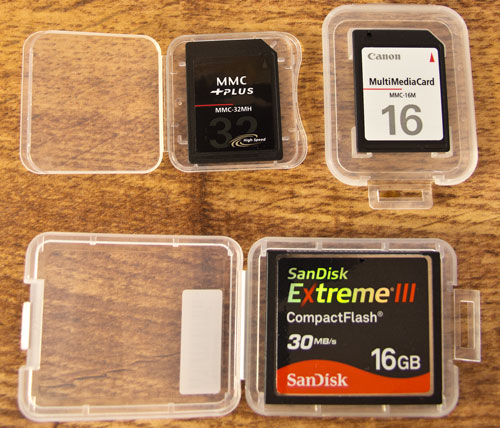
The flash memory card in your camera is not a safe environment for files.

The flash memory card in your camera is not a safe environment for files.

The Danger

Memory cards are NOT safe media. The shocking truth is they are insecure, vulnerable, damageable and corruptible! I have seen a grown man cry after losing a whole day of shots! I am going to go cover ways to prevent losing files.

Problems and Solutions

1. Do not use ‘dirty’ memory cards! Corrupt files, old data, errors and old data can cause problems, errors or corruptions – especially if the card has been in another camera or mobile device.
Solution: Every time you put a card into your camera…
– Check you have already downloaded any files on it.
If it is OK…
– Format the card using the on-camera format system.
Regular formats ensure that the card database is refreshed, errors are corrected and old data is deleted. Only format the card in the camera. Other formats may be different to the camera system. If you do not normally remove the card (recommended) then format it at the start of every shoot.

2. Inserting and removing memory cards can damage them or the camera. Compact flash cards are particularly vulnerable. Tiny wires (40) are pushed into it when inserting the card. Put it in too hard or the wrong way round and you can cause serious damage. Small format cards can be bent on inserting which can literally break the chip. The contacts on all memory cards are vulnerable to grease, dirt and damage. Most cards will exceed over a million read/write cycles. However, they will not survive near that number of inserts/removals – even under perfect conditions.
Solution: Push the card in slowly and gently. Do not force it. Ensure it is in the right way around. Ensure it is the right type for the slot. Don’t touch contacts. Minimise the number of times you handle your card. If you have time download your files from the camera. It’s slower but saves handling the card.

3. If your camera reports an error your files could be overwritten if you carry on shooting.
Solution: Stop shooting immediately. Remove the card and use another to continue shooting. Corrupt files and errors can be recovered with rescue software and there are data services that can recover lost files. Nothing can be done if files are overwritten.

4. Don’t put all your eggs in one basket. One card and a failure will put you out of action.
Solution: Carry at least three cards. If one fails you have one to replace it and still have space on the third. If you were on the second card when it failed you still have the third. Less than three there should never be!

5. High capacity cards = high losses! If your files are precious (wedding shots for example) you are at high risk if you have a large card and put all the files on it.
Solution: It is better to have small batches of files on many disks than lose them all on one disk. If you only have a few files on a disc then others on other discs are safe. Professionals download or change cards frequently.
More after the jump…

6. Do not delete files while on the camera. The deletion process is error-prone. Advice from many sources, including manufacturers, indicates that deleting in the camera can cause corruptions. This may prevent access to the rest of the card, damage many files or prevent file removal. (Note: deleting and formatting are different processes).
Solution: It is better to delete your files once they have been downloaded and onto your computer where you can manage them properly and back them up.

7. Do not fill up the memory card. There is a chance that filling the card will prevent further access to it or may corrupt the software on the card. Card problems often occur on filling a card.
Solution: Finish shooting before filling the card. Download the files safely and then format the card before re-using. Change the card if you do not have a way to download immediately.

8. Do Not remove a full card from the camera. Some corruptions occur when you try to access a full card using a different system to the camera. Do not attempt to delete files to make space as this can also cause corruptions or files to be overwritten.
Solution: Download files from a full card using the camera. This may take longer than usual. If you have to remove the card to carry on shooting, put it back in the camera when downloading later at your computer.

9. Do not individually delete files to clean a card. The on-camera delete leaves file residues. The file remainders can cause problems later.
Solution: The recommended way to ‘clean’ all cards is to format the card in camera. The format process reduces the accesses, deletes all file data and cleans up the database the camera uses to manage files on the card. This will minimise the risk of corruption and errors.

10. Do not turn off your camera immediately after a shot. It can destroy your files. Your battery running out has the same effect. If the camera is deprived of power while processing a shot it may corrupt its record in the database of file information. Worse, it may damage the database, possibly damaging other picture files.
Solution: Wait at least fifteen seconds after your last shot before turning off your camera. Never let the battery get low. Have a spare battery on hand.

By Damon Guy (author and Photokonnexion editor)

Damon Guy - Netkonnexion

Damon Guy (Netkonnexion)

Damon is a writer-photog and editor of this site. He has run some major websites, a computing department and a digital image library. He started out as a trained teacher and now runs training for digital photographers.
See also: Editors ‘Bio’.

Can you write? Of course you can!
Write for Photokonnexion...

We would love to have your articles or tips posted on our site.
Find out more…
Write for Photokonnexion.

Natural Light Portraiture – with reflected fill-in light

Make your natural light portraiture work

Love photography? Then natural light portraiture is something you will try at some time. In the video below we will see a few tips that overcome some of the lighting issues photographers encounter when starting these portraits.

For photographers just starting out, natural light portraiture is often about snapping shots of friends. Actually, portraiture as an art form in its own right. Why? Because the human eye is incredibly well tuned to viewing the human face. Get it wrong and it is blatantly obvious!

Snaps often result in a flat and poorly sculpted face. Bad or flat light leaves the face looking drawn or sick. Worse, it can look as if it is almost featureless. The way to get around this is to use natural soft light. The best light for this is during the golden hour. The low light will mean a big contrast between bright sky light and the side of the body away from the light. The answer is to use a reflector to fill in the darker areas of the face. Reflectors are cheap and available in lots of photography suppliers. You can easily make your own reflector from white art board too.


In this video photographer Karl Taylor shows you how to use natural light and a reflector to take a good natural light portrait. Watch out for his five key points. Enjoy!
Seen on YouTube: GreatPhotographyTips External link - opens new tab/page

Remember these?

  1. Communication
  2. Lens
  3. Aperture
  4. Lighting
  5. Environment

Key points worth remembering.

By Damon Guy (author and Photokonnexion editor)

Damon Guy - Netkonnexion

Damon Guy (Netkonnexion)

Damon is a writer-photog and editor of this site. He has run some major websites, a computing department and a digital image library. He started out as a trained teacher and now runs training for digital photographers.
See also: Editors ‘Bio’.

Making Your Own Photography Equipment

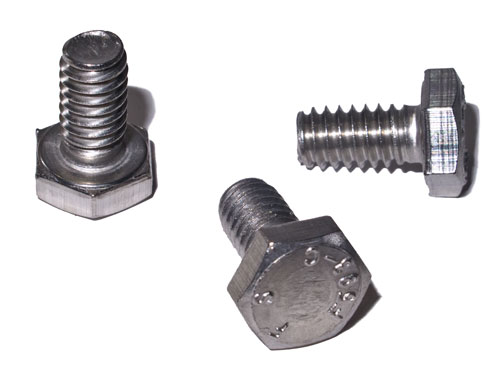
1/4 in by 20 thread bolts are what fits into the bottom of your camera for mounting on a tripod. It also happens to fit many other photography accessories.

1/4 in by 20 thread bolts are what fits into the bottom of your camera for mounting on a tripod. It also happens to fit many other photography accessories.

A DIY Project

Here is a quick and easy photographic DIY project. Pictured above are three bolts which are 1/4in by 20 by 3/8th inch long. These are the size that screw fit into the bottom of your camera, flash units, lights, tripods and so on. This is a standard size. (See: DIY Photography Equipment. I have used these bolts in several DIY photography projects. In this project we are going to drill on hole to create a clamp that will hold a remote flash unit.

Off-camera flash provides a great way to light your projects. It is easy to diffuse the light since the lens is not mounted on the camera. You can use diffusers, reflectors or even bounce flash off the roof or walls. Because the light is not in line with the lens, back reflections are more easily controlled. The highlights do not reflect directly back at the camera. Off-camera flash is fun to use and easy to do. However, you have to find a way to mount it somewhere. This quick clamp idea gives you a flexible and easy method for attaching your flash to all sorts of items. Tables, pipes, chairs, your tripod, all sorts of things can be a mounting. You just clamp it to a firm base and away you go. You can even buy a cheap ball-head mount to go on your clamp so you can set the angle of the flash more accurately.

You will need…
A clamp;
the bolt;
a drill bit (1/4in) of a type suitable for drilling your clamp;
a thin rubber washer;
and an electric drill.

You will also need a cold-shoe mount for your flash. Most off-camera flash units come with their own ‘foot’ or base. Often these have a screw mounting bolt built into the bottom so you can either stand the flash on a table or screw fit it to a tripod or light stand. In our case we are going to use a clamp.

The method is simple. You have to purchase a suitable clamp. Some photographic retailers sell cheap clamps for photographic studios. One of these would be fine. I used a plastic hand squeezed clamp from a DIY store. It cost about £7.00 (about US $15.00) for four clamps.

I took a little time to set the clamp onto a few things so I could work out what is the best place to drill the hole. It is easy to just drill it and find it is at the wrong angle. My tests showed that with my clamp it tends to sit slightly angled down when clamped to a table. So I picked an upper position where the flash would sit upright despite the slight angle.

Next I put the clamp in a vice, you could use other grips. This was just to allow me to drill the hole safely. Then I simply drilled one hole in the clamp handle. Next, the bolt is pushed through the hole. It was a little tight as it was the same diameter as the hole. However I did intend that to enable a grip. Once through I pushed the rubber washer onto the bolt. In my case this was a rubber washer from a tap. You could use a variety of different types of rubber washers. The washer is to take up any slack when the flash foot or cold screw is screwed on. There! Job done.

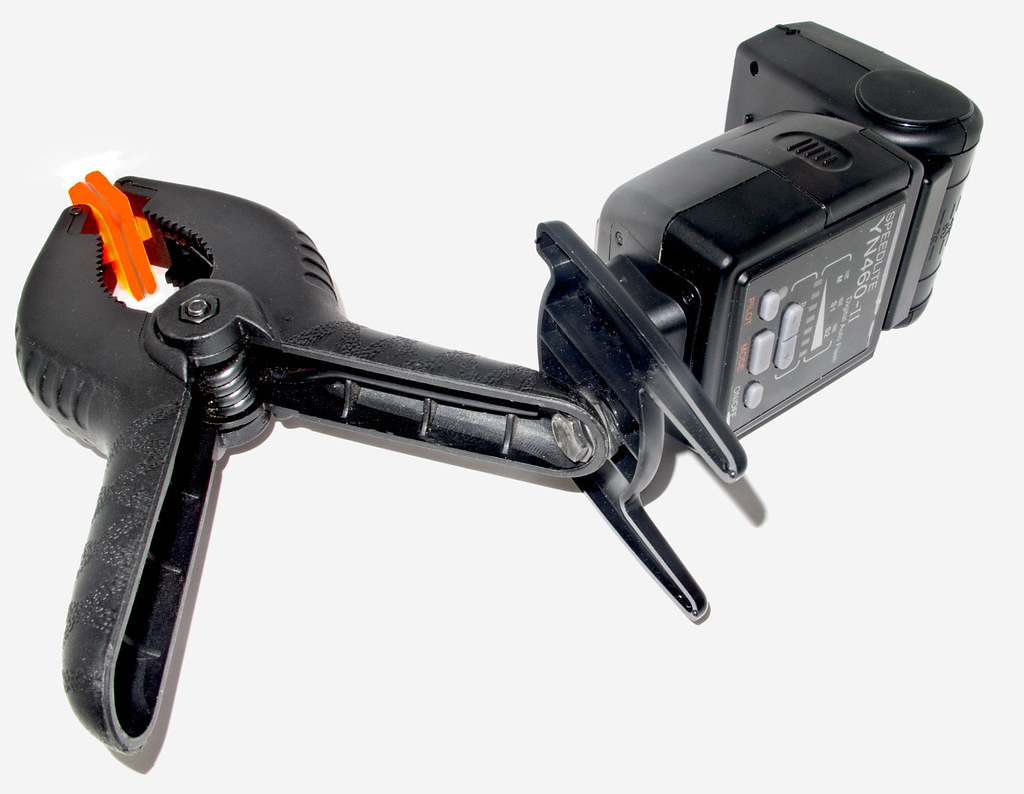
Here is the completed project with the flash mounted on its own foot base.

Off-camera flash mounted on a clamp.

Off-camera flash mounted on a clamp. Notice the bolt through the handle which screws into the 'foot' plate of the flash. Click to see large.

By Damon Guy (author and Photokonnexion editor)

Damon Guy - Netkonnexion

Damon Guy (Netkonnexion)

Damon is a writer-photog and editor of this site. He has run some major websites, a computing department and a digital image library. He started out as a trained teacher and now runs training for digital photographers.
See also: Editors ‘Bio’.

What is a Monopod?

The monopod is an aid to providing stability for your camera during a shot. We provide a full definition of a monopod in our glossary (see: Monopod).

It is a false economy to buy the cheapest available of something. Good quality and great design are not cheap. However, popularity often brings the price down to reasonable levels. Good quality, well designed equipment, becomes affordable. This superb Monopod from Manfrotto, the quality tripod manufacturer, is a great example.

High quality and great design - Manfrotto photographic equipment. A popular monopod.

High quality and great design characterise Manfrotto photographic equipment. Shown here is the Manfrotto MM294A3 294 Aluminium Monopod in 3 Sections

Manfrotto have a wide range of monopods. The Manfrotto MM294A3 294 is a popular popular monopod in Aluminium, built in three sections. It is compact light, durable, and reasonably priced.

The fittings, especially the clamps on the leg joints, are superbly designed. Cheap monopods often suffer from poor or wobbly clamp joints which reduces the monopod stability. Another feature of this model is the aluminium mounting disc. Cheap monopods often have plastic platforms. This does not perform well, especially with bigger compacts and DSLRs. This model also features both the 1/4in and the 3/8in standard tripod screw sizes – most monopods only feature the 1/4in size.

A suitable head for this monopod is the Manfrotto 234RC monopod tilt-head (Quick Release) External link - opens new tab/page. It’s a simple tilt head which allows a camera to be turned through 90 degrees for either vertical or horizontal format shots. It features a quick release head for immediate release of your camera for hand-held shots.

By Damon Guy (author and Photokonnexion editor)

Damon Guy - Netkonnexion

Damon Guy (Netkonnexion)

Damon is a writer-photog and editor of this site. He has run some major websites, a computing department and a digital image library. He started out as a trained teacher and now runs training for digital photographers.
See also: Editors ‘Bio’.

Can you write? Of course you can!
Write for Photokonnexion...

We would love to have your articles or tips posted on our site.
Find out more…
Write for Photokonnexion.