Category Archives: Tips Tutorials & Techniques

A teaching or tips and tricks article.

Three creative jump start ideas

Post by Ann H. LeFevre

A creative jump start – get going again.

It happens to all of us at least once. Our creativity runs down and we feel uninspired. Those are the times when our cameras feel like they weigh a thousand pounds and our brains seem like they are stuffed with cotton. There are many ways to combat such a slump. What you need is a creative jump start. Here are three suggestions to help you the next time you come up against that photographic brick wall.

The 30 second game

Pick a room in your home at random to try the first creative jump start. With camera in hand, walk into the room. Select a subject (perhaps the first thing you see) and start shooting. Don’t “think” about it; just do it. Make it quick and no longer than 30 seconds. The idea here is to be loose.
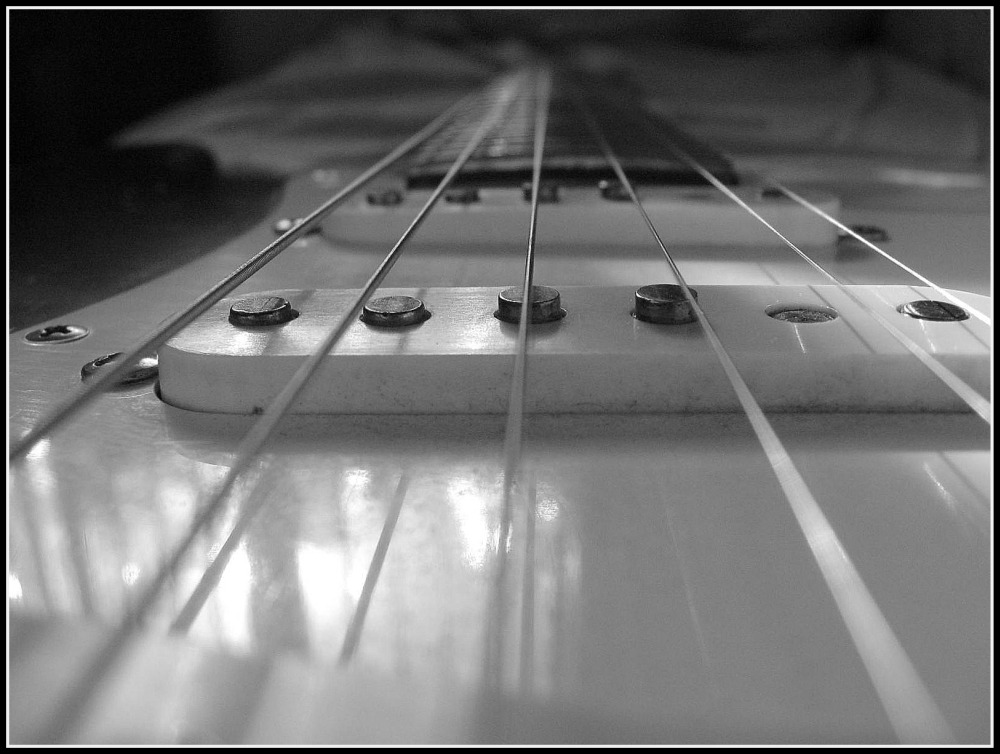
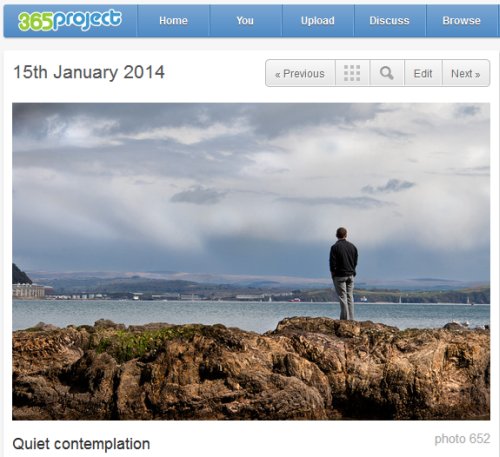
The Strat • By Ann H. LeFevre • Three creative jump start ideas

• The Strat •
By Ann H. LeFevre (Click to view large)


Creativity can be blocked by over-thinking about the “next shot”. This little game helps to bring back some spontaneity into your picture taking.

Take Another Look

We get used to seeing things the way we always see things. In this exercise the object is to take something common, perhaps something you see all the time. Then, to look at it from a different perspective.
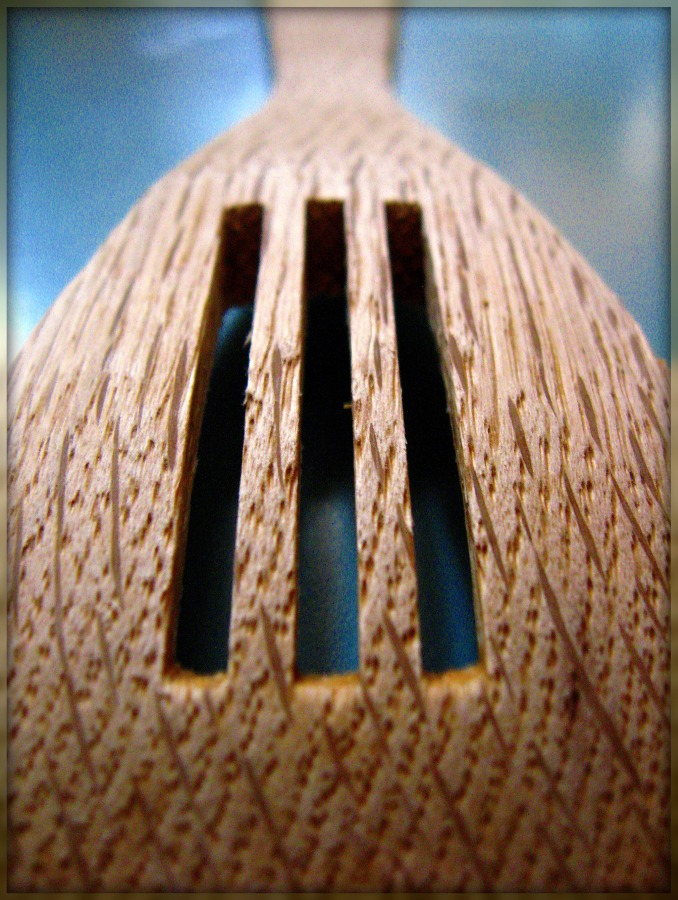
• Wooden Spoon • <br />By Ann H. LeFevre • Three creative jump start ideas

• Wooden Spoon •
By Ann H. LeFevre (Click to view large)


Look at your chosen object from all different angles. Take a shot from each one. Look up. Look down. Look close. Look all around, taking pictures as you go. Looking at a common object from a new vantage point can loosen up the creativity block. A creative jump start works best with a simple views of things.

Play with Processing

Take one of those “Why did I even take this picture?” photos. Make a copy of the original. Put it into your photo processing program and play around with some special effects. Go all out and experiment. Don’t worry about whether or not you’ll actually keep the picture when you’ve finished. Simply spend time playing around on it for as long as you want. Let your processing ideas flow.
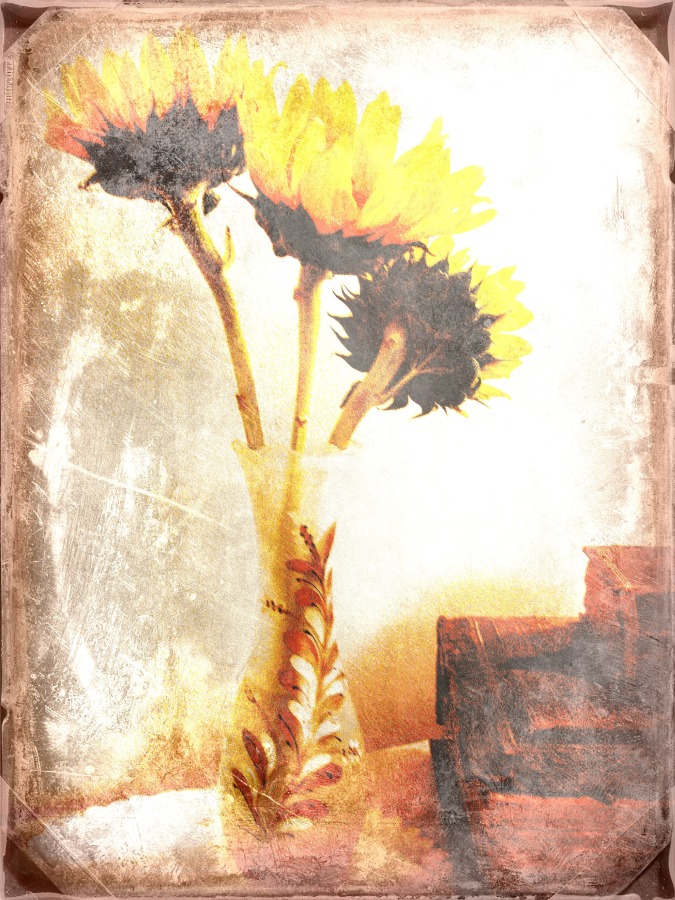
• Sunflowers •<br />By Ann H. LeFevre •  Three creative jump start ideas

• Sunflowers •
By Ann H. LeFevre (Click to view large)


Laugh at what you create. Laughter loosens up your creativity. And who knows? One of those crazy effects may trigger an idea! Processing can also transform an ordinary picture into something that is visually pleasing. Playing with the way a photo looks is a great way to charge up your creativity.

Beyond routine and distraction

Shooting slumps occur because we become anchored to routine or distracted by our busy lives. A creative jump start serves to break those habits and change our perspective. Try one out the next time you’re in a rut and see what happens!

Ann H. LeFevre – contributing author

Ann holds a B.A. in Fine Arts from Bethany College. She is a member of the Pocono Photo Club Pocono Photo Club | External link - opens new tab/page, and participates in the 365 Project Ann H. LeFevre - contributing author on 365Project.org | External link - opens new tab/page an on-line photographic community. She has enjoyed the artistic aspects of photography for many years and enjoys exploring a variety of photographic subjects in her work.

Top ^

Comments, additions, amendments or ideas on this article? Contact Us
or why not leave a comment at the bottom of the page…

Like this article? Don’t miss the next — sign up for tips by email.

Can you write? Of course you can!
Write for Photokonnexion...

We would love to have your articles or tips posted on our site.
Find out more…
Write for Photokonnexion.

Ten ways to develop confidence in your photography

To develop confidence in photography you’ve got to be doing it.

There is a difference between a photographer and an occasional snapper. It is about attitude. Determined to improve your skills? Actively seeking new knowledge? Practising the things you are learning? An answer of ‘yes’ to these questions confirm you a photographer. Once you start learning photography you will go on doing so for life. It’s in the spirit of photography to keep learning and experimenting. Here are ten ideas to help you Develop confidence.

1. Keep it simple

• Party person • <br /> Take a simple approach to your photography.

• Party person •
Take a simple approach to your photography.
Example: In portraiture, working for simplicity helps you see the person and concentrate on the technique. Cut out unnecessary distractions.

Leonardo da Vinci was a Renaissance painter, inventor and genius. He made many insightful observations. One of the things he said was, “Simplicity is the ultimate sophistication”. This insight suggests that we should show only what is needed to make the point.

Do not allow anything to creep into your picture that is not absolutely necessary. Your viewer wants to see the main subject. Don’t spoil that view by including other things that are not relevant. They will distract the viewer. Make sure what you are photographing is simple.

This makes your job easier too. Don’t think big – think simple. Simple photographs are easier to do. Get in close to your subject. Make sure what you photograph is bold. Show the subject. Remove or reduce any other distraction or things of secondary or no interest. Taking the simple approach makes the photography easier and will develop confidence.

2. Shoot every day

There is no better way to develop confidence. If you always carry a camera you will always have an excuse to use it! So get out and take the shots.

Just shooting is not good enough. If you want to build your confidence you will need to be doing two things when shooting every day…

  1. Ensure you can see an improvement from day to day. Challenge yourself a little each time you shoot. Try hard to move on from where you were.
  2. Make sure you do things that will help that improvement happen (read an article, discuss a technique, try an experiment etc).
3. Repetition is a great way to develop confidence

Having a go at something new just once is rarely good enough. When you try out a new technique, learn it before moving on. To learn it well do it a lot – repeat it in different situations. Experiment and play. Focus on its good points. Identify its bad points. Each time you use this technique make sure you challenge yourself a little more. Your confidence will develop as you see you can do it in almost any situation.

4. Learn about light

There is a time honoured truism about photographers in general. It is…
Amateurs worry about equipment. Professionals worry about time. Masters worry about light.

It is not altogether clear why amateurs suffer from equipment lust but they do. Actually, an effective strategy for improvement would be to spend most of your time learning about light. It will shorten your journey to competence. Light is the centre of the art of photography. Learning about light will teach you to see great photos and help you to understand more about your equipment. Studying light will develop confidence because you will learn about the most important thing in photography.

5. Creativity (This point By Ann LeFevre)

Don’t look at limitations as obstacles. Use them to encourage your creativity. Every photographer has a good set of eyes. They also have the creativity to photograph what he/she sees with the camera in their hand.

Explore and discover the strengths of the camera you own. Develop your artistry with what you can accomplish with it. You do not need an endless supply of cash to feed your photographic appetite or a lust for equipment.

The best camera in the world is the one you have got. Make the best of that. Enjoy the creative outcome. As you get creative you will develop confidence.

6. Read up on photography

There are some wonderful resources on the Internet. This website is a great start. There are literally billions of photos to look at and take lessons from across the Internet. There are also some great video resources available. Offline there are some absolutely wonderful books to read too.

There is nothing better to develop confidence than learning more. For the new photographer it can all be a little daunting, despite all the resources online. At Photokonnexion we try to make it simple to learn about making great images. However, sometimes your learning style might lead you to a short course or to work with a book. Which ever learning style you choose, keep working on improvement. The work you do to learn more will help you become more confident.


Scott Kelby :: Digital Photography Boxed Set. Parts 1, 2, 3, and 4, Updated Ed. Amazon.com :: Scott Kelby :: Digital Photography Boxed Set | External link - opens new tab/pageThere are more than 800 professional photographic “tricks of the trade” in this set. These four volumes make up Scott Kelby’s best-selling series. It is an excellent resource for any one who wants to improve their photography and make sharp, colourful and professional photos.


7. Find photo-friends – develop confidence together

If you can get excited about photography with someone else it really helps you be more enthusiastic. Join a club, chat with a friend online about your pictures, do what it takes. But try to share. You and your friend will gain a great deal. You will both learn off each other. You will develop confidence through shared friendly feedback. Try things out together. You will have encouragement from each other. Go on then, phone your friend now!

365Project - A friendly project to develop confidence in your photography

365Project  Amazon.com :: Scott Kelby :: Digital Photography Boxed Set | External link - opens new tab/page
A friendly site where people help each other to develop confidence and improve their photography.

8. Join a supportive online community

The Internet is full of great sites to display your photography. And, there are lots of people there who will help you. They love to get feedback for their own pictures. So they will be prepared to give yours a good look over too. I have a been a member of 365Project  Develop confidence on 365Project.org | External link - opens new tab/page for a number of years. What a great site. I have made a lot of friends over there. There is lots to do. Some fun games and lots of ideas and sharing. People swap techniques and help each other. Some groups meet up regularly too. If you need to develop confidence and take a shot every day then that is the place. Give it a go. Great fun!

9. Dump the naysayers

Don’t waste time on people who speak negatively. Nothing can destroy confidence quicker than negative comments. Sometimes the most effective thing you can say is nothing! Ignore them and they will probably go away. Victory is yours! It is always better to surround yourself with positive people, and have positive attitudes and thoughts. This will help you develop confidence. It’ll help your skills to bloom, and your photographic eye begin seeing anew.

10. Celebrate the victories

Nothing better than a good celebration. When you get something right take a little time to show your family and friends. Enjoy it and make sure you keep it safe. It is one of the milestones mapping your progress to being a better photographer. Have fun!

Comments, additions, amendments or ideas on this article? Contact Us
or why not leave a comment at the bottom of the page…

Like this article? Don’t miss the next — sign up for tips by email.

Damon Guy - Netkonnexion

Damon Guy (Netkonnexion)

Damon is a writer-photographer and editor of this site. He has run some major websites, a computing department and a digital image library. He started out as a trained teacher and now runs training for digital photogs.
See also: Editors ‘Bio’.
By Damon Guy see his profile on Google+.

Picture titles prompt your viewer

Picture titles - Quiet contemplation

• Quiet contemplation •

It’s all about communication.

It’s a great feeling when your point is understood. This is true with pictures too. When we show people our picture we want them to understand what it is about.

Sadly, pictures are often shown out of context. Then the meaning can be misinterpreted. For example, social networks and art sites show pictures. When posted with lots of other pictures the viewer sometimes needs some idea of the picture’s meaning. That is where picture titles come into their own.

Picture titles give context

A pro-photog tries to make sure their images have a point. They work to make their point from the moment they approach a scene. The final image is the result of a composition that pulls the essential elements together. It crystallises the point for the viewer.

In completing the composition the photog has a clear idea of what he wanted to achieve. It is that ‘idea’ that can be used to make picture titles. For the viewer it is the idea they need to explain the point of a picture when it is out of context on a gallery wall or where-ever.

How do you use picture titles?

The most important thing about a picture tile is brevity. To be effective you need to say it all in a few words. If the viewer has to read a long text about the point of a picture the meaning will be lost. A picture is worth a thousand words. It should express the point. The title is a sign post, a clue.

Your title will achieve two things. It will express the point of the picture. It will also give the viewer an insight into how your thinking went while making the image.

Think carefully. Leave out your brief clue to the meaning of the picture and you may leave the viewer clueless. I am sure you would not want them to miss the point of your lovely picture. Would you?

Comments, additions, amendments or ideas on this article? Contact Us
or why not leave a comment at the bottom of the page…

Like this article? Don’t miss the next — sign up for tips by email.

Damon Guy - Netkonnexion

Damon Guy (Netkonnexion)

Damon is a writer-photographer and editor of this site. He has run some major websites, a computing department and a digital image library. He started out as a trained teacher and now runs training for digital photogs.
See also: Editors ‘Bio’.
By Damon Guy see his profile on Google+.

Snowflakes – a source of mystery and wonder

Snowflakes are intricate and beautiful.

• Snowflake crystal •
Snowflakes are intricate and beautiful. They are a source of interest to scientist – but photographers can make amazing pictures with them.
Image taken from SnowCrystals.com External link - opens new tab/page

Snowflakes are amazing!

Close up pictures of snowflakes show how intricate and beautiful they can be. And there are an infinite variety of them too. Here are a few ideas…

Some history about snowflakes

The perfect six-sided snowflake exists, but is not the only sort. Early snowflake pictures were taken by farmers’ son, Wilson “snowflake” Bentley  External link - opens new tab/page (February 9, 1865 – December 23, 1931) from Vermont. Aged 15 he was captivated by snowflakes. It started with looking down a microscope. But in 1885 he began experiments with a camera too. After struggling with the early camera technology he began to make some progress. During his life he made thousands of photos of snowflakes. His work still dominate our ideas today. In particular he was the first to claim snowflakes are unique and six sided. His pictures are also some of the best too.

Snowflake photographs by Wilson "snowflake" Bentley

• Snowflake Photographs by Wilson “Snowflake” Bentley •
Wilson “Snowflake” Bentley was famous for his snowflake photographs. Nearly a century after his death we are still using the images.

Research has shown how diverse snowflakes can be. They are not all perfect, regular shapes either. In fact according to “New Scientist  External link - opens new tab/page” (a weekly publication, UK) there are many types. The various forms are created under different conditions…

  • -2°C = Simple hexagons and star shapes
  • -5°C to -10°C columns
  • -15°C Six sided crystals (dendrites) form again
  • -22°C onward… complex plates and columns form again

Here is detailed morphology diagram for snowflakes Morphology Diagram for snowflakes - External link - opens new tab/page. It shows the relationship between the snowflakes’ type and temperature/humidity.

Snowflakes go through a range of temperature, humidity and other changes while falling. They have a unique and sometimes violent history. They clash together. They may ball-up with other flakes. It’s common for them to have multiple crystals joined in one flake. They may circulate in the clouds for long periods. They may also melt and refreeze before descending to the ground. It is not a surprise they are all so different. There is a great infographic on SnowCrystals.com External link - opens new tab/page showing snow crystal growth and the no-two-alike idea.

Capturing snowflakes on camera

You can’t easily photograph snowflakes on the ground. The overall white in a snow mass makes it difficult to distinguish individual flakes. The small size makes them a challenge too. The best approach to snowflakes is two-fold.

  • Use a macro lens or macro extension tubes.
  • Use a clean (new) long hair artists paint brush. Sable hair is best. Use a small black velvet cloth (about 500mm x 500mm) to see the snowflakes.

The aim with these is simple. Tease out individual snowflakes onto a black background. Then get in close with the lens. If you are working with a macro lens help yourself out and use a tripod.

The snowflakes themselves are easily destroyed. The trick is to use the artists brush to lift snowflakes onto the velvet. The brush and velvet have hairs that support the snowflake without damage. Be as gentle as you can to preserve its delicate nature of the crystal.

Sadly tiny ice crystals tend to go grey when on a black background surface. When shot on a dark background they are best converted to monochrome. This helps to increase the contrast and definition of the crystal.

To show the beauty of the refracted light use a well-lit background. If you can, place the snowflake onto a glass slide delicately lifting it off the velvet. You can buy Blank Slides – Microscope accessories External link - opens new tab/pageBuy microscope slides for your snowflake photos. from various places. Make sure you have left the slides to cool down to the snow temperature or the snow will melt on it.

Be sure to keep your cloth, brush and slides cold and dry. Make sure your breath is not directed at the snowflake. Even slightly raised temperature or humidity will affect the snowflake while you are trying to photograph it. More than once I have had them dissolve in front of my eyes.

If you are using an actual microscope, or if you are using a glass slide try to get some backlighting. To get the best refractive results try light at different angles on the snowflake. The best results are not necessarily when the light is directly from below. The angled light tends to create contrasts on the snowflakes. This brings out light and dark as well as some aesthetic colourations from refraction through the crystal.

For your interest here is an amazing camera-microscope…

Celestron Dual Purpose Amoeba Digital Microscope – Blue External link - opens new tab/page
This an affordable and well reviewed digital microscope. It will do detailed images direct from your computer. It’s a photography tool which provides an opportunity to develop your macro skills. Hours of fun too!

Masterful shots

One of the acknowledged masters of the art of shooting snowflakes is Kenneth G. Libbrecht External link - opens new tab/page. He’s a professor of physics who researches crystal growth. He also runs the SnowCrystals.com External link - opens new tab/page website. There are wonderful resources on the site including a “how to guide” External link - opens new tab/page and many hints about photography and equipment. There are some wonderful galleries of images External link - opens new tab/page. There is also a section on how to grow your own snowflakes. Although, the latter was a bit more complex than I think I would go… but who knows. People in this field seem to get obsessive about it. Snowflakes are extraordinarily beautiful.

Other sources of snowflake inspiration…

For a huge range of inspiring snowflakes images check out this search page on Google: Snowflakes photography  External link - opens new tab/page

Comments, additions, amendments or ideas on this article? Contact Us
or why not leave a comment at the bottom of the page…

Like this article? Don’t miss the next — sign up for tips by email.

Damon Guy - Netkonnexion

Damon Guy (Netkonnexion)

Damon is a writer-photographer and editor of this site. He has run some major websites, a computing department and a digital image library. He started out as a trained teacher and now runs training for digital photogs.
See also: Editors ‘Bio’.
By Damon Guy see his profile on Google+.

Camera grip – hold your camera correctly

Improving your camera grip.

Improving your camera grip is an important part of developing your skills.
[Image taken from the Joe McNally video below].

Your camera grip is a critical skill.

Do it wrong and you’ll have problems getting a sharp image in many situations. You may even give yourself bad posture and back pain. Learning to have a good camera grip will help develop your skills in many ways.

Camera grip and overall stance

The way you grip your camera works as part of your overall stance. You can get the grip perfect, but with a poor stance it will ruin the impact of a good camera grip. In Simple tips for a good photography stance I set out a detailed plan for a good stance. It will be worth reading that before you see the videos below.

Joe McNally – Da Grip

In this video Joe shows us how to properly hold the camera. He apologises for how this best suits a left-eyed shooter. However, the technique can apply to both left and right eye shots. So don’t be put off. Watch to the end. Joe makes many of the points I do in Simple tips for a good photography stance and this article. He shows you how to properly grip your camera. He also demonstrates how to control it from this grip too.

JoeMcNallyPhoto External link - opens new tab/page.

Sharpness and camera grip are close friends

When teaching I have often found that poor stance and grip go together. They result in soft shots and poor quality images. I try to help people to be more deliberate and use relaxed but firm control. Then, if they hold a good stance and a good grip the sharpness and image framing seem to come together.

In the next short video Gavin Hoey goes through his method for a camera grip. It is very similar to Joes grip and my camera grip too. Everyone has quirks and slightly different ways to do it. The important thing is to follow the basic plan and practice until your shots are sharp and controlled. Then you will see the benefit of good stance and camera grip.

Gavin spends time on some other aspects of sharpness too. This nicely shows how all these methods come together. Great stance, camera grip and control of your camera will develop your skills in leaps and bounds. For more on improving your sharpness check out this article :: The Zen of sharpness – 12 easy ways to improve.

No more blurred photo’s… Ever!

Gavin Hoey External link - opens new tab/page.

Comments, additions, amendments or ideas on this article? Contact Us
or why not leave a comment at the bottom of the page…

Like this article? Don’t miss the next — sign up for tips by email.

Damon Guy - Netkonnexion

Damon Guy (Netkonnexion)

Damon is a writer-photographer and editor of this site. He has run some major websites, a computing department and a digital image library. He started out as a trained teacher and now runs training for digital photogs.
See also: Editors ‘Bio’.
By Damon Guy see his profile on Google+.

Getting down to pixel level

Getting down to the pixel level in your pictures.

Getting your image sharp is more about your photography technique than where the pixel level is in the image.
Click image to view large.

Viewable images need sharpness.

Viewing an image on your computer is easy. Just open it up. Actually, that is not the full image in most cases. It’s a tiny version of it. A control on your image viewer will allow you to view it at 100%. It is at that resolution that you will know what the sharpness is really like.

What you see normally

When viewing a full image on a screen you normally see the picture reduced. Most people have the image viewer set to show the full picture. To fit it on the screen the computer does a throw-away exercise. It looks at the image file data. It finds as much detail as it can to discard but still leave a picture you would recognise. To do that it will lose some of the picture detail. But to compensate the image is sharpened up. That means the computer will emphasis any lines and edges it finds. This helps you to see detail and make up the rest.

We are very good at that – making up the rest. After all, every image we see is in two dimensions. But we still perceive it in three dimensions – because we make it up. So it is with the lost detail. We still see the image as pretty complete and can imagine it. The picture above was taken on a 21 mega pixel camera. The original picture is 5616 x 3744 pixels = 21,026304. So as you see it, at 800 × 488 pixels (scaled to 473px × 288px) it is pretty sharp. You can see it at 1000px wide if you click the image to get a larger version.

Most cameras take at least 8 mega-pixel images

What eight mega pixels means is that the sensor has approximately eight million photosites (sometimes pixelsites) on the digital image sensor. A pixel site is one individual sensor point. It senses the light. Each pixel site translates into an individual pixel in your image. You can see how to calculate the different mega-pixels on this page  Camera mega-pixel calculator - External link - opens new tab/page.

See the pixels as they are – get sharpness

A picture at one hundred percent of its size is at its proper resolution. It is the picture that the digital sensor was able to capture. If you view the picture at this resolution your image should be sharp. If it is not then your photography technique needs some work. Sharpness at the 100% size of an image is the tale-tell. It tells you if you are really getting a sharp result. Any smaller resolution and the sharpness is created by the computer, not your technique.

Seen at 100% resolution each pixel will fall into the visual position that you expect and the image will appear sharp. If on the other hand you are viewing the image at 100% and it is not sharp you will see lines and edges that are blurred. They will appear ‘soft’ – as if the lines and edges are not really as thin as they are when you see them in real life. The image below is a section of the image from the top of the page. It is shown at its 100% resolution. Of course it is cropped to fit the space. So you are not seeing the full picture. However, you should be able to see the detail.

The image from above at 100% resolution. (Pixels are not visible as individual points)

A section of the Christmas tree from above showing the sharpness when viewing at 100% resolution. The detail is clear and recognisable.

When you blow them up pixels are messy

If you open an image up at more than one hundred percent you are asking the computer to lie to you. An image file can only reproduce an image at the resolution it was taken at. If you ask it to blow up the image further it will try to do it. What you actually see will be a best guess. Your computer will try to show the current pixels replicated outwards. Each pixel will be surrounded by replicas of itself. This will make your picture look blurry. If you continue to blow it up you will get a pixelated version of the picture. Squarish artefacts and lines appear. The picture will look increasingly blocky as it gets more blown up.

A blown up section (500% resolution). Look carefully you can see individual pixel points. The quality is poor.

This image is blown up to 500% of the proper resolution. It is still taken from the image at the top of the page. You can see individual pixel points and the quality is lost

What is the point?

The point, that is what a pixel is. When blown up large enough it shows as a single point on the picture. It comes from one point on the image sensor – a pixel site. At normal resolution a pixel is too small for the eye to see individually. Mixed with all the other points it helps create a picture. The eye views all the different pixel positions as a mass. Not individually. Together they form an image. But that image is the result of your minds eye assembling them to resemble reality. That is what you see. It is an imagined facsimile of reality run together from a mass of dots.

When you next see an image you have made, stop. Change it to 100 percent view size. See if it is sharp. If it is not, work on your photography technique (see: The Zen of sharpness). If it is sharp, then bless your imagination because you have created a wonderful thing in your head. You have created a real image.

Comments, additions, amendments or ideas on this article? Contact Us
or why not leave a comment at the bottom of the page…

Like this article? Don’t miss the next — sign up for tips by email.

Damon Guy - Netkonnexion

Damon Guy (Netkonnexion)

Damon is a writer-photographer and editor of this site. He has run some major websites, a computing department and a digital image library. He started out as a trained teacher and now runs training for digital photogs.
See also: Editors ‘Bio’.
By Damon Guy see his profile on Google+.

Get some new ideas for your photography – a quick tip!

Get some new ideas for developing your photography

Here is a great book External link - opens new tab/page you can learn some new ideas about photography without paying…

New ideas to develop your photography…

Here is an interesting and easy way to find some new ideas. At the same time you can do some reading at no cost. A great way to grow your knowledge and find out more about photography.

How to get new ideas

I am sure you know Amazon, that great book-shop on the web. It is not all about book sales (and more). It is also a source of actual reading too. There are ways to use the website for new ideas and information. More to the point it’s free.

Let’s take an example to see how you can get these new ideas. The Collins Complete Photography Course External link - opens new tab/page is an excellent book. Well produced and researched. It’s a top seller and well reviewed. When you go to the Amazon page for it the book also has a readable section. That’s right. While on Amazon you can read several chapters. If the book has a “click to read” tag, like the picture above, you can read some of the text. The chapters you can read in this book are…

  • The story of photography
  • Camera types
  • Getting to grips with your DSLR camera
  • About various exposure modes

…and at the back of the book you can read a great little glossary of terms used in the book.

OK, so maybe you are not going to learn the whole of photography with this method. But, it is one way to pick up some new ideas and information. Other books are of interest too. This extends to books about art and composition ideas as well as other information. You could find yourself in a world of new ideas, facts and know-how.

One more new idea

If you are looking for projects or new ideas for a photograph try this. Go to the index at the back, or sometimes the contents at the front. Both of these areas of a book are packed with concepts. If you are in a book about art or composition in photography, these can start you thinking. Inspiration is all about the idea right? Use this resource just to get the new ideas flowing. Then follow your thoughts…

Comments, additions, amendments or ideas on this article? Contact Us
or why not leave a comment at the bottom of the page…

Like this article? Don’t miss the next — sign up for tips by email.

Damon Guy - Netkonnexion

Damon Guy (Netkonnexion)

Damon is a writer-photographer and editor of this site. He has run some major websites, a computing department and a digital image library. He started out as a trained teacher and now runs training for digital photogs.
See also: Editors ‘Bio’.
By Damon Guy see his profile on Google+.