Tag Archives: Film

Ansel Adams – Master Photographer

Ansel Adams Video

• Ansel Adams BBC Master Photographers (1983 •
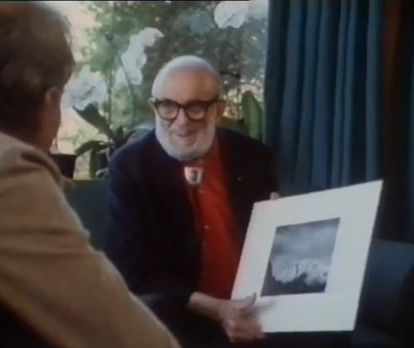
Ansel Adams speaks about his photography and his development.
Picture taken from the video.

Exquisite insights to a legend.

The videos I show are usually for you to quickly watch and learn. This one’s different. It’s longer (34 mins.). And, there is so much in it that you will want to watch it over and over again. The wonderful insights run deep and some show us how much photography has changed.

Ansel Adams’ ideas, photographic insights and depth of feeling is magnetic. He was probably one of the first philosophers of photography. He was one of the undoubted masters too. I hope you enjoy this video as much as I did.

Ansel Adams – “BBC Master Photographers” (1983)

Uploaded by: Rob Hooley External link - opens new tab/page

Can you write? Of course you can!
Write for Photokonnexion...

We would love to have your articles or tips posted on our site.
Find out more…
Write for Photokonnexion.

By Damon Guy (author and Photokonnexion editor)

Damon Guy - Netkonnexion

Damon Guy (Netkonnexion)

Damon is a writer-photog and editor of this site. He has run some major websites, a computing department and a digital image library. He started out as a trained teacher and now runs training for digital photographers.
See also: Editors ‘Bio’.

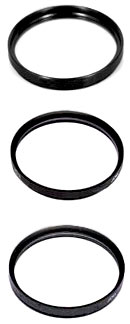
Skylight and UV filters

UV and skylight filters

• UV and skylight filters •
There is a debate about how useful they are…

What are UV and Skylight filters?

The keen starter in photography wants to protect their investment… Filters protect your lens – right? Or, is it that they stop damage from the sun? I want to clear up some myths and explain some half truths in this article. You may also save some money.

What are these filters for

Skylight and UV (UltraViolet) filters have a single purpose… to reduce ultraviolet light reaching film. The only difference between them is that skylight filters have a slight pink colour. Both filters prevent the slight tendency of some chemical films to acquire a slightly blue colour cast under some light conditions. (Yes, we are talking about film).

That was simple, wasn’t it?

Now the myths cleared up

UV and skylight filters have a number of myths surrounding them.

They prevent sunlight damaging my digital image sensor.
• No, they don’t. Sensors are UV insensitive or have built in filters (for both infra red and ultraviolet). UV (and IR) light has no effect on them.

They prevent the blue colour cast on sunny days.
• Not true. It is about 25 years since ultraviolet sensitive film was on sale. Even then, the film brands that were sensitive tended to only be sensitive in relatively few conditions; eg. when it was sunny at high elevations or beside the sea.

They provide more clarity in bright sunlight or at high elevations (over say, five thousand feet).
• Once upon a time… some colour film brands used a chemical that was sensitive to UV light. Around 30 years ago an ultraviolet inhibitor was developed that reduced the sensitivity of the film. Problem solved. The slight lack of clarity caused by the sensitivity went away.

They prevent lighter greys being over-bright when in black and white mode.
• Silver-based chemical black and white films were affected by UV. This is not a problem in digital cameras.

The skylight filter has slight pinkness that warms the picture up.
• No it doesn’t – pink is not a warming filter colour. Pink reduces blues in the image. Anyway, if you use auto-white balance any colour effect will be wiped out. If you use RAW there is no need for a filter as you can adjust in developing.

Actually these filters have problems

It turns out that UV and skylight filters can cause a few problems. Poor quality filters; inappropriate filter materials and lack of special coatings all take their toll…

Image effects…
Affects are created by using these filters. In particular over-exposure haze, flare and ghosting are created. The haze results from light bouncing between filter, lens elements and the sensor inside the body of the lens/camera. This creates a slight haze of over-exposure in very bright conditions. Flare, and therefore reduced contrast in the image, is sometimes caused by a beam of bright light being scattered by the filter. More expensive filters reduce this by having chemical coatings on (lens glass has coatings too). Ghosting is where spots of light appear in the image that were not in the scene. They originate from back reflection off the sensor onto the other lens elements or the filter. Usually this happens in low light situations stimulated by bright lights like car headlights.

Adding another glass (or resin/plastic) element…
Additional elements degrade the image. Cheaper filters can cause chromatic aerations, creating colour banding in an image. There may be additional light scattering. Some filters significantly reduce the light getting through (maybe as much as 1/3rd of a stop of light) leading to underexposure. Optical aberrations may be caused by poor alignment of the filter element (not flat/parallel) in its place. This causes loss of definition, particularly in some places where sharpness would be expected.

Are there any reasons to buy them?

Yes, but not many.

Protection:
UV and skylight filters do provide protection, creating a barrier against mechanical damage to your lens. The front elements glass or coatings on the surface are protected from dust, dirt, splashes and possible scratches or breakage from a bump, scrape or blow.
• Alternatively, consider a proper lens hood. They prevent angular light beams straying into the lens which can improve the image. They also greatly reduce the probability of damage to the lens too. Lens hoods are cheaper than filters, and don’t cause optical problems.

Supporting your dealer:
Filters are expensive to buy, but are profitable to sell. In these hard economic times you will be providing a rich return for your dealer and helping him survive a tough market.

A mistake to clear up

Somebody told me recently, “I always have this polarising filter on the front of my lens”. Wow! (It was actually a skylight filter when I looked). Polarising filters are great for reducing some reflections from some surfaces and may darken skies in some light conditions. Some people mix them up with UV and skylight filters. Just let me say for now, don’t keep a polarising filter on your camera.

By Damon Guy (author and Photokonnexion editor)

Damon Guy - Netkonnexion

Damon Guy (Netkonnexion)

Damon is a writer-photog and editor of this site. He has run some major websites, a computing department and a digital image library. He started out as a trained teacher and now runs training for digital photographers.
See also: Editors ‘Bio’.
How good is your exposure?

There is no such thing as the perfect exposure.

The manufacturers might have you believe there is a perfect exposure for every shot. They invest a lot in their cameras and the programming. What should you look for when trying to produce a great shot? Is it about relying on camera auto-settings or is there something else?

The three pillars of exposure

You are probably aware of the three main controls for exposure

  1. ISO – Controls how sensitive your camera image sensor is to light.
  2. Shutter speed – Controls how long your sensor is exposed to light.
  3. Aperture – controls how much light is allowed to reach the sensor.

These essential elements in exposure are inter-related. Each has an impact on the others. They relate to each other in two ways. As each varies it has an impact on the amount of light which reaches the sensor. And, as each varies, they have a special impact on the quality of the photograph…

  1. Low ISO gives a high quality result. High ISO introduces digital noise.
  2. Shutter speed – movement blur introduced at long exposure; movement frozen at short shutter speeds.
  3. Aperture – Wide aperture, shallow depth of field; small aperture gives a deep depth of field.
Control

Controlling these elements to get a final exposure is essential. Highest ISO, widest aperture and a long shutter speed all together is likely to allow too much light into the camera in daylight. The shot will be over-exposed. The opposite is also true. A low ISO, tiny aperture and very fast shutter speed will allow very little light to enter the camera; result underexposure.

Exposure is about a balance. We must work at getting the three pillars to create the right light for the scene we envision. This is the key – creating the right light in the camera to make the scene come out the way we want. Yes, make the scene come out as we want. A photographer makes the picture that they want by controlling the exposure. A snapper captures the scene they see by relying on the camera to make the exposure for them. The difference between the photographer and the snapper is learning to control the camera.

Genius at work

By way of example I want to show you a short documentary video. Stanley Kubric made a period film, released in 1975, called Barry Lyndon. “Lyndon” was set in the 1750’s. It was a ground breaking work.

Kubric envisioned a cinematic experience which was as close to the way the eye would see life by the light of the time. He procured special lenses for his cameras and had them modified to work together. These lenses were F/0.7 Zeiss lenses made for NASA. They allowed the aperture to be open very wide – much wider than most modern lenses will go. As a result Kubric was able to use these fast lenses to film entire scenes only by candle light. This created an atmosphere which paralleled indoor light in the 1750’s. The costumes and set pieces were also of high quality. The overall effect is one of extreme authenticity.

A lot of pictures as dark as shots in this movie would be considered as under-exposed in the eyes of many photographers. Yet the gloom is the essence of the success of the shots. The exposure is correct for these scenes. Kubric went to extreme lengths to get the exposure he wanted. With the proper approach and control you can do the same in your photography.

The one consequence of shooting at such wide apertures is an extremely shallow depth of field. When you see the candlelit scenes you will see how much bokeh there is behind the heads of those in focus. What a gorgeous result.

This video is actually a commentary on “Barry Lyndon” the movie. I have started the video at the scene where the exposure and special lens set up is discussed. Despite this being a movie, the same internal camera conditions apply as in a DSLR. ISO, Shutter speed and aperture still have the same effect on each frame taken. Kubric showed true genius in marrying the camera and the lens into a unique synthesis that recreated the prevailing light conditions of the time. He literally controlled the exposure to emulate life in the 1750s. That is the genius of the man. It is also the supreme insight in photography.