Category Archives: Definition

Definition:  description, analogue, annotation, answer, characterization, clarification, clue, comment, commentary, cue, delimitation, delineation, demarcation, denotation, determination, elucidation, exemplification, explanation, explication, exposition, expounding, fixing, formalization, gloss, individuation, interpretation, key, outlining, rationale, rendering, rendition, representation, settling, signification, solution, statement of meaning, terminology, translation

Get your settings right with all file types

File-formats and settings

The power of the file format you use…

Most photographers don’t think about settings and file formats when starting. First off, most people just want to take pictures. Down the road you need to think about what you are doing more carefully. You will need to get into RAW processing to overcome the shortcomings (but also, see my comment after this article)

File formats

When you think about settings and file formats it appears very technical. It’s not easy to work out what you need to know. Here are the basics. There are two in-camera file types for photographers…

  • RAW = a file type for capturing all the data from your camera, but which needs developing (post processing) after the file is downloaded. There are many manufacturer-specific versions of the RAW format.
  • *.jpg = a specific file type created in-camera from a RAW file. It is processed by the camera. The *.jpg format was originally designed only for transmitting and displaying files. It is extremely limited for post processing and easily degraded.

Both file types are useful for certain things. The RAW format is ultimately the most useful for photographers because it is so flexible. It allows you to develop the image you want from the picture you have taken. The *.jpg file on the other hand is processed for you, in a limited auto-processing system over which you have little control. It is confusing for beginners because *.jpg files create reasonably good images. But it is difficult to make them do what you intend. Beginners eventually find they cannot create the excellent images that RAW users produce. Nevertheless, starters use *.jpg because they don’t understand RAW and processing – they are stuck without help.

The processing is already done for *.jpg files by the time they are downloaded. Most beginners think they have something special when they get a great image straight out of the camera. Actually they are getting something processed according to someone else’s ideas. So it is not entirely their creation.

How do you break out of this situation?

The easiest way is to do a course or join a club or both. Then you can gain the experience and techniques you need to learn while having fun with others who share your interests. There are lots of courses and clubs around. More specifically you will have three goals. You need to learn how to…

  • Control your camera to get the picture you want.
  • Do post processing to produce great images.
  • See great scenes and compose them to create great images.
Along the way…

At some point every aspiring photographer is told, “why not try moving to RAW, that format gives you greater control over your processing”. This is true and a worthwhile pursuit.

What most beginners also hear along the way is something like this… “It is easier to shoot in RAW because you don’t need to worry about your settings so much”. “You can sort it out in post processing”.

This whole “sort it out later” attitude is a recipe for disaster. Here is my reasoning…
Most beginners:

  • Have an underdeveloped sense of colour.
  • Are not sensitive to light intensity or brightness variations.
  • Have an underdeveloped sense of the quality of light.

And crucially…

  • Cannot properly remember the colours shades, tones and brightness levels at a scene until they can start the post processing hours or days later.

The result is that during processing colours, brightnesses, tones and shades get over/under processed owing to no reference point. The resultant image is often a long way from reality. Incidentally, as your eye/mind system develops the “photographers eye” you begin to remember these details much more.

I urge you to cultivate the habit of fine control of your camera. Every shot, or at least every set of similar shots, should be set up individually. Be obsessive about it. Then, when you get your work into the computer, your post processing has a realistic starting point. It is easier, and more realistic, to process a picture that starts out very close to your intended image.

There is another reason to be obsessive and accurate about controlling settings from the start. Bad habits are really, really difficult to break. If you get into the habit of sloppy settings from the start you will almost certainly be a lazy photographer. I can assure you that will condemn you to many hours in front of the computer doing menial development tasks. It is much easier to get it right in-camera from the start. Then you can slightly tweak it later. Breaking a sloppy habit to get fine control of your camera later is a long, hard road.

Professional photographers are obsessive about getting the settings right. They know that the difference between an amateur and a professional is getting EXACTLY the image they want. And, they know they will not get that exact image by being sloppy. Precise, accurate and pre-set control is the name of the game if you want to create sharp, and realistic images.

So, forget about ‘rescuing images later’. Do your photography correctly from the start and do it using RAW files.

Addendum:
It is important to consider the tools you work with. If your camera does not offer the opportunity to save RAW files you have to work with what you have got. Nothing wrong with that. It is worth reading my comment after this article.

By Damon Guy (author and Photokonnexion editor)

Damon Guy - Netkonnexion

Damon Guy (Netkonnexion)

Damon is a writer-photog and editor of this site. He has run some major websites, a computing department and a digital image library. He started out as a trained teacher and now runs training for digital photographers.
See also: Editors ‘Bio’.

A quick look at negative space

Paraglider

The paraglider is defined by the space around about. The strong open space makes a statement about freedom and openness.

Negative space offers an opportunity.

The use of space in a photo is an interesting way to open up a picture and to emphasise the importance of the main subject. In this post we are going to examine use of negative space.

What is negative space

In simple terms negative space is everything in the picture that is not a subject. What lies around and between the subject(s) is negative space. In most images that surrounding space between the subject(s) is not a strong compositional element, forming part of the background. The background in an image forms part of the overall perspective of the shot as well as the in-fill. While they are important, the negative space they create does not normally carry a significant compositional impact like the subject.

Power

Negative space can be used as a major compositional element in a photograph, perhaps even the largest element. In the picture above the paraglider is defined by the surrounding open space. A sense of openness and freedom is conveyed by that negative space. The image is intended to show the elegance of the flight, the emptiness of the negative space and the balance between them. Simple images like this provide a way to draw the viewer into the picture through the use of the open space. The strength of the openness, which occupies most of the image, provides a power that not only defines the image but represents a significant part of the message in the shot.

Definition

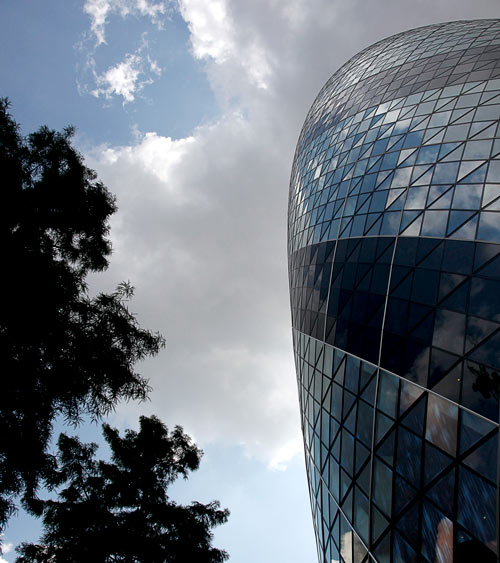
One of the most obvious uses of negative space is create a defining part of the subjects space or positive space. In the image below the building and the tree represent a pair of opposing geometries.

The Gherkin building - City of London, UK

The Gherkin building – City of London, UK
The negative space (sky) between the tree and building creates a definition, highlighting the very different edges of each of the positive spaces.

The one is well defined in its geometric format of windows (the Gherkin building in London) and curves. On the other hand the tree represents a chaotic, irregular, almost disorganised entity. The negative space between them creates a definition of both and refreshes the eye when moving back and forth. The counterpoint is defined by the negative space.

Using negative space as the subject

It seems funny to use ‘nothing’ as a subject. Nevertheless, the absence of something is still meaningful. In the next photograph the subject is actually negative space – albeit of a relatively small size…

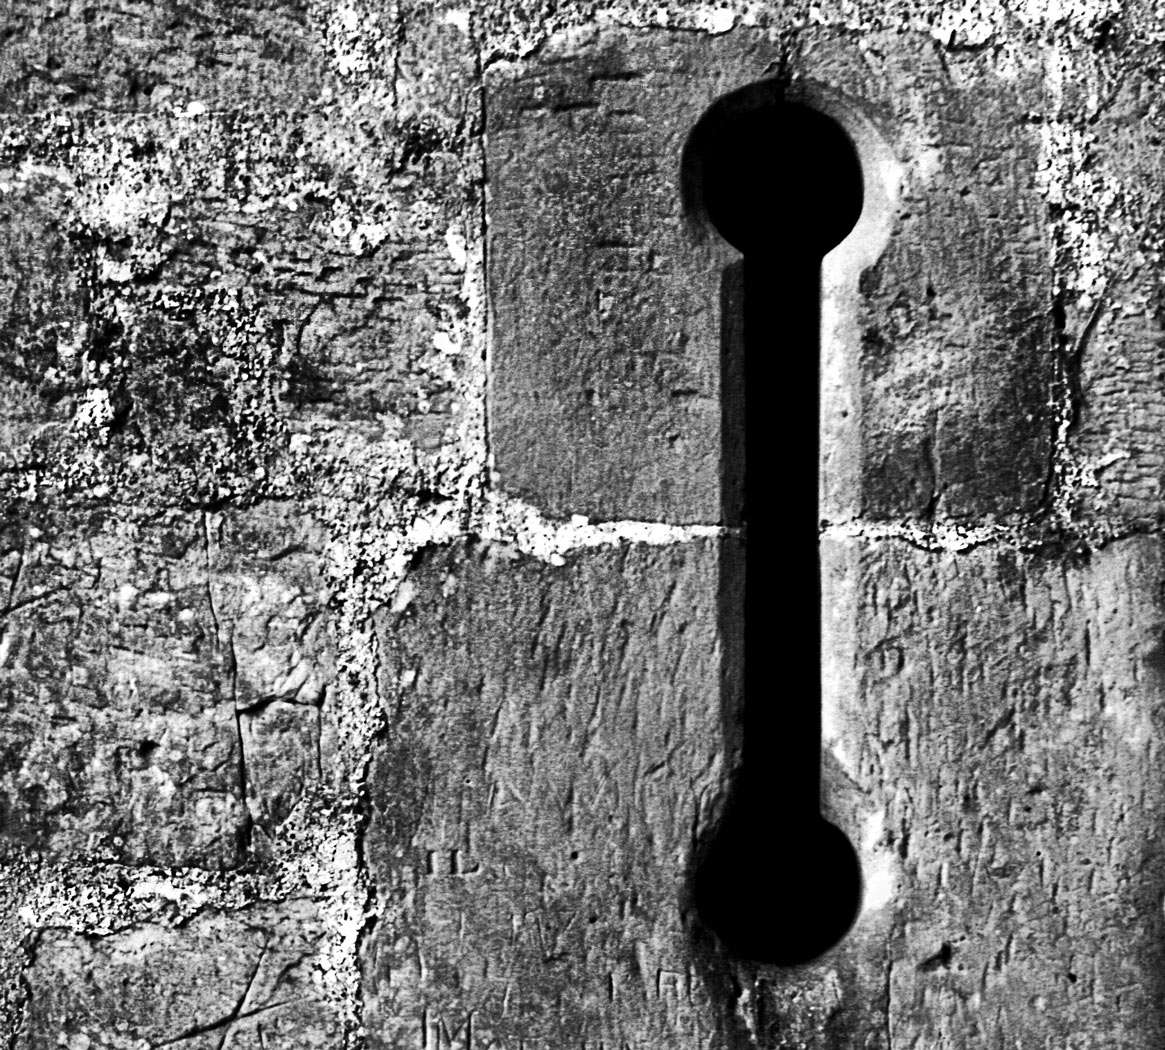
Arrow Slot - Bodium Castle

Arrow Slot – Bodium Castle
The existence of the slot is defined not by the brickwork, but by the intense blackness of the arrow slot.

As you can see the power in this image is in the deep black of the arrow slot in the wall, off-set nicely by the textures in the hand-cut stonework. It is that deep blackness that, in this case defines the slot.

As an additional point, the opposite is true too. The positive space can define the negative space in a picture. When you look at the picture of the vase you will see the main vase to start with. However, stare at the image long enough and the stem of the vase becomes two faces staring at each other closely. The positive space of the vase has acted to define the negative space around the outside of the vase where you can see the faces.

Rubins Vase - a study of the negative space created by the vase stem.

• Rubins Vase • Vs study of the negative space created by the vase stem.
Click image to view large
• Rubins Vase • By Wikipedia External link - opens new tab/page

Negative space can be used in powerful ways. In essence, it is a great way to draw the eye of your viewer into the picture.

New definitions – Photographic Glossary

Two new definitions have been published.

The new definitions are compositional elements of the picture. They will help an understand of the way to use space. These definitions are complementary to each other in a photograph. They are Negative Space, and Positive space.

Read the definition for Negative Space.

Read the definition for Positive Space.

Colour depth and aspect ratio – Simple explanations

Digital cameras have their own screens.

Colour depth and aspect ratio are both important aspects of the final image. The camera screen is not the best place to assess the impact of your shot. Your shot is only a basic representation on the camera screen. You have to judge what a picture looks like before you shoot it. Is it going to be the same after the shot? No, it is a facsimile of the final shot.

The screen on your camera is an indication of what the image will look like. The actual image will probably be processed in an image editor, colour enhanced and possibly cropped. What you see on the camera screen is therefore a basic concept. It’s not an accurate representation. You can find out more about the general issue of screens in… “Of video graphics and cameras”.

Here is a little background to help you understand the idea of colour depth and aspect ratio.

Colour depth

This is the levels of colour that are found in a graphics display. Not just how many possible variations of Red, Green, Blue, (RGB) but also the full range of derivative colours and the tonal variations and brightnesses available. Colour depth involves a huge number of colours – potentially more than sixteen million colours. Not all of these are always represented on the screen on your camera. You should view the camera screen as a less than complete colour range. In addition the image on the screen is compressed to get the picture into a small space. This reduces what can be shown and how detailed it is. So the camera reduces colour and sometimes details. So be wary of what you seen on the screen. Read more about colour depth.

Aspect Ratio

Throughout the history of film, television, graphics and images through the last century aspect ratio has been of importance. The term is used to describe the shape of the screen. Historically a large number of formats for screen shape have been established. Aspect ratio is the subject of a full article in the Photokonnexion Photographic Glossary. The final shape of your picture is related to the aspect ratio of your sensor. Normally that aspect ratio is the same as the screen. However, when looking at your picture in the screen it is worth thinking about your final crop. The crop shape can significantly affect the impact of the shot. So do not rely on the aspect ratio you have been given. When using the screen think about your overall composition in the completed image.

Easy introduction to light modifiers – don’t miss out (pt 2)

Light modifiers manipulate light.

Photographic lights are shaped and controlled by the light modifier. With it you create the lighting you need. Use the right modifiers and you create the scene you want. Knowing which one to use is crucial. The resources set out here aim to help you understand what light modifiers are and what they can do.

In a previous post, Easy introduction to light modifiers (pt 1), we examined:

In this post we are looking at more of these useful tools for controlling light.

Grids

Much more open than the honeycomb are a variety of other types of grid. They are used in front of many different types of light source. The aim of a grid is to…

Beauty dish

The beauty dish is widely used in fashion industry. Photographers love it’s flattering light. Using this dish creates…

Barn doors

Originally used on film sets barn door light modifiers have a special function. They are normally fitted to…

New resource pages

Part one and part two (this post) have added a number of new resources about light modifiers to the photographic glossary. However, as a group of resources they can also be reached from the page of light resources…
Light and Lighting – Resource pages on Photokonnexion
Light modifier resources on Photokonnexion – A new page linked from the Light and lighting page.

Simple tips to save you from disaster on your photoshoot!

Am I preaching to the converted?

Ever gone on a shoot and forgotten something? I have. If you’re like me you will have a bag packed ready. But, check the night before. Things may have changed. Here is some help.

Checking

The night before you go is the first time you should check your equipment. That’s the time to realise you need to charge your batteries. Yes, always have more than one – you don’t want to run out. Charge both. If you have an off-camera flash, check they are up to power too. I use rechargeable batteries in my flashes. So I charge them. But you may have standard disposable ones. Have fresh ones on hand.

Check you have a memory card in the camera and at least one spare. A corrupt card is as good as stopping your shoot if you have no spare. Oh, and make sure you downloaded the previous shoot. I turned up to a shoot once with a card nearly full of my previous shoot. I had not had time to post process them. OK, no problem. Ah! Had I downloaded them? Er… I could not remember. Then, eeek! I had no spare card. One full, no spare. It cost me an hour to find a shop for a new card – I was not impressed with the card either, but no choice. How stupid did I feel when I got back and found out I had downloaded the previous shoot. I could have used the card I had. Better safe than sorry.

Lenses

Choose your lenses if you have more than one. Also check they are clean, properly packed and have lens caps. Camera bags are generally made of very harsh material. If the glass rubs against the material it will rub off the coating and may scratch the glass. Look after your lenses and they will last for years. Got clean lens cloths? Make sure you do… you may need to clean up while out. Oh, I have an extender for my 70-200mm. It takes the lens up to 280mm – enough for most long shots. Don’t forget lens accessories. And, if you think you are going to need them, what about filters?

Camera straps?

Check your camera straps for damage. The little slits the straps go through gradually wear the strap. If a strap breaks your pride and joy will crash to the ground! Check the straps and zips on your camera bag are good too.

Got your tripod? Ah, but have you got the quick release plate? I forgot one once and had a day of really hard shots and poor results.

I normally carry three different light modifiers. They are a little honeycomb for focussed, hard light and a strap on diffuser which directs the light in one direction for soft wide focussed light. Finally, a plastic diffuser for popping on top of the flash for all-round bounce light to give wide-spread light. So, check your modifiers. If you don’t have any get some. Flash is too harsh for most shots.

Camera?

Ha ha! I am not joking actually. I once went on a shoot with a great friend. He had a new Canon 7D – proud as punch. He turned up on our shoot with a wonderful camera bag. In it was everything he needed for the shoot – except the camera body. He had left it on the table at home. Fortunately I was able to lend him one of my spares.

Sundry other items may be important too… Torch? Large plastic sack to cover everything in a sudden shower? Map? Tablets? Sandwiches, drinks, money? Well you get the idea. Everyone’s list is personal, so work out what is meaningful for you.

Going on a shoot for a day or more is a complex business. Your day can be ruined or shortened if you are not prepared. So why not make check lists. One for the night before, one for the morning before you go. Go through everything you have an then put it on the list. Then, check it all in complete confidence that you will have a great day.

Throwing your precious camera in the air!

At the end – I could hardly watch!

Well, Wow! Here is a video about photography I just did not see coming. Funny? Yes! Expensive? YES!

The mad photographer from DigitalRev.com shows you how to throw your precious camera in the air to take a photo. Not content with that feat, he does it in typhoon conditions. Then, when he breaks a lens with his first efforts, he pulls out a top of the range camera and carries on in pouring rain…

From DigitalRev.com  External link - opens new tab/page on YouTube.com  External link - opens new tab/page

Can you write? Of course you can!
Write for Photokonnexion...

We would love to have your articles or tips posted on our site.
Find out more…
Write for Photokonnexion.