Tag Archives: Portraits

How can hidden lines help your pictures?

Geometetry in your pictures works to help you see patterns. It draws the eye into the picture.

Geometetry in your pictures helps you see patterns. It draws the eye into the shot.

Look for patterns and geometry in your shots… capture the eye

The human brain is an extraordinary filter. We see things in the world around us that capture our attention all the time. Often it is a pattern that fires our imagination. We may not even be aware of it. We are programmed to see patterns in the world, and we are very good at finding them.

When composing, look for lines to associate.

When composing, look for lines to associate. If you can get lines to hold a pattern with strong geometry your composition will have a more compelling impact.

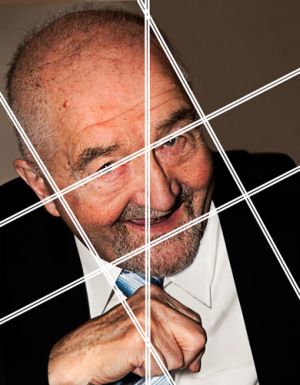
The geometry in a picture is not always obvious. First of all look to join up points of interest. Lines can be made by the eyebrows, the eyes themselves, the mouth, the nose, the connection with other aspects of the picture… in fact a lot of things. So what you are looking for to create strong lines is anything that has a prominent part of the picture. In the portrait here, we are looking at lines with the eyes/eyebrows. The eyes are always strong. The mouth is a strong feature too. So if you can line up these things with other prominent features of the picture you are revealing the strong points. That’s right, its simple. Lines are strong in a picture because they catch the eye. I have identified the eyes and mouth, the sides of the head and the lines from the hand to the mid-point of the eyes as strong aspects of the picture. There is no mystery here. You need to look for prominent points and edges. The way they create implied lines, join up or connect is what creates a pattern.

The use of geometry is a very old technique in composition of paintings. It can also enhance our photographs.

In the second picture (above) I show how the portrait has been dissected by lines that pull out the geometry. Of course in a photograph we don’t have the luxury of perfect alignment. Painters can map out thier work ahead of the actual painting. Photographers have to look at the subject-scene and do their best to analyze how it holds together, or work the scene to achieve a well proportioned pattern.

In the case of the portrait I have shown three sets of lines. First it is unusual to get a dynamic relationship out of a centre line. However, in this picture the mid-line of the face, the knuckles and tie all line up. So to emphasize it I have featured this in a central position.

Of course a more dynamic relationship comes out in pictures with strong diagonals. Faces on the diagonal are quite powerful. Our eye is trained to know faces very well after years of social interaction. So when they are not in an upright position our eye has to work harder to resolve them. This is good. The eye lingers and goes around the face. It takes into account the different aspects of the face and the way it is inclined within the frame.

Not only have we got a face on the diagonal but we have a close relationship to the rule of thirds. In this portrait it is not a perfect correspondence. However, the proportions are reasonable and there is a pattern.

There is nothing perfect about applying geometry to photographs. The photographer usually has to guesstimate the lines, thier association and the way they may work to give impact to the picture. However, it is up to you to find ways to do that.

Geometry in mathematics is all about perfection and calculation. In photography it is about finding ways to pull out pattern and emphasize the strengths in the picture. Our eyes look for patterns and when we find well proportioned geometric relationships we are pleased and intrigued. It is another way to bring more impact to our pictures.

By Damon Guy (author and Photokonnexion editor)

Damon Guy - Netkonnexion

Damon Guy (Netkonnexion)

Damon is a writer-photog and editor of this site. He has run some major websites, a computing department and a digital image library. He started out as a trained teacher and now runs training for digital photographers.
See also: Editors ‘Bio’.

Landscape verses Portrait – page orientation

Sometimes page orientation is dictated by subject... but there are other reasons to pick a particular format

Sometimes page orientation is dictated by subject... but there are other reasons to pick a particular format

There are a many reasons to choose portrait view

Landscape orientation is where a page or picture has the longest side on the horizontal. The picture above is in the portrait view – the longest side is upright. The use of the term ‘page orientation’ refers to either horizontal (landscape) or upright (portrait).

Of course there is more to it than that. In most cases we also consider the aspect ratio. In most SLR formats the aspect ratio is 4 to 3 (or 4:3 as it is written). This means four units along the long axis. And upwards, 3 units tall. This is a typical landscape view. Wider screens on televisions in recent years has introduced a new format of 16:9 although this is not seen as a common format for still photographs.

The current norm is for SLR video formats to be the same 4:3 of the still images. Normally the aspect ratio is considered only for landscape view – a ratio is not given for portrait view.

When taking a picture the photographer needs to consider orientation as part of the composition decision. It is probably true to say that the starter SLR-photog generally uses landscape orientation. It is a natural position since the shutter release is in a naturally comfortable position.

So what makes you turn your camera sideways and change the page orientation to take a portrait shot? There could be a number of good reasons. So here are a few ideas to keep you thinking…

Subject orientation

If your subject is long and upright then it is pretty natural to take it in an upright framing. Despite how natural it is, many people take the picture in landscape, then crop the shot afterwards. This is wasting a compositional opportunity and image space. If you take the shot in portrait from the start it lets you get close to the shot and fill the frame.

Page orientation drives the framing decision. The same framing opportunities arise in portrait as do in landscape. You just have to practice the framing.
Exercise: Go out for a day. Take only portrait view shots. Consider every one as carefully, or more carefully, than your normal landscape shots.

Panorama shots
So panorama shots are in landscape view? Yes. But the best panorama shots are frequently made of portrait shots digitally stitched together along the long axis. This assembly gives them the height and width needed to make up a substantial picture in panorama format. Understanding the portrait format gives you an appreciation of the type of framing needed to master panorama landscape work. So, even in panorama work the page orientation is crucial.
Images in text: page orientation is an essential consideration

If you are planning to contribute to a publication you learn how to take portrait shots. Editors are often more interested in the portrait view. It will fit into one column. That will give the editorial more space to tell the story. Editors like this format. If you wish to be published cultivate your skills in portrait view.

Portraiture:

Portraiture can easily be done in landscape format but has an odd feel. It is important to make page orientation comfortable for the eye. The portrait format is ready made for capturing the upright nature of the natural portrait. We would normally give a wide orientation to something that is moving. The landscape view provides space to move into. In portraits there is often no movement or implied movement. The taller, thinner format helps the person pictured to engage with the viewer. An upright page orientation helps the picture sides to hold in the viewer’s eye to the portrait subject.
Exercise: Try a traditional portrait format and see if you think the portrait orientation is more effective. You will need to shoot a number of different shots to get the feel for it. Try different lighting conditions too.

Page orientation is also about presentation

The need for upright formats is not just about what is in the picture. It might also be about the way the picture is to be used. A picture may be chosen for its shape. Often a picture purchase is made to fit in a place which needs that format. A long thin alcove in a wall suits a long thin picture format. Taking the picture with that page orientation better suites the situation than cropping afterwards. How a picture will be used is a reason to frame a picture that way. Page orientation is a composition and presentation decision.

Words:

If you are taking a picture with words in it think about your page orientation.

It is easy to forget that very wide pages make reading difficult. Landscape view will hinder reading if the text spans the page. If you must use that page orientation with text find ways to keep the text from going across the page.

Using landscape format may be a good idea if the meaning of the text is unimportant. Where the impact of text is stronger than its meaning then you can span the image for effect. For example, the name of a café may not be as significant as the run down and decaying feel of the old building and its name sign. The impact may be more in the other elements of the scene. The importance of reading the text is minimised. Reducing the impact of text in an image is often a good idea as the eye is drawn to it. This can reduce the impact of the rest of the picture. Try to strike a balance. It may be better to use landscape with text if you want to include other things in the image.

If for some reason you are setting up a picture to take text then consider the portrait view. It will make the shot easier and your viewer will appreciate it. The reading will be more comfortable and quicker. This will take the emphasis off the text and allow the reader to quickly move on to the rest of the image.

Exercise: Paste a page of text into a word processor page. Set the page to landscape view. Print it out. Easy to read?

Page orientation as an eye stop

Artists and photographers often use the page orientation as a way to control the eye. The landscape page orientation helps the eye to flow from one side to the other. You can use other elements in the page to help keep the eye move around. The right sort of content in a picture can stop the eye moving out of the page. For example, a tree trunk on the edge of a landscape page tends to act as a natural stop to the eye, directing it upward into the canopy. The eye can then flow back the other way.

The use of a portrait format naturally causes the eye to move upward or downward. Where it is important to stress the up/down impact of an image use portrait view. Portraits, are a classic example. Other examples might be trees, or tall architectural images. The power in the image is controlling the eye between the image sides.

Page orientation is also a resolution issue

Where page orientation is a bad match for the composition, all is not lost. It is easy to crop the image to bring out the content in a new page orientation. However, consider the resolution for a minute. If you have to crop out a segment of the picture you may be affected by resolution. Artefacts, lack of sharpness, poor resolution and blur are all enhanced by a crop. Changing the page orientation makes these more likely to affect the final image. Consider the correct orientation from the start. Then you will not be faced with these quality issues.

Overall

The context of landscape or portrait orientation is the important thing. There is no reason to assume that either format is best. Pay attention to the needs of the composition or context in which the image is used. Clearly both upright or horizontal have their place. It is down to you to decide page orientation. My main point is, don’t ignore poor old portrait view. It can lead to some stunning compositions. It would be a shame to miss out on the benefits.

Comments, additions, amendments or ideas on this article? Contact Us
or why not leave a comment at the bottom of the page…

Like this article? Don’t miss the next — sign up for tips by email.

Damon Guy - Netkonnexion

Damon Guy (Netkonnexion)

Damon is a writer-photographer and editor of this site. He has run some major websites, a computing department and a digital image library. He started out as a trained teacher and now runs training for digital photogs.
See also: Editors ‘Bio’.
By Damon Guy see his profile on Google+.

Natural Light Portraiture – with reflected fill-in light

Make your natural light portraiture work

Love photography? Then natural light portraiture is something you will try at some time. In the video below we will see a few tips that overcome some of the lighting issues photographers encounter when starting these portraits.

For photographers just starting out, natural light portraiture is often about snapping shots of friends. Actually, portraiture as an art form in its own right. Why? Because the human eye is incredibly well tuned to viewing the human face. Get it wrong and it is blatantly obvious!

Snaps often result in a flat and poorly sculpted face. Bad or flat light leaves the face looking drawn or sick. Worse, it can look as if it is almost featureless. The way to get around this is to use natural soft light. The best light for this is during the golden hour. The low light will mean a big contrast between bright sky light and the side of the body away from the light. The answer is to use a reflector to fill in the darker areas of the face. Reflectors are cheap and available in lots of photography suppliers. You can easily make your own reflector from white art board too.


In this video photographer Karl Taylor shows you how to use natural light and a reflector to take a good natural light portrait. Watch out for his five key points. Enjoy!
Seen on YouTube: GreatPhotographyTips External link - opens new tab/page

Remember these?

  1. Communication
  2. Lens
  3. Aperture
  4. Lighting
  5. Environment

Key points worth remembering.

By Damon Guy (author and Photokonnexion editor)

Damon Guy - Netkonnexion

Damon Guy (Netkonnexion)

Damon is a writer-photog and editor of this site. He has run some major websites, a computing department and a digital image library. He started out as a trained teacher and now runs training for digital photographers.
See also: Editors ‘Bio’.

Outdoor lighting – Getting into Portraits

Natural light makes wonderful portraits – a great video

When photographers feel the first urge to start on portrait photography they think they have to buy a whole range of new equipment. That’s not true. Photography is all about the light. It is the only thing we really need to know well. Getting to know how to do portrait shots without a huge investment in lighting equipment is easy and fun. Not only that, the outdoors provides a great resource for portraits and the light is already there.

In this video Jeff Smith explains how to run an outdoor portrait session. He explains the way to use natural light using only reflectors. He also explains great ways to bring out the character of your subject in natural light. A great video.

Can you write? Of course you can!
Write for Photokonnexion...

We would love to have your articles or tips posted on our site.
Find out more…
Write for Photokonnexion.

Portraits – Three Tips and the Work of the Masters

The National Portrait Gallery - see the works of the portrait masters

The National Portrait Gallery (NPG) - see the works of the portrait masters

The National Portrait Gallery (NPG) is a superb national resource for UK photographers interested in portraits. There are great exhibitions and events many of which are photography based.

There is lots to learn at the NPG. Seeing the works of portrait masters helps you appreciate their work and think about your work too. Self analysis is important. So, it is worth going there with a few pictures of your own. Then you will have something to compare with the pictures you see. Contrasting and comparing is an excellent way to learn photographic composition. A well captured portrait brings out the character of the face through the lighting of the facial structure. The shadows and light on the face emphasises the unique form of that person. There is no good or bad light! There is just the light that makes that portrait work well – or not. A visit to the National Portrait Gallery will provide you with wonderful insights.

Three Portrait Tips To Get Started

Eye Contact…

Build a rapport with your sitter. They are happy about you taking their photograph. Make the most of this opportunity. Engage with them, talk to them, discuss what you are doing, most of all ask them how they would like you to take shots. You will get a better picture if your subject is involved. Get them to make eye contact with you. The portrait will work much better if there are connections between you and the person you are working with.

Use a Prop…

Having a prop often helps the person you are photographing to settle down and relax. Portrait sitters often feel nervous, especially if they are not normally the centre of attention. So if they have something to hold, play with or look at it gives them a little security. I often ask people to bring a favourite object of their own. That helps a because they are comfortable with it. The whole result of a portrait session can be vastly improved if the object says something about the person too. A pair of skis for a skier, a guitar for a guitar player, saw for a carpenter… nearly everyone has some sort of object that can say something about them.

Get them doing things…

Just sitting there is not interesting for the photo-viewer, and it will certainly be boring for your subject. Get them to do a few things that will look good in the camera. Use the prop, get them moving, sit them on the floor or on top of a table. There are dozens of things they could do in front of the camera. You and your subject should work out a few things that will enable you to bring out their character. While they are moving about to try different poses you can also get in a few sneak candid shots. See if you can get them to do something silly too. Pulling faces, jumping up and down, slow running, funny walks are all possibles. If they are slightly reluctant then that is actually a good thing. It will help them get into the session and will bring out their character in the shots.

Have fun with your portrait shots, then compare your work with others. Try the NPG… its a great place for photographers!

By Damon Guy (author and Photokonnexion editor)

Damon Guy - Netkonnexion

Damon Guy (Netkonnexion)

Damon is a writer-photog and editor of this site. He has run some major websites, a computing department and a digital image library. He started out as a trained teacher and now runs training for digital photographers.
See also: Editors ‘Bio’.

Can you write? Of course you can!
Write for Photokonnexion...

We would love to have your articles or tips posted on our site.
Find out more…
Write for Photokonnexion.