Tag Archives: Portraits

Simple, basic rules of lighting anyone can use

Every time you take a photograph you use light.

It’s no surprise that a few simple rules apply to getting a good understanding of light. Knowing more about how certain light conditions work is a great insight. It’s simple too…

In this great video Ed Verosky looks at the basic ways that light can be understood and used. Using some really simple graphics the video takes us through the basics. Great work Ed… more after the video.

Published on Aug 13, 2012 by Ed Verosky

Of course you can find many other light resources here at Photokonnexion to supplement this video. Here are some ‘must reads’ to go with what you have just seen in the video.

A simple challenge to use your new knowledge…

Take a portrait of someone lying down. Use only the light from one window (daylight). You poser should have feet pointing toward the window, head pointing away. The idea of this is to see how you can vary the light intensity with distance from the window. We want to see how the softness of shadows on curves change along the length of the body.

Now repeat the exercise with your pop-up flash or off-camera flash. See how much harder the light is and how sharp the boundaries between light and dark.

I hope that has proved fun and easy to do. I would love to see the results. So if you can post your shots online and leave a link in the comments below I will comment back on your shots. Have fun!

Portraits come from you and the sitter

How do you feel when you do a portrait?

Most of us probably feel a little nervous. Portraits are quite personal things and it’s important to get them right. So how do you build your relationship with the person in front of you?

I admit that when I do a portrait a little nervousness creeps in. It tones up the senses. Normally doing a portrait is a quick activity. I have rarely spent more than 30 minutes doing one and most times quite a lot quicker. In that short time you have to assess the person, know their mood. You need to build a little rapport and understand them enough to capture their essence. Its quite a tall order. Yet photographers manage to do a great job on a regular basis.

As a way of keeping my approach fresh I like to hear how other photographers approach their portraits. In this video acclaimed American portrait photographer talks about his approach. He gives us lots of useful insights. One of these is that every portrait is at least a little bit a self portrait – the photographer puts a little of themselves into the shot. Hmmm! Some interesting stuff here. Oh, there is also some superb lighting and photography too. Enjoy!

A few minutes with Gregory Heisler… from Stumptown Visuals on Vimeo.

Five tips to help your portraiture from the Renaissance

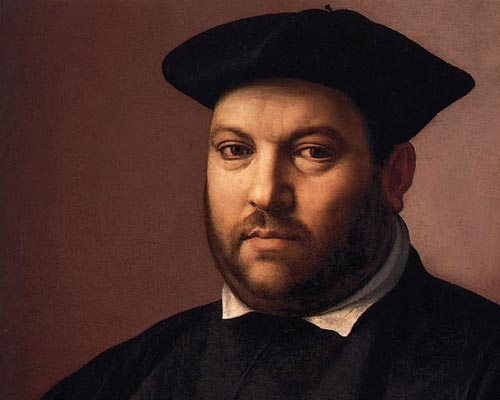
Renaissance Painting - "Portrait of a Gentleman" by Ridolfo Ghirlandaio

“Portrait of a Gentleman” by Ridolfo Ghirlandaio (Part copy of the original)
Renaissance painting can teach us a lot about portraiture.

The way we look at people is a constant in time.

Renaissance Portraits represent the artists view at the time. Our photographs represent our view today. Artists paint to bring out features. We can see lessons in that emphasis to help our portraiture in photography.

The Renaissance painters created a culture of portraiture leaving us with a superb legacy. Their realistic portraits were a study of light and shadow – the fundamentals of art. their study specialised in the face. They wanted the lines and shadows to be flattering, portraying the features in the best possible light – literally. Today we have a lot of portraits by masters who knew how to see light and shadow and pick it out.

Here are five things that we can look at in Renaissance portraits to apply to our own photographic work.

The direction of light

To make the best of the features of our portrait sitter we need to understand light direction. Renaissance portraits tend to have slightly exaggerated shadow lines. As a result we can see which direction the light is coming from. Once we have worked this out we can apply the principle to our own shots. We can place the sitter relative to a light source or move the lights.

Light intensity

In general Renaissance portraits have no highlights on the face. Modern flash and lighting techniques tend to produce harsh, hard lights unless we carefully control it. The Renaissance images sometimes have bright light, but the painters left them as bright, not white. Spots of white, blown out light, are very distracting for the viewer. We should be on the lookout for the brightest spots try to reduce the light intensity. In films the make-up reduces skin reflection. When that is not practical we can instead just use reduced lighting, or diffusion screens.

Angle of incidence

In the picture above there’s quite a strong shadow line on his forehead under the hat line. This is because a hard light is striking the face slightly from above and to the side, not straight on. This imitates the sun, or a high point of light – say, through a window. By looking at the shadows on the face we can see how the light is angled in addition to it’s direction. Different angles of lighting and the shadows responding to it give clues about how the scene is lit. An evening scene with a lamp would show a lower angled light and it would be more yellowish. An evening light would be more straight from the side and tend to be redder. Bright daylight will tend to be from a higher angle. Looking at the angle light strikes the face, and the type of shadows, helps you to imagine how your own portraits could be set up.

Hard and soft light

Sometimes the old masters cheated or messed about with light to emphasise something on the face. In the picture above you will see quite a hard line of shadow down the shadow-side of the nose. This hard line of shadow comes from a harder light. Yet on the cheeks the light is soft – the shadows have a gradual tenancy toward darker areas rather than a hard line. In general, it is difficult to mix hard and soft light lines like this in real life. It is interesting because here it shows how the face is well defined. I think this is because the artist was trying to define a quite rounded face. Too rounded and the face becomes feminine. To avoid that feminine look he has put one or two harsher, sharp lines on the face to bring out the masculine side. For your portraits remember that hard light brings out masculinity and soft light brings out feminine features.

Eyes

Eyes are something of a study for artists and photographers. They establish life and vitality as well as a rapport with the viewer. If you can mark the direction of the eyes so the person in the portrait is looking directly into the viewers eyes then you capture the viewers attention. We are transfixed by eyes that look at us. In a very clear picture the pupils gives us a clue. In most pictures the catchlights in the eyes indicate the direction light in the face, the direction they are looking and also provides vitality and expression in the eyes. In the portrait above the catchlights are small, the picture is reduced in size and low resolution. But the catchlights are present. Have a close look at them. When working your portraits make sure your catchlights are a good shape and are true to the direction of the main light.

Here is a fun exercise

To improve your portrait skills pick a Renaissance portrait. Try to create a modern version of it. Look carefully at the light direction, intensity, angle, relative hardness/softness and the eyes. See if you can get someone to sit for you while you reproduce the light, shadow, catchlights and the pose. Work on the ways that the shadows lie on the face. See how the shadow graduation works. Soften and harden the light to reproduce that softness.

Here is a link to the Google image pages for Renaissance Portrait Paintings External link - opens new tab/page

This is an exercise in light control. You can do it with natural light. You can even do it with a table lamp (although it may create a colour-cast). The idea is two-fold. First, get control of the light. Second, try to reproduce classic portraiture pose. Both are fun, and both will teach you all sorts of lessons about what in the light makes people look the way they do.

Could you make an iconic picture?

There are very few iconic pictures created every year world-wide.

Some of the most iconic pictures are taken by journalists. They visit difficult places and see sights to challenge the human spirit. Here are some pictures that tug our heart strings.

The video below shows thirty one iconic pictures from the last century which have a lasting punch. They are mainly taken by journalists and they all have a collective impact. It is a short video, yet in those few minutes I was moved to tears. There is something that smashes your defences in an iconic shot. However, a lot of the pictures in the video would not have the impact without the title text. It is important to have a context even for an iconic picture.

Three Iconic photographs missed in the video

The video also set me thinking about a few pictures that were not in the video that have had a powerful effect on me as a photographer. They are clearly brilliant photographs. I include them here because they also show class, lasting punch and great skill. There are many more, but these spring to mind.
Afghan Girl by Steve McCurry External link - opens new tab/page – (in Wikipedia, the free encyclopaedia)
Hurricane Katrina, New Orleans by Michael Appleton; 2005 External link - opens new tab/page

The World’s Most Powerful Photographs…

Published on Aug 1, 2012 by BuzzFeedVideo

Video: What makes a great photograph great?
Music: “Hypnagogia,” By Andrea Rossi
Attributions/Photographers:

1. Robert Capa
2. No official citation. Army photographer referred to as Major Benjamin
3. Heinrich Hoffman
4. Citation not given
5. John Dominis
6. Jeff Widener
7. Claude P. Dettloff
8. Stan Stearns
9. Aaron Thompson.
10. CFP – Photographer not given
11. Héctor Rondón Lovera
12. Yomiuri Shimbun
13. Mark Pardew
14. Nevine Zaki
15. Marc Riboud
16. No Official citation. Possibly George Mejat
17. KOREA POOL – Photographer not given
18. Goran Tomasevic
19. Cecil Stoughton
20. Vanderlei Almeida
21. Getty – Photographer not given
22. No citation given. Photographs are on English Russia if you’re interested.
23. AP. Photographer not given
24. No official citation
25. Jeff Roberts
26.Str / AFP – Getty – Photographer not given
27. Louie Favorite
28. Getty – Photographer not given
29. Can’t find this one.
30. This has gotten so saturated over the internet, the original is near-impossible to find.
31. William Anders
(many thanks to BOSOX9004 for compiling, http://www.youtube.com/user/BOSOX9004!!)

The art of posing for the camera

Looking at you looking at me and being comfortable.

Photographers may be comfortable with taking a portrait. I know from experience that our subjects are often very uncomfortable. Some insights may help us put our subjects at ease.

As a photographer you should be running the portrait session. It is good form to help the subject feel, not only at ease, but looking good. Many photographers forget that the subject often does not know how to look good. So you can do two things about that…
1. direct your subject to act in ways you think they look good.
2. give them a quick lesson in looking good.

Both can work. Direction works best with experienced sitters and models. They often settle down once they see the way the session is going to pan out.

Directing an uncomfortable and reluctant sitter may not work well with someone who has no posing experience. I’ve found that if you do a portrait session where you are directing the reluctant sitter, they often look more uncomfortable and wooden. In this latter situation you have the option of going through a series of practice exercises to see how they feel and what looks good. The video below takes a bit of both approaches. It is worth viewing to get some insights and ideas.

Some other considerations

I think it depends on who you have sitting for you. I prefer to work with the person. Get to know them a bit and build a rapport. That does often settle your subject down. However, some people never feel comfortable in front of the camera. So, after the jump are some hints to help them out…

Tell them you need to take a few test shots, “just sit there for a minute while I get everything set up”… then get chatting to them. Make them laugh if you can. Get a few shots in. Spend two or three minutes doing this. Get as many shots off as you can. Show and share them so the sitter sees what they look like relaxed. This helps them settle down for ‘the’ shots. Actually, you have probably got the best shots already! Yup! This is portrait photogs psycology at work.

Some people really relax if they have a familiar object. Get them to bring a favorite item. A guitar, roller skates, a hat, whatever. Get them to show it off while you chat and shoot.

Getting someone to do something silly sometimes helps. Just afterwards they have a happy demeanour and a more relaxed pose. So click away during the silly bit, but catch the best shots afterwards. This works well especially with families. The parents go with it to get the children going. But children rarely need help once started. In fact you are settling down the wooden poses of the adults!

Actually…

There is no one way to run a portrait session. You, the photographer, have to suck it and see. Sometimes what you do works first time. Often you have to try things out as you go through the session. Flexibility, experience, and trying out a few of the techniques above may all come into play. Try a few things and see how you get on. The more experience you get the easier it will be to work with your subject. Have fun!

By Damon Guy (author and Photokonnexion editor)

Damon Guy - Netkonnexion

Damon Guy (Netkonnexion)

Damon is a writer-photog and editor of this site. He has run some major websites, a computing department and a digital image library. He started out as a trained teacher and now runs training for digital photographers.
See also: Editors ‘Bio’.

The secret character of your lens – faces show it…

Fisheye lenses obviously distort - all lenses distort in some way. The distortion is less obvious with most lenses.

‘Fisheye Face’ – Fisheye lenses obviously distort – all lenses distort in some way. The distortion is less obvious with most lenses.

Learn what lenses do to a face

Broadly speaking, the camera captures a scene and reproduces it. The reality is that every lens has its own characteristics and does not reproduce the scene exactly as you see it. Some lenses create distortions deliberately. For example, wide-angle lenses tend to elongate the picture in the longest dimension of the image frame. Fish-eye lenses distort images in more than one dimension. What is not so clear is that every different model of lens has some element of distortion.
More after the jump…

Accepting that lenses distort the scene, we can get different effects with each one. Although every model has its own characteristics, lenses also vary consistently with focal length. The video below looks at a range of focal lengths and demonstrates the effects of each one on the face. It is important for a photographer to recognise the impact different lenses have on faces. As you will see from the video some lenses produce distortion effects we would want to avoid. Some lenses produce more flattering results…
Video: Published on Aug 4, 2012 by TheSlantedLens External link - opens new tab/page

Aiming high… An approach to portraiture

Creating a portrait is a unique action

All of us do portraits at some time or other. Doing them is the easy part. Making the character of the sitter come out in the picture is where the skill comes in.

Nadav Kander, photographer, has an interesting and keen approach to portraiture. Creating a good portrait requires a unique rapport with the subject. He takes a different route to his portrait work to most portrait photographers. In this video Kander explains what he puts into his work and what he is trying to achieve.


Nadav Kander – gives us some insight into his portraiture.