Beach views – ideas for a seaside photoshoot

Beach views are really worth planning out.

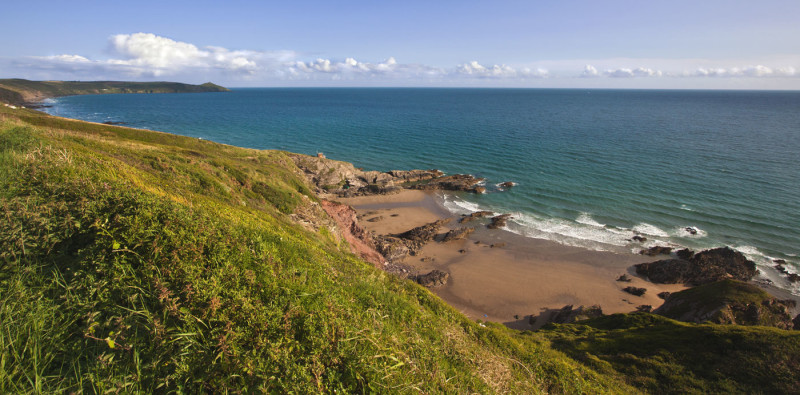
• Cornish Afternoon •
The great British beach experience is based on our long history of holidays by the sea. The beach views that come with it are worth pursuing too.
(Click image to view large).

Work up a great coastal vista shot.

Beach views can be magnificent and there is always something worth photographing. Sea makes a magical subject in almost any weather. In the right place the views can be magnificent. Here are a few ideas for you to help you get a great photo from your visit to the seaside.

Beach views :: great vista shots

Photographers should be aware of the opportunities for great vista shots. Here are three tips to help you get the shot and the right light…
1. Spotting a rugged coast: Scout out the maps near your destination. Most good maps will show contours and the coastal shape. If you are looking for interesting coastline check out the height of the land beside the sea. Cliffs and hills indicate harder, more resistant rocks. This helps build up a range of rugged landscapes. Also, the more jagged edges the map shows along the sea/beach line the more likely the coast will have an interesting viewpoint.

If you are looking for a place to try out, Google Maps is useful. The Google maps are not very good at showing contours or heights. But the jaggedness of a coast line is shown. If you convert the map to the Google “Earth” view you can get a satellite view of the coast. From that you can get quite a good idea of the terrain.
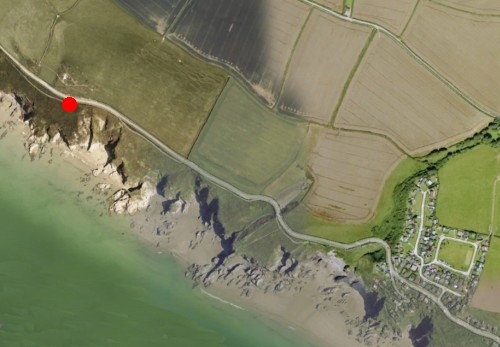
Google Earth - the satellite view provides a good idea of the type of coast.

• Whitsand Bay Cornwall •
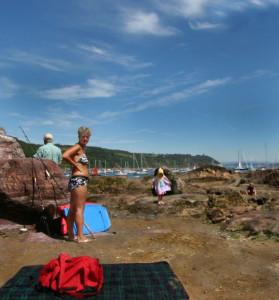
The photo at the top of the page was taken from the position of the red dot. The view was taken along the rugged coast there. You can see from the Google Satellite view how rugged the coast is along there. It’s ideal for lots of different Beach views.


2. Beach views :: Checking out the light:
There are two times a day when the light is best for landscapes and vista shots. These are the Golden Hour just before sundown and the hour around sunrise. There is great light and low sun position at these times of the day. Why is low-sun position good? Because that causes long shadows to be cast off the rocks. Strong contrasts between the dark and light help define edges, shapes and form of the rocks and features. Shadows provide the defining depth in a picture too. Well defined shadows help the eye to see objects as more three dimensional.
• The Okta • The symbol for cloud cover on good weather maps.

• The Okta •
The symbol for cloud cover on good weather maps. A useful symbol to tell you the light conditions when checking for good beach views.
(Attribution: Wikipedia.org Beach views :: Oktas - cloud cover symbols | External link - opens new tab/page)


Of course we are not always able to take our photos at the best times of the day. So how do you check to see what the light will be like when you are there? Of course the starting point is the weather. Most good weather forecast web sites will tell you the amount of cloud cover. You can usually tell how much cloud cover is expected by the number of Oktas (or Octas) shown. The more cloud cover the more diffused the light will be. The actual types of clouds make a difference too – if they are dark and ominous they will make a great backdrop to your beach views. Seascapes really look great with heavy storm clouds. Make sure you have a tripod to hand. Dark clouds mean longer exposures.

3. Sun position: If it is a sunny day you might find the sun position is important. If the sun is up high, cliffs can still be in shadow. It depends exactly where in the sky the sun is at the time you want to take photos. There are websites to help with that too. Check out The Photographers Ephemeris Beach views :: Get the light right with . This really useful website “is a map-centric sun and moon calculator: see how the light will fall on the land, be it day or night, for almost anywhere on earth”. There is a web-based version. But usefully, there are versions for your mobile phone too. You will be able to work out where the sun will be at any time of the day. This will help you work out how to fit your beach view shot into your day.

Putting depth into your beach views shot

The shadows you are able to capture will help your beach views appear to have depth. But a longer distance view, especially in mid-day daylight, will need to have other perspectives. Here are a few ideas for you to introduce a feeling of depth into your shots…

  • Overlaps: When you are looking down a long beach you often find features of the beach itself will overlap in your sight. Mounds of beach stones; sand dunes; different rock layers at beach level; cliff top undulations; variations in the cliff face itself and even local vegetation all help. The ways that these features relate to one-another in the scene give you clues to depth in the photo.
  • Contrasts in colour: The colour of the beach stones, rock, sand and even vegetation can often be used to show variation. As you shoot down the length of the beach these can help to show depth to the eye.
  • Texture variation: The cliffs, dunes, rocks and any seaweed revealed by a low tide provide great variations in texture. Look for ways to bring all these into the shot. Textures often come out by slightly underexposing the shot. That may make the scene look darker than it actually is, but it will bring out the light and dark aspects effectively.
  • Lines of perspective: Strong lines are not often associated with beach views. However there are some strong ones that people often miss. The sea line itself is a strong line. You can look down the length of the beach and use the surf or water line where it meets the beach. Looking down on the beach from cliffs you can use wave lines (see below). If you are on the beach itself you beach views are often enhanced by cliff top lines. Although they often undulate they perspective is still distinct against the sky. On the beach itself, fences and other man-made features (groynes, buildings, paths, roads, beach walls etc.) provide lots of points of perspective you can use.
  • Distant points: If you have something in the distance that your viewer knows to be large they have a distance perspective. In the picture at the top of the page you can see a cloud line. These tiny clouds in the distance give a perspective for the viewer. Other things can be large shops towns on the coast, and even buildings.
• Cornish beach view •

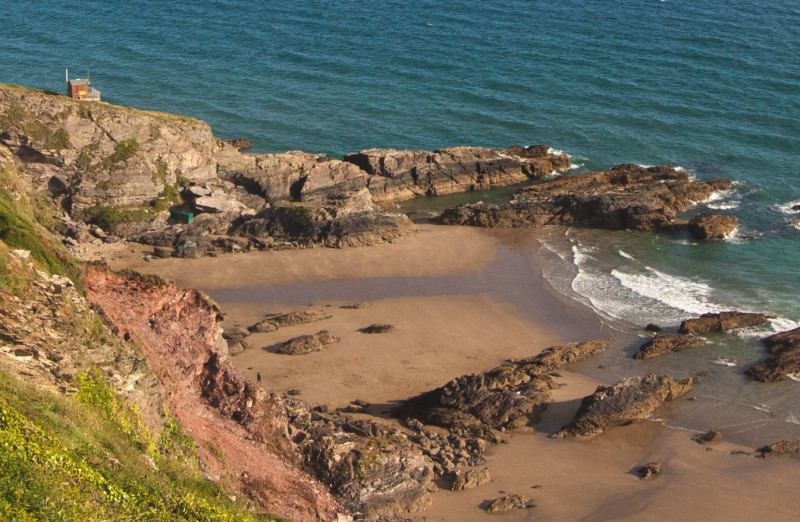
• Cornish beach view •
This view of the beach shown at the top of the page loses some perspective because the distances are reduced. The wave lines in the sea and the rock protruding from the cliffs gives back some of the perspective. The nearness of the grass close-up and smallness of the person and buildings also give depth to the shot.
(Click image to view large).

Check out other pictures of the location for your beach view

The most effective way to plan for your picture is to look up your destination and look for pictures done by other photographers. Try putting your intended location into Google Images. You will be able to pick out features in advance to help you give depth and perspective. You will also be able to see some good places to take shots. Here is the page for the bay where my pictures above were taken. You can see my shots are quite different from the others shown there. There is lots of scope to help you pick out some ideas.
Google Images: Beach views Whitsands Bay Cornwall Google Images: Beach views Whitsands Bay Cornwall | External link - opens new tab/page.

Comments, additions, amendments or ideas on this article? Contact Us
or why not leave a comment at the bottom of the page…

Like this article? Don’t miss the next — sign up for tips by email.

Damon Guy - Netkonnexion

Damon Guy (Netkonnexion)

Damon is a writer-photographer and editor of this site. He has run some major websites, a computing department and a digital image library. He started out as a trained teacher and now runs training for digital photogs.
See also: Editors ‘Bio’.
By Damon Guy see his profile on Google+.

Looking for the natural detail

Looking for natural detail :: It is all too easy to miss the finer details in nature.

• Looking for the natural detail •
Casual observation often misses the natural detail in a scene. Most of us are guilty of walking past the fascinating detail and seeing only the bigger picture.

Getting closer to the riches.

“I’m sure we’ve all walked along a beach, enjoying the moment. A time to kick off shoes, socks and the shackles of daily life. To relax in one’s own world, exploring new surroundings. But do we soak up all we see around us or do we merely pass by, with little more than a cursory glance? To stop and look closely, could be considered a luxury – but then why not? Enjoy all the riches a beach has to share, it fuels our memories all through the winter time. Is it real, or just a dream?”

These are the opening words to a sequence from the second presentation in my Hebridean Trilogy, entitled “The Island Dream”. And how true they are. I am sure we have all been guilty of overlooking the finer natural detail, spread out as it is, all around us.

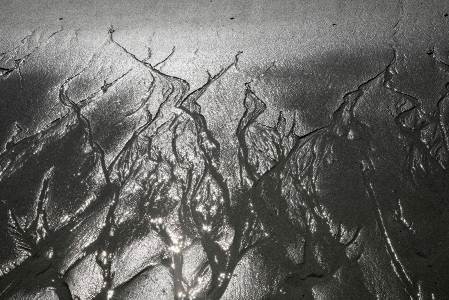
Natural detail :: Patterns left by the falling tide as the sea, sand and peat mingle

• Water patterns in the sand •
Patterns left by the falling tide, as the sea, sand and peat mingle on a Hebridean Island.

Natural detail – the wonders up close

I am often on my knees, on a beach, photographing the wonders to be seen up close. Whether they be patterns left by the falling tide, as the sea and the sand and the peat mingle together, or broken shells who have ended thier life by being smashed in the endless surf.

You don’t need specialist equipment or Macro lenses to capture this natural detail. Most cameras have a close up feature incorporated which adjusts the camera’s settings accordingly. With your feet and legs set firm in the sand, and holding the camera tightly, you can almost replicate a tripod. This ensures images are sharp and in focus where they have to be.

Natural detail :: Shells which ended their life smashed in the endless surf.

• Broken shells •
Shells which ended their life smashed in the endless surf.


You may also need to consider lighting. We photographers often keep the sun behind us. When crouched on the beach your subject could be in deep shade. This is tasking the camera too far. Perhaps a bright but overcast day would be better, avoiding strong directional light which may cause camera sensors to work overtime.

A quiet, wondrous place

A quiet beach in the right light can be a wondrous place. Try mooching along the sand, being careful not to leave footprints where you may later wish to photograph. No need to rush either, enjoy the rare moment.

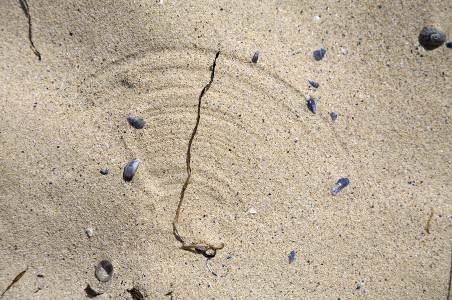
Natural detail :: You can almost replicate a tripod

• Detail in the sand •
With feet and legs set firm in the sand you can almost replicate a tripod for your natural detail shot.


I recall a visit to Harris, in the Outer Hebrides. One beach offered me countless opportunities to photograph the finer points of natural detail. I must have spent several hours, in glorious warm sunshine, ambling along the shore line. I can’t recall now how many images I got. It must have been several dozen. With digital, if the shot doesn’t work for you, at least you can delete it later. In the days of colour transparencies, you couldn’t delete them and each shot had a cost attached. Even then you couldn’t see how it had come out!

Work the scene

So my advice is to find a suitable beach and “work it” hard, but in a relaxed fashion. Enjoy both the atmosphere and the images you find.

Natural detail :: On a beach there's fine detail is all around.

• Fine detail everywhere •
Find a suitable beach and “work it” hard. The natural detail is all around.


Photography should be fun and not a chore. I used to be most concerned if, after 3 or 4 weeks shooting in the Hebrides, I came home with very few images. Nowadays it doesn’t bother me so much, as I have revelled in the hidden beauty of the wonderful Hebridean Islands.

Comments, additions, amendments or ideas on this article? Contact Us
or why not leave a comment at the bottom of the page…

Like this article? Don’t miss the next — sign up for tips by email.

Ruari Cumming ARPS (contributing author)

Words and images by: © Ruari Cumming ARPS/Hebridean-Island-Images.com
Ruari has been photographing the Hebridean Islands for many years. He is a distinguished photographer holding the ARPS award. He continues to take stunning pictures of the landscapes, beaches and people of the Islands. He also regularly gives talks on his work. More… Hebridean Island Images Hebridean Island Images | External link - opens new tab/page

Family day out – three tips to help you remember

Family day out :: Try not to take formal shots on the beach

• Family day out •
The memories are preserved better if you have relaxed shots. Don’t ruin the day obsessing about your photography – make a story. Forget the world class aesthetics and concentrate on the stuff of memories.

Capture the spirit of the day out.

The “Family day out” is one of the important bonding moments for a family. When you get to your destination the family relax and spend time doing what they enjoy. Memories are made of great days out. And, your pictures of the day make for wonderful memory-moments when you look back.

Often photogs out for the day tend to line people up in stiffly-posed formal positions. The informal clothing and location put these poses at odds with the scene. And it is not all about great aesthetics either. The family day out is more about people enjoying themselves than it is about achieving a world class image.

Here are three tips to help you get the most out of your family day out memory-shots.

Family day out – the candid moment

It’ll be fun, especially if you have the children there. So the most important thing is to get them doing what they enjoy. There is a problem though. You’ll never get a memorable family day out image if you spend the day fretting about getting it all just right.

Sometimes as photographers we get rather precious about poses, backgrounds, set up, simplifying scenes… It all has to be right. But does it really? Capturing a family scene is about your memory. Great aesthetics are one thing. Seeing your loved ones in a memory popping moment is another. So, relax your high principles – for the sake of a family memory moment.

Family day out :: candid moment

• A quiet moment at lunch •
Catch your loved ones in a candid moment. Tell a compelling story of your family day out.


There are lots of different aspects to photography. Instead of being an over-bearing photographer consider a different way. Just do something for you. You could make a great family day out miserable by regimenting them just so you can record it.

Alternatively, you could make the whole experience a vital and unique series of captures. Spend your time documenting what your family are doing. Catch them really enjoying themselves. Leave them be, spend your time getting the candid moments when they are most absorbed. That way you will see the deeper aspects of their character as well as making your shots tell a compelling story.

Capturing people doing what they enjoy

Doing what you enjoy on a day out is very character revealing. If you capture your subject in a moment that reveals their inner self then the shot is more memorable for you. It’s still in the spirit of the candid moment. Don’t interrupt them – capture them in action. It helps tell the story of the day. It also will help you remember the context of the shot and what you were doing at the time.

Family day out :: Capture your loved ones doing what they enjoy.

• Making pictures •
Capture your loved ones doing what they enjoy. It helps make the story of your family day out more compelling.

Family day out – vista shots – story continuity

As the family photog you can be happily engaged in your interest while the rest of the family pursue theirs. So don’t forget to have a good look around. There are plenty of things you can be photographing as well as your family. This is your chance to make your photographic skills come out. You can obsess all you like over the detail of things you photograph while you leave the rest of the family to have their fun.

Take in the vista too. Make sure you look at the surrounding area. Capture the things that interest you and others in your family. Think about how to put your “family day out” story in context. So make sure you take some shots of the scene and the surrounding areas or activities taking place. If you take the time to do this through the day you can build a story line with your pictures. It will make a great album for you all to remember your family day out for years to come.

Comments, additions, amendments or ideas on this article? Contact Us
or why not leave a comment at the bottom of the page…

Like this article? Don’t miss the next — sign up for tips by email.

Damon Guy - Netkonnexion

Damon Guy (Netkonnexion)

Damon is a writer-photographer and editor of this site. He has run some major websites, a computing department and a digital image library. He started out as a trained teacher and now runs training for digital photogs.
See also: Editors ‘Bio’.
By Damon Guy see his profile on Google+.

A ten point plan to “think photography” all day

• Unlock your potential - think photography all day •

• Unlock your potential – think photography all day •
Almost everything has texture, pattern, depth, contrast and interest for the eye. It is a question of lighting, composition and bringing out its potential. Find ways to think photography all day to help you develop the right techniques and skills.
(Click image to view large).

Improving and learning takes thinking and practice.

Each day we should focus on doing plenty of thinking to help improve our photography skills. It does not take long and it’s fun. You can fit it into things you are doing through the day. The idea is to keep you focussed. Here is what you do to help you “think photography” during your day.

1. Think photography :: Change your thinking

Try to think photography in a positive way. Photographers need to be positive. Always look at the light side. Don’t let your mind drag you down. Ignore the negatives and obstacles. Look at the good things, the easy ways and fruitful outcomes. Practice taking time to be positive about a situation where a negative thought popped into mind. When negativity looms, think of your favourite photographic situation and picture yourself there.

2. Think photography :: Problem solving

Photography is a problem solving skill. Pick up your camera. Now find some object to photograph. Find a way for the light to come at it from a low angle and from the side. It is this basic skill that gives you the shadows and contrasts you need to give an object texture. Do this daily. Do it even if you do not have your camera. Think photography by visualising what you would do if you could photograph it.

3. Think photography :: Appreciate a good thing

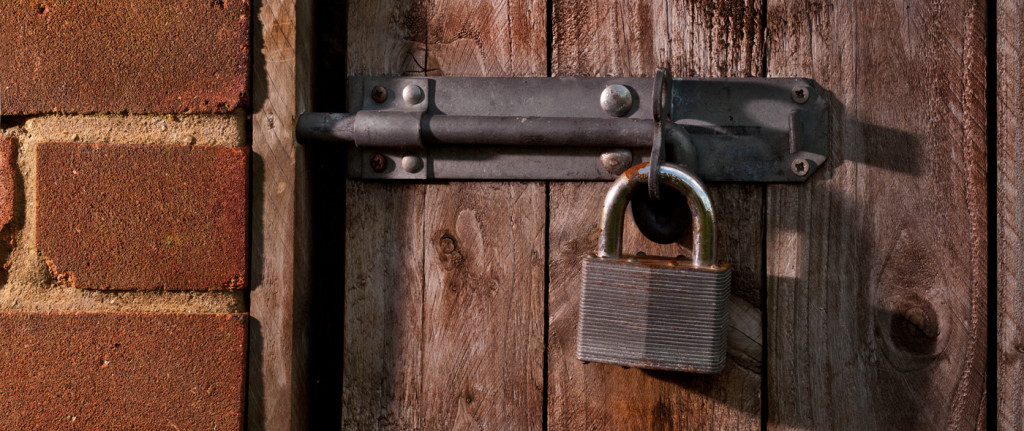
Make sure that every day you find a way to spend a few minutes appreciating the aesthetics in something. Lots of things have simple texture and pattern too. Look for them and find a way to bring them out. Do this even if you don’t have a camera to hand. Just thinking about it helps you get in the right frame of mind. The picture of a lock and bolt on a garden shed above is an example. Creative lighting and exploiting texture and shadow made a picture suitable for this article!

4. Think photography :: Watch television

Watch television. Yes, that’s right. Watch TV. I am sure you will find it illuminating – literally. Some of the best lighting and photographic tricks are on TV every day. Look for them – side lighting, top lighting, rim lighting, mood lighting, pattern lighting, catchlights. There is lots more to look for. You can use your leisure moments to improve your photography. (See also: A little known idea that will help your photography every day).

5. Think photography :: Do some reading

Each day, devote some time to reading a page or two of a photography book or an article online. Gradually things will begin to come together. It will help you keep thinking about improvement and new techniques. At the time of writing there are over a thousand articles and definitions on Photokonnexion. Try one of those!

6. Think photography :: Look at photographs

See if you can look at 50 photographs each day. Ask yourself questions about each one. Why you like or dislike it? What is the photographer trying to say? What is the theme? Why is this photo published? What composition tricks have they used to draw your eye into the shot? Which forms of perspective, shadow and light have they used to create depth? There are lots of other questions. Find as many ways as you can to analyse the shots. Really try to get into the photographers mind. You will really learn a lot about you, and how you “think photography”. (See also: 50 ways to improve your photography – every day! and also: 15 great links for you to see 50 photos a day).

7. Think photography :: Go back in time

Reprise one of your old photos. Why was it good, bad or indifferent? What could be done better? What were you thinking? Is there really something in the this picture worth shooting? Ask yourself the same questions as in 6 above. Really give it a harsh review. You will learn a lot about your own style and improvement.

8. Think photography :: Give yourself a treat

Make a photographic treat for yourself every day. Think of something you can make for your still life photography. Check out an article about a new camera. Look up an old friend. Among other things tell them about your photography. Buy a treat for your evening meal. Then think about how you could cook it and present it ready to be photographed. Find lots of ways to reward yourself in the context of photography. It will help your enthusiasm.

9. Think photography :: Keep a shot-list – add to it daily

Make a list. Every day try to add a shot you want to do. Try to imagine a simple plan for how to do that photo when you get a moment with your camera. Get ideas from Google images, magazines, television, books – everywhere.

10. Think photography :: Go to sleep

Photography is a great pursuit. It is also relaxing. Before you go to sleep at night close your eyes. Then think about how it felt to make your best image. Plan how you can have another success like that. You will sleep well and have some great ideas!

Keep your day relaxed and on focus – think photography

This post is really about finding ways to spend your day doing lots of things. But in the background keeping your passion fired up. Most of these things you can do while no one else knows you are doing it. But at the same time you are learning and having new insights. Its fun to spend time doing your hobby while your boss is sounding off or while you sit at your desk. Wow! Now that is the way to think photography!

Comments, additions, amendments or ideas on this article? Contact Us
or why not leave a comment at the bottom of the page…

Like this article? Don’t miss the next — sign up for tips by email.

Damon Guy - Netkonnexion

Damon Guy (Netkonnexion)

Damon is a writer-photographer and editor of this site. He has run some major websites, a computing department and a digital image library. He started out as a trained teacher and now runs training for digital photogs.
See also: Editors ‘Bio’.
By Damon Guy see his profile on Google+.
What you can learn from candid photography

Groom • Candid photography :: getting the shot is a pressure.

• Groom •
Candid photography – getting the shot is a pressure. Weddings are times when you need to work particularly fast and accurately. •

Responding is a skill.

When starting on the path to disciplined photography we’re told to slow down. Take careful, measured and pre-visualised shots. We are told to stop trying to frantically pepper the scene with shots. Take time. Take stock. Think everything through. The aim is to get the shot under control.

A good photographer often needs to respond rapidly. The careful, measured approach still applies. They still have to get the picture. However, the pace of a situation demands swift shots. The practised photog can respond with speed and accuracy. Practice at candid photography is a great way to realise those skills for yourself.

Candid photography and practice

The aim is to make a clean, sharp, well composed image. The nature of a candid shot makes that difficult. While trying to make a success of your candid photography some conditions may apply. Some of those may contradict each other…

  • The subject may not know you are going to take a picture.
  • The subject could know you are going to take a picture.
  • The subject may be unpredictable.
  • You will need to be very quick.
  • You will need to be able to get a sharp image despite speedy working.
  • You may have to take several shots (eg. not dozens).
  • Your subject should be in an interesting position.
  • The subject needs to to be in an interesting context in the scene.
  • You should anticipate the shot (rather than getting lucky).
  • You will have your camera ready and settings correct for the shot.
  • You will have only a microsecond to compose the shot.

You just do not know what you are going to encounter until you have to deal with it.

Dealing with all that may seem a tall order. Especially if you are told not to machine-gun the scene with shots. Haste and frantic bursts rarely lead to good luck. Actually, it is not about doing all that at super speed. Like everything you do in photography, candid photography requires preparation, practice and control.

Equipment – knowing what you can do

NO! Do not go out and buy yourself a micro-weight, super-camera. Up-to-date bells and whistles are not the point. Instead, look for simplicity. Sometimes the best camera is an old and familiar one. What we want for this exercise is knowledge.

The best possible way to get fast with a camera is to know what it can do. The lens too. If you are familiar and well versed in using your equipment you will automatically respond to the scene. Here is an example.

In candid photography control of depth of field is essential

• Impish grin •
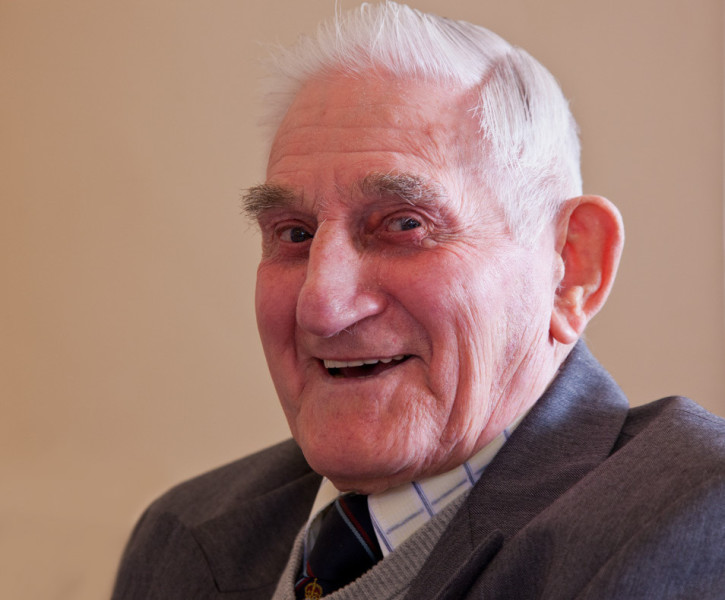
Keep the subject in focus but the background is frosted out.
In candid photography control of depth of field is essential
(Click to view large)

This shot was captured as this lovely man turned from a conversation. He was talking to someone on his right. I was ready for his turn toward me. His impish grin as he saw me really made the shot.

I wanted a depth of field that had his head and face sharp. I also wanted the background indistinct. Notice the sharpness is lost just on the far shoulder. My lens was set up to have a depth of field of about 400mm (about 15in to 16in). But there was no measurement involved. This was an estimate. It involved knowing the depth of field at my distance from the man, and using the right aperture. This capture is the result of knowing the lens and camera combo really well. It was a practised shot using very familiar equipment. The successful candid photography came out of the practice and familiarity.

Equally, it is easy to get the shot wrong. Depth of field, especially at close range, is fickle. It is easy to get the tip of the nose out of focus, the eyes and face in focus, and the hair out of focus. It is important to look at the variables involved. The aperture size and distance-from-subject control the depth of field. So, try the exercise below using manual settings.

Take a bright coloured builders tape measure. Place a small object beside a mid-point on the measure. Take a photo of the object down the measures’ length. Use a wide aperture. Check out the depth of field by looking at the measurements that are sharp. Now by varying your distance from the object see how much you change the depth of field. Do this for a wide range of apertures. With experience you will get a feel for controlling the depth of field. With twenty or thirty variations you should get a feel for the depth of field.

Settings

Aperture is one setting. ISO and shutter speed are important too. Getting a feel for your equipment means getting familiar with how these settings work.

Candid photography often involves working in darker lighting. Parties and indoor sessions, weddings in churches and in evening light all require wide apertures. You might use flash. But in a lot of situations that may not be practical or desirable. So using a high ISO setting (more sensitive sensor) will allow you to work effectively in lower light. So, lower the light where you are working with the tape measure. Raise the ISO and repeat the exercises. Get a feel for how you can vary the exposure by changing the ISO.

Needless to say you can vary the shutter speed in similar ways. Try the exercise again. This time keep the aperture and ISO fixed and change the shutter speed up and down through a range of shots. [More on varying shutter speed].

Learning to use your settings manually takes more than one session. That is important. You can gain a lot by training yourself to be sensitive to the settings. Working toward good quality candid photography can really help you gain that sensitivity. Poor photographs of faces and people are immediately obvious! You get great feedback from the experience of poor shots.

Composition – seizing the moment

Candid photography is about seizing the moment. You need to use good settings. You also need some understanding of composition. This means working to get your subject in the right environment. They will have an appropriate pose and possibly the right context or behaviour too. Without all these coming together the moment is lost. Setting it all up takes some thought.

Normally people do candid photography with some idea of what they want to achieve. Random wanderings are normally unproductive. Luck follows more often from preparation and forethought than stumbling upon a notable event.

So, have a good think about your scene composition….

  • Set yourself up in a viable position ahead of the shot.
  • Think about how the light is placed in the scene overall.
  • Place yourself for the right background on the far side of the shot.
  • Fix the camera settings for the composition ahead of the shot.

In other words be prepared. Then, when the right moment comes along, you will have the minimum to do. A little composition, framing the shot, is essential. A tweak of the focus possibly… But essentially – you should be ready.

Now you stand the best possible chance of getting the shot.

Candid photography is successful when it all comes together

All this preparation and practice is about getting you to the moment when you take the shot. Making a success of your candid photography is about three things…

  • Knowing your settings.
  • Practice with and knowing your equipment.
  • Forethought about the scene.

Having everything ready is the key. Then when all the elements of the scene come together all you do is frame it and capture. If you succeed in that, you will also make a swift shot. Because, in fact, you have little to do. Speed and accuracy is about being ready with everything and having the minimum to do when the right events pull the shot together.

Comments, additions, amendments or ideas on this article? Contact Us
or why not leave a comment at the bottom of the page…

Like this article? Don’t miss the next — sign up for tips by email.

Damon Guy - Netkonnexion

Damon Guy (Netkonnexion)

Damon is a writer-photographer and editor of this site. He has run some major websites, a computing department and a digital image library. He started out as a trained teacher and now runs training for digital photogs.
See also: Editors ‘Bio’.
By Damon Guy see his profile on Google+.

World Backup Day – save your files

The only safe files are ones in backup

World Backup Day  World Backup Day | External link - opens new tab/page
Make sure your files are safe. Back them up.

Backup, backup, backup!

March thirty-first 2014 was World Backup Day  World Backup Day | External link - opens new tab/page. “What’s that all about?” you might ask. Well, if you do ask that you probably have not experienced the anguish of losing all your files. For some people it can be devastating.

What if you don’t backup?

I spent fifteen years in managing IT services and image libraries. A job where backup is everything. Without it we might have lost thousands of precious files. Most could not be replaced.

In that time I’ve come across many people who lost files. The most common losses were simple delete mistakes. In most cases these lost files can simply be un-deleted.

However, if you lose your storage media or hard drive you lose everything stored on it. Theft, software failure, software infection, mechanical failure – all are equally devastating. Your files are gone.

I have often heard people say, “well, it could happen”. “But I have nothing precious to lose”. This indicates a state of mind. People often do not appreciate the value of the data they have on their computer. Photographers may appreciate our collection of files. They represent our cumulative photographic efforts. But most people have other valuable data too. Past emails from loved ones. Pictures sent to you. Medical information. Passwords. Personal banking and finance data. Personal correspondence and records. Insurance details; investment files… The list goes on.

Over the years I have so often seen people devastated by what they have lost. They just did not realise what they had on their computer. But when the data is gone it’s too late.

If you lose your data there are also many problems ahead. Finding information again after losing data takes months. Getting in contact with people to get new accounts set up takes time. In fact one or two people have told me that after losing a hard drive they spent years recovering from it. After you lose some information some Internet accounts may never be available again! Will you lose files that way?

The answer is simple – backup

Many photographers do not backup their photos. So what should you do to protect against loss?

Backup is easy. It requires a small investment and a mental commitment. First an important principle…

LOCKSS :: This stands for Lots of Copies Keep Systems Safe.

Of course you need to spread these copies across different storage media. If every file is on one hard drive this becomes a single point of failure.

So, the second thing you need is a second hard drive or storage medium. With a second drive you can back up your files onto it.

A USB drive is a bit unreliable for backup and and easily lost. An external hard drive is best. They have big capacities to hold all your files. Buy one which is the same size as your computer hard drive. They can be purchased at reasonable prices. You can check out a range of them easily – External USB hard drives for your computer  External USB hard drives for backup | External link - opens new tab/page.

A more secure backup system will involve two backup drives. Here is how it will work…

  • Working drive: this has your working files on it – it’s normally the hard drive on your computer.
  • Backup drive: Backup working files by copying them to this dedicated backup drive. Now if your computer hard drive fails you will have your files safe on a standby drive.
  • Third copy: On a regular basis, backup to a third drive.
  • Off-site storage: Take the third backup drive to a different location. Now if there is a fire or other loss (theft, virus etc). The other location represents a safe place for your files destroyed by the fire.

So you will have: two copies where you normally work and one off-site. This is a safe backup system. It will cover most file loss situations.

Backup time

It takes little time to copy files from one drive to another. However, it is easier when you use an automatic system. There are many file archive systems available. A good number of them are free.

One good example is the file backup system I use. Called Allway Sync Backup and archive software - AllwaySync | External link - opens new tab/page. I have found it a very flexible system to use and very easy to run.

There are other backup systems you can research…
Check this page on Google File backup software - Google search | External link - opens new tab/page.

As you can see from this search many of these systems are free software. You have chance with others to try “before-you-buy” too.

Another way to back up your data, photographs and files is to upload them to an online drive. Google has such a drive. Dropbox Dropbox - Online backup and file storage | External link - opens new tab/page is another… there are other versions too. All you do is have one drive to work on – and one drive on the Internet. That way you have a second drive that is off-site and safe.

This cloud-based backup system sounds good. But it can get expensive, and slow, once you start to accumulate lots of files. And, lets face it, photographers really do have lots of files. But it might suit you. So feel free to experiment or try out internet storage.

Backup commitment…

Earlier I said you need some commitment. Well that is needed to backup regularly. You really need to do it. Either have an automated system. Or, diary a date – say weekly. Then back up regularly. Do it daily if you need to do so. But make the commitment. If you don’t backup regularly you will pay for it later. Because, you will have a drive failure one day.

A state of mind

Doing regular backup work is a state of mind. You’ll need to spend a little money on drives or storage. You need to have some software or a regular date with your diary. And, you need to be aware of how much effort it takes to recover from a loss. Setting up a backup system for yourself now can save you a lot of time and pain recovering from losses later.

Make sure you commit. Make sure you backup regularly. I would hate you to be one of those people who spend years recovering from a major data loss.

Comments, additions, amendments or ideas on this article? Contact Us
or why not leave a comment at the bottom of the page…

Like this article? Don’t miss the next — sign up for tips by email.

Damon Guy - Netkonnexion

Damon Guy (Netkonnexion)

Damon is a writer-photographer and editor of this site. He has run some major websites, a computing department and a digital image library. He started out as a trained teacher and now runs training for digital photogs.
See also: Editors ‘Bio’.
By Damon Guy see his profile on Google+.
Three creative jump start ideas

Post by Ann H. LeFevre

A creative jump start – get going again.

It happens to all of us at least once. Our creativity runs down and we feel uninspired. Those are the times when our cameras feel like they weigh a thousand pounds and our brains seem like they are stuffed with cotton. There are many ways to combat such a slump. What you need is a creative jump start. Here are three suggestions to help you the next time you come up against that photographic brick wall.

The 30 second game

Pick a room in your home at random to try the first creative jump start. With camera in hand, walk into the room. Select a subject (perhaps the first thing you see) and start shooting. Don’t “think” about it; just do it. Make it quick and no longer than 30 seconds. The idea here is to be loose.

The Strat • By Ann H. LeFevre • Three creative jump start ideas

• The Strat •
By Ann H. LeFevre (Click to view large)


Creativity can be blocked by over-thinking about the “next shot”. This little game helps to bring back some spontaneity into your picture taking.

Take Another Look

We get used to seeing things the way we always see things. In this exercise the object is to take something common, perhaps something you see all the time. Then, to look at it from a different perspective.

• Wooden Spoon • <br />By Ann H. LeFevre • Three creative jump start ideas

• Wooden Spoon •
By Ann H. LeFevre (Click to view large)


Look at your chosen object from all different angles. Take a shot from each one. Look up. Look down. Look close. Look all around, taking pictures as you go. Looking at a common object from a new vantage point can loosen up the creativity block. A creative jump start works best with a simple views of things.

Play with Processing

Take one of those “Why did I even take this picture?” photos. Make a copy of the original. Put it into your photo processing program and play around with some special effects. Go all out and experiment. Don’t worry about whether or not you’ll actually keep the picture when you’ve finished. Simply spend time playing around on it for as long as you want. Let your processing ideas flow.

• Sunflowers •<br />By Ann H. LeFevre •  Three creative jump start ideas

• Sunflowers •
By Ann H. LeFevre (Click to view large)


Laugh at what you create. Laughter loosens up your creativity. And who knows? One of those crazy effects may trigger an idea! Processing can also transform an ordinary picture into something that is visually pleasing. Playing with the way a photo looks is a great way to charge up your creativity.

Beyond routine and distraction

Shooting slumps occur because we become anchored to routine or distracted by our busy lives. A creative jump start serves to break those habits and change our perspective. Try one out the next time you’re in a rut and see what happens!

Ann H. LeFevre – contributing author

Ann holds a B.A. in Fine Arts from Bethany College. She is a member of the Pocono Photo Club Pocono Photo Club | External link - opens new tab/page, and participates in the 365 Project Ann H. LeFevre - contributing author on 365Project.org | External link - opens new tab/page an on-line photographic community. She has enjoyed the artistic aspects of photography for many years and enjoys exploring a variety of photographic subjects in her work.

Top ^

Comments, additions, amendments or ideas on this article? Contact Us
or why not leave a comment at the bottom of the page…

Like this article? Don’t miss the next — sign up for tips by email.

Can you write? Of course you can!
Write for Photokonnexion...

We would love to have your articles or tips posted on our site.
Find out more…
Write for Photokonnexion.