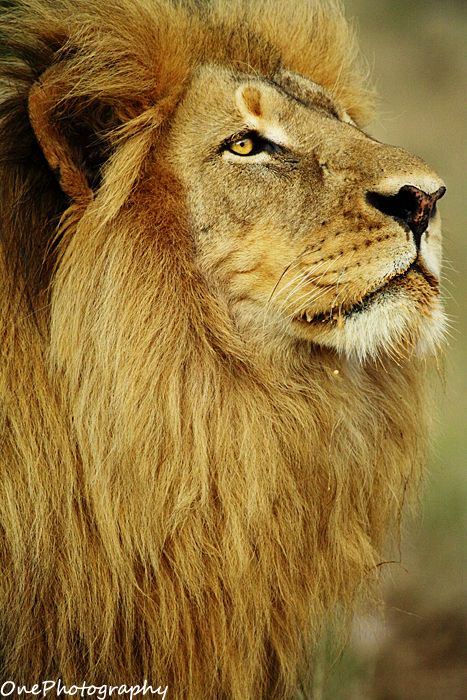
Tag Archives: Wildlife

How to prepare for a photo safari and what to take

The King

• The King
Image by John de Jager • OnePhotography  External link - opens new tab/page

Going on safari – it’s amazing.

Photographic safaris should be experienced by every photographer at least once in a lifetime. They provide the perfect opportunity to photograph wildlife and nature as they are dedicated tours focusing on photography.

What is on offer on a photo-safari?

Most offer private vehicles allowing the photographers to focus on specific wildlife, spend the needed time with the wildlife to get the shot, and allow for a more flexible approach to the safari. Most importantly, the safari is hosted by an expert wildlife photographer to assist clients with getting the perfect shot and then processing the images.

How should you prepare

• Contact the operator of your chosen photographic safari company and confirm with them what their recommended equipment is. This can vary from area to area, especially with regards to lenses. Some reserves allow vehicles to follow animals off road and one can get away with shorter lenses e.g. 200mm. Other reserves are more restricted and longer lenses are required e.g. 600mm.
• Spend time getting to know your camera and equipment. Wildlife photography is not static. You will see fast moving subjects and shifting light. You should be able to change settings quickly.
• Practice by photographing pets or birds in your local home area. Get a feel for photographing a moving subject. (You can get some more advice on this in our action photography course – Editor).
• Beginners and amateurs, don’t worry! This is exactly why an expert wildlife photographer joins you on safari. The host will assist you with the best camera settings and how to get the best out of your camera.
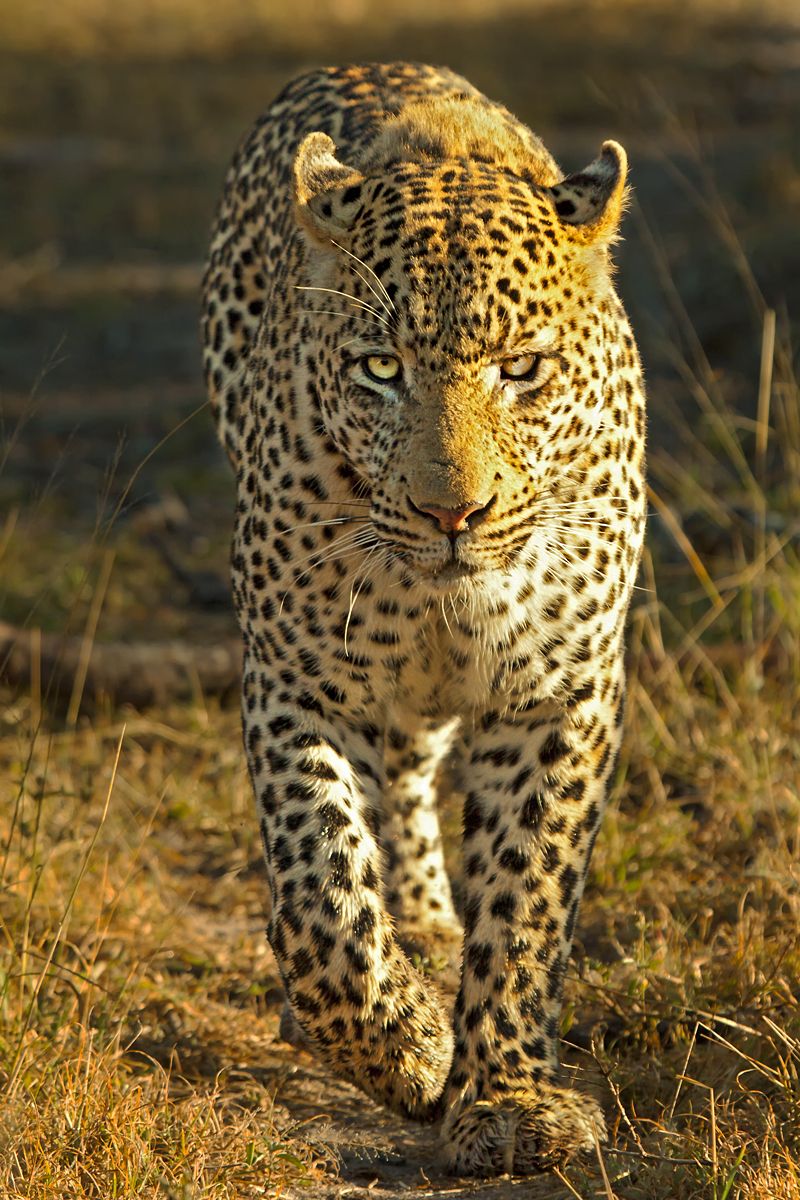
On a mission

• On a mission •
Click to view large
Image by John de Jager • OnePhotography  External link - opens new tab/page

What you should take

Once you are out in the field it is not easy to get more equipment. Think ahead…
• A camera and lens within your price range (some operators offer equipment rental). Lens wise, it is good to have a wide angle lens for landscapes and a telephoto lens for the animals.
• An external flash with spare batteries is well worth having. If you can also bring a wireless flash transmitter to avoid “red-eye”.
• A shutter release switch for star trails and possibly an (intervalometer).
• Take enough memory cards (high speed). I have shot 8GB in RAW images in less than an hour on safari before, so it is important to have enough backup memory space available. Some form of external storage device to transfer images onto after each safari is advisable too. The reason why I suggest high speed cards is because in wildlife photography you will often shoot in high speed continuous mode. Card speeds affect how many frames you can capture in a burst of shots.
• Take spare batteries. You can be out on a drive for many hours at a time.
• A good laptop powerful enough to process images on Photoshop/lightroom or other post-processing software. Some operators offer monitors to uplink to for editing purposes but if not, bring a laptop with dedicated graphics and an RGB LED screen.
• A memory card reader or method of downloading your images to clear your memory cards each day.
• A good lens cleaning kit is essential. Being out in the field leads to dust collection!
• Insure your equipment! Weather can be unpredictable and I have had a client lose a Canon 600mm lens in a freak wind storm that caused a log to fall on the lens. The lens was not insured…!
• Bean bag or vehicle mount to hold your camera nice and still while shooting.
• Plastic packets, waterproof camera sleeves or waterproof material! Thunderstorms are common in Africa through the summer months. So bring something just to cover up that lens or camera.
• Bring a lot of patience! Wildlife photography is often about waiting for the right moment. Under the guidance of your host and guide, this wait will be more than worth it.
• A willingness to learn and share. It is important on these safaris to be willing to learn, not just about photography but about the creatures you are photographing. The more you learn about animal behaviour. the better. It will allow you to anticipate your next shot. Share with the others on safari too. Everyone has some idea or technique that may just help others in the group.
• An ethical respect for nature is very important. Not only is it unethical to disturb animals to get a shot, but it can at times put you and the rest of the clients in danger.
• Adequate protection against the sun (hats, sun cream etc).

John de Jager (Contributing Author)

John de Jager is the owner of Onephotography, a photographic safari company operating in South Africa. They specialize in luxury photographic safaris focusing on rare and endangered species found in South Africa – as well as all the classic wildlife. See OnePhotography on FaceBook  External link - opens new tab/page for regular updates and stunning imagery.

Comments, additions, amendments or ideas on this article? Contact Us
or why not leave a comment at the bottom of the page…

Can you write? Of course you can!
Write for Photokonnexion...

We would love to have your articles or tips posted on our site.
Find out more…
Write for Photokonnexion.

Simple facts about successful birds-in-flight shots

Vultures on the wing

Vultures on the wing – the capture of these birds needs the same panning techniques as any other moving objects.
Click image to view large. “Vultures on the wing” By Netkonnexion on Flickr External link - opens new tab/page

The capture of birds in flight is fun.

Birds rarely stay still for long and move fast when flying. The techniques here will provide basic ways for you to master birds-in-flight photography. The ideas build on techniques used in other areas of photography.

Panning techniques

Bird-in-flight shots are about movement. With any moving thing the only way to capture a sharp shot is to pan with the subject as it moves. Bird-in-flight panning uses the same techniques as other action shots. To learn panning techniques check out this series Action shots – How to….

As with any photographic technique, mastery comes with practice. If you are learning panning to photograph birds, start by panning cars. They are big targets and move with consistent speeds. They come past at regular intervals so practice is easy. You can practice almost anywhere and you will learn to pan quickly. Then, when you are ready, move onto smaller bird targets when you have mastered the simple movements and turning speeds.

Camera settings

Applying simple panning techniques is easy but the detail is important. The speed at which the birds are flying is critical. The focus you need to use is equally as critical. Here are some simple steps to set up the shots…

  1. Take a photograph of your subjects using automatic mode. You will use this as a starting point. Note down the settings for:
    ISO,
    Shutter speed and
    aperture.
  2. Next, set the camera to manual mode.
  3. Set your manual settings to those you noted from your auto-mode shot. You are going to gradually vary the settings until you get them right.
  4. The ISO setting will need to be fixed (for now). Leave it as you set it from your first (automatic) shot.
  5. Aperture is going to be an artistic decision. If you need to have the background sharp then you can tend toward higher F.stop numbers – say F11. If you need it soft (with bokeh) then use a wider aperture (F 4.0 to F5.6).
  6. Shutter speed is going to dictate how much movement you will see in the wings. To be safe, start with a faster shutter speed to freeze the action (500th, or 200th with flash).

You will be making changes to these settings from your original setting you noted from the auto-mode shot. Just remember, all settings are related. They balance. A change one way with a setting will need a compensation with another setting. If you need to move toward a faster shot to freeze the action you need to…

  1. Change the manual setting for shutter speed by one click toward a faster setting. This will be one third of a stop on most DSLRs.
  2. Then, to balance the settings, move the aperture setting one click off toward a larger aperture. This is because if you have less light coming in (faster shutter) you will need to open the aperture to compensate.
  3. You can repeat this process until you get the bird to freeze in its movement.

If you set a faster shutter speed, you need to open the aperture to compensate for less light getting in. A wider aperture reduces your depth of field. If you want to keep the depth of field as it was, then you need to increase the ISO by one third of a stop instead.

In other words, to move a setting towards your desired position you need to keep the balance of the other settings by equal amounts.

Focus and framing

When capturing birds-in-flight the focus is critical because the bird is moving. Set your camera focus to “continuous auto focus”. Continuous focus mode adjusts the focus as the bird moves. This allows your camera to maintain some focus control for the moving target.

You also need to set your focal length to approximately where you are going to capture the bird in flight. This means being ready with the approximate focal length to capture the incoming flight path of the bird(s). You may have no idea where the next bird is going to come from. However, you can make some approximate guesses based on experience and your location. The rest is up to you.

Zoom out from the shot leaving enough room to hold the bird in the frame while panning

Zoom out from the shot leaving enough room to hold the bird in the frame while panning. Click image to view large.
“Seagull in flight” By Netkonnexion on Flickr External link - opens new tab/page


Setting up the framing is the critical final step.

You need to be able to confidently place the bird in the frame for the shot. However, it is not easy to frame the bird so it fills the frame because they move so fast and are a small target. If you fill the frame when panning you will find it very difficult to get the subject consistently in the frame throughout the pan. So, zoom out. You will have to crop the shots later to bring the bird up to size. Yes, this probably means you are going to have to take more shots and do more post-processing. Unfortunate, but it is in the nature of these types of shots.

You should also consider leaving some room in front of the subject so it looks like it has some space to fly into. If your bird is right up against the edge of the picture in the direction it is going it looks like it is about to fly into something. The viewers eye naturally follows the line of flight and they will be distracted by that line if it is about to fly directly out of the frame.

Applying the techniques

So now you have the settings and you have the location/focus/framing worked out. The rest is practice. Now it’s shoot and wait – shoot and wait. It is time to apply yourself, to try out the techniques.

My personal experience with birds has involved plenty of practice and trial and error. What you read here will give you the essentials. Applying them is about doing some photography and learning as you go along. Enjoy it, panning and photographing birds in flight is great fun.

#11030#

Knowing Your Wildlife Subject

Find out everything you can about your wildlife subject

Find out everything you can about your wildlife subject. It will save you time and you stand a better chance of getting the shot you want.

Do your research in good time before your trip

Photographing wildlife is one of the most satisfying photographic subjects. When we get a great shot we feel terrific. However, if your back-to-nature shot is to be a success then you should make sure you know what you are doing. Preparation and research is essential. Find out how to improve your chance of a good wildlife shot.

Define the shot you want

For any sort of wildlife consider what you want to achieve… and what is practical. Doing a Google image search for the animal you want to shoot will reveal hundreds of pictures that relate to your subject. It really helps to go through those and see what is possible, and what you like. Getting ideas about shots will help you to visualise what works. On location it will also help you clarify ideas for when and how to take the shot. Pick out a few pictures you like. Review them often to keep what you want in your mind.

Research the creature

A lot of photographers go on location to photograph a particular animal and never see one. They appear on location assuming they will find an animal but don’t know where ‘exactly’ to look or when. Wildlife is often rare, shy, wary of humans or deep in the natural cover of the landscape. Knowing roughly where an animal or bird lives is definitely not the same as knowing its habitat or how it uses its environment. Read up on Wildlife Photography. Make time to learn the nesting, habits, feeding and hunting activities. Without a good knowledge of these you will stand little chance of tracking down your intended animal. Read the work of experts. Then you will be able to build up a complete understanding of the animal and how to photograph it in the wild.

Health and safety

This is about both you and the animal. Wild animals are just that – wild. If you disturb them they may, in their surprise, attack you. On the other hand, if you surprise them they may abandon a nest or kill their own young as a result of the stress. Often wild animals are only found in wild places too. Most of us today are not used to these places and don’t know the ways of the country very well. Chasing an animal down in unfamiliar territory (mountains, wild open areas etc) could prove hazardous to you. Particularly in the winter.

Get to know the shots and the areas where you will get them by going on guided shoots. There are lots of companies that specialize in overseas and local wildlife shoots. They will know when the animals will be visible and where to find them. They probably have great hides to use while observing and imaging your chosen beast. They will also be able to show you what is the best equipment to use for photographing and tracking down you chosen animal.

Get trained up to cope with the environment you will be shooting in. Too many people each year get lost or die because they had no idea how to cope with the conditions they encountered. That could have been avoided with a few simple, and fun, sessions with expert trainers.

Knowing the moods of your subject

Using guides will help you get to know more about what you can reasonably expect from a shoot. You will find out about the animals moods or habits and what time of day it is out-and-about. The mood of an animal is all-important to the shot. Catch it doing anything natural and you have the type of shot that is a winner. However, if an animal is stressed or wary, scared or protecting young – your shot is unlikely to be what you want. Knowing the mood and normal activities of an animal is crucial to getting the candid shots that make great photos.
More after the jump…

Composition

Great wildlife shots are also about Composition. A good wildlife photographer works within the environment. They know all about where they are and what they are after. They place themselves in locations for the best shot of their animals. If you don’t have a natural and pleasing background for your shot all your efforts will be wasted with the animal. Hides, walls, tracks, vehicles, local roads and buildings can all impact your shot. So you need to give careful consideration to not only the location of the shoot, but where you will be pointing the camera when the animal happens past.

Time

Wildlife photography can be very time consuming. Good wildlife photographers may wait weeks for a particular shot, or some such length of time. If you visit the Wildlife Photographer of the Year External link - opens new tab/page website you will see comments next to shots by the winners about the photos. Sometimes they mention their preparation and time. It is useful to see what is involved.

Don’t always expect to come back with what you want. You may be lucky. I hope you are. But, whatever, be patient. Wildlife photography is great fun, very rewarding and often fruitful. Success only comes consistently if you know what you are doing.
Enjoy!

By Damon Guy (author and Photokonnexion editor)

Damon Guy - Netkonnexion

Damon Guy (Netkonnexion)

Damon is a writer-photog and editor of this site. He has run some major websites, a computing department and a digital image library. He started out as a trained teacher and now runs training for digital photographers.
See also: Editors ‘Bio’.