Tag Archives: Low light

Low light action shots – tips for getting them right

“Low light action shots” is contributed by Melanie Hyde (Bio) of PaintShopPro.com Low light action shots | External link - opens new tab/page.

Low light action shots need care to get them right.

Low light action shots need care to get them right.

Action photography itself can be extremely challenging. Being in the perfect place at just the right time, capturing that incredible moment. Then, hoping to transport anyone who sees your photo across time and space to take them back to the moment the image was taken. It’s a truly a magical experience, whether you’re taking the picture or the viewer.

Given the challenges that come with action photography, removing most of the light only makes it all the more difficult.

There is good news. The same principles of action photography and proper exposure apply. It’s just a little more challenging to get those low light action shots.

Light sources for your low light action shots

When it comes to taking low light action photos, you’ll need to combine the available light sources. This will help to make the most of the situation. First, take a look around and identify whether the lighting is constant or variable.

Constant Light

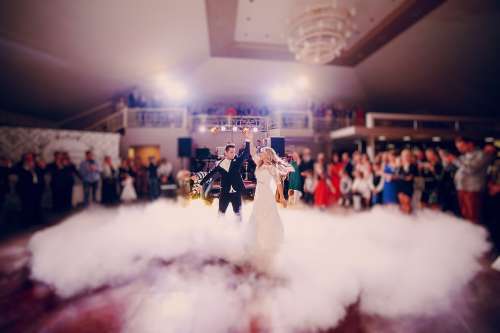
Constant light occurs within your setting when you can isolate out a source for a shot. Framing the shot is important so that the light is consistent for that shot. The next shot may have a different source – you need to isolate the light for that too. For example, if you were shooting a wedding reception, you might capture an image of the bride and groom on the dance floor. Then, you turn around and capture an image of the bride’s parents dancing across the room. Depending on the setting, the lighting may be different between the two subjects but consistent within each shot.

When lighting is consistent, operating your camera becomes much easier. The camera can adjust to meet the needs of the low light action shots. Here are a few points to keep in mind when shooting with constant low light:

  • Shoot in shutter priority mode so the camera can adjust.
  • Use Auto White Balance so the camera can adjust.
  • Manually control your ISO.
Variable light

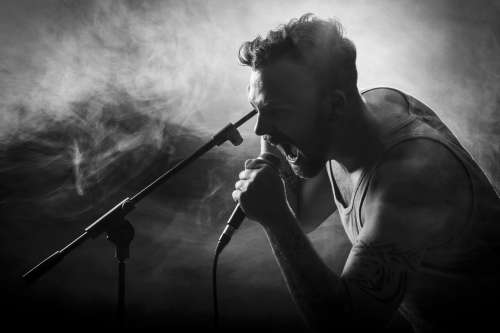
Variable light occurs when light sources are constantly changing and are inconsistent across your field of view. Imagine you’re photographing the lead singer at a rock concert. You may have to deal with strobes, spotlights and pyrotechnics. The constant changes in light sources will cause your camera to struggle to automatically expose the image correctly.

Low light action shots with variable light sources can confuse your camera - go manual.

Low light action shots with variable light sources can confuse your camera – go manual.

When dealing with variable light conditions it’s usually best to go manual. In this situation, remember to:

  • Manually set your aperture and shutter speed.
  • Manually set your White Balance.
  • Manually set your ISO.
Balance aperture, shutter speed, and ISO

You have three ways to control the way your camera exposes an image. Aperture, shutter speed, and ISO. To successfully capture great low light action shots, you must be able to manipulate these elements. Select settings that allow you to capture the highest quality image for the ambient light conditions.

The exposure triangle helps you to keep your shot’s exposure within the capability of the camera and lens. So when going manual your settings should allow these three essentials to balance. Look in your viewfinder to get the needle settled in the centre for a proper exposure. For more detail check out The Exposure Triangle – An aid to thinking about exposure.
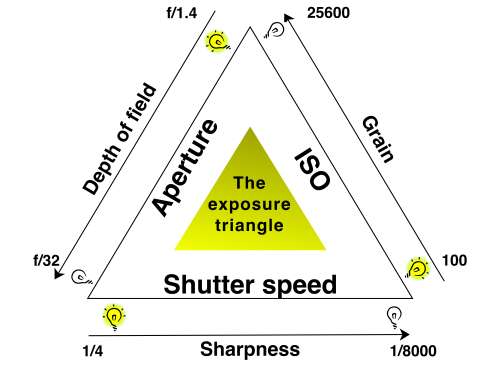
The exposure triangle is an idea that helps you balance aperture, shutter speed and ISO for a good exposure.

The exposure triangle is an idea that helps you balance aperture, shutter speed and ISO for a good exposure.

Start with shutter speed

Low light action shots are by definition going to be in difficult light for your camera. Getting your shutter speed right can be tricky. However, it has a huge impact when shooting movement in low light. The following diagram will help you select the right setting.
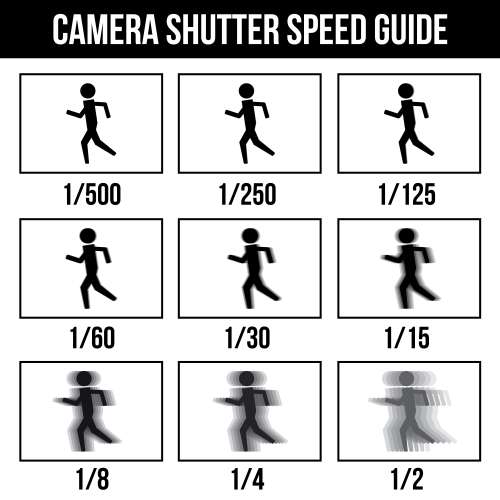
Camera shutter speed guide.

Camera shutter speed guide :: Low light action shots need the right camera speed. If the shutter speed is too low you get blurring.

You have to select a speed that is fast enough to capture the motion clearly and without blur. The speed should still slow enough to deal with the lack of light. For action shots, it’s always best to use the fastest shutter speed that the light allows. It is a balancing act so you will need to practice.

Select the widest aperture for your low light action shots

In action photography, capturing crisp and clean images is usually the priority. When shooting with low light settings, it’s crucial to get as much light to your sensor in the small amount of time that your shutter is open as possible.
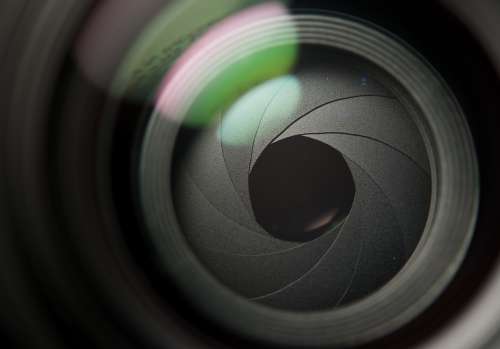
For low light action shots use a wide aperture to increase the incoming light.

The aperture sets the initial amount of light coming into the lens. For low light action shots use a wide aperture to increase the incoming light.

To accomplish this, use the widest aperture that your camera allows. While shooting in shutter priority mode, you allow your camera to do this automatically. Shooting in manual mode however, you’ll need to keep a close eye on your exposure. You need to make sure that your images are not underexposed in the low light.

Using high ISO

Are your images are consistently coming out blurry with your aperture is as wide as can be? Consider stepping up your ISO settings.

Your low light action shots can really win the day if you get your ISO right.

On the dance floor the light is almost always difficult. Your low light action shots can really win the day if you get your ISO right.

By changing your ISO, you alter your camera’s sensitivity to light. The higher the ISO, the more exposed your image will be. Just be cautious: using a higher ISO may introduce more “noise” to your photos. This noise can often be reduced or corrected in a post-processing software like PaintShop Pro Low light action shots | External link - opens new tab/page or Lightroom Low light action shots | External link - opens new tab/page. (Shooting in RAW is especially helpful with noise reduction).

Check your work as you go

Throughout the shoot, use your histogram. (See: Can you use the histogram on your camera?) It will help to make sure you’re exposing your images correctly. The histogram shows the distribution of the type of light in your shot. It aims to help you capture a consistent amount of light across the full spectrum of your image.
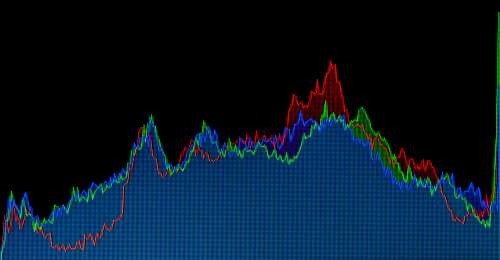
The histogram on your camera helps you ensure effective use of light in your exposure.

The histogram on your camera helps you ensure effective use of light in your exposure.

The histogram on your camera helps you ensure effective use of light in your exposure.

You’ll also want to make sure that your white balance looks good and adjust accordingly. In most cases, your camera is going to be able to set white balance automatically, but you may need to tweak it; especially if your lighting is wildly inconsistent.

Increase your odds

Low light action shots are all about being in the right place at the right time with the right equipment.

Use the fastest lens you can find. The wider the aperture, the more light your lens allows to strike your camera sensor. Anything higher than F2.8 will cause you to struggle with exposure.

Set the camera to continuous drive. This equips your camera to capture a burst of images every time you press the shutter release and gives you a better chance of capturing that perfect picture.

Use a fast memory card. Your camera can only capture images as fast as it can write them to the memory card. If you snap too many images in rapid succession, you’ll have to wait for the card to catch up with your camera and you might miss “the shot.”

Be prepared to shoot…a lot. You’re going to have a lot of images that are no good. So remember to keep tinkering with your settings. The key is shooting lots of images at different settings until you get the perfect mix.

Don’t forget to have fun

Low light action photography can be both challenging and fulfilling. As you refine your skills and your eye for lighting, action, and composition, remember to regularly experiment and try new settings.

Comments, additions, amendments or ideas on this article? Contact Us
or why not leave a comment at the bottom of the page…

Like this article? Don’t miss the next — sign up for tips by email.

Settings for overcoming hand-shake blur

Balance your settings to avoid hand-shake blur in low light.

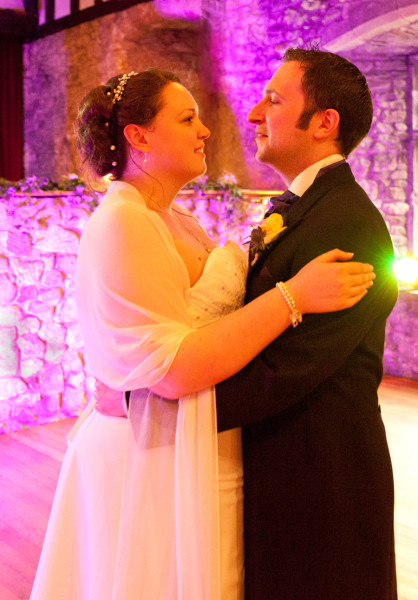
First dance
Low light photography needs a careful balance of settings to ensure a sharp shot and avoid hand-shake blur.

Hand-shake blur and sharp results.

Hand held shots often return blurred results. While using auto-settings the problem does not seem to arise. What is going on and how do you overcome hand-shake blur?

Manual settings and auto

Your digital camera is a sophisticated computer. It has access to a range of powerful programs that make decisions about each shot. When you use auto settings you are handing the camera over to the control of its programming. The auto setting is selected with the green square on the program dial. It makes all the decisions and you just point and shoot. This ‘auto’ strategy is limited. It leaves you unable to make creative decisions about your shot. Depth of field, movement blur and the light or dark emphasis in a scene is beyond your control.

With any of the manual settings on the program dial things are different. Shutter speed (S or Tv), Aperture (A or Av) and ISO settings allow you to get control of the exposure. Once you control these settings you are able to make creative decisions about your shot. But if you get it wrong you might allow hand-shake blur to creep in. Equally, with the right strategy, you can also set up to prevent the effects of hand-shake blur.

What causes hand-shake blur

Low light, long shutter opening or low ISO can all contribute. Hand shake-blur is caused by hand movement while the shutter is open. To prevent it you shorten the time the shutter is open. With a shorter shutter opening any hand movement is not given time to impact on the shot. Very fast shutter opening, say 1000th of a second, freezes the shot. The hand has almost no time to move in that short period. So, no hand-shake blur.

However, short shutter opening time means less light reaches the sensor. A good exposure requires sufficient light. A shutter speed of 1000th of a second would leave the picture under exposed in low light conditions. On the other hand, if you select a 15th of a second, the shutter is open for a long time. Hey presto! Enough light. But, (boo!) hand-shake blur. The shutter is open too long. Your hands have plenty of time to move.

Over coming hand-shake blur is about balance

If you raise the ISO setting, the sensor becomes more sensitive to light. So, raise the ISO until you can set the shutter to around 200th of a second. At that speed it is easier to hold the camera steady.

Of course, if you have to raise the ISO a lot to allow 200ths sec. you will get a grainy picture. Raising the ISO reduces the quality of the shot. Ideally an ISO setting of 100 will give you the best quality photographic result. On an average day you may have to set your ISO at around 200 or 400 to get a 200ths of a second shutter speed. Up to about ISO 800 the quality from most good DSLRs will be fine. After that, the quality of the image will be affected more and more by grain or “Digital Noise”.

Pictures taken in a dark church, or at an evening dance will have very low light. So, as an example, an ISO of 1600 would possibly give you enough sensitivity to work with a shutter speed of, say, 160th of a second. That would allow you to get a hand-held shot without hand-shake blur, if you have a steady hand. But you might also get a little digital noise in the final image.

Getting the right settings between the ISO and shutter speed is a fine balance. You need to raise the ISO the right amount to give you the shutter speed you need. Too much ISO and you get bad quality in the picture. Too little ISO and you will be forced to use a shutter speed that’s too low. Hand holding under these low light conditions may cause hand-shake blur.

Hand-shake blur and aperture

With ‘auto’ shots the camera program takes account of the light conditions. The program sets the ISO, aperture and shutter speed to values that allow shorter shutter opening. So far we have only discussed shutter speed and ISO. But aperture has a part to play too.

If you open the aperture wider it lets in more light. So, you don’t need to raise your ISO so high if you also open your aperture. In our church example above, an ISO of 800 (not 1600), shutter speed of 200th sec. and an aperture of f4 (wide) could create a good exposure.

If your aperture is set at say f11 (small) less light will get through. So, again you are going to need to have higher ISO or long shutter opening (or both), depending on your light conditions. A small aperture, like f11, will give you a sharp picture to infinity. But, you may have to sacrifice picture quality (high ISO) or suffer hand-shake blur (from longer shutter opening).

The wide aperture does have a penalty too. As the aperture gets wider the depth of field gets shallower. So once again we are back to a balance. To hand-hold a camera we must make decisions about all three basic settings – Shutter speed, aperture and ISO.

Other strategies for avoiding hand-shake blur

Camera movement or hand-shake blur can be avoided in a lot of different ways. Sometimes you must work in situations where hand-shake blur is inevitable without more radical solutions. Then there are other things you can do to reduce hand-shake blur. Here are some of them…

  • Lens anti-vibration: Many quality lenses have anti-vibration systems. These sophisticated systems detect hand-shake blur as it happens and counteract it. This might extend your safe shutter speed down to quite slow shutter speeds (say a 60th of a second). While this many not solve all your problems it can help in less extreme light conditions.
  • Tripod: A steady platform will prevent camera movement. If you need a long shutter opening then work from a tripod to eliminate hand-shake blur.
  • Flash: If you are working in a low light situation you may need to raise light levels. A flash unit, on or off the camera, is one answer. An intense flash of light can raise the light high enough for you to work with settings that prevent hand-shake blur.
  • Studio lights: More controllable, but more expensive, these lights can accurately raise light levels to enable you to reliably avoid hand-shake blur and get a good exposure.
  • Reflectors: You can use these to bring more light to where you are working by, say, reflecting from another artificial light or natural light source. Reflectors are particularly useful in reducing the darker areas of a shot. You can reflect the light to just raise light levels in some areas bringing the over all light level up. As the light level across the shot is raised the hand-shake blur can be reduced since shutter speed can be faster.
  • Improve your stance: A better stance is a great way to improve your steadiness.
  • Go to the gym: “What? This is about photography not fitness”, I hear you say. Well, here is a revelation. If your arms are stronger you can hold the camera steadier. A DSLR is a heavy object. Especially after a long session your arms will not hold the camera steady. If your camera is too heavy for you – well, strengthen up. Actually, more strength gives you much better motor control of your hands in any case. You will be able to hold even a point and shoot camera or phone with a steadier hand after regular exercise. Photography, like all other pursuits benefits from a fit body. Improved fitness will reduce hand-shake blur.
The answer to avoiding hand-shake blur

The auto program in your camera may give good results and reduce hand-shake blur. However, it will only do so in average conditions. In more extreme conditions, or where you want to exert some creative control over your shot you need to go manual.

The use of manual settings gives you control. You can control depth of field, subject movement-blur and light vs. dark emphasis in your shots. But, to get the best out of your camera you will need to set it up to avoid hand-shake blur. In this article I have tried to help you understand that the settings you pick can help you control hand-shake blur. Overall, the answer lies in creating a balance between the basic settings of aperture, shutter speed and ISO so that your hand held shutter speed is around 200ths of a second or higher. Lower than 200ths of a second and hand-shake blur is liable to creep into your shots.

Of course there are other things you can do to help raise your shutter speed. I have mentioned some of them. But they all have the same effect. They either stabilise the camera (tripod) or allow you to get the shutter speed high enough so you can steady the camera. So, now you know. Get out there and try to get your settings so you have around a 200th of a second when you take the shot.

Comments, additions, amendments or ideas on this article? Contact Us
or why not leave a comment at the bottom of the page…

Like this article? Don’t miss the next — sign up for tips by email.

Damon Guy - Netkonnexion

Damon Guy (Netkonnexion)

Damon is a writer-photographer and editor of this site. He has run some major websites, a computing department and a digital image library. He started out as a trained teacher and now runs training for digital photogs.
See also: Editors ‘Bio’.
By Damon Guy see his profile on Google+.

Five tips to create a winning image with ‘mystery’

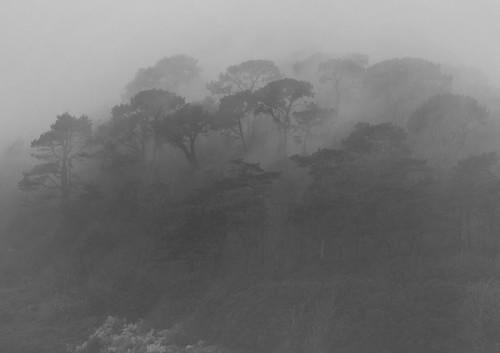
"Mysterious Landscape". Creating an air of mystery draws your viewer into the picture

“Mysterious Landscape”. Creating an air of mystery draws your viewer into the picture.

Keep the viewer looking and you have a winning image

Sometimes it’s what the viewer cannot see that makes the image powerful. The ultimate aim of your picture is to draw the viewer into the image and keep them there thinking about what they see. One way to do that is to create a mystery…

Something unseen

In a previous article I discussed the way a title is part of your overall communication. You can capture the imagination of the viewer by hinting with your title. Something that cannot be seen, but could be there, draws the attention. The viewer wants to find what is behind the hint. Give them something to look for but don’t show it. Mist is a great device for this. The very thought of a misty forest is primeval and mysterious.

Darkness

Darkness creates a sense of menace if it is done right. Anything with lurking shadows and moody lights creates the sense that something may be there – but not quite seen. This is a situation ripe for the use of under-exposure and low lights. It does not have to be a night scene. However, use of low lights, threatening colours and impenetrable shadows brings on the mystery. Mood and threat make a great combination. Both urban scenes and moonlight landscapes are ideal. I am sure you can let your imagination run wild!

Around the corner

I used to manage parks. When we were designing new landscapes we often tried to give an air of mystery. People enjoy going to parks much more if there is a sense of the unknown around the next corner. Walks and views were designed to give people somewhere to go where they could not initially see the destination. So it is with photographs. Create a path, steps, road – anything – that leads somewhere you cannot see. Make the viewer look down the line expecting to see something, which at the end, is not there. An implied destination is a great way to draw in the viewer.

Hidden faces

One thing humans love to see is a face. We train ourselves from birth to take in peoples faces, understand them, communicate with them. Deprive the viewer of a face and the mystery is on. Masks are great fun. A deliberately hidden face is an immediate mystery. Wide-brim hats in dark places are powerfully mysterious. We have a compulsion to find out who the mystery person is – and it immediately captures our attention.

Illusion

Perhaps the most timeless way of creating mystery is to fool the eye. You know something is wrong and you cannot see what. Your eyes tell you one thing, you feel there is something else. A good illusion has you visually chasing around the image to find the issue. If you create a good illusion you will have a great image based on mystery. There are lots of places on the web to find out about photographic illusions.

 
There are other ways to create a sense of mystery. We would love to hear about mysterious images you have created. Please leave a comment below with a link if you have an image online.

By Damon Guy (author and Photokonnexion editor)

Damon Guy - Netkonnexion

Damon Guy (Netkonnexion)

Damon is a writer-photog and editor of this site. He has run some major websites, a computing department and a digital image library. He started out as a trained teacher and now runs training for digital photographers.
See also: Editors ‘Bio’.

Can you write? Of course you can!
Write for Photokonnexion...

We would love to have your articles or tips posted on our site.
Find out more…
Write for Photokonnexion.

Out on a Night Shoot – Night Composition

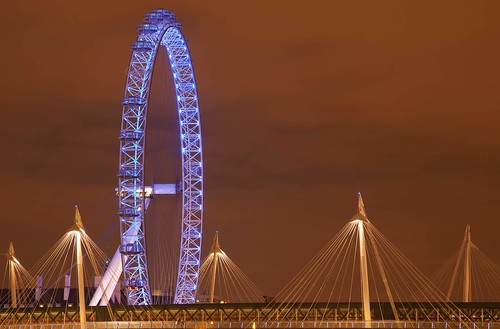
A new angle on the London Eye.

A new angle on the London Eye. Be careful with long exposures, the urban environment can create strong colour casts. Click to view large.

Thinking Ahead

Planning your night shoots are essential. Working in the dark can be dangerous and is more difficult. Make sure you plan ahead – read this first: Planning and Preparing for a Night Shoot

Night Composition

Night-time and low light composition is similar to daytime – the rules of composition don’t change. However, expect to account for the following:

  • Highlights and shadows have different impacts at night compared to daytime. Practice in the garden at home before your shoot. Then you will be able to see the different quality of light that creates shadows and how much more powerful highlights can be.
  • Low light and night leads to longer exposures. Be aware of any bright lights you will have in your field of view. You may need to think about the direction or angle of the shot to compensate.
  • Be aware of very strong colour casts, especially in urban areas. Neon lights can make some strong orange or green effects. Be prepared with a knowledge of how to compensate using white balance settings.
  • Cloud levels can affect light levels, especially in urban areas. Clouds reflect light back down – you can lose the blackness of sky in heavy cloud cover. Wilderness shots can be ruined by nearby light sources like cities. Plan for this by pre-visits. Colour casts may be intensified by cloud cover.
  • Night reflections are brighter than day reflections – be aware of the difference with your settings. Night reflections will still need a longer exposure, but you may need to experiment with the settings or take a range of shots to get it right. It is easy to over-expose a night shot with bright reflections.
  • Consider the shot angle relative to bright lights. They may produce great flare – fun to shoot and it looks good (see the bright multipoint street light in the photo above). It can also mean colour banding and bright reflection spots inside the lens. This leaves orbs of light all over your shot. Consider excluding very bright lights, especially if they are coming in from the side. A lens hood is always worthwhile at night.
  • If you are doing light painting or catching light trails from something moving, watch the background. Some light trails are ruined by the colour or brightness of say, a shop front. Compose for different angles or heights to avoid it.
  • The light/dark contrasts are much stronger at night. So you might consider black and white instead of colour – especially when there are strong neon colour casts.
  • Preparing your shot is important. Advanced practice helps, but often the actual settings are done on the spot. Do lots of shots. Try different settings and lengths of exposure. You will certainly mess up some shots – we all do. The more you experiment (especially in your first few night shoots) the better you will get at estimating what works.
  • Be logical in your experiments. Start using the light meter in your camera to get a good exposure setting. Then go up one third of a stop and shoot again. Then one third more… until you are certain you have it all covered. Do the same going down a third from your ideal, then another… and so on.
Light Battles Dark

Digital cameras cannot see the same wide range of contrasts as the human eye. The range of contrasts at night is far too wide for even top-of-the-line cameras. Try and find a happy medium, avoiding very bright lights in particular. Make sure you have your histogram turned on and set to ‘blink’ if the white detail is lost. Than you will be able to spot very bright lights in the screen after each shot. You can then change your shot.

Weather Conditions – night effects

In wilderness areas, away from light pollution, ‘dark’ is very dark! It sounds odd to say that. However, most urban dwellers do not really know how intense ‘dark’ can be. They have always been used to street lights. With no cloud the darkness can be very intense on moonless nights. So you really need a torch (flash-light). Wilderness long exposures will be much longer than if you took a night shot in an urban environment.

Cloud may lighten the environment a little in the wilderness, and quite a lot more in an urban environment. They reflect the light back. So it may increase any colour casts from local light sources like neon street lights. Fog can create some odd colours at night too. Sometimes orange neon colours turn greenish. Darkness under trees may look black, but may come out bluish in post processing – depending on light levels and background colours.

Strong local light sources and reflected light may mean that the sky is very dark and the ground level is comparatively light. This is especially true when photographing light trails from cars. The light from a busy road can light up the local area. Our eyes see a constant level of light. But over a long exposure the light levels get very high in the shot. Try shooting to exclude the sky so that there is less contrast against bright lights near the ground. Alternatively you might shoot upwards to get the sky – shooting above the light at ground level.

The Moon and stars

The moon is a strong light source. Be careful with it in the frame if you want to include other things. It can be too bright causing highlights or flare on your lens. Check your screen after each shot (Chimping). If you are shooting at ground level the moon can help by lighting the sky. This lessens the sky ‘darkness’ making light levels at ground level manageable.

The Earth rotates and as it does so the moon and stars change position relative to us on the ground. To the eye the movement is not apparent. However, to a stationary camera they both move. If your exposure is too long then they will leave a track. Short exposures will not be too noticeable. If you are exposing for more than 15 seconds the stars will start to have an elongation noticeable to the eye in a high resolution image. This is an approximation as the atmospheric conditions and your position on the Earth’s surface will both change this time. However, it is worth considering how long your exposure will be when you can see stars in the frame.

On the other hand, very long exposures can create exciting star-tracks. These are where the movement of the Earth cause the stars to create long arcs of light during a long exposure. Look up “star tracks”  External link - opens new tab/page in Google Images .

Practice

Night shooting is great fun. With practice and awareness of the above you can get great results. Fortunately you don’t need to go far to practice. Your garden or the street outside is a great place to start. Try out some of the ideas in your local area before planning a more complex shoot on location. You will benefit from what you learn.

Have fun with your night shots!

By Damon Guy (author and Photokonnexion editor)

Damon Guy - Netkonnexion

Damon Guy (Netkonnexion)

Damon is a writer-photog and editor of this site. He has run some major websites, a computing department and a digital image library. He started out as a trained teacher and now runs training for digital photographers.
See also: Editors ‘Bio’.