Tag Archives: Lens

Understanding The ‘F’ Stop

The ‘f’ stop is one of the fundamental concepts of photography. How much light you let into your camera on pressing the shutter button is set by the aperture size. In the photograph (above) the black circular gap in the centre of the lens is the aperture. Surrounding it is the iris… you can just see the sliders. The iris controls the size of aperture. Each time you change the ‘F’ setting you are going up or down a stop or fraction of a stop. The iris opens up the aperture or makes it smaller.

Each time you go up or down an ‘f’ stop you are doubling or halving the amount of light that gets through to your camera sensor. The following video explains the way that this works and some of the terminology behind the idea…Via Petapixel External link - opens new tab/page

Can you write? Of course you can!
Write for Photokonnexion...

We would love to have your articles or tips posted on our site.
Find out more…
Write for Photokonnexion.

Natural Light Portraiture – with reflected fill-in light

Make your natural light portraiture work

Love photography? Then natural light portraiture is something you will try at some time. In the video below we will see a few tips that overcome some of the lighting issues photographers encounter when starting these portraits.

For photographers just starting out, natural light portraiture is often about snapping shots of friends. Actually, portraiture as an art form in its own right. Why? Because the human eye is incredibly well tuned to viewing the human face. Get it wrong and it is blatantly obvious!

Snaps often result in a flat and poorly sculpted face. Bad or flat light leaves the face looking drawn or sick. Worse, it can look as if it is almost featureless. The way to get around this is to use natural soft light. The best light for this is during the golden hour. The low light will mean a big contrast between bright sky light and the side of the body away from the light. The answer is to use a reflector to fill in the darker areas of the face. Reflectors are cheap and available in lots of photography suppliers. You can easily make your own reflector from white art board too.


In this video photographer Karl Taylor shows you how to use natural light and a reflector to take a good natural light portrait. Watch out for his five key points. Enjoy!
Seen on YouTube: GreatPhotographyTips External link - opens new tab/page

Remember these?

  1. Communication
  2. Lens
  3. Aperture
  4. Lighting
  5. Environment

Key points worth remembering.

By Damon Guy (author and Photokonnexion editor)

Damon Guy - Netkonnexion

Damon Guy (Netkonnexion)

Damon is a writer-photog and editor of this site. He has run some major websites, a computing department and a digital image library. He started out as a trained teacher and now runs training for digital photographers.
See also: Editors ‘Bio’.

Buying some lenses is throwing away good money

Do you really need to buy the lens your heart most desires? Or is the lust for the equipment seducing you?

My friend is convinced he needs to buy a long lens. He wants to buy the 120-400 mm Sigma Zoom Lens. Looking at Internet reviews and comments shows it is a fine lens. It is reviewed as a great performer and well suited to long-shot wildlife photography and its like. The lens is also billed as a good performer at very close shots for flowers and other small objects.

Wildlife photography experience shows that how long you wait in the bush maybe more effective than how long your shot is. World class photographers become successful with patience, experience, skill and a little luck. Long lenses help, but the skill and experience will be the deciding factor.

The 120-400 mm Sigma Zoom Lens costs more than £700. It is a well-reviewed lens with a good reputation. But things are not always what they seem. I wondered what would it be like for him? On a cropped sensor the quoted focal lengths are longer. My friend has a Canon 60D. A fine camera with a 1.6x cropped sensor. Lens focal lengths are quoted against a full-frame sensor (35mm). The ‘crop factor’ indicates you need to multiply it by the quoted focal length to get the effective focal length for that lens. So, multiply the crop factor (1.6) by the focal length (120). Thus, working through, 1.6 x 120 = 192mm at lower end of the focal range. At the top end the focal length is 1.6 x 400 = 640mm. This lens, on a cropped sensor, has an effective focal length of 192 to 640mm.

As a generalisation, long range photography tends to be a double edged sword. Many of the shots taken at long range could easily be done at closer range – probably with better results. So a sharper shorter range lens would be more use – when combined with a hide and, or, a patient vigil. Long range lenses do not justify their expense unless you use them. If you do a lot of photography where it is impossible to get closer to the subject they are fine. Birds on cliffs are a possible example.

At nearly 200mm the short end of the focal range on this lens means that objects you are looking at may be a bit bigger than is ideal for everyday photography. Long distance focus is not always the great thing that some people think it is. My experience with lenses shows that the further you get from the normal range of the human eye (approx. 50mm equivalent), the less use the lens gets. That will of course NOT be true if you have a speciality interest you pursue regularly – like photographing birds on cliffs.

I advised my friend that the lens is well-reviewed. However, he is not regularly in places where he cannot get closer to the subject. He is not a keen bird watcher and does not spend hours shooting objects or animals from long distances. So how much use will that focal range be to him? Unless he radically changes his current lifestyle and photographic interests he would be better buying a lens in the shorter focal length range. Most of his current shots are ideal for the range 50mm to say, 200mm. He will get more use and fun out of higher quality, shorter range lens than one that gives him long distance vision.

There is a lesson here. Before you spend a lot of money on a lens make sure it is what you really need. ‘What you want’ and ‘what you need’ are different. It is fine if you can afford to buy a speciality lens – in fact this is a great lens. If you need to save up for something you are only going to use once a year – don’t throw your money away. I advise that you borrow or hire a speciality lens to try it out for a weekend or a few times in order to get a feel for it before you commit hard-earned cash.

Quick Tips to Save your Lens from dust

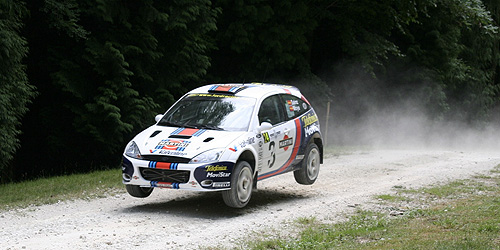
Dirt track motorsport is awesome photography - watch the dust fly!

Dirt track motorsport is awsome photography - watch the dust fly! And, spend time cleaning your camera afterwards!

Dust is death

…to a photograph. Spots distract the viewer and make for unnecessary post processing. They are most obvious when they appear on a bright continuous colour – like sky.

The trick is to keep your lens wiped regularly. Make sure you have a good lens cloth with you when out shooting. Replace it regularly to keep it from accumulating dust.

Dust is really invasive. You cannot see the really tiny particles. However, those particles penetrate the moving parts. Over time your lens function will be affected. So you need to wipe your camera regularly to preserve it.

You cannot help getting your equipment dirty. Rain drops, even tiny drops, form around dust particles. The particle remains suspended in the drop until it lands on your camera and dries! Then it leaves a particle of dirt on the case. There are lots of other ways to get dust on your camera too. Those ground level shots for the unique perspective don’t help!

The dust thrown up at a car rally is awesome. Great shots! But, you need to spend time cleaning the dust off afterwards. In particular, modern lenses are so high-tech that dust in the moving parts can ruin them. A dirty case will also deposit dirt inside your camera when you change a lens. Before you take the lens off, clean your lens glass and barrel and the camera case. Pay attention to the areas around the focus rings to remove dust near moving parts.

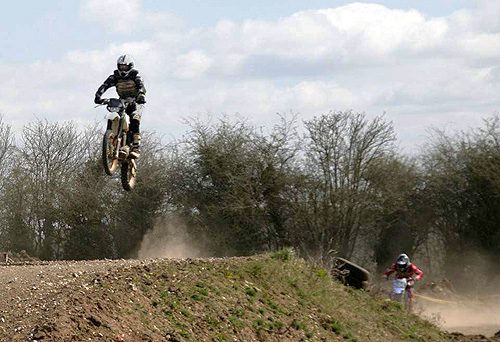
Dirt biking is great photography - clean up afterwards...

Dirt biking is great photography - clean up afterwards...

Doing the cleaning

After you have cleaned your lens glass – go the extra distance. Take another lens cloth – make sure it is a micro-fibre or low-lint cloth of some sort. Spray lens-cleaner straight onto the cloth. Make sure there is only a slight mist of spray on your cloth. The slight dampness will lift, and retain the dust, on the cloth (until it dries). Then do the same with a new cloth. This time wipe it all over your camera and lens barrel. Too much spay and you risk droplets running down the case into the focus rings. Liquid drops and moving parts do not mix! DO NOT spray your camera directly – it will blast a fine jet of liquid drops into the vital parts!

When you have wiped the camera/lens barrel with the misted cloth, gently dry the whole thing with another cloth. It is best not to mix the two cloths. Otherwise dust you have just wiped off will be rubbed back onto the clean casing as the spray on the cloth dries!

Research photography cleaning equipment.  External link - opens new tab/page to Research photography cleaning equipment..

Recommended cleaning tool
Dirt on your camera, or worse, on your digital sensor? You need this tool. An efficient blower, the stream of air will clear dirt and grit from damageable places. Use it to clear dirt from the camera sensor and to blow out dust . It is an indispensable tool for the keen photographer. Giottos GTAA1900 Rocket Air Blower – Black  External link - opens new tab/page.

Comments, additions, amendments or ideas on this article? Contact Us
or why not leave a comment at the bottom of the page…

Like this article? Don’t miss the next — sign up for tips by email.

Are you sacrificing image quality with a zoom lens?

Have you experienced the quality of a prime lens? Most photographers have used zoom lenses. They are popular. One zoom lens tends to suit a wide range of purposes. This gives the photographer flexibility, fewer lens changes and buying one lens to do all appears cheaper. However, zoom lenses may give you a poor or soft image. In fact overall they may give a substantially poorer performance than a prime lens for some purposes.

The key to the difference between prime lenses and zoom lenses is focal length. A longer focal length magnifies the shot but reduces the angle of view. A shorter focal length widens the view in the frame. As a result of the wider view the subject in the frame appears smaller. A zoom lens allows the photographer to change the focal length.

A prime lens has a fixed focal length. The focal length is the distance from the lens to the sensor where the focus is achieved. To change the size of a subject in your shot using a prime lens you need to move closer or further away from the subject. The fixed focal length is achieved using a simple arrangement of glass elements.

Zooms use a complex arrangement of glass elements in the lens. You zoom your lens to make the image fit the frame. As you zoom you are moving the glass elements closer or further from the sensor in the camera. The complex arrangement of lens elements allows this movement to change the focal length. To allow for the movement and to change the focal length there must be more lens elements, motors and complex control technology in the lens body.

What are the advantages of a prime lens?

It’s simple…

  • Any movement in your lens is achieved by moving parts. The more moving parts you have the more difficult it is to get a sharp image. In zooms the complex technology can mean quality is lost. Prime lenses are typically much sharper than zooms.
  • Composing an image is more immediate when you have to walk around to fit the shot in the frame. Most photographers think more carefully about composition when you use a prime.
  • Prime lenses tend to use fewer lens elements than a zoom. Fewer lens elements mean it is easier to maintain sharpness.
  • Each glass lens element tends to absorb or scatter light. Less glass reduces this light loss.
  • Fewer glass elements in the prime lens means it can be a lot lighter and more compact than a zoom.
  • Fewer elements in a lens mean that optical and colour distortion is reduced.
  • Prime lenses are often cheaper because they have less complex glass elements, motors and technical equipment in them.
  • Primes are often of simple construction. It is easier to give them wider aperture as a result. A wider aperture gives superior low-light performance and shallower, more controlled depth of field.

So, the zoom lens you have may give you more flexibility with your shots. However, it may be compromising the quality of the shot.

Prime lenses give great results and are fun when composing a shot. It is worth trying one out. As with all lenses you need to practice with them before you will get the best from your lens.