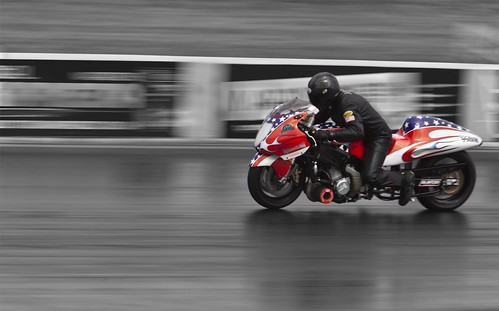
“Drag bike” – Selective colouring is a great way to bring out your point of interest.
Click image to view large
Focus the attention of your viewer using these great techniques.
The most important thing about your image is the part that you want your viewer to see. A great image needs to concentrate their attention and hold it in the shot.
Next time you are ready to take a photograph – pause for a second. Think about composing your picture so you direct the viewer at the most important part of your image. The ‘point of interest’, ‘focus of attention’ or a ‘focal point’ is where the viewer finds satisfaction from looking at the image. It makes sense that you use one or two techniques to point the viewers eye right at the reason you are taking the shot.
10 Techniques directing the eye to the point of interest
- Crop: The cropped shape of the picture is an important way to help the viewers eye find the ‘point of interest’. Letterbox shaped crops help the viewers eye to run across the width of the picture; square crops help direct the reader to the centre of the shot; landscape views are so common that they help the reader be unaware of the crop; Portrait views alert the reader to the vertical things of interest. A crop is a great way to help the readers eye, especially when used with other techniques below.
- Position: Where you place your point of interest in the shot can affect how prominent it is or how the eye is drawn to it. A good introduction to positioning is to look up the Rule of Thirds. That is a basic rule of composition that gives the eye a dynamic reason to look at the point of interest.
- Size: A large subject or point of interest is a great way to make people look at it. Big and bold and your viewer will hardly miss it!
- Focus: The use of depth of field is really effective. The human eye naturally sees what we directly look at in focus. So we tend to concentrate our viewing in the area of sharpness in a picture.
- Movement blur: Capturing movement creates blur. In my picture above the bike is travelling very fast. To capture it like that I have panned my camera. The background is out of focus. The sharpness and blur create a contrast that draws the eye to the sharpness. Alternatively, you can photograph something moving that you want to become blurred as the focus of attention. Classic movement blur is often created at the fair in the evening. Fast movement with brightly coloured lights wonderfully blurs the merry-go-round in a longer exposure. The strangeness and strong colours draws the eye to the patterns.
- Colour: Using colour is a great way to draw the eye. Strong primary colours (red, green, blue etc.) are especially good at catching the eye. One bright colour against other lesser colours also directs the eye. Contrasting colours can be a good way of highlighting a particular point of interest too. Colours are best used to make the point of interest stand out from the background.
- Selective colour: The absence of colour in part of a picture and the selection of one colour or an object in colour is a great contrast in the picture. That difference – greyscale to colour – will strongly make the point of interest stand out. An example is the picture above.
- Shape: The use of shape is a way to draw the eye too. Again you can use a contrast. One round object in a group of square objects really captures the attention. A strong geometric shape in a picture where there is no other strong, well defined shapes pulls the eye.
- Pattern: Where there is pattern there is focus. Our eyes are good at picking out patterns. Sudden, clear formation of pattern in a picture where there is no otherwise clear pattern focusses the attention on the pattern. The opposite is true too. Where there is a breakdown in a pattern the eye is drawn to the difference and questions why the change or break in the pattern.
- Lines: The eye naturally follows lines in a picture. So, you can use lines both as the actual point of interest, and as a way of pointing at the focus of attention. Implied lines can be useful in the same way. A line that strongly points to something else is another way to capture the attention.
It is important too, you are careful not to make the picture too complicated or cluttered. To much to catch the attention will have the eyes whizzing around the picture and not able to settle on your point of interest. Likewise, it is best to use just one or two of the above techniques. Too many and the eye is confused with what direction they should follow. Composing your picture is about subtle messages and directions to help the eye. The last thing you want to do is to confuse or misdirect your viewer.
Composition
Definition: Crop; Cropping; Cropped;
Definition: Depth of Field
Action Panning Shots with Motion Blur
exposure
Rule of Thirds
pattern
lines
We would love to have your articles or tips posted on our site.
Find out more…
Write for Photokonnexion.


