Tag Archives: Auto-white balance

Do you suffer from the sunset fail?

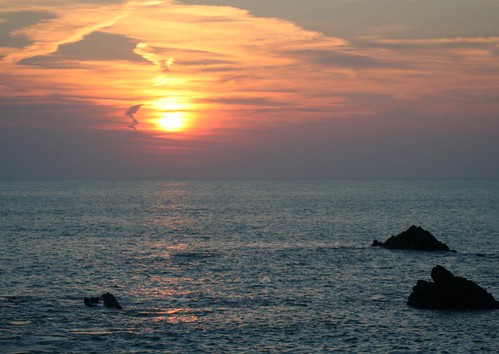
Disappointed... The sunset photography auto white-balance fail!

• Disappointed…
• Auto white-balance fail! •
sunset photography can present colour and detail problems.
Click image to view large
• Disappointed – Auto-white-balance fail! • By Netkonnexion on Flickr External link - opens new tab/page

Flat sunset and poor colour – a beginners special.

My first digital sunset failed and it affected my confidence. It was flat, desaturated and the detail was lost. In this quick tip we look at how to fix it in one easy step…

The Sunset sunset photography fail!

In the picture above the flat, desaturated appearance caught me out. I sat there, after a 60 mile drive, for over an hour, and this flat failure was all I produced from hundreds of shots. For months I had this hanging over me. I had never had this problem with film. What was going wrong?

The problem was the auto white balance (AWB). In digital sunset photography the AWB tries to create a picture where the colours and the spread of light variations are balanced around a neutral grey. This reduces the shift in colour temperatures away from neutral. It has a very high impact on oranges and golden colours typical of sunsets (and sun rises). The upshot is you get a flat, cartoon-like, washed out colour range. This also reduces the detail in the sky.

The solution to the sunset photography fail?

Switch your colour balance to non-AWB settings. ‘Daylight’ AWB setting works well, giving realistic results.

However, if you select the ‘Cloudy’ setting this can have a spectacular pay-off. The ‘cloudy’ setting is used to off-set the coolness that clouds often give light. It warms the scene. So, if your sunset is already warmed by reds, oranges and golds the setting intensifies them.

You can intensify the colours in your sunset photography by using the White Balance ‘Shade’ setting. This adds an even greater warmth than the ‘cloudy’ setting. Be careful though, it can look unrealistically saturated. Run some test shots to be sure you have the right setting.

That’s it! Get your confidence back and increase the impact of your sunset photography in one easy setting.

By Damon Guy (author and Photokonnexion editor)

Damon Guy - Netkonnexion

Damon Guy (Netkonnexion)

Damon is a writer-photog and editor of this site. He has run some major websites, a computing department and a digital image library. He started out as a trained teacher and now runs training for digital photographers.
See also: Editors ‘Bio’.

If you shoot with JPG, beware Auto-White Balance

"Test shot" - the ambient light in the room has created a yellow/red colour cast.

“Test shot” – the ambient light in the room has created a yellow/red colour cast. Removing this colour would be pretty impossible in *.jpg format.

It is ironic that people often shoot with the image format *.JPG because it seems ‘easier’. They can simply point and shoot with the camera on auto-settings. Well, precious photos are at risk. The *.jpg format dumps data when it is created in the camera.

Shooting in *.JPG mode is a problem. The data that is dumped leaves the file ‘baked’. Photographers use that term to describe a file where your options for change are limited. It’s a bit like a cake. Once the ingredients are baked, you cannot change the flavor of the cake. You might be able to make cosmetic changes. But you cannot change the fundamentals of the cake. So it is with *.jpg. If your colours or your white balance are off, you cannot change it.

Domestic florescent light bulbs (for example low energy bulbs) are some of the worst culprits for colour cast. They often create a bright yellow colour. The ‘Test Shot’ shown above is an example. Our eyes can normally compensate for the colour cast. The camera cannot. This ambient light shot has picked up a bright yellow cast – actually the background was brilliant white. It was white core board. The *.jpg format means that colour cast is there to stay.

Other colours may appear. Most common are yellows or steely blues. It depends on the bulbs that are present. So if you see these colours appear in your test shots, which is quite common, you need to compensate. If you read your camera manual you can look up White Balance. You will be able to find out how to compensate for these colour casts. In most cases digital cameras have white balance menu-settings for ‘tungsten’ and ‘fluorescent’. So it easy to select the appropriate setting. The next test shot will shot the colour as ‘true’ without the cast.

On the other hand, you can make it easy on yourself. Shoot in RAW instead. This is the type of file where the data in the file is retained. Then you can use an image editor – like PhotoShop or Elements – to change the colours when you are doing your post-processing. RAW files do no have the ‘baked in’ colour problem.

That brings me back to my original point. It is ironic that people think it’s easier to shoot in *.jpg until disaster strikes and everything goes yellow! Actually, since you cannot change anything, *.jpg is pretty hard to deal with at that point.

The motto of this story is… either get your white balance right when using *.jpg, or do the sensible thing and learn to shoot in RAW. The latter is easier and more flexible. And, you can save the day in ways that you cannot with *.jpg.

By Damon Guy (author and Photokonnexion editor)

Damon Guy - Netkonnexion

Damon Guy (Netkonnexion)

Damon is a writer-photog and editor of this site. He has run some major websites, a computing department and a digital image library. He started out as a trained teacher and now runs training for digital photographers.
See also: Editors ‘Bio’.