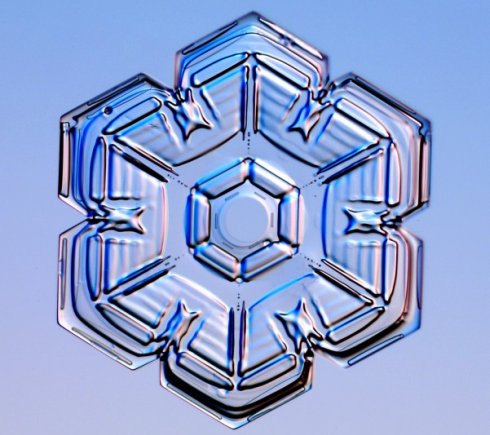
• Snowflake crystal •
Snowflakes are intricate and beautiful. They are a source of interest to scientist – but photographers can make amazing pictures with them.
Image taken from SnowCrystals.com ![]()
Snowflakes are amazing!
Close up pictures of snowflakes show how intricate and beautiful they can be. And there are an infinite variety of them too. Here are a few ideas…
Some history about snowflakes
The perfect six-sided snowflake exists, but is not the only sort. Early snowflake pictures were taken by farmers’ son, Wilson “snowflake” Bentley ![]() (February 9, 1865 – December 23, 1931) from Vermont. Aged 15 he was captivated by snowflakes. It started with looking down a microscope. But in 1885 he began experiments with a camera too. After struggling with the early camera technology he began to make some progress. During his life he made thousands of photos of snowflakes. His work still dominate our ideas today. In particular he was the first to claim snowflakes are unique and six sided. His pictures are also some of the best too.
(February 9, 1865 – December 23, 1931) from Vermont. Aged 15 he was captivated by snowflakes. It started with looking down a microscope. But in 1885 he began experiments with a camera too. After struggling with the early camera technology he began to make some progress. During his life he made thousands of photos of snowflakes. His work still dominate our ideas today. In particular he was the first to claim snowflakes are unique and six sided. His pictures are also some of the best too.
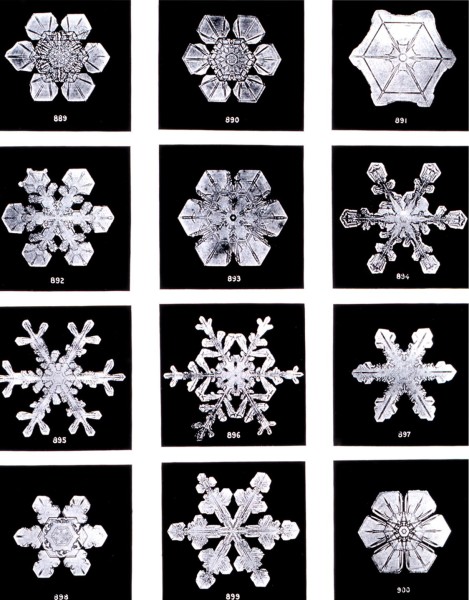
• Snowflake Photographs by Wilson “Snowflake” Bentley •
Wilson “Snowflake” Bentley was famous for his snowflake photographs. Nearly a century after his death we are still using the images.
Research has shown how diverse snowflakes can be. They are not all perfect, regular shapes either. In fact according to “New Scientist ![]() ” (a weekly publication, UK) there are many types. The various forms are created under different conditions…
” (a weekly publication, UK) there are many types. The various forms are created under different conditions…
- -2°C = Simple hexagons and star shapes
- -5°C to -10°C columns
- -15°C Six sided crystals (dendrites) form again
- -22°C onward… complex plates and columns form again
Here is detailed morphology diagram for snowflakes ![]() . It shows the relationship between the snowflakes’ type and temperature/humidity.
. It shows the relationship between the snowflakes’ type and temperature/humidity.
Snowflakes go through a range of temperature, humidity and other changes while falling. They have a unique and sometimes violent history. They clash together. They may ball-up with other flakes. It’s common for them to have multiple crystals joined in one flake. They may circulate in the clouds for long periods. They may also melt and refreeze before descending to the ground. It is not a surprise they are all so different. There is a great infographic on SnowCrystals.com ![]() showing snow crystal growth and the no-two-alike idea.
showing snow crystal growth and the no-two-alike idea.
Capturing snowflakes on camera
You can’t easily photograph snowflakes on the ground. The overall white in a snow mass makes it difficult to distinguish individual flakes. The small size makes them a challenge too. The best approach to snowflakes is two-fold.
- Use a macro lens or macro extension tubes.
- Use a clean (new) long hair artists paint brush. Sable hair is best. Use a small black velvet cloth (about 500mm x 500mm) to see the snowflakes.
The aim with these is simple. Tease out individual snowflakes onto a black background. Then get in close with the lens. If you are working with a macro lens help yourself out and use a tripod.
The snowflakes themselves are easily destroyed. The trick is to use the artists brush to lift snowflakes onto the velvet. The brush and velvet have hairs that support the snowflake without damage. Be as gentle as you can to preserve its delicate nature of the crystal.
Sadly tiny ice crystals tend to go grey when on a black background surface. When shot on a dark background they are best converted to monochrome. This helps to increase the contrast and definition of the crystal.
To show the beauty of the refracted light use a well-lit background. If you can, place the snowflake onto a glass slide delicately lifting it off the velvet. You can buy Blank Slides – Microscope accessories ![]()
from various places. Make sure you have left the slides to cool down to the snow temperature or the snow will melt on it.
Be sure to keep your cloth, brush and slides cold and dry. Make sure your breath is not directed at the snowflake. Even slightly raised temperature or humidity will affect the snowflake while you are trying to photograph it. More than once I have had them dissolve in front of my eyes.
If you are using an actual microscope, or if you are using a glass slide try to get some backlighting. To get the best refractive results try light at different angles on the snowflake. The best results are not necessarily when the light is directly from below. The angled light tends to create contrasts on the snowflakes. This brings out light and dark as well as some aesthetic colourations from refraction through the crystal.
For your interest here is an amazing camera-microscope…

This an affordable and well reviewed digital microscope. It will do detailed images direct from your computer. It’s a photography tool which provides an opportunity to develop your macro skills. Hours of fun too!
Masterful shots
One of the acknowledged masters of the art of shooting snowflakes is Kenneth G. Libbrecht ![]() . He’s a professor of physics who researches crystal growth. He also runs the SnowCrystals.com
. He’s a professor of physics who researches crystal growth. He also runs the SnowCrystals.com ![]() website. There are wonderful resources on the site including a “how to guide”
website. There are wonderful resources on the site including a “how to guide” ![]() and many hints about photography and equipment. There are some wonderful galleries of images
and many hints about photography and equipment. There are some wonderful galleries of images ![]() . There is also a section on how to grow your own snowflakes. Although, the latter was a bit more complex than I think I would go… but who knows. People in this field seem to get obsessive about it. Snowflakes are extraordinarily beautiful.
. There is also a section on how to grow your own snowflakes. Although, the latter was a bit more complex than I think I would go… but who knows. People in this field seem to get obsessive about it. Snowflakes are extraordinarily beautiful.
Other sources of snowflake inspiration…
For a huge range of inspiring snowflakes images check out this search page on Google: Snowflakes photography ![]()
Comments, additions, amendments or ideas on this article? Contact Us
or why not leave a comment at the bottom of the page…
Like this article? Don’t miss the next — sign up for tips by email.
Photokonnexion Photographic Glossary – Definitions and articles.
SnowCrystals.com ![]()
Wilson “snowflake” Bentley on Wikipedia ![]()
New Scientist (a weekly publication in the UK) ![]()
The Morphology Diagram for snowflakes ![]()
Snow Crystal Growth and ‘The no-two-alike Conjecture’ ![]()
Definition: Macro Lens
Definition: Macro tube(s); Extension tubes
Definition: Refraction (optics)
Blank Slides – Microscope accessories ![]()
Prof. Kenneth G. Libbrecht :: Home page ![]()
Photographing Snowflakes … A How-To Guide … ![]()
Snow Crystal Photo Gallery I … Capturing the fleeting beauty of snowflakes … ![]()
Celestron Dual Purpose Amoeba Digital Microscope – Blue ![]()
Snowflakes photography images on Google ![]()
Definition: Backlighting

Damon Guy (Netkonnexion)
See also: Editors ‘Bio’.
By Damon Guy see his profile on Google+.