Tag Archives: Orange

Avoid funny colour casts in your holiday pictures

White balance - grey card

White balance – grey card

Unnatural indoor colours?

Holiday time – out comes the camera and most daytime shots are great. However, indoor shots often get a funny colour cast. Odd yellowish, greenish or blue tones have appeared. The reason? Auto-white balance problems. The condition is curable.

Auto-white balance problems

Outdoors the auto white-balance function works reasonably well. But not in all cases. Auto-white balance aims to iron out colour casts in your photography. The problem is that the camera frequently gets it wrong. There are two main places that can happen…

  • Out of doors when there is a lot of one particular colour around (eg. lots of sky blue; orange/red sunsets or snow)
  • Indoors when there are artificial lights illuminating the scene (ordinary domestic lights, fluorescents and bulbs).

When a lot of one colour appears in your shot. The camera assumes that too much of one colour is a problem. So, it shifts something called the colour temperature toward a neutral grey colour. This takes out the colour cast.

Intentions ruined

If you intended to capture that colour cast (from a sunset for example), the auto-white balance mechanism will ruin your shot. Typically blue skies and white snow tend toward grey. And, the real classic, lovely orange and red sunsets look pink, cartoon-like and flat instead of saturated. Orange and reds are particularly badly affected. So if your sunsets look cartoon pink/grey instead of saturated fire-orange you need to adjust your auto-white balance.
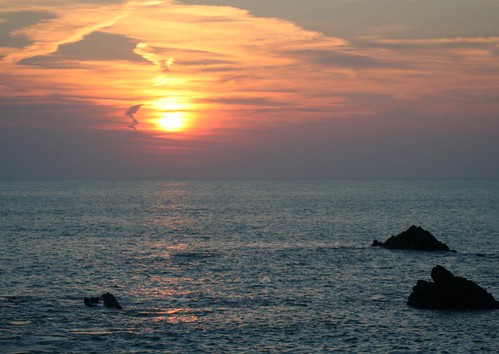
Auto white-balance fail!

• Auto white-balance fail! •

Cartoony pink-grey skies. The auto-white-balance function has colour shifted the orange/red tones toward greys.
Click image to view large
• Auto-white-balance fail! • By Netkonnexion on Flickr External link - opens new tab/page

Artificial light also creates a colour cast. Often the auto-white balance cannot properly adjust for this. The result is odd yellowish, blue or greenish tones in the picture where you did not see them yourself at the time. These also require an adjustment to your white-balance.

Why is there a problem?

Mainly the problem arises because we have made an adjustment in our heads without noticing. Most of the time we compensate for these colour casts and don’t see them. In fact, once we realise there is such a thing as a colour cast we can train ourselves to see it. We certainly see the heavy red colour casts of evening and early morning light. If we look carefully we can also see the yellows and blues from domestic lights – although less strongly.

Remedies

There are two possible ways to tackle the situation…

  • Compensate for colour casts by using a camera pre-set.
  • Correctly set the white-balance so it records the natural colours.

DSLRs have reasonably good pre-sets to tackle well known colour cast issues. On most cameras you will find white balance settings something like these below. The notes explain details…

  • Auto – The cameras best-guess colour match for what it senses. OK most of the time. Poor when there is a predominance of a strong colour.
  • Tungsten – (bulb icon) indoor, tungsten incandescent lighting using bulbs. Cools the colours – often bluish. This setting helps remove blues to warmer tones.
  • Fluorescent – for use under fluorescent lights – will tend to warm up the colours.
  • Daylight/Sunny – (sun icon) indicates the ‘normal’ white balance (may not be present if this is the default setting).
  • Cloudy – (cloud icon) Adds a warmer, yellowish colouration.
  • Shade – This light is cooler (bluer) than sunlight. Shade mode warms the colours a small amount.
  • Flash – (lightening icon) Stark and cool, flash desaturates towards blue. Flash setting compensates with a slightly warmer yellowish tone.
  • Custom – You do a little procedure to get an accurate setting to suit the situation.
Accurate colours

Colour accuracy is important. You really do want a bright blue sky or white snow or saturated red sunsets. The problem is that the pre-sets are averaged out for the “types” of situations encountered. The pre-sets will change the colours from dull flat colours to more representative ones. For example more saturated sunsets will be captured if you use the cloudy setting. However, to get it right you need to adjust the custom white balance.

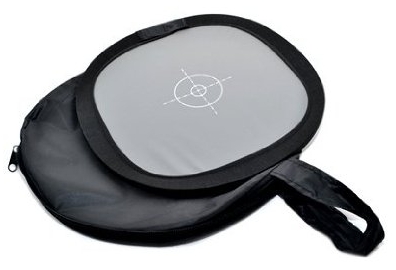
Setting the custom white balance is simple. The camera does most of it. You need a “neutral grey card”. This is simply a card or piece of material set at an average grey colour, normally at 12% grey, which matches the cameras accurate shade for neutral. You can buy these quite cheaply at most camera stores. (See: Range of photographic grey cards).

• The Lastolite Ezybalance •

  • collapsible; durable
  • wipe clean; very light
  • 12% grey; 30cm wide

An easy to use grey-card system. White on one side, grey on the other. The card doesn’t crease, the sprung border stretches the material tight. The card collapses into the supplied case, slipping easily into your camera bag. A great accessory to ensure colour accuracy in your pictures. You should not be without one.Spacer image

To set custom white-balance

It’s easy to set the white balance. However, there are lots of variations for how different cameras do it. Therefore it’s essential to use the right procedure from your manual. To get ready…

  • Place the card about 30cm/12 inches in front of your camera.
  • Zoom in or out to make the grey card fill the frame.
  • Now follow the camera manual “custom white balance” instructions.

To ensure complete accuracy you must do this procedure in the ambient light in which you will be shooting. This is the light the camera will sense and compare to the grey on the card.

More after this…

find out more...Photokonnexion tips by email
Enjoying this article? Please sign up for our
Tips by email service.
                                                Find out more

Shooting with RAW vs. *.jpg

I am sure lots of you are saying, “But I shoot with RAW and this is unnecessary”. OK, that is partly true. You can, with RAW format files change the white balance in the post-processing. Here are two reasons you should NOT do that…

  1. It is time saving to get as much right in the camera as possible. I like to spend my time shooting not computing!
  2. I have rarely met anyone who can remember colours so accurately that they get the post-processing colour and temperature balance right. I like to get them right in-camera as accurately as possible. Then I can safely change them later if necessary.

RAW format is excellent – you have complete control over colour temperature and hues. However, if the picture is wrong from the start, RAW is only as good as your own memory or colour awareness. Artists of many years may be able to remember colours accurately. Very few others can. Beginners especially have very poor colour memory/accuracy. So, use RAW, get it right in-camera – then do your artistic processing from a solid colour-base you know is accurate.

Compensation and accuracy

While both compensation for colour casts, and accurate representation of colour casts both rely on white balance there are differences in how they are treated. Strong colours or a strong colour bias through the picture needs some special treatment. Think about the two different methods above and practice them.

Comments, additions, amendments or ideas on this article? Contact Us
or why not leave a comment at the bottom of the page…

By Damon Guy (author and Photokonnexion editor)

Damon Guy - Netkonnexion

Damon Guy (Netkonnexion)

Damon is a writer-photog and editor of this site. He has run some major websites, a computing department and a digital image library. He started out as a trained teacher and now runs training for digital photographers.
See also: Editors ‘Bio’.

A simple project with fruit – a tutorial for fun!

• Orange •

• Orange •
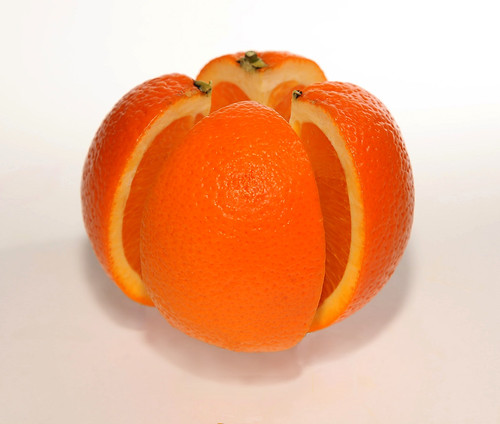
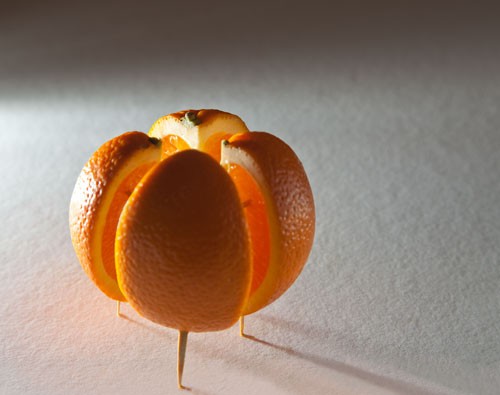
Have a go at producing a floating orange in “exploded view”
Click image to view large
Orange By Netkonnexion on Flickr External link - opens new tab/page

Fruit is fun!

This tutorial will show you how to photograph fruit in all its glory – in a unique way. There are ways you can make the project your own with plenty of room for creative ideas. It is an easy project giving you some useful tips for still life lighting and working with a high key background. Have fun!

The picture of the orange

The picture above shows an orange, a wonderful fruit, in all its glory. We can see both inside parts and out. In this tutorial I will show you how to create this yourself and show some other similar examples to give you some ideas of your own. This tutorial will cover the following simple steps:

  1. Pick a good firm, clean orange.
  2. Cut it into quarters.
  3. Assemble the orange in an “exploded view” using toothpicks.
  4. Create lighting to show off your orange without highlights.
  5. Finally you will clone out the toothpicks on the computer.
Choose your fruit

Be careful, make sure that your orange is nicely shaped, no odd depressions or bruises, and as firm as possible, not over-ripe. Check the skin for consistent colour too. You want your orange to look delicious. No one will be interested in your shot if it is damaged, dripping and discoloured. Also, wash and gently wipe the skin before starting the tutorial. The skin should look bright and clean. Dirt, hairs and marks will really draw the eye of the viewer. Don’t let them be distracted.

Constructing the orange

Cut it in four pieces top to bottom (two cuts). It helps not to have too many cuts. Cut carefully and accurately. If you hack the orange you will be adding distractions to draw the eye. Be careful and slow to ensure accuracy.

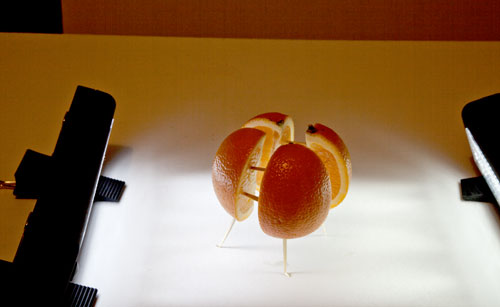
Once cut we are going to assemble the orange in an “exploded view”. That is the term used to describe an “almost” assembled item that is floating in space so you can see how it would assemble. To hold the pieces apart I arranged the quarters using tooth picks. In the picture below you can see how the orange is braced with the toothpicks. The picture also shows how the back lighting is set up.

• The toothpick set-up and initial back-lighting •

• The toothpick set-up and initial back lighting •
• The toothpick set-up and initial backlighting • By Netkonnexion on Flickr  External link - opens new tab/page

You can see from the picture the orange is held firmly together by the toothpicks. It is also supported by four toothpicks as legs. We want the orange to be slightly off the ground so it has the feel of an independent object in space.

The white card under the orange extends to the edge of a table. On a chair a little way back from the table is another upright card. You can see the white back-card is very bright. I used a strong light under the table to illuminate that card giving it a high-key brightness. There are some links at the end to explain more about high-key effects.

We want to take the final shot with a little shadow under the orange. This give the impression the orange is floating in space. I will light the orange from the front with a flash. You can use the flash on your camera. However, that will create a very sharp shadow since flash is a very hard light. This means very harsh, sharp-edged shadows that will be quite dark.

In the next picture you can see how I created some under-lighting below the orange to soften the shadows created by the flash. I have two cheap Rolson 61770 72 LED Camping Lights. These are really flexible for table-top still-life and can be easily set up for fill light. They are great lights and affordable.

The underlighting setup to soften the shadows and create fill light.

• The underlighting setup to soften the shadows and create fill light •
• The underlighting setup to soften the shadows and create fill light • By Netkonnexion on Flickr External link - opens new tab/page

The lights under the orange and the back-lit card provide light on all sides except the front. If you have an off-camera flash you can use that, off-set to one side, for the front lighting. It is important to off-set so that you prevent ugly highlights on the front of the orange. Better still you could bounce the light off the ceiling if it is white. That way the orange will be evenly lit from above. To find out more about off-camera flash and some great opportunities for affordable models see:

If you only have a pop-up or on-camera flash then you should find a way of diffusing the light from it. Alternatively you could create a diffused reflection. You should be trying to find ways to prevent the flash pointing directly on the orange. Bright highlights would be created that are distracting and ugly.

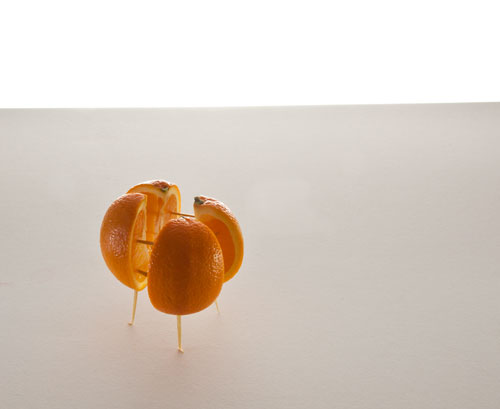
Once the lighting is set up to your satisfaction you need to position the orange for the final shot. It is important to spend a little while positioning the orange so it obscures as many of the toothpicks as possible ready for your final shot.

The final position ready to photograph the orange obscures as many of the toothpicks as possible.

The final position ready to photograph the orange obscures as many of the toothpicks as possible. Then there is less cloning work to do on the computer.
The positioned orange By Netkonnexion on Flickr External link - opens new tab/page

You can see from the picture that the orange is positioned so most of the internal toothpicks are not visible and the legs are minimised. Once the shot is taken we are going to clone out the remaining sticks. So if you have less showing you have less cloning-out to do.

Now you are ready to take the shot – shoot it! Make a few attempts. Do plenty of chimping to ensure you have the lighting right. Pay special care to minimising highlights on the orange. When you are ready you can download your shots to your computer.

The remaining work is to clone out the toothpicks. You will need to very carefully clone the white surface around the legs over the legs themselves until you can not see them any more. Pay attention to any shadows so that they remain realistic and consistent after your cloning is finished. When cloning over the toothpicks in the orange interior use the same coloured flesh of the orange to clone out the remaining toothpicks you can see.

If you are not familiar with cloning techniques you can see a tutorial here: Getting Started With Cloning.

find out more...Photokonnexion tips by email
Enjoying this article? Please sign up for our
daily email service.
                                                Find out more…
#11030#

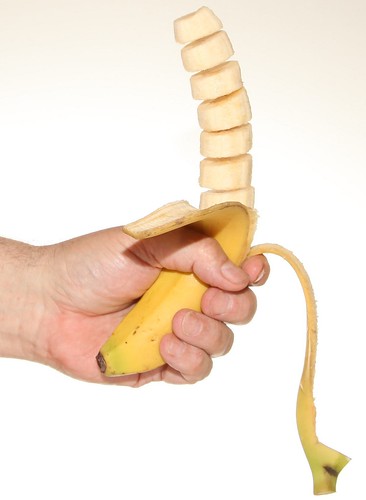
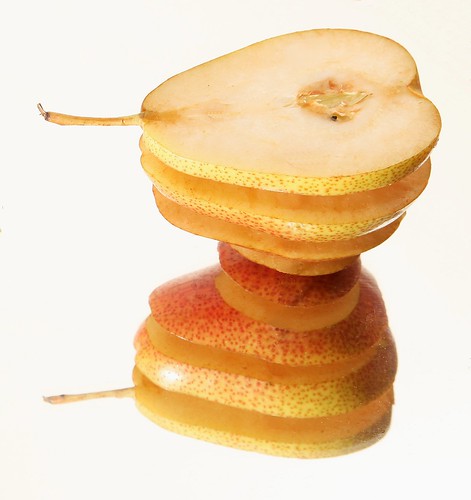
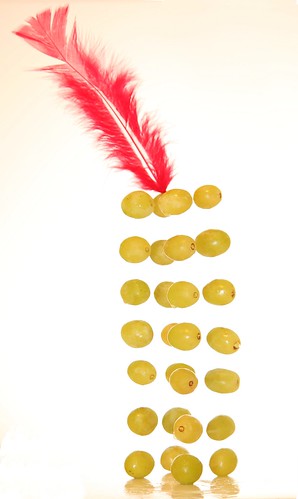
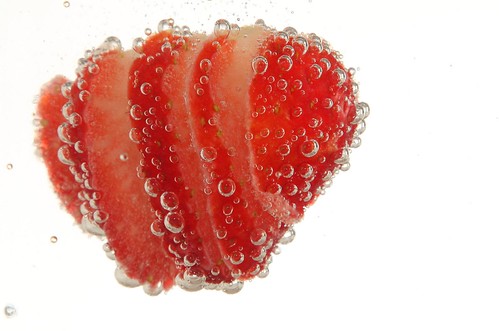
If you want to try other ideas here are a selection of other fruit-cut pictures below. All done using toothpicks or cocktail sticks. There is an infinite variety of things you can do using this technique so have lots of fun!

• Sliced Banana •

• Sliced Banana •
Click image to view large
The banana slices were held together with cocktail sticks while the shot was taken. Then they were cloned out afterwards.
• Sliced Banana • By Netkonnexion on Flickr External link - opens new tab/page


• Sliced pear on mirror •

• Sliced pear on mirror •
Click image to view large
A half pear was sliced and held in the exploded view with toothpicks. However, the pear was on a mirror – giving the effect of an inverted pear.
• Sliced pear on mirror • By Netkonnexion on Flickr External link - opens new tab/page


•  Alexander The Grape •

• Alexander The Grape •
Click image to view large
Each grape was painstakingly held apart using cocktail sticks.
• Alexander The Grape • By Netkonnexion on Flickr External link - opens new tab/page


• Strawberry Layer Drink •

• Strawberry Layer Drink •
Click image to view large
The strawberry has been sliced and held together with toothpicks. Then it has been placed in sparkling water to create the bubbles.
• Strawberry Layer Drink • By Netkonnexion on Flickr External link - opens new tab/page

By Damon Guy (author and Photokonnexion editor)

Damon Guy - Netkonnexion

Damon Guy (Netkonnexion)

Damon is a writer-photog and editor of this site. He has run some major websites, a computing department and a digital image library. He started out as a trained teacher and now runs training for digital photographers.
See also: Editors ‘Bio’.