Tag Archives: Technology

What is an SLR?

1949 Zeiss Ikon VEB Contax S, the first pentaprism SLR

The historic 1949 Zeiss Ikon VEB Contax S, manufactured in Dresden, the first pentaprism SLR for eye-level viewing. (Wikipedia.org)

‘SLR’ stands for “Single Lens Reflex” – a type of camera. The format of the SLR is about giving the user a direct view of the scene the camera will capture. This did not happen in previous formats. So how does it work?

Before the SLR, and before the digital sensor, cameras had viewfinders to sight-up the shot. The optical path of the viewfinder was separate and parallel with the optical path for the camera lens/film. Unfortunately this meant that the viewfinder gave a view that was slightly offset and different to the scene captured by the lens/film. This made it difficult to frame the shot. The difference was called a parallax error. See diagram one. [Find out more about parallax    External link - opens new tab/page]

Diagram: Side View of a Viewfinder Camera

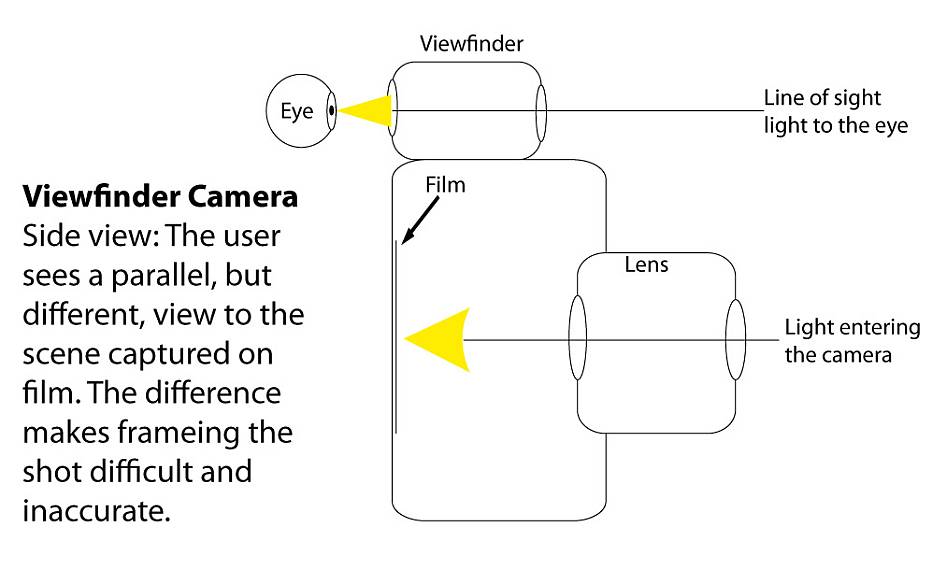
Diagram one: Side view of a viewfinder camera showing parallel lines of sight to the eye and the film or sensor today. (Click to view large).

The pentaprism SLR changed that. The user looked through an eyepiece that redirected the optical path through the cameras main lens and up through a ‘pentaprism’, reflecting out to the users eye. This path allowed the user to view along the same optical axis that the film, or today the sensor, uses for its exposure. Diagram two shows the optical path through the SLR to the eye.

Diagram: Side View of an SLR camera showing the optical path to the eye.

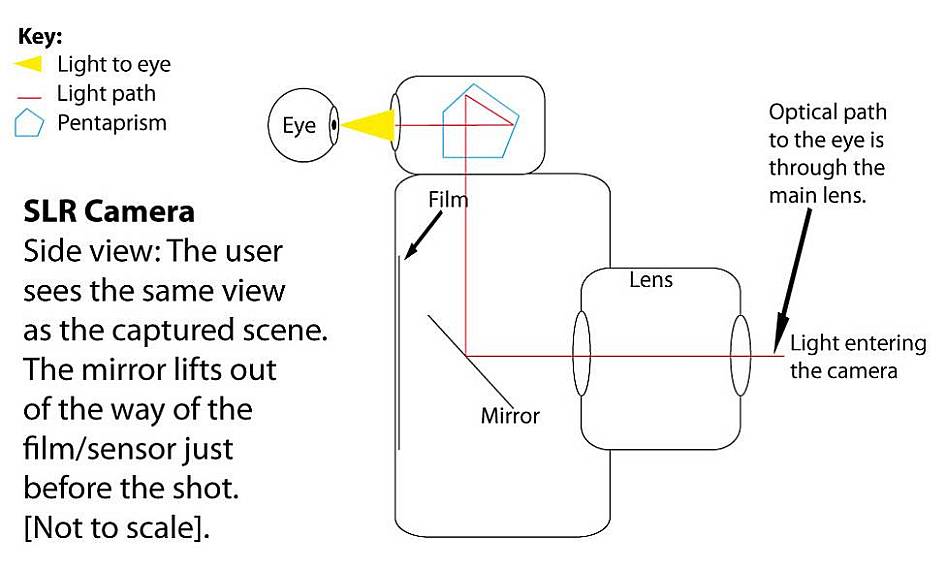
Diagram two: Side view of an SLR camera showing the optical path to the eye through the main lens. (Click to view large).

These diagrams are simplified and not to scale, but they show the difference between the two types of optical paths. The SLR uses a pentaprism to redirect the image from the main lens to the eye. The pentaprism is a five sided prism that works like a mirror. It has two internal reflective surfaces allowing the optical path to be modified. The pentaprism performs a simple trick. It maintains the same view as you would see if not looking through the eyepiece. A mirror reflecting a right-angled view in the eyepiece would cause the user to see the scene upside down. The pentaprism reflects the light twice, and back on itself, which corrects for an inverted image.
[More on the pentaprism on Wikipedia.    External link - opens new tab/page]

When the shutter opens, the mirror in the SLR would obscure the path of the light to the film or sensor (the diagram does not show the shutter for simplicity). However, in reality, before the shutter opens the mirror is moved out of the way on a swinging arm. This movement is the ‘Reflex’ that allows the exposure to take place.

The Single Lens Reflex camera was first marketed in 1949, long before the digital sensor. So, today, the ‘film’ in the diagrams would be replaced with a sensor. However, the SLR technology is just as effective as when it was first released. It allows modern photographers to view the world as their lens and sensor would capture it. This is a simple mechanical technology which corrects the parallax errors of the earlier formats of camera. It allows us to more accurately frame and compose photographs.

Comments, additions, amendments or ideas on this article? Contact Us
or why not leave a comment at the bottom of the page…

Like this article? Don’t miss the next — sign up for tips by email.

Damon Guy - Netkonnexion

Damon Guy (Netkonnexion)

Damon is a writer-photographer and editor of this site. He has also run some major websites, a computing department and a digital image library. He started out as a trained teacher and now runs training for digital photogs.
See also: Editors ‘Bio’.
By Damon Guy see his profile on Google+.

Canon Powershot G1 X tested


Video from DigitalRev.com

Wow! The Canon Powershot G1 X review I wrote recently seems to be coming good. Here is a specification.

Large 14.3 MP CMOS, DIGIC 5, HS System
Compact 4x zoom; Intelligent IS
3.0 inch vari-angle 920k dots LCD
Real-image zoom (live video zoom), optical viewfinder
Full Manual, RAW, DPP
Full HD, HDMI
High-speed Burst HQ
Smart Auto
Extensive accessories
HDR mode and ND filter
Via ISO1200.com/

A great spec. for a great looking camera. Fitting into the range of the keen shooter, this great little camera should provide a great stepping-off point. On one hand it is a really flexible for those who want to move up from the straight forward P&S crowd. It also has some cool social networking features for those who want to improve their social photography. On the other hand it looks powerful and full-featured as a pocket camera for the expert and professional shooters. Reports say it has great image quality.

The video shown here is a little mixed in its response. Unfortunately the review does not cover some of the more interesting under-the-bonnet possibilities. So I think there is a lot more to say yet. He is clear on one thing – the good image quality. Image quality counts for a lot. So do the other features. If you are a keen photographer and want to move up into the near SLR range this is a great opportunity. If you love photography but don’t want to carry a full size, full featured SLR everywhere, this is one to go for… remember it shoots RAW. Discerning photographers love RAW!

Damon Guy

Which is the Best Camera?

Canon PowerShot digital camera

The Canon Powershot range are excellent cameras. They are efficient, flexible, light, small, and powerful. There is a great range of features. The quality is excellent. Consider buying the most suitable camera - NOT the most expensive.

Creative Photography

The act of taking a photograph is creative. It is not capturing ‘reality’. The photograph is a reflection of a scene. It is never exact or a perfect replica of that scene – it is your record of it. You interpret the scene and characterise it by the way you chose to take and control the shot. When you set up a scene for a photograph, you are making something from scratch. Record, control, make, or any combination, these are types of creativity used to express yourself. Creativity comes through in everything that you do with your camera.

Some people don’t appreciate how creative it is to take a photograph. The uninitiated may be heard to say, “You have a great camera. You must take good pictures”. I am insulted when I hear that. Good equipment helps you be flexible under difficult circumstances. It provides a quality platform upon which you can develop good techniques and returns a quality of image to match your aspirations. However, a good picture quality is not the same as a great image. Producing a great image comes with perseverance, technique, experience, understanding, composition, creativity and a certain way of ‘seeing’. It is these, and other things, that make a photographer what they are.

If you have aspirations…

So if you have aspirations to be a top photographer in your chosen area of interest, then buy the best camera! But do not buy the best camera to be the best photographer. That will not happen. Buy the most suitable camera for what you want to do. Then you could easily meet you aspirations!

Consider buying the most suitable camera. Not the most expensive. You can create a GREAT photograph with a point and shoot. You do not need to spend thousands on a camera to do that.

Consider a Canon Powershot

The Canon Powershot range are excellent cameras. They are efficient, flexible, light, small, and yet powerful. The range of features is extraordinary. The quality is great. They are the most flexible cameras I know for their size and price. I think of these cameras as ‘The photographers point and shoot cameras’. More like a DSLR than a point and shoot’ They have a full range of functions, as well as the ability to shoot RAW. Just great for street photography and I have made some great landscapes images with mine too. They are adaptable to most types of photography. They are also pocket sized and fully functional. Great cameras.

 
You can see the Canon Powershot Range on Amazon. They are best sellers.

Damon Guy - Netkonnexion

Damon Guy (Netkonnexion)

Damon is a writer-photographer and editor of this site. He has run some major websites, a computing department and a digital image library. He started out as a trained teacher and now runs training for digital photogs.
See also: Editors ‘Bio’.
By Damon Guy see his profile on Google+.

Do you know what your DSL Shutter is Doing?

Here is some awesome high speed photography. Destin has a YouTube video channel called “Smarter Everyday”. He published this high speed video showing a DSLR camera shutter working. Watch this short video, then I’ll help you to improve your photography…

In the top left corner of the video there is a counter showing the time taken.

The mirror/shutter sequence is…

  • The mirror goes up. Look how much movement there is! Especially notice the mirror bouncing into its resting place above the shutter. This is causing a lot of vibration inside your camera.
  • The camera waits to calm the worst part of the vibration.
  • The shutter ‘first curtain’ opens, exposing the censor to light.
  • Then, the ‘second curtain’ falls, closing off the light. As the shutter closes, look at the shutter curtain and watch it vibrate!
  • Finally, the mirror comes down again. By now the shutter is closed. This last movement does not affect your shot.

The mirror causes a lot of movement in your camera. You can particularly see how much movement there is from vibration and distortion in the mirror mounting when it drops back into position. In this video that is really obvious. That same amount of movement occurs on the mirror up-lift, although the video does not show it quite so well. The uplift movement of the mirror causes vibration throughout your camera. This impacts on your shot milliseconds later as the shutter opens because the camera is still vibrating from the mirror uplift.

My point is that the movement of the shutter and the mirror creates a lot of vibration in the camera. Vibration that affects the sharpness of your picture.

The shutter has to move, you cannot do much about that. To minimise the vibration in your camera – prevent that mirror vibration!

In your DSLR camera manual you will see there is a function called ‘Mirror Lockup’. This allows you to lock the mirror up before the shot starts. Thus, when the shot is taken, all the mirror movement is eliminated. The mirror is up before, during and after the shutter opening sequence. ‘Mirror Lockup’ is one of the important techniques for improving sharpness.

The “Mirror Lockup” technique is particularly effective when you use a tripod. Vibration in your camera causes waves of vibration through your tripod. These vibrations often continue well into your shot. Eliminating them can sharpen your picture a lot.

There is a downside to the mirror lockup technique. While the mirror is locked up the viewfinder is blocked. So you will need to set up your shot before doing the mirror lockup.

This video helps you understand a main source of vibration affecting the sharpness of your shot. This vibration actually comes from within the camera. Learn from your manual how to do “Mirror Lockup” and eliminate this cause of lost sharpness.

Destin does some really fun videos. They cover basic, everyday science – it’s great fun. He has a terrific sense of humour. I subscribed to his channel last year and have enjoyed his work ever since. Subscribe to this YouTube channel and you get notification of new videos.

Enjoy!
Damon Guy

Do You Dump Your Best Photos?

An opportunist snap - a personal memory.

2002 - An opportunist snap - a personal memory. Not aesthetically pleasing. I would not dump it for the world! One day the memory will be important.

How good is your photographic judgement? Are you actually throwing away just the worst shots? Fine if you are. Otherwise, if you keep only the best shots and dump the rest you are probably throwing away some really good stuff!

How do I know you are dumping good shots? We all develop. We all take a new perspective as our skill and knowledge increases. My experience has taught me that when I was starting out I made some bad decisions. I threw out some great shots – because I did not recognise they were great. My artistic vision and appreciation of good composition has improved a great deal over the years. Today, when I look back at old shots, I find many of them were better than I realised at the time. This was unexpected. I realise that I have thrown away a lot of great shots. What I kept from back then are more use than I realised. Today I frequently use many of my old shots. I sell them or use them for various purposes. I wish I had kept all but the real no-hopers (the exposure tests, lens cap-on shots, total blurs…).

People are always telling me they throw away a lot of the shots they take. So I did an exercise with a group one day. We spent three hours taking shots in an urban setting. Then we all picked our best shot. Once that was done I told everyone to pick the shots they would normally dump. What fun we had next! We spent an hour arguing about the merits of the dumpers. The group frequently disagreed with the image-maker about the ones they would delete. What each author found was that they were throwing away pictures that others liked. Not all of them – but a surprising number. One of the group members actually chose to throw away a great shot. Later the group voted it second best shot of the day. Out of the work from nine photographers the loss of that photograph would have been a great shame. Others were certainly worth keeping too.

Since I went digital I have stored hundreds of thousands of shots. At what cost? Very little. Mostly investment in external hard drives. As a result I have a reservoir of perfectly good photos that provide me with a great library for all sorts of things. Work, family, memories, for sale… whatever I want. Some things are pretty precious. My family shots – blurred and all – might one day provide me or my ancestors with wonderful memories of my life and the lives of my family. If I lost someone close – I would want to remember all about them. Blurred smiles? Memories transcend blur.

For a tiny investment in electronic space you are building a wonderful repository for the future. Don’t listen to those who would have you throw your heritage away.

Recommended Equipment…

A History of Photography – Part Six

Canon Digital SLR Camera EOS 5D Mark II + EF24-105 Kit

Canon Digital SLR Camera EOS 5D Mark II + EF24-105 Kit

The Digital Age

The digital age of photography began in 1973. The invention of the integrated circuit chip in the late 1950s led to new electronic developments in the 1960s including the first Charge Coupled Device, or CCD chip. Each light-sensitive point on the chip changes the light intensity to an electric charge (in a capacitor). The charge is passed across the chip to an amplifier which creates a voltage. The CCD chip captures a frame at a time by coupling the charges and passed across the array. Fairchild Semiconductor    External link - opens new tab/page released the first large image-forming CCD [http://en.wikipedia.org/wiki/Charge-coupled_device ] chip of 100 rows and 100 columns in 1973 (black and white only). This was followed in 1975 by a colour CCD. Yet it was over a decade before Kodak invented the first megapixel sensor (one million pixels per sensor – 1986).

The charge coupling method was invented using minimal chip components. As integrated circuit chips improved the Complementary metal–oxide–semiconductor chip    External link - opens new tab/page (CMOS) was developed. Used for general integrated circuits the CMOS chip also provided a platform for imaging sensors.

The 1980s saw significant advances in circuit miniaturisation using the CMOS technology. CMOS chips allowed many components to be built into each pixel where light-stimulated charges were created. During the 1980s this saw each light sensitive area of the chips surface become not only a charge generator, but also its own mini-amplifier. These “Active Pixel Sensors” (APS) simplified the building of the chips – making them cheaper than older CCD technology.

Early 1990’s experiments with CMOS/APS technology showed advantages over CCD sensors. They compared well, but as the CMOS technology developed it proved to be more advantageous.

Advantages of the CMOS Vs. CCD

CMOS – cheaper to build

  • ‘Blooming effect’ minimised (strong light does not bleed-over electric charge to the next pixel)
  • Easy integration of light sensor and camera management into one chip
  • Lower power consumption
  • Faster image data processing

Disadvantages of the CMOS Vs. CCD

  • CMOS sensor captures data a row at a time from the sensor array. This may cause image skew (tilt depending on the direction of camera or subject is moving). Stationary objects will not skew, but something moving would be gradually captured at a row-a-time leading to some distortion as the movement changes between row captures. This does not happen when the whole frame is captured at once (CCD).
  • Relatively high noise levels compared to CCD requiring noise reduction technologies.

By the late 1990s CMOS technology had largely displaced the pure CCD chip. This was mainly because CMOS chips were easily developed into Active Pixel Sensors (APS) – a type of architecture for the image sensor chip. This should not be confused with the ‘Advanced Photo System Type-C’ sensor format used in many SLRS. An APS is a chip developed for a specific job, like imaging and camera management. Other application specific chips might be built for running a car, or being the processor in a desk-top computer. These types are not interchangeable.

Application specific chips enabled manufacturers to develop specialised chips for digital cameras. These systems captured the light intensity and colour. They also, processed the data, reduced noise, managed data storage and did camera management. Such chips is the Canon Digic system    External link - opens new tab/page processor range performs many powerful tasks beyond imaging. Its main function is the image exposure. It also provides ‘presets’ – selections the user can make. These allow use of sophisticated photography techniques with little photographic knowledge. The “night preset” sets the shot for very dark conditions and still produces a good image. The same applies to the portrait preset, landscape preset and so on. The camera program runs these ‘typical’ picture situations on behalf of the photographer. The latest version of the Digic processor can do some interesting new tasks. For example it can recognise 12 faces per picture and index them according to data given in advance. The user can upload pictures to social networking sites and the camera reports who is in the picture without user intervention. The Digic processor can also carry out ‘landscape recognition’ setting the camera up appropriately. These advances are computing tasks integrated into the imaging chip system.

Today most amateurs and professionals consider digital imaging systems in modern cameras to be at least equivalent to film in flexibility if not quality. It is fair to say that film still has a place in high end photography, particularly large format film. There are also some environmental conditions under which digital technology has not performed well – especially wet or extreme cold conditions. Late version high end professional range cameras have recently addressed this with improved environmental sealing.

Digital has surpassed film in many ways impacting the market to the extent that several big film companies have changed direction or gone out of business. Kodak recently filed for bankruptcy in the United States. While the brand may survive, it is unlikely that film production will ever start again. Digital has, for the moment at least, won the day.

It is difficult to see what the next stage in digital imaging will be. As with many industries, we may see a late resurgence of legacy-style systems in an unusual way. Many old recordings on records have moved onto CD. So, ‘film’ systems may in the future see a resurgence as an interesting hobby, supported by a renewed industry springing up. It is doubtful this will ever be more than a hobby market.

The human eye can see about 15 to 18 stops of light – a digital camera about 10 stops, film about 8 stops. This leads to loss of depth and contrast in digital (and film) images. High Dynamic Range photography (HDR) enhances this contrast-distinction by integrating images from different dynamic ranges into an image range similar to the eyes’ own range. While HDR images have a deeper tonal richness, the enhancement is artificial. Most HDR is detectable and artificial in appearance. However, greater sensor capability is developing. In time digital imaging will mimic the dynamic range of the eye, rendering dynamic ranges the eye cannot detect from real.

Stereoscopic three-dimensional photography is already advanced. However, the possibilities for still images are limited at present. So there are potential developments likely in that for the near future.

Innovation has always driven the passion in photography. So bring on the new inventions!

find out more...Photokonnexion tips by email
If you enjoyed this article please sign up for our
Tips by email service.
                                                 Find out more…

Can you write? Of course you can!
Write for Photokonnexion...

We would love to have your articles or tips posted on our site.
Find out more…
Write for Photokonnexion.

By Damon Guy (author and Photokonnexion editor)

Damon Guy - Netkonnexion

Damon Guy (Netkonnexion)

Damon is a writer-photog and editor of this site. He has run some major websites, a computing department and a digital image library. He started out as a trained teacher and now runs training for digital photographers.
See also: Editors ‘Bio’.

The camera lies – find out how

Festive lights bokeh • The camera lies - every shot

The soft and homely blur caused by lights being out of focus is called bokeh. It is one of the many ways your shot can show something completely different to the actual scene.

The famous saying goes, “The camera never lies”. In fact every photo is a type of lie. The content of the shot is a pretty good representation of the scene. Is the final photograph really as would be seen by the eye? No, the camera lies. Let’s look at the facts.

The camera has questionable vision

Everything we see is light that has bounced off something. Once light passes into the eye it is focused on the retina. The retina signals the brain which builds a picture up. The brain interprets the scene.

The camera works the same way. Reflected light passes through the various lenses in the camera and hits the sensor. The sensor is stimulated to send signals to the processing chip. The chip compiles a picture of the intensity of the various signals. It outputs the result in a file that our computers use to construct a picture.

During this process in the eye, and the camera, there are a number of intervention points. These are where the scene is changed. This is where the camera lies.

How the camera lies

Modern ‘lenses’ are actually many individual lens elements working together. Any individual glass lens suffers from a number of failings normally referred to as aberrations. To correct these aberrations takes more lenses. One popular lens, the Canon EF 70-200mm f2.8 L IS II USM Lens External link - opens new tab/page is made up of 19 groups of lenses! This superb lens is probably one of the most popular Canon ‘L’ lenses. The excellent sharpness and low distortion produces wonderfully faithful representations of the scene. However, no matter how good a lens, there are shape distortions, colour (chromatic) aberrations and distortions of the symmetry of the lens. Without getting too technical about it lenses distort reality. What is in front of the lens is changed by the time the light reaches the sensor. Slightly less light, slightly changed shape, slightly different colour… a different scene.

Theoretical Lens diagram • The lenses change the scene. The camera lies.

Click image to view large
Generalised photographic lens layout showing the principle features.
Lenses change the scene the eye sees. The camera lies. What you see is not what you get in the final picture.

On your whim, or control, you set your camera to a fine balance of shutter speed, sensor sensitivity and aperture. There are millions of ways to capture a scene. Under or over expose, blur, bokeh, filter… all can radically or minutely change the way the camera records the light falling on the sensor.

That is not the end of it. The code that runs in the cameras chips and the conversion to an image is another point of change. The ‘RAW’ image, the native data format of your manufacturer, is pretty much as you would get the data direct from the sensor. Change that file format to .JPG format and you have a translation from one type of data to another. You may change the RAW file in post processing. If you don’t make the change the camera does. The result either way is clear. There is a difference in the resultant file from input to output. The camera lies through its lens and the computing it does.

Beyond the camera lies

The next point of change is in your computer. The computer puts the files onto the screen. The screen renders the file as instructed by the computer. However, every screen has its own interpreter. This makes the rendering dependent on the screen makers electronics, code and colour maps for the screen. This is yet another point of change.

That is not all. Printing, file editing and even transmission over the Internet can all take their toll on your files. Each process changes the current file state and produces something different. After a while the file that you finally end up with is somewhat changed. It is not as it was seen in front of the camera when the image was made. Maybe you don’t see a great difference. Once your eye learns to spot the changes they are in plain sight.

What we see in the final print, screen rendering or projection is different to the original scene. However, it is the fun and craft of photography to make that new view what you want it to be. This is not new or exclusive to modern digital photography.

Every camera and photo-process changes the original scene. When you make a photograph it is made by the manipulation at all those intervention points.

A new synthesis

Photography is about making a new synthesis from light collected when the shot was taken. Get to know your camera and all its controls. You will be able to make your picture what you want. Remember, the camera lies. The master photographer is a master of change – not of capture.

Comments, additions, amendments or ideas on this article? Contact Us
or why not leave a comment at the bottom of the page…

Like this article? Don’t miss the next — sign up for tips by email.

Damon Guy - Netkonnexion

Damon Guy (Netkonnexion)

Damon is a writer-photographer and editor of this site. He has run some major websites, a computing department and a digital image library. He started out as a trained teacher and now runs training for digital photogs.
See also: Editors ‘Bio’.
By Damon Guy see his profile on Google+.