• Fruit distraction •
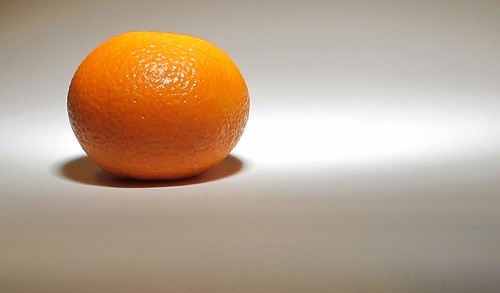
Working with highlights creates distractions. The highlights introduce nasty little specular spots that people wonder about. What are they? Why are they there? Normally, when seen with the eye they are not there.
Click image to view large.
• Fruit distraction • By Netkonnexion on Flickr ![]()
A big part of composition is focussing the viewer on your subject.
If you create ugly highlights you tend to distract the viewer. Highlights are useful, but can have an adverse impact. In this post we are going to look at these distractions and what to do about them.
The problem with bright lights
A lot of natural and man-made things have reflective surfaces. Some, like this orange above, are not mirror-like across the whole surface. So the most reflective spots create small highlighted points. While these will be found in natural situations, they readily stand out strongly under artificial lighting in a photograph.
Normally very bright highlights occur where bright light is reflected from a point on a surface where the light concentrates a beam – like a rounded surface. A droplet would form a surface that is highly reflective. Such a surface would cause a specular highlight to occur. We might see it as a sparkle from a droplet.
We see a ball as rounded because under the sky we see the top brighter and the bottom half shadowed. Between the top and bottom there is a graduation of light to dark. This defines the roundness (particularly under soft light).
To maintain this roundness in a photograph we want to create soft and graduated highlights to help the viewer to see the object as a three dimensional form rather than a flat two dimensional shape. In the shot above, the spotty high-intensity of the reflected light on the uneven surface has created burnt out specular highlights. These strong white spots are were the detail is lost to the intense white. These are rather ugly and distracting.
As our eyes are better than a camera at resolving lighting contrasts, we would probably not see these highlighted spots normally. Or, we would not see them as strongly. However, the strong artificial light in this shot created intense points of light that have burnt out in the photograph. The bright spots are therefore rather artificial and a result of the the poor ability of the camera to deal with very intense light.
Turning down the strength of the lights in this case would not help. It just made it too dark to see the surface well. However, there are two other solutions that help.
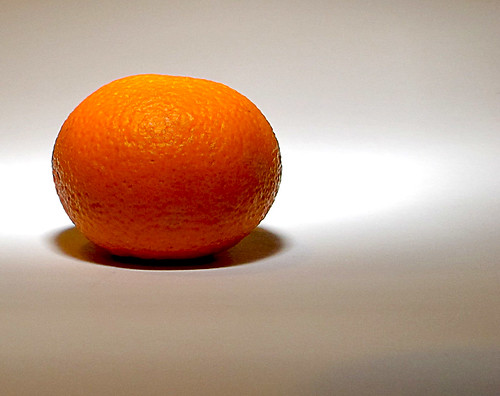
One way to solve the problem is with a reflector. I pointed one light at a white board above the orange. The back-reflection onto the top of the orange created a softer light. The bright spots disappeared and the orange retained its roundness.
More after this…
Alternatively the light could have been flashed through a diffuser of some kind onto the top of the orange. This would have given a brighter area in the same place on top. The correct diffuser would reduce the light so it would not be strong enough to blow out the spots to pure white. The result would have been a soft light wrapping around the orange.
The shot (below) with the reflector worked well. The image was created with more emphasis on the back lighting and a softer (reflected) overhead light. The roundness of the shape was preserved and maintained by the graduated overhead soft light. The bright specular spots were gone and replaced with a result more like that seen with the eye.

• Orange •
Less distracting is the softened light and reduced highlights on the surface.
Click image to view large.
• Orange • By Netkonnexion on Flickr ![]()
Working towards graduated soft light
The softer and more realistic result in the second photograph allows for emphasis without ugly white spots. Of course this was an exercise designed to make the point. When taking photographs all too often the photographer forgets to see bright spots reflecting off windows, doors, glass, all sorts of things. The bright burn that results pulls in the viewers eye to the bright spot. The result is to draw attention away from the main subject, or for the bright spot to ruin the main subject if it is in the main eye-line.
Highlights when well controlled should be softly lit, but boldly brighter than the surrounding surface. They should not be solid white and no detail in the subject should be lost. This preserves the shape of the object without distracting the viewer…
The right place for bright white spots
There may be a place for bright white spots created by strong light. A good example might be the spots that would reflect off raindrops in strong sunlight after a quick downpour. You would normally see those with your eyes. They create strong sparkles and good viewer impact. The point about this is that strong, burnt out spots like on the top orange picture look artificial and are not a reflection of reality.
Now you are aware of these eye-distracting spots or bright points you can keep an eye out for them. Do a reality check before you allow them into your shot. Find ways to control them, omit them or even post-process them so they are not going to ruin your shot. If they look real then make a feature of them. Whichever you do, be aware and treat them right!
Light and Lighting – Resource pages on Photokonnexion
Definition: Soft light
Definition: Hard light
Specular Highlights
Definition: Highlight; Highlights


