Category Archives: Definition

Definition:  description, analogue, annotation, answer, characterization, clarification, clue, comment, commentary, cue, delimitation, delineation, demarcation, denotation, determination, elucidation, exemplification, explanation, explication, exposition, expounding, fixing, formalization, gloss, individuation, interpretation, key, outlining, rationale, rendering, rendition, representation, settling, signification, solution, statement of meaning, terminology, translation

Implied Lines in Composition

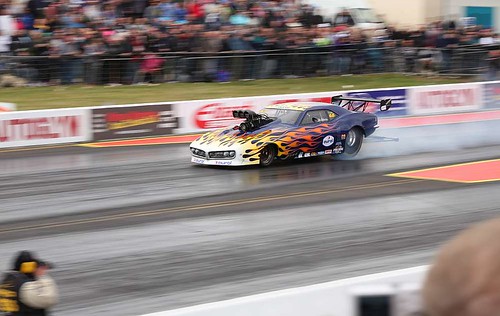
Implied lines can be created by a direction of travel of a moving object

Implied lines can be created by a direction of travel of a moving object. The eye naturally moves down the line to see where the object is going. (Click to view Large).

You don’t need actual lines to direct the eye

Here is some astonishing news! You don’t even need some types of lines, for them to be effective compositional elements. Implied lines are important to help direct the eye around the picture. But they are not actually there.

Influenced by implied lines

When you look at a picture you are often influenced by the contents or some feeling or impression it gives. The influence may not be conscious. Subconscious feelings, impressions and influences play an important part in in how we appreciate and view a picture. In fact, composing a picture is the process of looking at the contents of your frame and try to find ways to make the best of your subject. In so doing you are hoping to influence the viewer and to draw them into the image, make them see something that you have picked out in your scene.

The general principles of composition with lines highlight the effectiveness of lines as a method of drawing the eye of the viewer into the picture. Possibly the use of lines is one of the stronger and more effective compositional elements. Certainly Horizontal and Vertical lines manage to provide strong leads to the way we view a picture.

Some lines in your picture do not even need to actually be there. They can be effective because they are implied lines. Perhaps one of the most common implied lines in a composition is direction of movement. When composing a picture where movement is a key component the eye naturally travels along the movement line. When you do so, you are using the implied line created by the direction of travel. A good composition will leave plenty of room in front of the moving object so it looks like it has somewhere to go – a space to move into. The implied line is then satisfied by the space.

Implied lines can be created in lots of ways. The ‘Tin Mine’ below uses a strong implied diagonal to knit the picture together. Diagonal lines are strong, dynamic, uplifting lines in composition. They promote a feeling of power. The crop in this picture, a square, creates a diagonal which intersects with all three chimneys. It also defines the left hand bottom corner of the picture. Such a strong, and yet subliminal, line is a great way to pull all the elements of the picture together creating a balance. However, sometimes it is difficult to see such a line when composing. You have to be aware that lines can be implied in order to draw on them as part of your composition.

Implied lines can have a major impact, like the major diagonal across this picture.

Old Tin Mine - The implied line as a major diagonal in this picture helps knit the picture together and give an uplifting feel to the picture. (Click to view large).

Creating implied lines

There are many ways to create an implied line. Perhaps one of the most common is the line-of-sight. This is where a person or animal in the picture has a very clear fix on someone or something in the picture. The direction they are looking creates an implied ‘sight-line’. Of course there is no actual line. However, the viewer is drawn to follow the viewing line to see what they are seeing. The classic form of this is a picture of two lovers staring into each others eyes. This is a strong connection. Usually the viewer is drawn back and forth between the two people when there is such a strong correspondence between them.

Another type of implied line is to use some feature that acts as a line or pointer. In the picture below the fence points out into the lake. As it does so the viewer follows the implied line into the picture. This form of implied line is common in landscape and seascape photography.
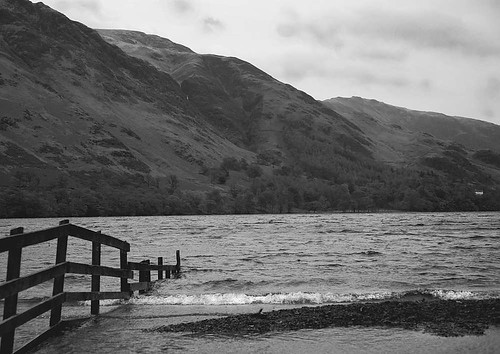
Fences can be used to create implied lines to take the viewer into the shot.

Fences can be used to create an implied line to take the viewer into the shot. (Click to view large)

Using graphic devices like arrows painted on walls, signs on roads is another way to point in a direction through the picture. In fact almost any regular pattern which tends to follow a path but which may be discontinuous can create an implied line. Footsteps on a beach are one such example. Your eye will follow them and be drawn into the picture.

Sometimes it is easy to miss an implied compositional feature. When you compose your shot in the camera you can miss the connections between things that cause implied lines. If you are not looking for them the stones on a beach laid out by a child may point to some feature that is not your main subject. If you don’t spot them the viewer will be confused. Other potentially implied features can do the same. So watch out for things that have a connection in unexpected ways. Your composition could be made or broken by such implications.

Conclusion

Implied lines can take many forms. Mostly they are imaginary, but create a way for the viewer to be lead into or around the picture by the implication of a line. You can be creative by using discontinuous objects that together create a line. For example, footsteps or stones on a beach. Alternatively you can create an implied line by starting it off and letting the viewer keep on following the line after is has finished. Whatever you do, be aware that implied features in your picture can still convey a strong compositional impact. And, even though they do not exist, implied lines can form major compositional elements in the picture – they create a powerful impact on the viewer. Be careful that features of your picture do not create an implied line without you intending them to do so. Remember, you are in control of the composition and so you should be aware of, and in control of, all compositional elements.

Comments, additions, amendments or ideas on this article? Contact Us
or why not leave a comment at the bottom of the page…

Like this article? Don’t miss the next — sign up for tips by email.

Damon Guy - Netkonnexion

Damon Guy (Netkonnexion)

Damon is a writer-photographer and editor of this site. He has run some major websites, a computing department and a digital image library. He started out as a trained teacher and now runs training for digital photogs.
See also: Editors ‘Bio’.
By Damon Guy see his profile on Google+.

Compositional Lines – Principles

Horizontals and Verticals - your eye naturally picks out the lines

Horizontals and Verticals - your eye naturally picks out the lines. In any picture you can use natural lines to bring out features in your picture.
Flag - by Damon Guy (click to view large).

Composition has many different elements. One of them is ‘lines’. Perhaps ‘lines’ are not something that people automatically ‘see’, often they work subconsciously. However, they are crucial to how the eye moves through a picture. We naturally look for patterns in nearly everything we see. Lines are strong patterns and simple ones too. So it is natural for the lines in a scene to draw the eye and to lead the viewer. So how can we use these lines?

When we compose a picture the best thing we can hope for is that the viewer is drawn into it. We want them to be absorbed by the picture and to be impressed by it. Lines provide a way to help the eye around the picture, to be pulled into the experience that it provides. A good composition using them will generally do one or more of the following with lines…

  • …make a pattern that is eye-catching
  • …draw the eye around the picture
  • …lead the eye to something in the picture
  • …create the focus/subject of the picture
  • …create a dynamic feeling of force or motion
  • …create a feeling of harmony and balance

On the other hand an unsuccessful composition with lines would tend to do the opposite of these. It may…

  • …create a chaotic view – the eye does not know what to follow
  • …distract the eye to an unimportant place in the picture
  • …block the viewer from getting deeper into the picture
  • …oppress the view, dampen the mood, upset the balance
  • …point or draw the eye out of the picture
What is a Compositional Line?

Basically, anything in your picture which is long and thin can be a line. Or it could be something that is a strong edge. There could be features in the picture that provide multiple lines. A river has two banks and the water itself, three lines. A road has several lanes and roadsides and lines drawn on the road for drivers to follow.

So lines could be anything well defined that have a length many times greater than the width. Your line could be a long thin set of clouds. It could be a fence. You could have a vertical line as a person standing up – they could be lying down (horizontal line). Many things together could be a line – traffic, railways, a queue, piles of something… I could go on and on. If it can be long and thin, implied as long or thin or an edge of something well defined, you have a line for the eye to follow. There is a lot of compositional flexibility with lines.

Of course lines could be more than just horizontal or vertical. Lines can be curved, diagonal, angled, shaped, chaotic, ‘u’ shaped – in fact anything you can envisage that you want them to be. And all the features that lines exhibit can be used in compositional ways in the picture. Basically, you are looking for ways your picture can be enhanced. With practice you will be able to spot them in the frame when you are composing the picture. Then the trick is to look for ways the eye can flow along the lines to draw you into the picture. Alternatively you can show the viewer things you want them to see. Again, you can make the lines into a pattern. Or, you can even ignore them as a compositional element.

What you must not do is let lines be in your picture without having some idea of how they influence the viewer. Use lines, or ignore them, but try to work out what the impact of the lines are. If they don’t enhance the picture then find away to get rid of them or minimise the effect. If they do enhance the picture then compose to make the best of them.

Have fun with your lines!

Principles of compositional lines

A complex of lines can join up. Making the lines work together can help compose a picture where the eye flows around the scene. Click to see full size.
- By Damon Guy

By Damon Guy (author and Photokonnexion editor)

Damon Guy - Netkonnexion

Damon Guy (Netkonnexion)

Damon is a writer-photog and editor of this site. He has run some major websites, a computing department and a digital image library. He started out as a trained teacher and now runs training for digital photographers.
See also: Editors ‘Bio’.

Definitions [L] [Lines]

Soft Light

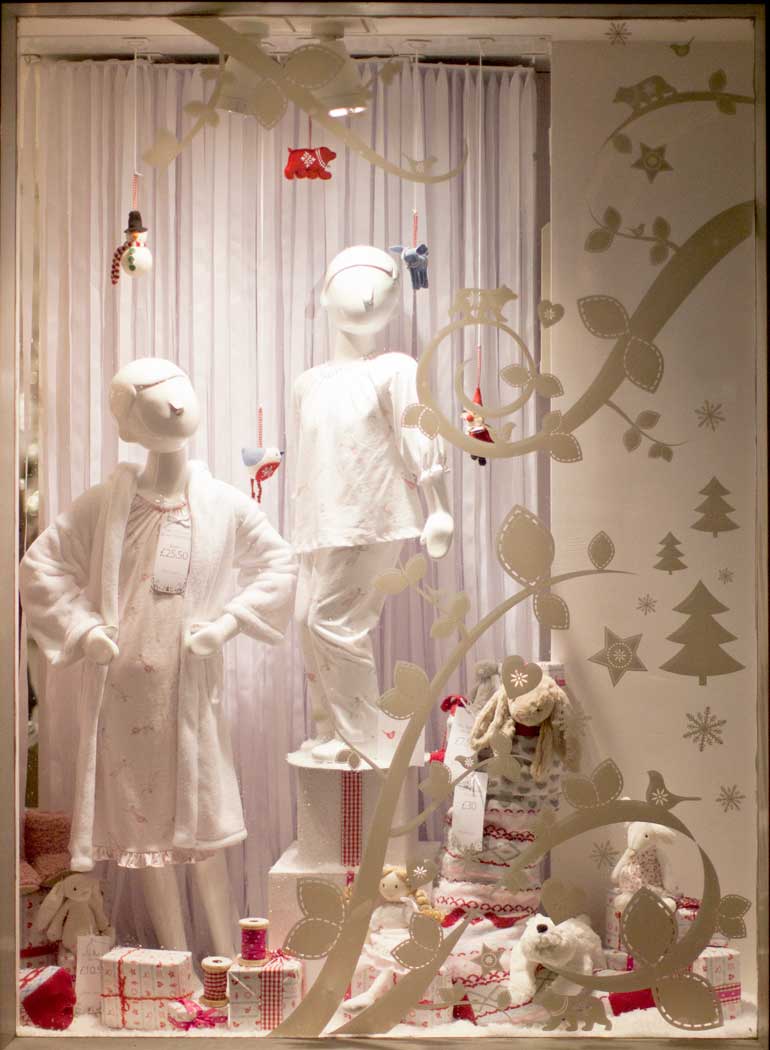
This festive shop window makes clever use of graduated light from hard to soft

This festive shop window makes clever use of graduated light from hard to soft

Soft Light

Soft light is not dim light. The term ‘soft’ refers to the transition from darker areas to lighter areas. In soft light there is no harsh or sharply defined shadow lines – the transition is gentle and gradual. The softest light has the most gentle and undefined shadows making the transition between dark and light.

In the picture above the designer of this festive shop window has been very clever. The two hard point-sources of light are directed each to one of the manikins. On the heads the light is very harsh and hard – you are immediately drawn to the bright light. The hairlines of the manikins are very strongly defined by the hard light. However, your eyes quickly turn from the brightness. As you look down the torsos the two light sources mix and cross-reflections occur between the white surfaces. As a result the light softens and the sharp lines of shadows are lost as you get further down the window. At the bottom of the window the soft light and diffused effect make the presents seem dreamy and romantic. Altogether the scene draws you in and directs you subtly to the presents below. A satisfying and gentle reminder that children’s Christmas presents can be purchased within.

The eye has a natural tendency to be drawn to the brightest light and to the face. The designer has capitalised on this. The eye then naturally moves downward to take in the softer more subtle tones and the more complex scene below. The complexity is softened by the diffused light and gentle hues down there – and yet excited by the reds and strong lines.

How Soft Light is Formed

Hard, sharp shadow-lines are not flattering in many different types of photographs – especially where people are in the shot. Our eyes are naturally tuned to a softened, rounded shape, especially in the human face. So where we encounter hard light our eyes next seek out the softer, easier light to help us interpret shape and form. So for many photographic situations we need to soften light to make it flattering or for the eye to better appreciate the form and shape of the subject we see.

Soft light can be created in many ways. In the natural world it is most often created by diffused light. A cloud layer causes light to lose its parallel beams. Clouds scatter the light in all directions as it tries to pass through the cloud. It is this scattered effect which creates the diffusion. Harsh, hard lines cannot form under scattered light. The light hits an object from many different directions. This causes the lines of definition in the shadows to be spread over the area of scatter, softening them.

Another way soft light forms in nature is by reflected light. When you photograph something that is in shadow, the subject is out of direct sunlight. It is therefore defined solely by light reflected off other things. Reflections from lots of things round about causes a scattering of the light. Again, this induces a softness. So in very bright direct sunlight working in shadow is one easy way to diffuse the light. In some circumstances, photography on a beach for example, the trees and buildings that might create shadows are absent. So in cases like this when you want to soften the light you might need to use a diffuser. A screen of some sort needs to be deployed that will let some light through, but which will create a shadow to soften the harsh, hard sunlight.

In the studio soft light is created by multiple sources of light or from reflectors scattering the light. Of course several strong light sources make a scene look unnatural. So normally one strong point-source of light is used with other weaker lights to fill the darker areas. The use of reflectors can achieve the same end, but creating a scattered light effect from the main light to fill in the light in shadow areas. The aim is to use the secondary lights or reflections to break up any harsh lines created by the main light source. Of course diffusers can also be used to help soften the light. Wide angle diffusers, like beauty dishes, spread the light over a wide area. This increases local reflections and light scatter to create a diffused and flattering light for the face.

Camera flash is a strong point source of light and as such tends to be hard light. To soften the light you can do one of two things. The simplest is to point your flash to a reflecting surface and let the light bounce of that onto your subject. The resulting scatter of light will be very soft once it gets to your subject. Make sure that you do not bounce the flash off a colour that will cause a colour cast in your picture. White is best.

The second way to create soft light from your flash is to put a diffuser onto the flash. There are literally dozens of types of diffusers available for flash units. After considerable experience with different types of diffusers I believe the simplest are the best. Simple push on flash diffusers are best for hot-shoe mounted flash units.

Flash diffusers

How to Use Soft Light

Soft light is very flattering on the face. Women especially benefit from soft light. The soft graduations and long transition between light and dark irons out lines and softens the angular parts of the face. If you can, create softness with bright lights. It emphasises the eyes and, particularly in young people, lifts the mood of the picture. In the use of soft light look for ways to bring a graduated emphasis to curves with deeper shadows in deeper curves.

The most significant thing to remember about soft light portraiture is that if the light is full on from the front you will tend to make the face look flat. If you bring the light from the side curves will be emphasized. However, if you have one light-source on one side the other side needs to be supported with a reflector. If you don’t the soft light will fall to a darkness and this will make the softness appear sinister rather than flattering. Don’t equally light both sides either. If you use an umbrella on one side to soften light, then use bounced, reflected or softbox light on the other side to off-set it. Also keep the intensity of the secondary light down so it does not overpower your primary light.

As you take a soft light away from your subject it will tend to harden the light. In general a light further away gets harder because the ray lines of the light get to be parallel. This minimizes the scatter effect and so hard shadows appear with well defined light dark borders. Larger sources nearer to the subject tend to be softer.

You can capitalize on this distance effect of light by using a close, dimmer light to improve the softness. Or you can vary the exposure to prevent blowing out with highlights with a close light. A longer exposure will give you a better quality image too if you lower the ISO for less digital noise (and use other settings if necessary). This varied exposure will enable you to soften the light more without creating distracting highlights.

By Damon Guy (author and Photokonnexion editor)

Damon Guy - Netkonnexion

Damon Guy (Netkonnexion)

Damon is a writer-photog and editor of this site. He has run some major websites, a computing department and a digital image library. He started out as a trained teacher and now runs training for digital photographers.
See also: Editors ‘Bio’.

Hard Light

Hard light gives harsh, well defined shadow lines

Hard light gives harsh, well defined shadow lines as you can see in this rugby scrum taken in bright, direct sunlight.

Hard light

The idea that light is hard is not immediately clear from the term. Hard light is not the very brightest light. Actually the reference ‘hard’ points to the transition from dark to light where shadows fall. Where there are sudden and clear lines which make out well defined shadows the light is said to be hard. In the picture above, the men in the rugby scrum are under direct sunlight. There were no clouds and the sky was bright blue. The light is coming from one single direct source of light, the sun. Hence the shadow-lines are strong and the transition from the dark of the shadow to the lighter areas is abrupt and well defined.

How Hard Light is Formed

Hard light comes from a direct single-point source of light. It is not intercepted, reflected or diffused in any way and falls on the subject in a direct beam. This direct source of light causes the hard shadow-line. In a blackened room, one light bulb will cause this hard-light effect. The hardness of the shadow-lines is unaffected by the brightness of the light.

Creating Hard Light

Hard light is best produced using one point source. In a studio one, very direct, light will form the strongest shadow/light division. However, if your studio is white walled it is more difficult. Light bouncing from the walls comes back at the subject and causes the shadow-lines to be less well defined. Try to make sure there is as little reflectance as possible. More than one light will create softness too. Keep your light sources minimal and the shadow sharpness will be increased.

The radiance of the light coming out from all sides of a large source close to the subject can cause softness. The rays of light are not parallel and can cross each other creating an ill-defined line in the shadow. To make such a source create hard shadow-lines move it away from the subject. As it moves further away the rays of light tend to become parallel. It is this attribute of light, the parallel nature of its travel, which causes the sharp shadow-lines. Or, you could use a grid over your light source. Light grids force the light to go only in the direction of the grid. This will be very strongly directional, creating the hard light.

Opteka Honeycombe Grid

Opteka Honeycombe Grid, creates a strongly parallel form of light giving a hard light on the subject.

Out of doors there is less control over hard light. In direct sunlight, with no clouds, shadows are sharp. In general, the more cloud cover there is the softer the light becomes. So to get hard light you will need to wait for the sky to clear. Remember, that even a few clouds in the sky can diffuse the light. Clouds reflect light from wherever they are, acting as multiple light sources through their reflectance. You may be in direct sunlight but the reflectance from clouds in other parts of the sky can still soften the light.

Using Hard Light

Hard light on a face is not flattering. The lines and forms that we know of the human face are best seen softened and gentle. So using hard light to bring out the lines and features of a face is harsh and unforgiving. The eyes feel deeply set, the nose is strongly defined by shadow and the nose shadow-line is very harsh on one side of the face when hard light is used. Nevertheless, there are times when the use of hard light can be effective on the face. Villains, monsters, Dracula and countless other threats have been photographed or filmed in such light. It is sinister and heavy to have such strong lines. And, they appear in moonlight as well as in strong sunlight… as long as the light is direct and undiffused.

Strong shadow-lines are often useful when you are trying to define a texture in something. Bark on a tree trunk often looks flat and uninteresting in soft light. However, a hard light from an angle will create a myriad of light and dark areas which gives the bark its texture. The strong variation of light in a small area gives the bark contrasts that make it look three dimensional.

Often man-made objects, especially those with a hard and angular appearance, are well presented in hard light. The sharpness of the lines and geometry is accentuated by the harsh shadow-lines. Steel bridges, railway lines, pylons, concrete structures and buildings – all these and more can excite the eye in hard light.

Of course, because hard light is so harsh and unforgiving, you often want to soften it. So, you can introduce more light sources, wait for the clouds to come over, move into shadow, put up a diffuser… in short find any way to reflect, diffuse or widen the source of light. Then you will make the light on your subject softer.

Can you write? Of course you can!
Write for Photokonnexion...

We would love to have your articles or tips posted on our site.
Find out more…
Write for Photokonnexion.

Quadtych – a what?

Original title :: Definition: Quadtych

This page is now at a new URL…
https://www.photokonnexion.com/definition-quadtych/

If you are not redirected then click the link above.

What is an SLR?

1949 Zeiss Ikon VEB Contax S, the first pentaprism SLR

The historic 1949 Zeiss Ikon VEB Contax S, manufactured in Dresden, the first pentaprism SLR for eye-level viewing. (Wikipedia.org)

‘SLR’ stands for “Single Lens Reflex” – a type of camera. The format of the SLR is about giving the user a direct view of the scene the camera will capture. This did not happen in previous formats. So how does it work?

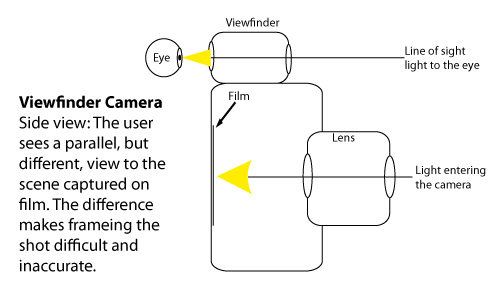
Before the SLR, and before the digital sensor, cameras had viewfinders to sight-up the shot. The optical path of the viewfinder was separate and parallel with the optical path for the camera lens/film. Unfortunately this meant that the viewfinder gave a view that was slightly offset and different to the scene captured by the lens/film. This made it difficult to frame the shot. The difference was called a parallax error. See diagram one. [Find out more about parallax    External link - opens new tab/page]

Diagram: Side View of a Viewfinder Camera

Diagram one: Side view of a viewfinder camera showing parallel lines of sight to the eye and the film or sensor today. (Click to view large).

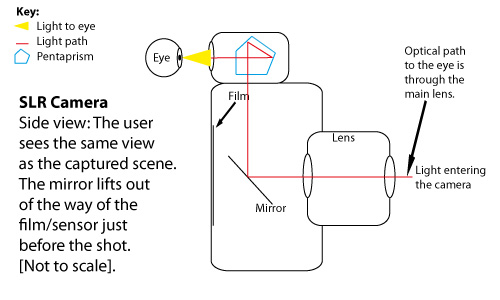
The pentaprism SLR changed that. The user looked through an eyepiece that redirected the optical path through the cameras main lens and up through a ‘pentaprism’, reflecting out to the users eye. This path allowed the user to view along the same optical axis that the film, or today the sensor, uses for its exposure. Diagram two shows the optical path through the SLR to the eye.

Diagram: Side View of an SLR camera showing the optical path to the eye.

Diagram two: Side view of an SLR camera showing the optical path to the eye through the main lens. (Click to view large).

These diagrams are simplified and not to scale, but they show the difference between the two types of optical paths. The SLR uses a pentaprism to redirect the image from the main lens to the eye. The pentaprism is a five sided prism that works like a mirror. It has two internal reflective surfaces allowing the optical path to be modified. The pentaprism performs a simple trick. It maintains the same view as you would see if not looking through the eyepiece. A mirror reflecting a right-angled view in the eyepiece would cause the user to see the scene upside down. The pentaprism reflects the light twice, and back on itself, which corrects for an inverted image.
[More on the pentaprism on Wikipedia.    External link - opens new tab/page]

When the shutter opens, the mirror in the SLR would obscure the path of the light to the film or sensor (the diagram does not show the shutter for simplicity). However, in reality, before the shutter opens the mirror is moved out of the way on a swinging arm. This movement is the ‘Reflex’ that allows the exposure to take place.

The Single Lens Reflex camera was first marketed in 1949, long before the digital sensor. So, today, the ‘film’ in the diagrams would be replaced with a sensor. However, the SLR technology is just as effective as when it was first released. It allows modern photographers to view the world as their lens and sensor would capture it. This is a simple mechanical technology which corrects the parallax errors of the earlier formats of camera. It allows us to more accurately frame and compose photographs.

Comments, additions, amendments or ideas on this article? Contact Us
or why not leave a comment at the bottom of the page…

Like this article? Don’t miss the next — sign up for tips by email.

Damon Guy - Netkonnexion

Damon Guy (Netkonnexion)

Damon is a writer-photographer and editor of this site. He has also run some major websites, a computing department and a digital image library. He started out as a trained teacher and now runs training for digital photogs.
See also: Editors ‘Bio’.
By Damon Guy see his profile on Google+.

What is a Cold Shoe?

If you want to mount flash on a remote point from your camera, you may put the flash onto a Cold Shoe. This strange little object is the definition for today…

Definition: Cold Shoe

Definition: Cold Shoe | Glossary entry

Cold shoe

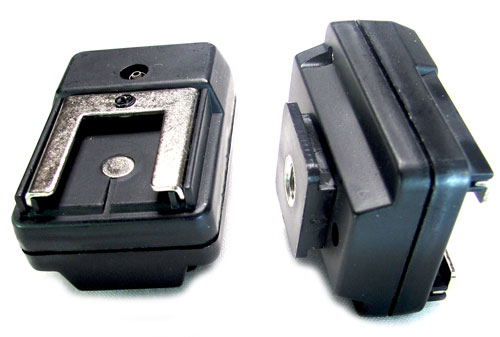
Cold shoes - left: showing bracket, right: showing the cold shoe foot

Cold shoes - Left: showing bracket; also the central contact wired to a socket (out of sight). A camera can connect to the flash. Right: showing the cold shoe foot; note the screw hole (bottom of the foot) for mounting on light stands.


The Cold Shoe is a bracket on top of a mounting plate or block. The mounting block is designed to be placed on a light stand, tripod or similar. A cold shoe is for holding an off-camera flash unit which is being used remotely from the camera. The cold shoe lacks any power of its own (hence ‘cold’ shoe). The lack of power and detachment from the camera define the difference from the hot shoe on the top of the camera. Thus, the cold shoe cannot trigger the flash on its own. The flash must have some method of receiving an impulse from the camera. Normally this is a radio signal or an impulse down a direct wired connection.

Cold shoes may have a wired internal connection. This will allow a wire to be directly connected from a camera to the cold shoe. The flash makes contact with this internal connection via the contact placed centrally on its foot where it fits into the cold shoe.

The cold shoe may be used to mount a variety of other accessories on light stands or tripods. These may include a radio-trigger receiver to fire a flash on a signal from the camera. Other accessories may include microphones for video recording and LED lights.

Cold shoes come in a variety of designs. The ones shown here have an internal wire so you can connect the flash to the camera by wire. Others may just be a bracket or they may simply look different to those shown here. Be aware of the wide design variations.
See also:
Hot Shoe

[refdefC][refdefS]#2870#

Contribute A Definition?

Send us a definition of a photographic word or phrase...

Send us a definition for our list of photographic words and phrases. Simply write a clear definition and send it in. Include an original picture if you wish. Give us your name and a link to your website and we will credit your work.