Tag Archives: Tips

Three great tips for travel and street photography

Three 'Ain't a Crowd

Three ‘Ain’t a Crowd – Taken in Lisbon, Portugal
By Paul Donohoe – Street photographer
• Click image to view large •
By Paul Donohoe on Flickr  External link - opens new tab/page

Travel and street photography are a natural fit.

All street photography involves travel. Whether you are travelling round the world, or just across town, this article is for you. It all involves travel. Adventure awaits the traveller and street photographer.

Finding the location

How do you go about finding the best location for street photography in a new place? I am going to cover three tips to help any street photographer, wherever they are traveling, and regardless of the time they have. Each tip will require a little tinkering depending on your needs and preferences, and on the place you’re traveling in.

1. Explore with or without your camera – Play the Tourist

Yes, that’s right: with or without your camera. Surely, you are asking, a good street photographer always carries a camera? Well, sometimes, no. You can carry one as you explore if you insist, but it’ll work better without!

What do people say about tourists? They are so busy trying to get pictures of the things they are looking at that they end up seeing hardly anything at all. Here is tip one: play tourist but without the camera. Just wander around, looking at — and seeing — the sights. Soak up the atmosphere.

If you’re in a new place for a week or so, take more time to wander around. Of course, if you’re visiting for only a day then you might only take an hour.

Following this plan has advantages for the street photographer. Just looking at the sights gets the sightseeing part of the deal out of your system. It’s important for a photographer to spend time without a camera, just using their eyes. In a new place there are always new sights to see. This can be really distracting when you are trying to focus on the lives of the people carrying on amid the other eye candy.

As you explore, you will discover places that appeal to you. You will find where the crowds are, the interesting backdrops – the places you just know you will come back to.

Lisbon Wall

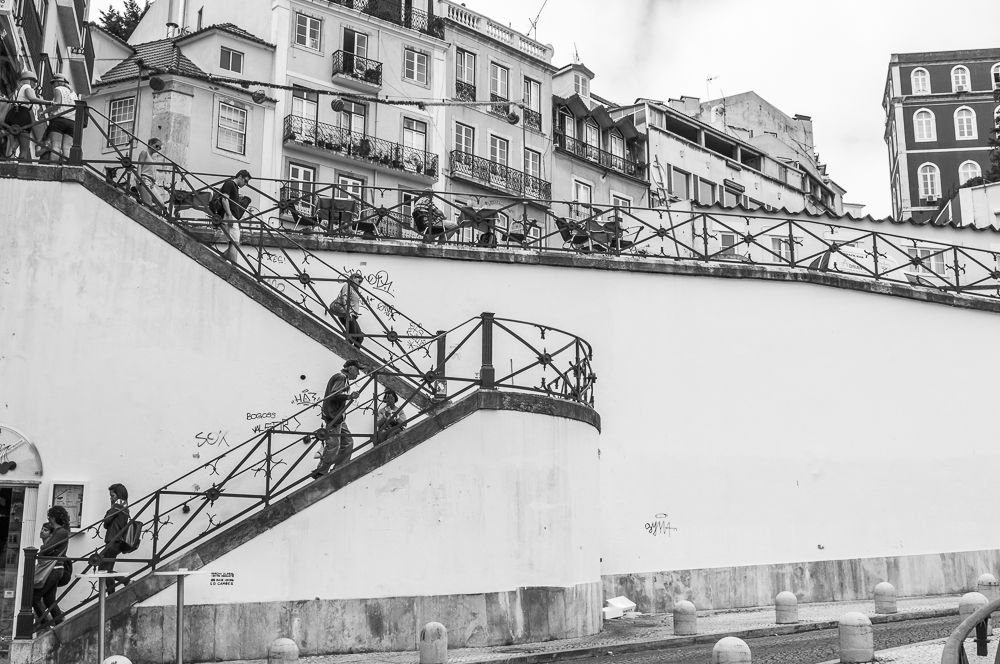
Lisbon Wall • After Escher
By Paul Donohoe – Street photographer
• Click image to view large •
Pauls-Pictures, on Flickr  External link - opens new tab/page

I saw this wall and climbed those stairs once or twice as I explored. I saw this image in my mind’s eye. Then when I came back with my camera, it was there waiting for me!

2. Research: the where, the what, the who and the when

It’s not hard to spend an hour on the internet looking at maps and other information. A lot of people will be content to conduct this research after they arrive at their travel destination, and that’s fine. For me, I like to prepare ahead. The planning, for me, is half the fun!

Are there events, festivals or other activities happening? Where do people gather? What about shopping areas where people stroll? Knowing these things ahead of time, will not only get you excited about your visit, but will start the creative juices flowing.

Check online for the work of other street photographers in the place you’re visiting. Read their blogs, think about their experiences. This isn’t so you can “copy” what they’ve done. You’d be surprised how much you can learn about where and what to photograph — and sometimes where and what not to!

Flea Market Stall Holders

• Flea Market Stall Holders •
By Paul Donohoe – Street photographer
• Click image to view large •
Pauls-Pictures, on Flickr  External link - opens new tab/page

Having heard there was a huge flea market twice a week, I headed there at the first available opportunity. I sometimes think markets were invented for street photography)

3. In street photographer mode…

Keep walking and exploring or focus on a favoured place you’ve found and stay there. You’ve explored and you’ve done your research. Now it’s time to get on with it and get some street photos! The crucial factor in being able to make good street photographs is to be in street photographer mode.

You will read that some people are always in that mode. Perhaps. However, here’s what I mean… To make good street photographs you have to be truly in the space and in the moment. You need to be in tune with the environment and with the people you encounter. In other words, you have to become “of the street” – you belong there, it is your space but it’s also a space you are sharing, even if only temporarily, with other people around you.

Keep walking. Go back to the places you discovered in your exploration and research.

So much of street photography is about feelings, intuition. If, by chance, you come across a space you feel is just right for you, sit awhile and watch the people go by. It might be a park, a town square, or even a train station entrance.

Walking or staying put: there’s no right or wrong. And you can switch between the two; sit for a while till you just feel it’s time to move on.

The picture at the top of the page is one of my all time favourites. It happened after I’d spent an hour just hanging around a small square five minutes from where I’m staying in Lisbon. You really do become invisible if you hang around in one spot long enough.

Three tips… plus!

So, there you have it – three tips for finding the best street photographs when you arrive somewhere new. Actually, there are a couple moew things… Have some fun while you’re at it. Whether you’re there for a day or a couple of months, take your time. There’s no rush – you’ll get the photos you’re meant to!


Paul Donohoe is a Social Documentary and Street Photographer currently traveling to random places as the fancy takes him and his partner. He is passionate about his art and takes his role as a photographer very seriously. He believes that there are no ordinary moments and there are no ordinary people and he has a simple but profound philosophy which informs his work: “Love, Compassion and Empathy are my guides”.


Comments, additions, amendments or ideas on this article? Contact Us

Have fun, take great shots – photography at the zoo

Elephants - at the zoo all sorts of images are there for you to capture.

• Elephants •
At the zoo all sorts of images are there for you to capture. Keep an eye open for the natural shots as well as the well timed ones.

Click image to view large.
• Elephants • By Netkonnexion on Flickr External link - opens new tab/page

The zoo is a rich playground for photographers.

All sorts of opportunities pop up for you. First off, concentrate on getting your pictures sharp and well composed. We will be looking at a few other ideas to help you on your zoo trip.

Sharpness and composition:

A zoo is a great place to practice your five S’s… check these out: Five S’s for super shots. We have also covered a lot of the subject matter in these pages on how to keep your shots sharp and well composed. So here are two links to look back on:

If you want to work through the issues of composition also check out the most important one to get started with: Rule of Thirds. However, composition is a wide study. So here’s the link to the composition articles on Photokonnexion: Composition resources. You can also find these listed under ‘Articles’ on the navigation bar above.

Any special tips?

Yes, fences! They are a pain. But also not as much as a problem as you think. Ring-tail lemurs are hugely cute animals, but great climbers. They need to kept inside a high and secure chain-link fence – you know the diamond linked fencing…

Ring-tail lemur - inside a diamond-shaped link fence.

• Ring-tail lemur •
inside a diamond-shaped link fence. By focusing correctly you can focus the fence out.

Click image to view large.
• Ring-tail lemur • By Netkonnexion on Flickr External link - opens new tab/page

In this picture you cannot see the fence at all! I assure you it was taken through the fence. If you focus correctly you won’t see the fence. Just leave enough room between you and the fence and the fence and the animals. In this shot I was about 2 meters from the fence and the animals were about the same distance inside it. Equal distance either side of the fence and you will be OK. A sharp focus on the animal will put the fence in its most out of focus point. A great tip!

Unfortunately it does not work with thick bars. It is slightly less successful with some finer mesh fences too. It works reasonably well with glass. It does not work from a long way back from the fence because the individual strands in the fence appear to come together and look like a sheen over the shot. So this tip takes a little practice but you should be able to do it if you keep ‘chimping’. Yes, chimping! In a zoo that’s just the thing to do… keep looking at your screen on the camera to see how it came out.

Approach to your shots

Sometimes plain old photos of an animal in a cage are fine. Especially if you are doing a science project or something similar. You do not want to mislead people about where you get the shots. So, if you are doing any sort of a record shot then capture the animal in its enclosure. If you are reporting, taking a journalistic shot, then you must not mislead the public in any way. So, make sure that you take a fair picture of caging as well as the animal itself.

It is great fun, for your own interest, to take shots that make it look like you caught the animal in the wild. This does take a bit of creativity. You need to find ways that show the animal in an environment where it might be seen naturally. Avoid fences, people, artificial surfaces and toys/climbing equipment. Put in plants, other animals, trees, natural nests and so on. Most caged-off areas are quite well suited to this in modern zoos. In the UK, and most other aware countries, zoos must cater for the animal so it has five needs satisfied. They must have…

  1. somewhere suitable to live;
  2. a proper diet, including fresh water;
  3. the ability to express normal behaviour;
  4. any need satisfied relating to being housed with, or apart from, other animals;
  5. protection from, and treatment of, illness and injury.

These five needs also give you a clue as to what to look out for when photographing the animals. Look around their enclosures and find them doing things that fit these five essentials of their lives. That way you will catch them doing things they might be seen doing in the wild. Eating, playing, chasing, sleeping, running… all these things are good photographic material. Capture the animal in movement and stationary… whatever gets your artistic juices flowing! It’s all about enjoying yourself as well as extending your photography.

Portrait of a Rhino - capturing an animal in its noblest pose...

• Portrait of a Rhino •
Capturing an animal in its noblest pose is fun and shows the essential character.

Click image to view large.
• Portrait of a Rhino • By Netkonnexion on Flickr External link - opens new tab/page

Portraiture

It is not always easy to capture animals in action, doing exciting things. Another great pass-time is portraiture. Capture the animal looking at its best. There are lots of things you can do for this, and it helps to use a fresh perspective. So, try high shots, low shots, ground shots. Oblique angles and upside down shots are fun! Sometimes just get a beautiful picture. With your portraiture, as with humans, try to capture the animal looking at its best, and especially, when it is stationary. The idea is to make the essential character of the animal come out in your shot.

Where possible, and it is difficult sometimes, try to get catchlights in the eyes of the animal. The eyes of all animals, including humans are a strong focal point. Catchlights are great for helping to make the animal look alive and dynamic.

A day at the zoo

If you spend a whole day at the zoo you can also have fun people watching. Animals are great, but watch out for stupid humans. Grown ups are especially funny if you catch them with kids. They imitate the animals, and jump around in an attempt to get the kids into the mood. Boy does that make for some fun photography. So keep an eye out for good ol’ Homo sapiens External link - opens new tab/page doing what comes naturally when around kids and animals.

Afterwards

Finally, remember that you should take a lot of shots. Animals, especially on the move, make difficult targets sometimes. So, work hard to get each shot right. Also, concentrate on your experimentation, your sharpness and your composition.

Back at the ranch you have a chance to do some great post-processing. Some of the zoo shoots I have done over the years have seen over a thousand shots in a day. Wow! Weeks of post processing fun! Remember, while the shots may be worth developing in your favourite editor straight from the camera, animals make great subjects for morphing, general ‘PhotoShopping’ and cutting and pasting into other pictures. So don’t think your day is over when you get home. The fun is just beginning.

Have fun on your zoo trip!

By Damon Guy (author and Photokonnexion editor)

Damon Guy - Netkonnexion

Damon Guy (Netkonnexion)

Damon is a writer-photog and editor of this site. He has run some major websites, a computing department and a digital image library. He started out as a trained teacher and now runs training for digital photographers.
See also: Editors ‘Bio’.