
Wedding retouches are essential to great results. Of course, they can be a challenging aspect of wedding photography. Every professional photographer has at least tried retouching their work. However, wedding specialists are particularly under pressure to provide the perfect image of the newlyweds. Specialists in the wedding genre, who also excel at retouches, are rare. The work is sometimes complex and often a tedious procedure. Each part of the work is important. There are no shortcuts. But, you have to do the work if you want perfect results.
[The article today is by Sara Reinhard, Wedding-Retouching.com – Bio]
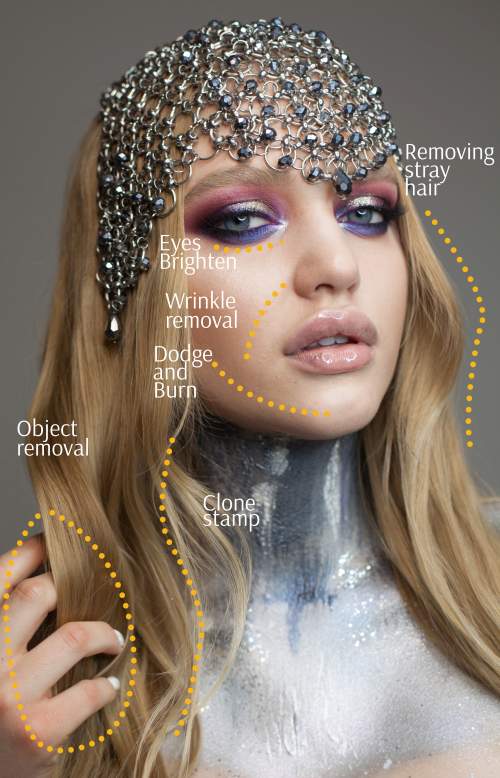
The clone stamp can be used to do a wide range of wedding retouches
Application and experience
There is a great variety of editing programs that can be applied to solve retouching tasks. Of those, Adobe Photoshop remains an undeniable leader. This application has proved its great usability, wide range of options and graphic potential.
The techniques I have chosen are by the way of experiment and developed through my experience. I hope that this list will help your workflow and make your life easier. With a good start, and practice you can really make an impact with your digital wedding retouches.
Wedding retouches – 1. Develop the picture in Raw
To get the best results with editing you should always work in RAW. This format allows the greatest manipulation of the data in the file. The common *.jpg file has very limited ability to make changes.
The first thing to work on is adjusting tone, temperature and exposure. This is done early in the process. Good skin tone and colour temperature are important. Of course, applying them is not obligatory and I use them only if I need them. This work involves a variety of sliders and largely depends on adjustment by eye. You have to develop your colour sense over time. So practice and careful observation of true colours and light are important. (See: Using curves for skin tones – Google search ![]() ).
).
With editing wedding photos, I focus on shadows and highlights next. To make wedding images look realistic and natural, I usually try to make the highlights dull. Bring down the brightness on the highlights only a little. At the same time bring the visible shadows back from black. Flatten them so the visible shadows are not distracting. It is ideal for wedding photo edits when all shadows are as flat as mid-tones. That gives the most realistic result.
This procedure, toning deep shadows and highlights, helps make my later work in Photoshop faster and easier. When I get it all right, the image will have a perfect contrast. If I do not tone the lights and darks before starting, adding changes and effects later can ruin a photo. Correct basic contrast levels are so important.
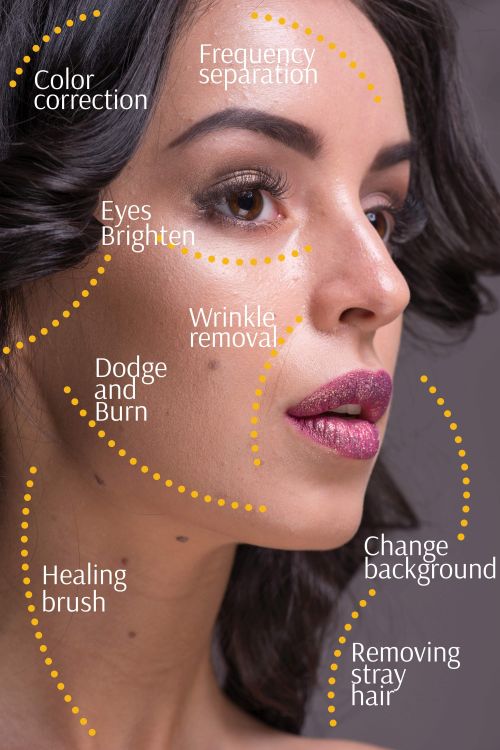
Wedding retouches – 2. The Healing brush! Mask imperfections
The healing brush is an effective tool when editing wedding portraits or guests pictures. There are two variants. You may use either the common Healing brush or Spot healing brush. I prefer the first. The reason is simple. I like to choose my own color source points. This brush is effective in masking all kinds of skin inconsistencies from acne to permanent scars or birthmarks. The healing brush produces a masking effect over the blemish. It takes its mask colour from the surrounding area, or a point of colour of your choosing.
The healing brush is just as effective for removing the spots in other places in the image. Removing facial marks are important. It is also handy when I need to improve the backdrop of a picture. I am amazed how an image changes after simple background work with this brush. Often people do not notice individual spots and marks in an image. However, they certainly notice when the image is crisp and clean. The careful use of this brush really improves the overall impact of the shot. (Learn about the healing brush: Using the Healing Brush – Google search ![]() ).
).
Wedding retouches – 3. The clone stamp
This is the quickest way to change the level of lightness or darkness in parts of a photo. I mostly apply this technique to lighten the dark areas in a photo. Basically, it is used on the background, but you can use it on the skin too. I use an opacity of 15%. Unlike the healing brush tool, the clone stamp is best used on the areas that do not have many details. For instance, it works well on landscape backgrounds, limited texture, or areas of a single tone.
Using the clone stamp can be pretty harsh at 100% opacity. At 15% it is barely visible. So, once you have selected the opacity you want then also select the mode as “lighten” or “darken”. In this mode the clone tool will do what it says, lightens or darkens the area it affects. It has the added bonus of not affecting areas around it that are the opposite to the selection you have made. (See: Lighten Up with the Clone Tool ![]() ).
).
Wedding retouches – 4. Dodge and burn
That is one of my favorite photo editing techniques. To be able to shape the visible light in a picture is brilliant. Photoshop has versatile ways to do this. I don’t use the actual tools for dodge and burn over wide areas of the image. I simply make the exposure brighter with one curve, and use a second curve to bring out the darker tones. That is better for making the overall contrast give a feeling of depth in the image. (See: Using curves in Photoshop – a Google search ![]() ).
).
Every photographer should use these tools for wedding retouches
From time to time I use the actual dodge and burn tools in Photoshop. They are better for more detailed work. Why do I like them as a professional wedding photo editor? I can set the mid-tones, shadows and highlights quite easily. I have noticed that for wedding pictures the most effective use is to add depth. That is possible by bringing out the lighter areas and toning down the darker areas where lights and darks lie close to one another. The obvious transition from light to dark in close proximity causes the eye to see depth. To use the subtle effects of these tools use the ‘Range’ and ‘Exposure’ drop-down settings on the Photoshop top bar.
Wedding retouches – 5. Frequency separation
There are plenty of photo editing tips for improving the skin condition. For wedding pictures, I am convinced that perfect skin is a keystone of success. The problem is that it is a very intense task. This technique makes the skin smooth. Still, it should be used in moderation. If you smooth out the skin too much it looks unnatural. The technique brings effective results in enhancing backdrops, clothes or other parts of the image that need smoothing. Try it on your own images. You will find it a great technique. However, it takes a lot of practice. Once learned it provides a solid way of preserving skin texture but taking out some of the more distracting aspects of tones, highlights and blotches. Have a look at the video below.
Two more techniques for great wedding retouches
Using layer masks
When I retouch pictures, I want every effect to be applied to a specific part of the photo. That is because every thing has different colors, tones and relationships with the surrounding areas. To successfully keep a natural feel I work with layer masks a lot. Each change I make has to be specific and effective. Layer masks allow me to isolate these specific parts of the image without my work spilling onto surrounding areas. The layer mask makes it easy, and quick to isolate each area I need to work with to make the changes.
Furthermore, when using different layers, your changes will not have a global effect. You can limit each change to a specific layer. I often add filters and dodge and burn on different layers. That too saves time and makes the overall task simpler.
Here is a little secret. I often edit a background and a photographed subject on different layers. I use layer masking to take out the photo-subject onto another layer. This allows separate toning and other treatments.
When you are using layer masks, it is important to remember while toning that the black colour conceals and the white colour reveals. (See: Working with layer masks in photoshop ![]() – Google search).
– Google search).
Blending modes – a versatile choice
Commonly, editors overlook blending modes. They appear to be complex. But actually, they give you a lot of creative scope. It is really worth having a go with them.
There are 27 possible blending modes (including ‘Normal’). They can be used in many ways. Basically, they allow you to blend something on a selected layer with an image below it. Blending modes change the way layers interact. The layers remain separate. Your image is quite safe! You actually just see the image with the “blend” laid over the image.
For wedding retouches, there is a high level of romantic impact. So, you can use blending modes to bring texture, tones, colours and hues into your image. Using overlays this way, allows you to raise the artistic and emotional impact. You can use textures in Photoshop templates or, there are a wide range of textures available on the Internet ![]() .
.
Here is a great video. It introduces the gentle art of using blend modes. They are not nearly as intimidating as they sound!
There is a lot to learn. Therefore, the best idea is to experiment both with the choice available and the opacity you use.
I have a favourite blending mode – ‘soft light’. It suits my tastes and photo preferences. From time to time I experiment and change curves to appealing ‘luminosity’ mode. It adds an elusive charm to wedding pictures.
An amazing world of opportunities
All these techniques, in skillful hands, provide results beyond the expectation of the original. They are powerful enough to change a photo in the most unbelievable way. Still, I ask you to use these techniques with care and attention. It is too easy to be over the top and spoil the effect.
Concerning wedding pictures it is especially important to preserve naturalness. Thus, it is better to add less rather than to over retouch. If you are experimenting, take my advice. It is best to use a separate layer for each effect or tool that you apply. That allows you to cancel changes you have made by deleting the layer. And, never make changes to your original. Always keep your original file as a safe back up file. Work only on a copy.
One further point. The presented pictures above were taken with natural light. That is important with wedding retouches. Why? Because the bulk of contemporary wedding photo shoots are held outside. It is quite expensive and difficult to adjust natural light. Modern photographers are used to professional editors improving imperfect light digitally.
If you are worried about the level of your skill when doing wedding retouches, or other digital work, our team are happy to help. If you face some unsolved editing problem, we also will give a supporting hand. (Wedding-Retouching.com ![]() )
)
Comments, additions, amendments or ideas on this article? Contact Us
or leave a comment at the bottom of the page…
Like this article? Don’t miss the next — sign up for tips by email.
Related articles/links:
Photokonnexion Photographic Glossary – Definitions and articles.
RAW Format – a definition
*.jpg format (A Glossary entry)
Using curves for skin tones – Google search ![]()
Using the Healing Brush – Google search ![]()
Working with layer masks in photoshop – A Google search ![]()
Texture – fine art photographic composition. (A Glossary entry).
Image examples of the wide range of textures available on the Internet ![]()
Post contributed by :: Sara Reinhard
Sara works at “Wedding Photo Editing Service”, a leader in picture editing since 2003. They have a team of experts that edit wedding photos. The service works to tight deadlines and high quality standards. The photo retouchers work directly to support photographers through every photo order. They work directly with photographers to build professional relations offering wedding photo editing at all levels and varied styles. The business also offers photo editing in other forms of photography, such as body, portraits or family pictures. A range of editing services are available at modest prices.
Wedding-Retouching.com ![]()
One response to “Wedding retouches – the five most common techniques”