Tag Archives: Portraits

Three “laws” of street photography that will help you

• Green Girls •

• Green Girls •
Click image to view large
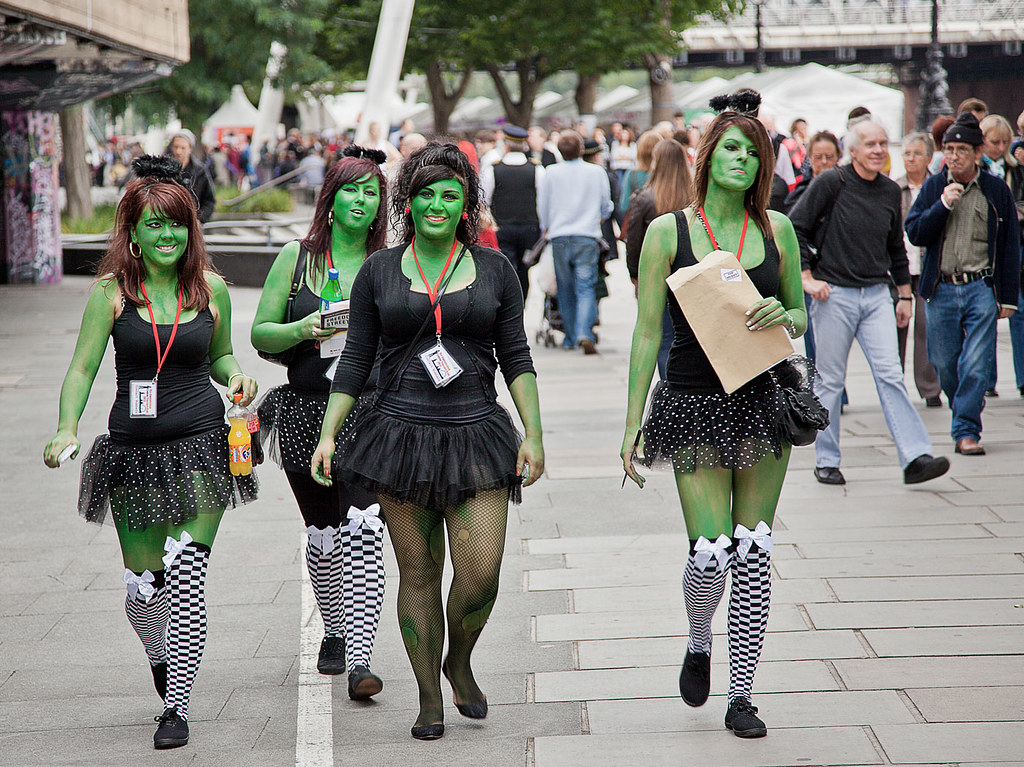
• Green Girls • By Netkonnexion on Flickr External link - opens new tab/page

Street photography is not as chaotic as you imagine.

Most people behave in predictable ways in public. Understanding the general “laws” of street photography can really help you get the shots you want and capture the most interesting characters. Here are three ways that you can get ahead as a street photographer.

Outrageous people

When people are out and about enjoying themselves, especially in groups, they love to be photographed. The more outrageous they are presenting themselves, the more they love to be in the frame. They have made the effort to be “stand-outs” and so they are! More to the point they love to have photos taken because it shows they are the centre of attention. Groups like the green girls above just love to show off. And, don’t we love it too! So, for a bit of carnival fun, our first law is…

The photographers law of street stand-outs: The more outrageously dressed someone is, the easier it is to get a street photograph.

Hiding in plain sight

Be obvious, better still, be official looking. Nobody will question you taking photos. At lunchtimes I used to go out taking street shots. I wore a suit, had a tripod, and a Canon 5D. Sometimes I even wore a fluorescent jacket. I would put my tripod up in the middle of the pedestrian precinct and take photos of anything I wanted – nobody asked questions.

When hiding in plain sight, never look at someone directly. There are three little tricks to this:

  • When you are looking through the camera people cannot tell what you are looking at. If you use a wide angle lens you get a general view. Keep the camera pointing in the general direction of interest. You don’t even need to have the lens pointing directly at individuals. As people walk in and out of view you can snap them and they never know you are doing it.
  • Spend a long time looking through the lens – poised. People will walk in and out of the field of view and never guess you are watching them. All the while you are snapping away. Crop them into position later. With a wide angle shot you have plenty of scope to change the composition on-screen later.
  • If you are doing some spotting, not looking through the camera, make a big effort to “look past” people. Make it look like they are just in the way. People soon lose interest. Bingo – you have the shot and they are none the wiser.

So, for our every day photography in the high street our second law is:

The photographers law of sticking out like a sore thumb: If the photographer is obvious, the subject will be oblivious!

Candid or “can, but didn’t”?

The candid shot is a part of the business of being out on the street. However, not every shot has to be a candid. Interacting with people, getting in close and watching them pose, work or play is also a part of the scene. You probably think it’s difficult to stroll up to strangers and ask to invade their privacy with a camera. Its not as difficult as you imagine. Most people are pretty flexible. If you show an interest in them, generally they like to show cooperation. The problem is with the photographer. I have heard photographers say, “yeah, I could of spoken to them, but I couldn’t be bothered”. What they really mean is: “I would love to have chatted with them and got some shots, but I was worried about rejection”.

Here is some news. It is not as bad as you think. If you do get rejected just walk away. Try someone else. Actually, rejection does not happen very often. Most of the characters you want to photograph are quite pleased to be involved. Be polite, chatty, fun, complementary and respectful and most of the time you will get what you want. Pick your subjects for their character, presence and interest and you will probably find that they are pleased to share with you. Get in close and personal, be enthusiastic and involved. You will be a part of the behaviour, and a part of their lives. If they want copies, send them some. Then you have given them something in return for their posing. This is the third law:

The street photographers law of proactive interaction: If you don’t ask you won’t get!

If you want to be a street photog…

You have to develop and practice a number of strategies. Street photography is a fast and fun activity. Sometimes the direct action approach works best. Other times the candid approach works. However you choose to do it you will find it’s not that difficult. Actually the most difficult thing is starting… and only you can sort that out.

find out more...Photokonnexion tips by email
If you enjoyed this article please sign up for our
daily email service.
                                                 Find out more
#11030#

By Damon Guy (author and Photokonnexion editor)

Damon Guy - Netkonnexion

Damon Guy (Netkonnexion)

Damon is a writer-photog and editor of this site. He has run some major websites, a computing department and a digital image library. He started out as a trained teacher and now runs training for digital photographers.
See also: Editors ‘Bio’.

Easy ideas for controlling your flash unit

Specular highlights

Bath toy
Specular highlights are distracting and draw the eye which spoils the shot.

Flash is a great benefit and a problem all at once!

Most people don’t realise two things about flash. First, the standard setting is nearly always too powerful. Second, the highlights resulting from flash are very distracting.

Working with flash power

Like all things in photography you need to think carefully about using flash. It is not simply click and move on. Most improving photographers are just beginning to make shots rather than snaps when they begin to see the quality and colour of light. So it is easy to miss some of the impacts that flash has on a subject. Here are a few consequences of a flash shot…

  • An over-bright subject.
  • Strong highlights with a tendency to wash out colours.
  • Specular highlights that create sharp, bright spots that distract the eye.
  • Bright foreground, dark background.
  • Flesh tones strongly whitened giving a sick look to the face.

Each of these is almost always down to using too much power in the flash. So, the way to over come these issues is to do two things. Turn down the power of the flash and diffuse the flash so it scatters the light.

Turning down the flash is simple. You must find the setting that adjusts the flash power level. This is easy if you are using an off camera flash because the unit usually has a display and a dial or buttons to change the settings. On-camera (pop-up) flash is usually adjusted by finding a menu setting that turns the power up or down. You may need to consult your camera manual to find where that setting is found.

The key to getting the right setting for your flash is to understand how to change it. Most off-camera flash units are marked up so there is two stops of light on the flash. Normally if the flash is marked 1:1 then that is full power, and more often than not this is the default setting. You can usually turn this down by one third of a stop of light at a time. Each time you stop down the setting one stop you are halving the light it emits.

Pop-up flash units may not be marked so clearly. Some are marked [low – medium – high], others, particularly point and shoot cameras, may just have “full | half”. More sophisticated pop-up units may also be marked in the same way that off-camera flash units are marked. Which ever your flash is, you should practice with it so you have an idea of how powerful it is and how much the settings can change the impact of the flash.

Flash diffusion

The best way to get used to using flash and controlling the power is experimenting. However, the issue of nasty highlights is the other problem the inexperienced user often does not spot at first. Strong highlights raise the light levels so you can see the tonal changes in the colour of the surface the light hits. This helps to define the shape of an object. So, for example, a brighter top on a ball and dark shadows under it help to define the spherical shape.

If the light intensity is too high, particularly on reflective surfaces, the reflected light level will exceed the level the camera can cope with. The highlight then becomes blown out. The light is so bright in that area that it becomes a bright spot where all the detail is lost to pure white. Unfortunately such strong, blown out areas, are severe distractions. In the picture above, the small reflective points, called specular highlights, are also strongly distracting. So what can you do to avoid these nasty effects?

If your power adjustments are not working and you still have blown out spots or highlights then you should consider diffusing the flash. This makes a difference in two ways. The diffused light will scatter the light from the flash over a wider area. This effectively lowers the light intensity even further in the area of the highlight since the light is not hitting it from a direct focused hard light from the flash.

Secondly, diffused light spreads the effect of the light. This makes it more likely to bounce off other surfaces nearby. These surfaces then become multiple mini-light sources. All these sources hitting your subject create a soft light which is much less likely to create specular highlights or very strong colour-destroying highlights.

So how do you do this diffusing? I just love this great flash diffuser. Designed to fit your off-camera flash unit it is an ingenious design and easily adaptable to any flash unit. Check out the Rogue FlashBender 2 – off camera flash. If you have an off-camera flash this is the best. It is the most adaptable diffuser I have ever used. You attach it to the flash with a wrap around grip. The big diffuser stands up above the lens of the flash. It is tough, flexible and creates a lovely daylight-white light. It is superb for portraits and still life work. Coupled with adjustments to the power settings on your flash it gives you excellent control and helps reduces highlights and the effects of hard light direct onto the subject.

For off camera flash there are a range of diffusers available. They are based on various different mounting or reflector principles too. So, you need to look around to see if you can find a diffuser that suits you.

For pop-up flash the options are not as easy. However, I recommend one of two options. I have successfully used ordinary white tissue paper sticky taped over the pop-up flash to both reduce and diffuse flash. However, while this works well, reducing the light by about a full stop, it is a temporary solution. Also, if you use the flash a lot the extra insulation may cause the flash to over heat. So, not for regular use.

My favoured options for pop-up flash diffusion are one of these three methods…

Professor Kobre’s Lightscoop, Standard Version Bounce Flash Device, Universal Model, fits over the Pop-up Flash of most SLR Cameras This diffuser produces a very effective ceiling bounce for the diffusion. However, make sure that in rooms where you use it there is no strong colours on the ceiling or it will cause colour casts.


Gary Fong Puffer – Pop-Up Flash Diffuser for Canon / Nikon / Pentax / Olympus / Panasonic- Lumix pop-up flashes A well reviewed unit, and has the advantage of an easy fit. The other advantage is that it diffuses the light moving forwards. The other two units here bounce the light which puts you slightly at a disadvantage in controlling the flash light direction.


Cateye LETS Flash Reflector/Diffuser Hybrid, for use with DSLR pop-up flashes Although I have not used this one personally, I know some people who have. I have had some very good feedback on this unit and it seems to work effectively in a wide range of situations.


Great shots with flash…

Yes, like everything else in photography, to get good with it, you have to practice use of flash. However, first you need to make sure you can spot the highlights, specular highlights and over-powered flash. Once you know what you are looking for you can adjust your flash power.

The best way to gain control of your flash is reducing the power, or at least adjusting it. Also, the more you soften the harsh, hard flash light the less distracting and natural the highlights will be.

Whatever you decide to do to make your flash manageable do plenty of experimenting to gain control of the light. Don’t forget to Examine Shots Before Shooting Again – “Chimping” to check for highlights. The practice will pay you back in great, well lit shots many times over.

find out more...Photokonnexion tips by email
If you enjoyed this article please sign up for our
daily email service.
                                                 Find out more
#11030#

By Damon Guy (author and Photokonnexion editor)

Damon Guy - Netkonnexion

Damon Guy (Netkonnexion)

Damon is a writer-photog and editor of this site. He has run some major websites, a computing department and a digital image library. He started out as a trained teacher and now runs training for digital photographers.
See also: Editors ‘Bio’.

Get talking to your street photography subjects…

Street photography: It helps to talk to your subjects!

Street photography: It helps to talk to your subjects!

The communications element in street photography…

Really, there are so many different ways to approach street photography that it is no surprise that people don’t know where to start. Today Mark Wallace discusses his communicative approach to the art. While some tend to be observers of people by capturing candids, he really likes to get into conversation and becomes a part of his own scene.

In the last street photography video, “Famous street photographer talks about his work” we saw Travis Jensen using a compact but fully functional camera. In the video today Mark Wallace uses a full frame, full sized DSLR. There is a debate about the camera you use in street photography. Do you go with a big DSLR and risk being really intrusive? Or, do you go with a little camera and risk not having control.

These variations on a theme are fine. Street photography is all about doing what you do best. There is no one way to be a street photographer. Everyone takes their own approach. This is exactly what is meant by your personal style. It is your approach, your way of doing street photography.

Digital Photography One on One: Episode 70: Street Photography

While street photography is endlessly fascinating the fact that we all take different approaches means there is always a benefit in listening to other peoples experiences. It helps you to think around your own approach. So, see what you make of Marks’ spin on the subject. Enjoy!
SnapFactory  External link - opens new tab/page

find out more...Photokonnexion tips by email
If you enjoyed this article please sign up for our
daily email service.
                                                 Find out more
#11030#

By Damon Guy (author and Photokonnexion editor)

Damon Guy - Netkonnexion

Damon Guy (Netkonnexion)

Damon is a writer-photog and editor of this site. He has run some major websites, a computing department and a digital image library. He started out as a trained teacher and now runs training for digital photographers.
See also: Editors ‘Bio’.

A quick look at ruins and countryside

• Lonely Bodmin Chimney •

• Lonely Bodmin Chimney •
Click image to view large
• Lonely Bodmin Chimney • By Netkonnexion on Flickr External link - opens new tab/page

The influence of man on the countryside is worth photographing.

For centuries we’ve created substantial buildings in open country. Today, these have become an intimate part of the rural scene. For photographers they provide an interesting focus for landscapes. Sometimes quaint, sometimes aesthetically pleasing, these old relics can provide great interest for the eye. They draw the viewer into the scene and provide a starting point for the appreciation of the rest of the image.

Finding ruins and old buildings

In the UK the Ordinance Survey  External link - opens new tab/page sell maps that carry a key which marks out old, derelict and protected buildings. Other countries have similar mapping systems. Surprisingly some online mapping systems are not so good at highlighting these features of our history. Unless, that is, they are part of some sort of commercial or historic leisure opportunity on the site.

I was crossing Bodmin Moor in the West Country, UK, one day and came across the chimney above in a tiny country lane. Well off the beaten track. Bodmin Moor, with many other places in Cornwall and Devon, was once a thriving mining area. The locals extracted tin. Sadly the workings bring little prosperity to either county now. But many of the old mine buildings, and especially the distinctive chimneys, bring many tourists. In the parks and moors these mines are preserved and they provide brilliant photographic opportunities. The ones that are away from the crowds are best. A lonely feature in a landscape is always more attractive than a solitary chimney surrounded by heavily trodden ground, tourists and coaches.

So how do you find these hidden gems? Here are some things you can do…

  • At walkers/backpackers shops ask the staff. They often know local interest spots.
  • Get to know some local people in places you stay.
  • Tourist information offices are found world wide and often know of hidden places.
  • Study maps and aerial views of places you are going to visit.
  • Ask in local camera shops.
  • Contact the local camera club to your destination before your trip.
  • Search out ‘interest’ booklets written by local people for local people – often found in walkers/backpackers shops
  • Contact historical and walkers societies in advance of your trip
How should you photograph ruins?

There are some basics you should think about…

Use perspective to exaggerate depth: Find a long wall or fence, even ancient pathways/hedges to shoot along and use these to create perspectives and lines to draw the eye into the picture and create depth.

Rule of thirds: In the picture above the chimney is on a third. The rule of thirds always helps with a more dynamic placement of solid objects in the landscape.

Foreground, mid-ground, distance: These help create layers in the picture. Picture something close to you as detailed and tail off the detail on the other side of some breakpoint in the image. My little steam in the foreground (above) not only provides detail, but acts to break up the picture into fore and mid-ground too. Nearer the horizon the chimney provides interest drawing in the eye and creating depth.

• Rock backdrop •

• Rock backdrop •
The textures on the sites of ruins are often great for portraits


Detail and texture: Some great things can be found around ruins, derelict buildings, mines and old industrial sites. Think of old spillways, waterways, old machinery, the wonderful textures, rocks, farm animals, heaps of mine spoils, rust, old beams of wood… the list is endless. They all provide great photographic opportunities.

People! ruins and derelict sites make great places for portraits. The textures and variations of the scene both make great backdrops. Look for surfaces that have high contrast. Lots of mid-tone highlights and darks mixed so that the texture stands out. If the light is no good then you can side light with an off-camera flash to exaggerate the texture in the rocks.

Light painting: There are some brilliant opportunities for lighting up these sorts of places fat night with all sorts of exotic lights, colours and fun light painting shots. You can find out more about light painting in this post: Night photography – let the sparks fly!. Be mindful of your safety – some of these places are dangerous and make sure you get any permissions you need before invading a site with bizarre night lights. Someone may object, especially on private ground.

Opportunities

Ruins and the like provide great opportunities for landscapes, portraits, studies in texture and fun shots. Be on the look out for local situations for you to get to know and plan ahead for when you are away.

find out more...Photokonnexion tips by email
If you enjoyed this article please sign up for our
daily email service.
                                                 Find out more
#11030#

By Damon Guy (author and Photokonnexion editor)

Damon Guy - Netkonnexion

Damon Guy (Netkonnexion)

Damon is a writer-photog and editor of this site. He has run some major websites, a computing department and a digital image library. He started out as a trained teacher and now runs training for digital photographers.
See also: Editors ‘Bio’.

Easy ways to avoid reflections on eyeglasses

Reflections on eyeglasses can be controlled.

• Party Person •
Reflections on eyeglasses can be controlled. Check the angle of light sources.


Flash creates irritating reflections on eyeglasses.

Flash can be difficult to work with. Especially pop-up flash.


In particular, reflections on eyeglasses make ugly highlights. On-camera flash is directly parallel to the optical path of the camera. The light from the flash travels right down the line, hits the glasses and reflects right back into the lens. This can cause ugly bright reflections, highlights in the eye space of the glasses. Picture ruined.

Get off the optical path

The use of flash should always be off the optical path if you want to avoid red-eye or reflections on eyeglasses. Ensure that you do one of two things. Use an off-camera flash where the flash is off-set to the side on a stand or convenient surface. Alternatively you can redirect the on-camera pop-up flash using a diffuser or some type of reflector. You can find out more about the latter in this post: “Does Pop-Up Flash Ruin Your Shots?”. Both these help to reduce the highlight problem. The light will be on the subject from bouncing off other surfaces. This reduces the direct effect of the light reducing the reflections on eyeglasses from direct rays.

Controlling reflections on eyeglasses

If you use off-camera flash, or any other type of light to illuminate your subject you can get highlights on the glasses. The key to overcoming highlights and reflections on eyeglasses is knowing the simple “Law of the angle of incidence”. The law states…
       • The angle of reflection = the angle of incidence •
Basically, light hits a surface and reflects off again at the same angle. Simple!

The “Law of the angle of incidence” teaches us not to stand so your camera is on the same angle as the light reflecting off the glasses. This applies to any light, not just flash. Remember, that when you line up your camera you should look carefully at your subjects eyeglasses to see if there are any highlights you can avoid. If there are lights reflecting off the eyeglasses then move so the “Law of the angle of incidence” does not apply.

Remember to keep the catchlights

Of course the way that eyes look alive is that wonderful bright spot called a catchlight. As in the image above that feature of a reflection brings vitality to an image. To help preserve that, use a tiny bright point directly in the line of the optical path. If you have an off-camera flash you probably have a white pop-up card on it. You can use that card for making a catchlight. Point the flash beam to bounce off a nearby surface. When the card is up, it reflects a gentle light at the subject. At the same time the main beam of the flash is heading off for the ceiling or walls nearby. That little card on the flash reflects just the right amount of light directly to the eyes of the subject. The small size of the card is critical. It is not bright enough to cause bad reflections on eyeglasses. But it is enough to create that lovely bright spot. The eyes suddenly become alive. They are not blotted out with massive back-reflections.

Avoiding flash reflections on eyeglasses:

In the video Mark Wallace explains the Law with a simple diagram then sets up the ways you can avoid the highlights. Remember, his advice applies to any light, not just off-camera flash or studio lights.
Ep 214: Digital Photography 1 on 1

More about off-camera flash

Off-camera flash is a much more controllable way to light with flash than pop-up flash. If you would like to know more about off-camera flash, including how you can buy effective equipment at affordable prices see this post: Off-camera flash. It provides more information about the flash units and how to use them. There is Also advice on purchasing.

find out more...Photokonnexion tips by email
If you enjoyed this article please sign up for our
daily email service.
                                                 Find out more…
#11030#

Damon Guy - Netkonnexion

Damon Guy (Netkonnexion)

Damon is a writer-photographer and editor of this site. He has run some major websites, a computing department and a digital image library. He started out as a trained teacher and now runs training for digital photogs.
See also: Editors ‘Bio’.
By Damon Guy see his profile on Google+.

A brave expression of passion – photographic heroes (pt 2) – Diane Arbus

Photomontage of Diane Arbus and some of her work.

Photomontage of Diane Arbus and some of her work.
“My favorite thing is to go where I’ve never been.” • Diane Arbus
Click to view a range of her work and portraits of her in Google Images.

Swim against the tide!

Your personal mission in life is important and your photography should reflect that. Don’t only transmit passion through your work. Diane Arbus worked in photography but found a rarely paralleled depth of expression in her exploration of a personal passion. She persevered even when that passion took her into domains that the public would rather have left unseen at the time.

Diane Arbus (Mar 14, 1923 – Jul 26, 1971)

The creation of a picture lies within the ability of everyone who holds a camera. Conjuring a meaningful ‘image’ in the mind and creating an enduring memory for the viewer takes a photographer with passion and expression far beyond simple picture taking. Diane Arbus was a phenomenon and a case in point. Throughout her varied career she was able to express her interests in ways that shocked or left people cold.

Born to a wealthy, talented and artistic family Diane Nemerov escaped the worst of the American Depression. Her siblings excelled in art and photography as did her father who retired from the family business to paint. She married at eighteen to Allan Arbus. Both interested in photography, they began a business after WWII in commercial and advertising photography. They were published in a wide range of well known magazines of the time, despite professing their hate of the fashion world.

During the late 1940’s and 1950s the Arbus’ raised two daughters. The couple separated in 1958 and divorced 11 years later. It was the late 1950s and 1960s that saw her unique style coming out. Working with a wider range of client publications she extended her personal ideas and techniques through assignment work. In 1963 she was awarded a Guggenheim Fellowship for a project called “American rites, manners, and customs”. This allowed her to extend her interests and to develop her personal style. While teaching, working on her projects and doing some assignment work the 1960s were a proving ground for her approach. Her commercial work declined as she became better known as an artist.

What made Diane Arbus unique was an exploration of her real interest. She pursued her photography working with “deviant and marginal people”. Her passionate portrayal of dwarfs, giants, transgender people, nudists, circus performers and other “ugly or surreal” people was for the time pretty brave and definitely against the grain of public opinion. Her work in advertising is little known today. Her writing and photographs of people at the margins of society bought her condemnation and severe criticism. Some of her work is still considered to be controversial. Yet, despite open criticism and damaging condemnation of her and her work she stuck to her interests and passionately expressed herself.

Her images are stark and sometimes ugly. However, this was the way she portrayed the world and was consistent in that approach. The extent to which she was a tortured individual is not clear, but she suffered bouts of depression and committed suicide aged 48 in 1971. Her legacy lies in her extraordinary persistence working with people considered to be ‘freaks’ in her contemporary America. She was notable in her success in getting permission from her subjects to publish the photographs. She established close personal relationships with many of her subjects while also portraying their less than ideal circumstances. And, she often returned over many years to take more photographs. Some of her images are shocking and harsh. Yet she seemed intent on hard lines, hard light and portraying people who had hard lives.

She produced a range of iconic images of people in difficult circumstances, against the public wisdom of the time. Diane Arbus remains controversial. But she published both photographs and writings that showed how she understood the nature of her own work and the impact it was having. She is one of my heroes because she stood up for herself and did photography with a passion. She showed important issues for what they were and exposed the underbelly of American culture at that time. Her work is sought-after as collectors items. Auction sales of individual pictures in the last decade have exceeded several hundred thousand dollars. Yet this has not diminished her insight. Important and controversial she may have been, but a powerful photographer with a passionate message she remains today.

Two quotes by Arbus define for me her outlook on her photography…

“Freaks was a thing I photographed a lot . . . . Most people go through life dreading they’ll have a traumatic experience. Freaks were born with their trauma. They’ve already passed their test in life. They’re aristocrats.”
Arbus, Diane. “Diane Arbus”. Millerton, New York: Aperture, 1972. ISBN 0-912334-40-1.

In this quote you can see the passion spilling out of her words…

I do feel I have some slight corner on something about the quality of things. I mean it’s very subtle and a little embarrassing to me, but I really believe there are things which nobody would see unless I photographed them.
Feeney, Mark. “She Opened Our Eyes. Photographer Diane Arbus Presented a New Way of Seeing.” Boston Globe, November 2, 2003.

In my twitter stream (@photokonnexion) I push photographers to ‘do their own thing’ with a passion borne of insight from a personal mission in life. Many contemporary professional photographers fall onto the media bandwagon and get trapped in a cycle of commercial and media ‘art’. As a result they never see their personal development get past commercialism. I would encourage photographers of all types to look for ways to make their own mark in photography. As artists, photographers should be looking to expand their own horizons. I urge you to explore new challenges that define you as a photographer. Diane Arbus was not afraid to go down this route, neither should you.

The following video is the first of four. See all four parts of this video here: Masters of Photography Diane Arbus (Parts 1 to 4)

[youtube http://www.youtube.com/watch?v=wKXwCctBLQU&w=500&h=375]
Masters of Photography Diane Arbus Part 1. By Rangefinder  External link - opens new tab/page

By Damon Guy (author and Photokonnexion editor)

Damon Guy - Netkonnexion

Damon Guy (Netkonnexion)

Damon is a writer-photog and editor of this site. He has run some major websites, a computing department and a digital image library. He started out as a trained teacher and now runs training for digital photographers.
See also: Editors ‘Bio’.

Simple positions for classic portrait work

The essence of portrait work lies in just five simple positions.

Nearly all the shots you take will be based on these simple set ups. All photography students learn to do these positions. The video today is all about how these sets are put together. It really is simple.

The five positions

The five simple positions are…

  • The Short: Often used to help rounder people have slightly longer faces. The face is angled so that the shadows are on the side of the face nearest to to the camera. The lighted side is on the side furthest from the camera.
  • The Broad: The subject faces the camera nearly straight on. The light comes in from the side. The shadow of the nose and the face on the other side of the nose are lit, but only softly.
  • The Rembrandt: A classic position – it is intended to show a triangle of light on the face on the side away from the light. The lighting is set high so that one side of the face is lit, and only the top of the cheek is lit on the other side.
  • Split lighting: one side of the face is lit. The other side is in soft shadow. This lighting technique is often used as a way of stopping shadow from a hat falling on the face.
  • The butterfly: The light is full on to the face. Generally this one is done slightly higher than the subjects head to ensure that the underside of the nose is slightly dark, but there should be no triangle of shadow on the space under the nose to the top lip. This gives a nice broad light to the face and shows off the eyes to an advantage.

More after this…

In the video these positions are shown off with a good measure of advice on how to set up the lights. A great video with a comic twist at the end. Enjoy!


Portrait Lighting for Photography and Video!
TheSlantedLens  External link - opens new tab/page·50 videos

In the near future I will be doing more on portraits. This post is a way of getting that going. If you have any questions or want me to tackle a specific portrait question let me know in the comments or via our Contact Us page.

By Damon Guy (author and Photokonnexion editor)

Damon Guy - Netkonnexion

Damon Guy (Netkonnexion)

Damon is a writer-photog and editor of this site. He has run some major websites, a computing department and a digital image library. He started out as a trained teacher and now runs training for digital photographers.
See also: Editors ‘Bio’.