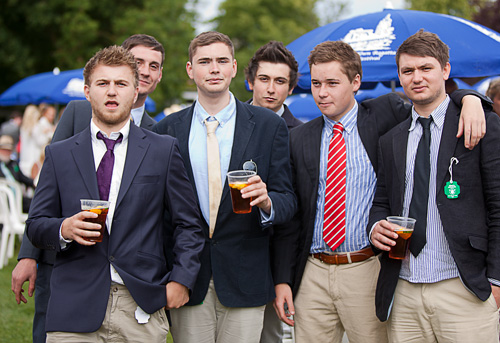
Tag Archives: Light

Seven easy tips to improve your group photography

• Boys Group •

• Boys Group •
The humble group photograph can be much improved by a few simple steps.

Simple steps lead to great shots…

With groups you must go a little further than with straight portraits. Getting people coordinated, a range of different settings, beating the dreaded ‘blinks’, great sharpness… Check these out, go the extra mile.

Planning

When doing group shots a few ideas up front helps. Some simple ideas about cohesion, commonality and framing can make your shots more compelling. Clear ideas about how you want this particular group arranged will enable you to get them quickly into place. Groups, by their nature become impatient quickly. Preparation moves things along keeps people on the ball. Have your location scouted and know where you are going to place your group. Have a good, simple background ready. Make sure you have adequate light to work with. Location is everything.

Settings

Remember, groups require a wide view and you need some depth too. Set your aperture too large and you risk the back row being out of the zone of sharpness. Most groups are best photographed at f8 or even better f11. To get the sharpness work with your shutter speed up reasonably high. 1/125th minimum – better 200ths of a second. Go higher if you don’t need flash.

Bigger groups always have a certain amount of movement. Higher shutter speeds help to freeze the action. The problem is, high shutter speed and small aperture leave you needing flash or extra lighting. There is always a trade-off. To compensate you may need to raise your ISO.

Sharp shooting

Shooting at high speed will help freeze the action. It will not steady your hand. If shooting a big group, especially for formal shots, it’s best to use other sharpening techniques. Consider these sharpness…

  • Using a tripod
  • Use mirror lock-up function
  • Image stabilisation off (not needed on tripods – it creates vibration)
  • Auto-focus off on a tripod after the group is focused (it creates vibration)
  • Operate with a remote shutter button or use the on-camera timer

A tripod saves time. You can arrange the group and smooth the shot through. If you have more than one group, your camera is always set up when it is on a tripod. It helps smooth the flow.

Light and shade

Overall light in the scene is important, so is the shade. When taking pictures of groups you are taking a wide angle view. The group is often spread out. It’s easy to miss that one or two of the group are in the shade. Or, with a camera mounted flash, the shadows from the flash fall harshly onto the people behind. Trees, buildings, other people, towers, street lights – any number of objects can cast unexpected shadows which are difficult to notice. Flash casts shadows you don’t see until you open the picture on a computer later. Look carefully at your group. Arrange them to be in clear, consistent light. Make sure any lights or flash you are using treats all the members of the group evenly and fairly.

Clothing

So often with groups you have no control over clothing. If the event is formal the clothes often have a stiff and upright feel. People don’t relax so well in this situation so you will have to set the scene and pose them accordingly. It is not easy, especially with family conventions or a preset plan. Where possible let them arrange themselves with your help. People will be most comfortable next to the people they like and know.

When a group is coming together informally the clothes may be wildly variable in character. What matters when working with a candid group is the fun arrangement of the group. Try to get the group to look dynamic and together. This will offset a strong clothing variation.

The prize giving

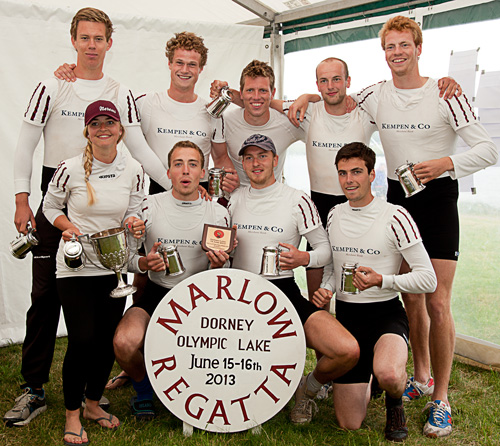
• The prize giving •
If the group feels comfortable and you work with them they’ll help make a great picture.

Organisation

Groups, especially close up, look odd if the faces are at different distances from the camera. They are close enough to us to look fine. However, the lens plays tricks on our eyes. If they are out of line – at different distances, but close together – they will appear to have different head sizes. Try to make people in each line of a group stand evenly down the line.

Sometimes the classic, short in front taller to the back works fine. Other times it is better to actually mix up short and tall – especially with different generations. It is much more natural for grandchildren to be arranged with grandparents than stuck on the end of the line because they are small. Putting children between adults also provides an opportunity to have a shorter person behind so as to break up a line up – to make it less formally arranged.

Close family groups, and friends, often look good leaning together, or heads together. It is very intimate to touch heads.

The dreaded ‘blinkies’ strike every group shot if you are not careful. The bigger the group the more likely that someone will blink. Overcome it with a little group control. Ready to shoot? Tell them you are going to help stop them blinking in the shot. Tell every one to shut their eyes. Count to two, tell everyone to open. Count to two. Press the shutter. Everyone will have open eyes. Explain it first so they know what is coming. It will make sure they all have eyes open long enough for you to get the shot.

So, with all these different ways of organising the group make sure that what you have is comfortable, natural – never forced.

Posing

Organising the group is about positioning and location. Posing is about personal stance and comfort. You, as the photographer, need to direct the group. But on the other hand you have to work with the people you have before you. Try to make it fun. Get them to relate to one another. If you have time, especially with candids or informal group, get them to experiment. Handshakes, greetings, hugs, arms around each other, standing in groups – the idea is to make ‘that’ group look good. Another group might not look good with the same poses. You should work with them, discuss ideas with them, respect their thoughts. They probably know each other better than you know them and will make the best suggestions. It is your job as a director to pick up on the most effective shots from their ideas. Consider what you know about them, consider their ideas for their poses – then work together to make the shot just right.

Getting the right feeling…

Working with groups is more than just lining them up. You have to consider the time, place, light, shade, the settings and the technique. But the best shots still come from the group itself. If the members of the group are comfortable, having fun and feel natural about their poses they will make sure you get a good shot. Work with them, help them make your picture work.

Comments, additions, amendments or ideas on this article? Contact Us

find out more...Photokonnexion tips by email
If you enjoyed this article please sign up for our
Tips by email service.
                                                 Find out more

By Damon Guy (author and Photokonnexion editor)

Damon Guy - Netkonnexion

Damon Guy (Netkonnexion)

Damon is a writer-photog and editor of this site. He has run some major websites, a computing department and a digital image library. He started out as a trained teacher and now runs training for digital photographers.
See also: Editors ‘Bio’.

How to use negative space effectively

• Boats •

• Boats •
Picture by Mike Browne (from the video)

Composition that is not there!

The space that surrounds the subject and fills the gaps between important objects in your picture can be described as negative space. In some ways it defines the objects you see. In another way it is not really there. Instead the background is what you see.

The concept of negative space is important. The shape of your subject is created, at least in part, by the space around it. The space helps to define its character too. How much space surrounds your subject, and the type of space, all pass messages to the viewer about your shot.

Negative Space in Photography

Negative space is a strong artistic element yet it is not always obvious how to use it in your photography. Seeing negative space, and using it, takes a little practice and some ideas on how to place the elements in the shot. In the video Mike Brown shows us, despite the annoying balloon, how to use negative space and how to place your subject. He shows us how to use the balloon too – eventually.

find out more...Photokonnexion tips by email
If you enjoyed this article please sign up for our
Tips by email service.
                                                 Find out more

By Damon Guy (author and Photokonnexion editor)

Damon Guy - Netkonnexion

Damon Guy (Netkonnexion)

Damon is a writer-photog and editor of this site. He has run some major websites, a computing department and a digital image library. He started out as a trained teacher and now runs training for digital photographers.
See also: Editors ‘Bio’.

Can you write? Of course you can!
Write for Photokonnexion...

We would love to have your articles or tips posted on our site.
Find out more…
Write for Photokonnexion.

The top twenty phototips that you should know

20 spots - twenty tips

• 20 spots – twenty tips •
Click image to view large

Learning photography is about…

Doing the simple things really well. Although there are a lot of things to learn, the important ones are a few things you do over and over again. If you improve them you will automatically improve your photography.

Work on these to make the biggest improvement
  1. A proper stance will provide a proper, steady hand-held camera position.
  2. Go everywhere with your camera. Use it every day – improve every day.
  3. Learn with what you’ve got, better equipment will not improve your skill.
  4. Three essentials – camera, lens, tripod. Learn to use them all equally well.
  5. Get close, fill the frame, your shots will probably be better.
  6. Think about every shot before you push the shutter button.
  7. Count to two before taking your camera away from your face.
  8. Never just look at others’ photos – do a critique every time.
  9. Work on your composition skills at least as hard as your technical skills.
  10. Be inspired by other photographers, but develop your own style.
  11. Discuss photography as much as possible with other photographers.
  12. Look for contrasts in colour, light, shape and other variables.
  13. Declutter your shots, show it as simply as possible.
  14. Use natural light as much as possible – get to know its properties.
  15. The rule of thirds works more than 95% of the time.
  16. Try different perspectives, points of view and heights at each scene.
  17. Vary shutter speeds, ISO and aperture settings to experiment with exposure.
  18. Make people, and especially faces, a central study in your photography.
  19. Great photos can be found everywhere – you just need to look out for them.
  20. Be completely obsessed with the study of light and the language of light.

If you pay attention to these important tips you will find your photography will develop.

Photography becomes a way of life, but don’t make it the only thing in your life. You need other interests to bring new perspectives into your photography.

Most of all enjoy what you are doing. Photography should be fun… don’t take it too seriously. Laugh a lot.

find out more...Photokonnexion tips by email
If you enjoyed this article please sign up for our
Tips by email service.
                                                 Find out more

By Damon Guy (author and Photokonnexion editor)

Damon Guy - Netkonnexion

Damon Guy (Netkonnexion)

Damon is a writer-photog and editor of this site. He has run some major websites, a computing department and a digital image library. He started out as a trained teacher and now runs training for digital photographers.
See also: Editors ‘Bio’.

How to tackle the problem of reflections and highlights with glass

• Photographing anything translucent requires treatment that defines the shape •

• Photographing anything translucent requires treatment that defines the shape •
Photograph by Phillip McCordall

Make the best of your resources.

Making the best of your resources is important. Expensive equipment is out of reach for many photographers. Using simple equipment and home resources helps. Glass presents particular problems. This tutorial will help you to tackle the problem with glass and learn more about using simple resources.

The problem with glass

By its nature, the translucence and reflectance of glass creates special problems for photographers. Translucence means that the definition of glass is lost against the background. Reflectance means that general highlights and specular highlights in particular can cause problems. Success in photographing glass is about learning to control those things. It is all a matter of using reflectance to define the glass and placing the light in the correct way for it to illuminate.

Using a simple house light and white and black cards, this tutorial helps you to control highlights to emphasise the glass and not create nasty highlights. You learn about good quality composition with a glass and a few tricks of the trade. Win:win I think.

find out more...Photokonnexion tips by email
If you enjoyed this article please sign up for our
Tips by email service.
                                                 Find out more

By Damon Guy (author and Photokonnexion editor)

Damon Guy - Netkonnexion

Damon Guy (Netkonnexion)

Damon is a writer-photog and editor of this site. He has run some major websites, a computing department and a digital image library. He started out as a trained teacher and now runs training for digital photographers.
See also: Editors ‘Bio’.

Can you write? Of course you can!
Write for Photokonnexion...

We would love to have your articles or tips posted on our site.
Find out more…
Write for Photokonnexion.

Three rules of lighting… simple, but effective

• Three Rules of Lighting •

• Three Rules of Lighting •

The simple explanations are the best.

Here at Photokonnexion we try hard to provide simple explanations for the things we all want to learn about our favourite subject. If you think anything is too complicated let us know on our Contact Us page or leave a comment below the article.

Well, here is a video in the spirit of simple explanations. I really do not need to explain before you see it… just watch and enjoy.

More after this…

find out more...Photokonnexion tips by email
Enjoying this article? Please sign up for our
Tips by email service.
                                                Find out more
#11030#

Three Rules of Lighting for Photography

“We talk about the three important rules regarding the behaviour of light. As photographers we can use these rules to achieve the type of lighting we want, including the look of soft light.” – Ed Verosky
© Ed Verosky 2012  External link - opens new tab/page

For more background on lighting

Don’t forget to check out our Light and Lighting resource pages and especially the links on Hard Light and Soft Light. These are essential to the understanding of light.

All our resources can be found in the menu at the top of the page.

By Damon Guy (author and Photokonnexion editor)

Damon Guy - Netkonnexion

Damon Guy (Netkonnexion)

Damon is a writer-photog and editor of this site. He has run some major websites, a computing department and a digital image library. He started out as a trained teacher and now runs training for digital photographers.
See also: Editors ‘Bio’.

Can you write? Of course you can!
Write for Photokonnexion...

We would love to have your articles or tips posted on our site.
Find out more…
Write for Photokonnexion.

The simple secrets behind good food photography

Food for Her World Vietnam magazine.

Food for Her World Vietnam magazine.
Food styling by Dang Phuong
Photography by Mads

Food for the World Vietnam magazine. Photography by Mads • on FlickrExternal link - opens new tab/page

We all love good looking food…

Food photography? So, what makes it look really good? I love to cook and make tasty food. But, great cooks also have a skill with presentation. It is the presentation which really makes great food shots too.

Food photography seems to be centred on three things – good looking food composition; great light and picking the right focus/centre of interest. Duh! Wait a minute, isn’t that pretty much photography summed up all over? OK, I jest. There are some specific ideas and techniques involved. Good food photography seems to require a particular approach.

Here are some introductory points for good food photography. You should look to achieve…

  • Experience with small-sized and table-top compositions.
  • A working knowledge of lighting at the table-top scale.
  • Simple natural light from one source (window).
  • Able to use reflectors/black cards to shape the light.
  • Simple centre of interest in the shot.
  • Carefully chosen depth of field.
  • Very simple, but rich backgrounds.

And with the food itself…

  • Natural and where possible bright colours.
  • The colour mix should work together.
  • Avoid odd clashes of colour.
  • The food combinations should be simple and few.
  • Focus on the main interest.
  • Avoid highlight bokeh spots where possible.
  • Try to emphasis the texture of the food (lighting).
  • Use simple but eye catching cutlery and plates.
  • Avoid cluttering the shot with too much food.
  • Give the food a big/deep background.

More after this…

Book recommendation:

Food Photography:
From Snapshots to Great Shots

Simple advice on lighting including great diagrams. The pictures include camera settings. Excellent advice on setting up a table-top studio which was also inexpensive to do. Lots of tricks and techniques like the pros use. Great presentation ideas.


Food Photography Tips – Video

In this video we look a range of ways to look at and shoot food. It is a great introduction to food photography basics. The video uses graphic images for a broad introduction to the art of angles, framing and creating drool inducing food photos.


Damon Guy - Netkonnexion

Damon Guy (Netkonnexion)

Damon is a writer-photographer and editor of this site. He has run some major websites, a computing department and a digital image library. He started out as a trained teacher and now runs training courses in digital photography.
See also: Editors ‘Bio’.

Can you write? Of course you can!
Write for Photokonnexion...

We would love to have your articles or tips posted on our site.
Find out more…
Write for Photokonnexion.

Ten simple ideas to help your portraiture improve

Video

Video

Straight forward portraiture advice is difficult to come by…

In the video we have some great ideas that help you to map out a great Portraiture session. This is straight advice aimed at getting you to a good quality completed portrait as directly as possible.

I have to add that the book advertised in the video is also a great book. It is packed with some excellent ideas and written in a simple and easy-to-read way. If you are interested in following up on the book I can highly recommend it. My copy is pretty dog-eared these days!


Portrait and Candid Photography: Photo Workshop This is a great book packed with lots of hints, tips and ideas like the ones below. A really worthwhile read.


Ten points at the core of good portraiture

In the video Erin Manning highlights the importance of the following ten points…

  1. Don’t fix your subject in the middle of the frame. Instead, think about the rule of thirds – a more dynamic outcome.
  2. Poses and “cheesy” words to force a smile are false and make the photo look strained.
  3. Make your clothes simple and un-distracting. Forget patterns and fussy details. Simple solid colours help the subject to stand out, not the clothes.
  4. Avoid straight on shots with a big flash. The open pupil in the eye will cause light to reflect back to the camera and show bright red eyes… You don’t want your subject to look like red-eyed monsters. Use red-eye reduction settings if your camera has them.
  5. Vary your poses, angles and heights. The more angles you get the more you are telling a story about your subject. Get them in many different ways.
  6. Use flash to help reduce harsh shadows. The sharp sunlight of the middle of the day is very unflattering. The use of fill-in flash softens the shadows bringing out the subjects character.
  7. Look for great quality of light. Remember that hard light (harsh edges and strong contrasts) is very unflattering. Shoot in the later afternoon or early morning to get soft light with better colours. Use shade to reduce hard light if you are forced to work in bright mid-day light.
  8. Don’t stand too close and use a wide angle lens. This exaggerates the nose. Stand away and zoom in. This reduces nose size and is much more flattering. (Great advice).
  9. Pay attention to the background. If it is too busy make sure there is nothing distracting. Check to make sure the background has not created odd effects like poles sticking out of heads and flowers in ears!
  10. Make sure you have enough battery capacity and memory card space to cover the whole session. You don’t want to lose any shots when you are in full swing.
Erin Manning’s Top 10 Dos and Don’ts for Great Portraits


Erin Manning

By Damon Guy (author and Photokonnexion editor)

Damon Guy - Netkonnexion

Damon Guy (Netkonnexion)

Damon is a writer-photog and editor of this site. He has run some major websites, a computing department and a digital image library. He started out as a trained teacher and now runs training for digital photographers.
See also: Editors ‘Bio’.

find out more...Photokonnexion tips by email
If you enjoyed this article please sign up for our
daily email service.
                                                 Find out more
#11030#