Tag Archives: Bokeh

An easy lesson in beautiful bokeh

Beautiful photographs depend on beautiful light.

In this video one of the modern lighting masters shows how to make great bokeh. Using a simple experiment with various lenses and apertures, you can see how its done. Then, he does some great street photography. Finally, he gives you some creative ideas. You can do creative thinking for doing your own bokeh shoot.

“Bokeh” is the Japanese for “blur” or “haze”. You can find out more about it in our bokeh definition in the Photokonnexion Photography Glossary.

Creating Bokeh: A Lighting Tutorial


From Jay P. Morgan. TheSlantedLens

Points to remember

In the video Jay P. Morgan identified four important points about making bokeh. They were…

  • Get as close to the subject as you can
  • Get as far away from the background lights as possible
  • Keep the aperture wide open
  • Shoot small light sources

These valuable points are really all you need to remember to make your own beautiful bokeh images.

find out more...Photokonnexion tips by email
If you enjoyed this article please sign up for our
daily email service.
                                                 Find out more…
#11030#

By Damon Guy (author and Photokonnexion editor)

Damon Guy - Netkonnexion

Damon Guy (Netkonnexion)

Damon is a writer-photog and editor of this site. He has run some major websites, a computing department and a digital image library. He started out as a trained teacher and now runs training for digital photographers.
See also: Editors ‘Bio’.

Ten obvious reasons to change your approach and how to do it

Your photograph is not perfect.

You see good quality photographs every day. Why does your photo not match up to the photographic quality in a publication? What can you do? The answer is simple. You need to look at your overall technique.

Things add up…

Assuming a great idea and composition – what can go wrong? In photography every step of the process counts. The more you get right the better the result.

Professional photographers often repeat a shot tens of times to get it right, sometimes more. They aspire to excellence. Care, dedication, persistence and attention to detail add up to technical quality.

What can go wrong?
  1. Bad lighting: There’s no substitute for suitable, interesting light that’s sympathetic to the subject. If the light is wrong, your shot will not work either.
    Solution: Learn everything about the quality of light, hard light, soft light, the colour of light and the properties of light.
  2. The whole picture is soft: You moved the camera while shooting.
    Solution: Pros use tripods – good ones. They use them fast and efficiently because they practice.
  3. The whole picture is soft: You had to hand-hold the shot.
    Solution: Professionals know how to set up a manual exposure that suits the light. Learn to shoot in manual modes. Know what shutter speed/ISO combinations you can use without movement.
  4. The exposure is too dark/light: Common when learning manual camera control.
    Solution: Use RAW, then you can compensate. With RAW you can deliberately manage your exposure too. There is no ‘perfect exposure’ – there is only the result you want. To get the result you want you have to adjust your exposure. (Hint: you can’t adjust your exposure effectively in *.jpg unless you use exposure compensation).
  5. Colours off: If you are shooting in *.jpg you deserve all you get. The white balance is probably wrong. The manufacturers settings are limited. You can’t fix it in processing. Remember, *.jpg is a RAW file developed in-camera to manufacturers settings, not yours. The settings are applied to your shot blind. No wonder they are not what you want.
    Solution: Get it right. It’s easier to shoot in RAW and develop the shot yourself. It gives you fine control and you can develop your shot work the way you want. Something *.jpg cannot do.
  6. Poor focus: Focus is critical to the right technical and artistic result.
    Solution: Learn about: Depth of Field; aperture, Bokeh, Circle of confusion and how they relate to your lenses. Pros know these things intuitively. You can too with practice.
  7. Poor or soft focus from movement: Focus mode is on the wrong setting.
    Solution: Learn to use the correct focus mode (eg. single shot or continuous etc). Also, learn to focus manually. There are situations where auto-focus is poor (eg. in poor-contrast light). Switch off auto-focus to get better results.
  8. The shot is not sharp: A suspect, poor quality or broken lens.
    Solution: Buy decent lenses. All lenses have sweet and sour spots – even professional ones. Cheap lenses have a poorer optical quality and have more sour than sweet spots.
    Solution: Quality costs money. However, look after a good lens it will last longer than your camera. If you choose right, it’ll fit your next camera. It pays to buy the best quality lens you can afford.
  9. Great lens and tripod! My shot’s still not sharp: Sharpness requires attention to the above and these specific details too…
    Solutions:
    one: Turn off vibration reduction functions. On a tripod motors cause vibration, not stop it.
    two: Turn off auto-focus (another motor), or at least the continuous-focus setting (use the ‘one-shot’ setting).
    three: Use ‘mirror lock-up’ (DSLRs). Mirrors clunk up causing tripod vibration.
    four: Keep out of wind, away from vibration and keep your tripod low (don’t fully extend legs).
    five: Use a remote shutter trigger. Button pushing causes vibration.
  10. I did all this and it’s still not right!
    Solutions:
    one: Practice – putting this together takes time and effort.
    two: Return to locations many times to get the right light and conditions.
    three: Post processing! RAW users, this is where you polish the shot up. Since the earliest photography developing the shot has been a key process. RAW processing is another skill to learn. It’s essential, so learn it. Only *.jpg’ers should worry because they have disabled files. If you used *.jpg there is no hope of properly completing the job.

There is a lot to do! Follow the links and keep at it – you WILL succeed.

By Damon Guy (author and Photokonnexion editor)

Damon Guy - Netkonnexion

Damon Guy (Netkonnexion)

Damon is a writer-photog and editor of this site. He has run some major websites, a computing department and a digital image library. He started out as a trained teacher and now runs training for digital photographers.
See also: Editors ‘Bio’.

How good is your exposure?

There is no such thing as the perfect exposure.

The manufacturers might have you believe there is a perfect exposure for every shot. They invest a lot in their cameras and the programming. What should you look for when trying to produce a great shot? Is it about relying on camera auto-settings or is there something else?

The three pillars of exposure

You are probably aware of the three main controls for exposure

  1. ISO – Controls how sensitive your camera image sensor is to light.
  2. Shutter speed – Controls how long your sensor is exposed to light.
  3. Aperture – controls how much light is allowed to reach the sensor.

These essential elements in exposure are inter-related. Each has an impact on the others. They relate to each other in two ways. As each varies it has an impact on the amount of light which reaches the sensor. And, as each varies, they have a special impact on the quality of the photograph…

  1. Low ISO gives a high quality result. High ISO introduces digital noise.
  2. Shutter speed – movement blur introduced at long exposure; movement frozen at short shutter speeds.
  3. Aperture – Wide aperture, shallow depth of field; small aperture gives a deep depth of field.
Control

Controlling these elements to get a final exposure is essential. Highest ISO, widest aperture and a long shutter speed all together is likely to allow too much light into the camera in daylight. The shot will be over-exposed. The opposite is also true. A low ISO, tiny aperture and very fast shutter speed will allow very little light to enter the camera; result underexposure.

Exposure is about a balance. We must work at getting the three pillars to create the right light for the scene we envision. This is the key – creating the right light in the camera to make the scene come out the way we want. Yes, make the scene come out as we want. A photographer makes the picture that they want by controlling the exposure. A snapper captures the scene they see by relying on the camera to make the exposure for them. The difference between the photographer and the snapper is learning to control the camera.

Genius at work

By way of example I want to show you a short documentary video. Stanley Kubric made a period film, released in 1975, called Barry Lyndon. “Lyndon” was set in the 1750’s. It was a ground breaking work.

Kubric envisioned a cinematic experience which was as close to the way the eye would see life by the light of the time. He procured special lenses for his cameras and had them modified to work together. These lenses were F/0.7 Zeiss lenses made for NASA. They allowed the aperture to be open very wide – much wider than most modern lenses will go. As a result Kubric was able to use these fast lenses to film entire scenes only by candle light. This created an atmosphere which paralleled indoor light in the 1750’s. The costumes and set pieces were also of high quality. The overall effect is one of extreme authenticity.

A lot of pictures as dark as shots in this movie would be considered as under-exposed in the eyes of many photographers. Yet the gloom is the essence of the success of the shots. The exposure is correct for these scenes. Kubric went to extreme lengths to get the exposure he wanted. With the proper approach and control you can do the same in your photography.

The one consequence of shooting at such wide apertures is an extremely shallow depth of field. When you see the candlelit scenes you will see how much bokeh there is behind the heads of those in focus. What a gorgeous result.

This video is actually a commentary on “Barry Lyndon” the movie. I have started the video at the scene where the exposure and special lens set up is discussed. Despite this being a movie, the same internal camera conditions apply as in a DSLR. ISO, Shutter speed and aperture still have the same effect on each frame taken. Kubric showed true genius in marrying the camera and the lens into a unique synthesis that recreated the prevailing light conditions of the time. He literally controlled the exposure to emulate life in the 1750s. That is the genius of the man. It is also the supreme insight in photography.

Six things you must know for a night shoot

Night photography is fun. A little foreknowledge makes your night shoot easy

Night photography is fun. A little foreknowledge helps make it easy

Night shoots can yield great images with a little thought.

There are a few things that will help you get better results. Understand your equipment, ensure you have a steady base, work with your settings. After that it’s about your photographic skills.

1. Before your shoot

Plan ahead for your night shoot. A little thought about night composition is useful. Consider your safety too. In the dark it’s easy to injure yourself, break equipment and lose things. These two articles will help to prepare you:
Preparing for a Night Shoot
Out on a Night Shoot – Night Composition

2. Equipment

You will need to use longer exposures on a night shoot. This means that to get a sharp image you should use a tripod. Most night exposures in an urban environment are from about two seconds to about 30 seconds. Some could be much longer than that, especially if you are outside urban areas where there is little light pollution.

You cannot get a sharp image hand-holding your camera for extended exposure periods. Tripods provide a stable platform at at any time. At night they are essential. If you don’t have a tripod there are alternatives, although I have not found any as effective and flexible as a good tripod.

You can use any of your ordinary day equipment on a night shoot. Lenses, cameras and even flash can be used with no problem. However, you may need to use your equipment in very different ways to the daytime. Also, be prepared to get very different results. You will need to experiment to get familiar with your equipment in night conditions.

You can’t use a Flash-light (torch) when you are shooting, it will affect your local light conditions and the shots you take. Switching a torch on and off will also cause night blindness. You have wait while your eyes adjust to the change in light levels each time. You can get away with a red-light LED torch. I have one that I can wear on my head and it has a red and white light. Red lights don’t spoil your night vision so much. They do affect the shot. So don’t forget to turn them off when shooting.

It’s best to work with the ambient light if you can, especially in urban areas. Using your equipment at night requires that you have a finger touch familiarity. You will probably be surprised if you have been using your camera a lot. You may know many of the buttons by touch anyway. However, some buttons you may not know. Practice builds familiarity.

3. Anti-vibration compensation

One button you may not be familiar with is the one to turn on/off vibration compensation motors. These motors, usually in your lens, help stabilise your shots (Canon: Image Stabilisation; Nikon: Vibration Reduction). They help reduce movement from hand-shake. On a tripod the motor causes vibration which is amplified by the tripod – making the situation worse. This is not just a night shoot trick to reduce vibration, it should be used any time you are using a tripod. It helps your image to be sharper if you reduce anything that causes vibration or movement.

4. Auto-focus (AF) and Manual focus (MF)

At night it is quite likely AF will not work. It might appear to be ‘hunting’ for a focus but not find it. Don’t worry! If you focus on the margin between a light and dark spot it will work again. AF works by detecting contrasts. Anyway, it is better to turn off AF and use MF. Manual focus is much more precise at night. It also stops the lens from ‘hunting’ for a focus point.

5. Flash

Think about how you want to use your flash. If you are using auto-settings your flash may fire when you don’t want it to go off. Read your manual to find out how to turn it off. You will also find a way to change the light intensity of your flash. On-camera flash is a particularly poor tool at night and is very difficult to use to any effect at all. My advice is turn it off for your night shoot work. If you must use flash, consider off-camera flash. Now that IS fun!

In general, you don’t need flash on a night shoot for general shots. In an urban environment the lights are sufficient from the streets. However, the length of your exposure could be very long. You might usefully use off-camera flash to manually fire to illuminate something, a statue, a tree, a car… whatever. The pattern of flashes you fire will determine your local lighting. In the dark flash will only effectively light a small area around where it is fired. So, don’t expect it to light up your whole shot. There will be an article later on night-lighting shots.

6. Settings for a night shoot

If you are using auto-settings on a night shoot you will have problems. There may be a night-mode setting on your camera. Don’t expect to get great results with it. Best results come with manually setting the camera up yourself while doing a night shoot. You should consult your manual if you really want to use pre-programmed settings.

Learn how to use manual settings from the start. A night shoot is great fun. Getting the results you want makes it really worthwhile. Use ‘M’ – manual mode. This is the only certain way to get the results you want. Remember, the length of the exposure is the critical setting on a night shoot. You will be working with long exposures all the time. The shutter may be open between a tenth of a second through to, well, possibly hours. It’s more likely you will start with settings of around 1 to 30 seconds. After 30 seconds you will need to change to the ‘B’ or bulb mode setting on DSLRcameras.

Long exposures are like filling a bucket with water. Over time the bucket gradually fills up. Over a long exposure light fills the shot making it brighter and brighter. Even moderate local lights may overwhelm areas of your long exposure with brightness. However, without a longer exposure you will not get enough light for the darker areas of the scene. Here are some basic pointers.

  • A wide Aperture lets in more light (settings around f4 or less are wide open). You will have a lot of bokeh in the background with a wide aperture. To avoid that you will need a longer exposure (and a narrower aperture).
  • A high ISO will permit faster exposures. High ISO settings will create a lot of digital noise in the final image. To avoid that you should use low ISO and a longer exposure.
  • Longer exposures (shutter speed or time value) give you greater clarity and a wider depth of field in your shot. However, the camera will be much more vulnerable to vibration. (Tripod – remember?).

You will need to adjust your settings to create the correct exposure. If you have not used manual settings before you should consider this simple set up…
(Assumption: urban environment at night, some street lights and other lighting)
– Set ISO to 100 (Low ISO will give low noise – the best quality image).
– Set aperture to f8 for close focus. Landscapes/long focus, use f14.
– Set Time value (shutter speed) to about two seconds.
Now take a shot and check the screen to see what it is like (“Chimping”)
Black? Too dark? – OK, turn the shutter speed on one click and try again, and again, until your shot looks right.
In fact the internal light meter will show you when the exposure is correct. When you push the release button half way, the needle in the bottom of the viewfinder (DSLR) will be centred.

A little experimental work with longer or shorter shutter speeds will give you an opportunity to try out a few shots. Having a go is the best way to move forward with night shots. Everyone messes up quite a lot of shots to start with until you get the feel for the correct exposure. It’s really rewarding when it goes right! Have fun…

By Damon Guy (author and Photokonnexion editor)

Damon Guy - Netkonnexion

Damon Guy (Netkonnexion)

Damon is a writer-photog and editor of this site. He has run some major websites, a computing department and a digital image library. He started out as a trained teacher and now runs training for digital photographers.
See also: Editors ‘Bio’.

Getting Started With Cloning

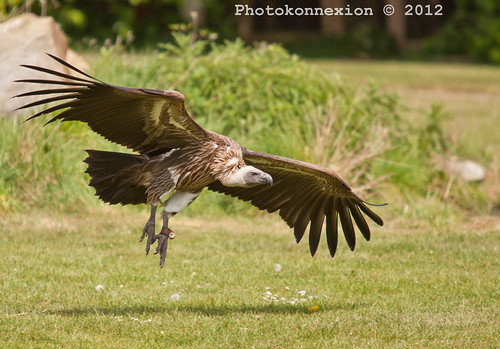
Vulture Landing - not a bad photo; some final adjustments are required

Vulture Landing – not a bad photo; some final adjustments are required. A little cloning work needed to tidy up loose ends. Click to view large.

Cloning allows you to clear up small problems – here’s how

Every picture starts its life with the composition. Once you have composed you take the shot. In those two simple actions is a world of experience and knowledge. It does not finish there – there is a third stage – post-processing (or just processing). Simplicity in your image is one of the keys to good photography. Often to achieve simplicity you need to remove unwanted elements of the picture. This is where cloning comes into play. In what follows I am going to look at simple cloning techniques using my photograph above.

Removing stuff

In this post we will concentrate on an essential technique… that of cloning in small strokes or spots. The essential element of any cloning job is the copying of the texture/pattern/colour (whatever) at the source point onto the destination point. The destination point is where you are hoping to remove something. Here is the first picture. It is an enlargement of the legs on the main image at the top of this article. The aim of this cloning work is to remove the leg harness from the bird.
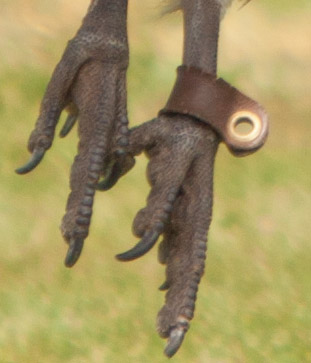
The problem... an enlarged view shows the offending leg harness.

The problem… an enlarged view shows the offending leg harness.

Two simple points of technique underlie about 75% of the work of cloning. First the spot technique.

The success of cloning usually depends on collecting the source texture or pattern from near to the destination point. This is because there is a better chance that the colours, textures and patterns are going to match if they come from close to each other.


Lets get started

First, set up the source point. How the source point is selected depends on the application you are using. You will need to check the instructions. The idea is that there will be a cursor icon for sensing the source and a painting icon for where the cloning will be done. In the next picture you can see how I have cloned a little from the harness from the surrounding area. The round icon is the painting tool, the cross-hair is the source tool. As you move the painting tool the cross-hair moves with it.

To replicate textures, use near-by similar surfaces

You will see that I have done some cloning in two places. The cursor is currently cloning over the area of the harness, collecting the source from the surrounding green bokeh.

Placing your clone tool sensor

You can place the sensor cursor at any angle or distance to the painter cursor. You will see if you look carefully, that I have also done some cloning on the leg. Part of the harness has been removed there. You will notice that the leg has a scaly texture. I had to work close to the harness with the cross-hairs north of the area I was cloning. This allows me to pick up the texture and deposit it on the harness area. If you run over the same area as you have just cloned you get a repeating pattern. So, use short strokes. Change the sensor cross-hairs after each stroke or spot you clone.
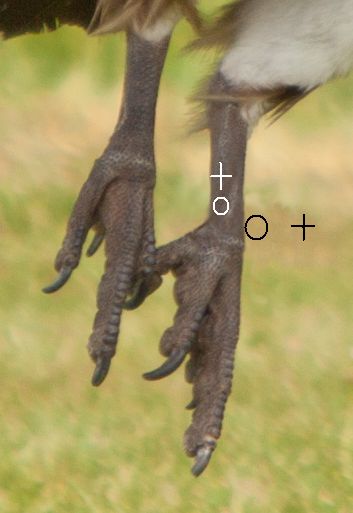
The source point can be anywhere. In this image I have shown the positions I took the clone from for the leg and the harness part off the leg.

The source point can be anywhere. The image shows the positions for the clone from the leg texture and the harness part sticking out from the leg.

Three common problems

When just starting it is easy to just clone away until the job is done. However, when you stand back there are frequently three things wrong – lines are not straight any more; repeating patterns show up; big clone spots show up. To counter all three of these errors it is best to work in very close to the area you are working on. Make tiny changes each stroke. They are less likely to be noticed. They blend in together better and have less impact on the picture as a whole.

As you can see from the black icons in the image the painting circle is very close to the leg edge. To get lines back you have to work with the edge of the circle, as I have done here. Just skim it along the line to straighten it from one side. Then, working from the other side (in this case on the leg) work that side too. Work from side to side. Gently skim it into a straight line. Keep working until you are satisfied your work will not be noticed when you zoom out. Here is the finished leg.
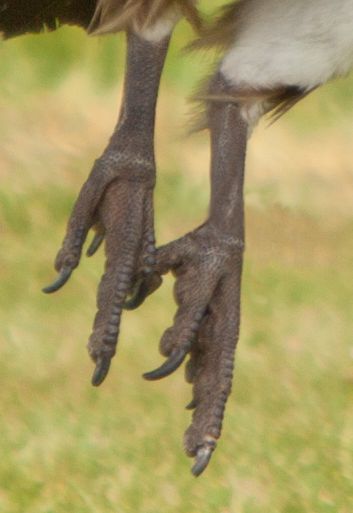
Now the tools are out of the way, you can see how the lines, shades, textures and colours are all blended and maintained.

Now the tools are out of the way, you can see how the lines, shades, textures and colours are all blended and maintained.

Working zoomed-in is critical

One of the easy mistakes to make is to do your cloning large, at the image normal size. If you look carefully at the leg you will see that, even zoomed out, you can see some texture and areas of darker and lighter shading. However, you cannot see the detail of the cloning spots/strokes. If you work at normal image size you will find it very difficult to replicate those shades, tones and textures. They are delicate and subtle. But life is delicate and subtle. If you want it to look realistic you have to put those subtle differences in. Working in a highly zoomed state allows you to do that.

If you click here  External link - opens new tab/page, you can see the finished full sized image on a new page. Look carefully. The slight colour variations and texture changes look natural and fit in well. The variations are poorly integrated, clumsy and unrealistic if you work in at 100% image size.

What we have covered
  • Make Small changes. They are less likely to be noticed. Also, work zoomed in and with small tool sizes. They blend in better and have less impact on the picture as a whole.
  • A pattern/texture source close to the clone destination is more likely to match than distant sources.
  • A continuous clone stroke will be noticed. Work with small spots and short strokes changing your clone source frequently.
  • Avoid running over an area you have cloned already with your sensor. It creates highly visible repeating patterns.
  • When working with lines/edges skim them gently from both sides until straight.

If this all sounds like quite a lot of time consuming work… well, it is. As you can see it is worth it. A good image improved in a natural way. And, like all your photography skills, it takes time and practice. It is fun and absorbing however, so enjoy your processing!

Useful links after the jump…

Irfanview – A free image viewer and basic image editor.

GIMP  External link - opens new tab/page – a full featured, open source, free image editor – download and install.

Photoshop (by Adobe) – Adobe Photoshop CS6 (PC) External link - opens new tab/page – Industry standard post-processing professional software

Adobe Lightroom – Adobe Lightroom 4.0 (Mac/PC) External link - opens new tab/page – Professional photographers workflow and post-processing software

Adobe Elements – Adobe Photoshop Elements 10 (PC/Mac) External link - opens new tab/page
– Powerful editing system for amateur/semi-professional photographers.

Google listing for ‘online image editor External link - opens new tab/page

Damon Guy - Netkonnexion

Damon Guy (Netkonnexion)

Damon is a writer-photog and editor of this site. He has run some major websites, a computing department and a digital image library. He started out as a trained teacher and now runs training for digital photographers.
See also: Editors ‘Bio’.

Be Obsessive About Light

‘Boats passing’ - Light that is no use for one purpose is great for another

‘Boats passing’ - Light that is no use for one purpose is great for another

Light is not good or bad – it just IS

The so-called ‘golden hour’ is that time before sunset when the sky is illuminated with that wonderful golden cast of the setting sun. Sometimes we slavishly avoid taking shots at other times because of the wonderful colours and tones as the day fades. However, is the harsher brightness of the rest of the day really so ‘bad’?

We should be careful about missing the point of a shot. Life happens at all times of the day and night. The light-levels of the moment are a part of the spontaneity of the event. There is little point attempting to shoot a lunch scene as a golden-hour event. Clearly it is something that happens in the brightness of the middle of the day. Your photographs should reflect the issues of the moment of the shot. To make your creative shots work look to matching the scene with the right sort of illumination – natural or artificial. Alternatively, if on the hunt for a shot, your scene can be picked to complement the light.

Pick you moment and the shot within the light available

The scene in the picture above was taken in the harsh power of mid-afternoon sunlight on a summer day. The wonderful high-key white sails are beautifully off-set against the blue of the water and the suns golden reflection off the boats onto the water.

When I saw this scene coming together I was aware that around me the other scenes were being harshly treated by the light. But, this boat scene just seemed right for the light at that moment. Obsess about your awareness. It will be your knowledge that provides the one true shot that suits your vision of the conditions.

Light is something you need to be obsessive about. Study it in all its moods. Become aware of its problems for the camera, and its wonders for the viewer. Look at light through the lens and study it without the lens. Compare the two and ponder on the changes the camera imposes.

Light is what it is – you need to recognise when it is right.

Lighting in all its forms has characteristics that suit some shots and attributes that don’t suit others. To capture the right light you need to study it until you have a deep and meaningful understanding of it. You will discover it with experience and knowledge.

Photography is about light – nothing else. Know it inside out and you will be equipped to transform your shots into impactful, artful statements.

By Damon Guy (author and Photokonnexion editor)

Damon Guy - Netkonnexion

Damon Guy (Netkonnexion)

Damon is a writer-photog and editor of this site. He has run some major websites, a computing department and a digital image library. He started out as a trained teacher and now runs training for digital photographers.
See also: Editors ‘Bio’.

Controlling Depth of Field for Creating Bokeh

"Allium" This relative of the onion produces the most wonderful ball of flowers on top of a long stem.

"Allium" This relative of the onion produces a wonderful ball of flowers. I wanted to show just a few of the flowers against a pink back drop - shallow depth of field.

Creating bokeh through Shallow Depth of Field

Bokeh is the of-the-out of focus blur in a photograph. Bokeh appears in your photograph in the part of the image that is outside the depth of field. Inside the depth of field is sharp; outside blurred. The quality of that blur is bokeh.

Creating blur is very easy. Your aperture controls your depth of field. A wide aperture gives a shallow depth of field and narrow aperture gives a deep depth of field. The blurred area of non-sharpness either side of the depth of field is where the bokeh is found. To bring out the bokeh you need to take control of your aperture settings. This means working with the shutter wide open. So, let’s get started.

Creating bokeh with control of your aperture

Your aperture is controlled using the aperture setting. Select the the aperture priority setting on your mode dial to set up aperture control – or M if you are confident with manual control. If you don’t know how to set aperture priority then consult your manual.

The setting ‘aperture priority’ or A (or Av for aperture value) on the mode dial sets your aperture control. This means you can use the control on your camera that changes aperture value. Depending on which camera you use, the aperture value is set by a specific control. You will need to consult your manual to find out which control sets aperture on your camera.

Aperture priority is what’s known as a semi-auto setting. You have control of the aperture, but the camera takes control of the other two settings (ISO and shutter speed) to give you a good exposure. This is a great way to learn manual control of your camera because you can concentrate on one thing at a time.

Look into your viewfinder and you will see illuminated settings there, below the picture view of your shot. If you can’t see the settings then press the shutter button half way down. This will illuminate them. You should see something like this…

                 250 8 |II|II|II|II| 200
                             ^
  • The figure ‘250’ (Left) is the speed of the shutter – 1/250th of a second.
  • The figure ‘8’ indicates the current f/stop value set on the aperture.
  • The upright markers indicate:   Under-exposure | Exposure | Over-exposure
  • The figure 200 (right) represents the ISO setting chosen by the camera

The upright markers are the exposure markers for your camera. They are graduated in thirds of an f/stop.

To remind yourself about aperture and f/stops see this definition: Aperture.

The central marker is the point where you get a good exposure. In aperture priority the camera allows you to change the size of the aperture. It does the work of managing the other settings to ensure you get a great exposure. The current exposure setting is indicated by the ‘^‘ symbol here. You will probably see a single pointer in your camera. If the pointer in your camera is at the centre marker you have a good exposure. If you are using the aperture priority setting this marker will not change as the camera will adjust the settings to always give a good exposure. In ‘M’ or manual mode you will see that central marker move as you change settings.

You may see a different order of settings in your camera. Consult your camera manual to see which figure indicates which setting.

When you change the aperture setting the other figures will change. Remember, as you change the aperture size, you are increasing or decreasing the incoming light. So the ISO and shutter speed are adjusted by the camera to compensate and give you a good exposure.

In aperture priority, moving the aperture control will have two effects. It will:
1. change the figure showing the aperture size (indicating increased or decreased aperture).
2. It will cause a change in the depth of field.

When creating bokeh you should be working at the wide end of the settings. So set your aperture to the widest setting for now. Lets say you select f3.5. This will mean that your depth of field will be quite shallow.

Focus your shot and take a picture. When you download it you will see that there is an area of the picture in focus. On the other side of the area of sharpness is an area that is not sharp, it is out-of-focus. This blurred area is where bokeh is found. Depending on your shot, you may find the foreground is out of focus too. Bokeh is found either side of the depth of field.

To make those bigger bright circles that give creating bokeh a really rewarding result, look for some highlights. Often on a bright day you can take a picture of a friend with trees behind. Set your aperture to a narrow depth of field. Focus your camera so your friend is in focus but everything behind is not sharp. Where you see bright light coming through the gaps in the trees you will get those bright circles of light.

Another great opportunity for creating bokeh is with Christmas lights. You can get great shots against Christmas trees, anywhere with multiple light sources. Look for places that have lots of bright or reflective points too. Any small bright point of light or reflection will cause those little bokeh circles to appear.

Creating bokeh is fun. However, using it is also a skill. Practice with passion. You will find that soon you are creating bokeh of all sorts. It is dependent on good focus though. So, practice making your depth of field very precise. This comes from knowing your lenses. Work in aperture priority a lot so you get to know which aperture setting helps in creating bokeh. However, you should also know the what the size of your depth of field is going to be on each setting. Then, you can get the focus right without blurring faces or other important parts of the picture.

Enjoy!

By Damon Guy (author and Photokonnexion editor)

Damon Guy - Netkonnexion

Damon Guy (Netkonnexion)

Damon is a writer-photog and editor of this site. He has run some major websites, a computing department and a digital image library. He started out as a trained teacher and now runs training for digital photographers.
See also: Editors ‘Bio’.