Tag Archives: Art

Using the command dial to pick the right Mode

The Command or Modes dial

• The Command or Modes dial •
(Image taken from the video)

Setting up your shot.

The settings you use when taking a photograph affects the shot outcome. Before choosing camera control settings, first choose the camera mode. Here is an explanation on the ‘Command’ or ‘Modes dial’ where you make that choice.

Getting into manual mode

In “The Exposure Triangle” I looked at how you should balance…

These settings, when balanced, create an optimal exposure. You need to understand these settings to go manual with your camera.

What the dial offers

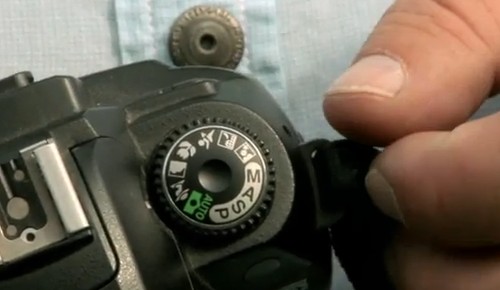
The Command or Mode dial sets the camera to use particular controls. You see a typical example of the command dial above.

‘Auto-mode’ or ‘Auto’ – the camera does everything for you. This setting is sometimes called the “green square” or Green mode. It’s normally green on the command dial. Using Auto you hand over full control to the camera. It provides a set of fairly average exposures. It’s used to snap basic shots in everyday situations.

To make your photography really effective you want full creative control. Learn to use the semi-manual modes and ‘Manual’ Mode. These give control to the three exposure factors. The picture shows these settings as ‘M’, ‘A’, ‘S’ and ‘P’ in a silver band.

  • M – the full Manual setting. You have full creative control over exposure.
  • A – Aperture – you set the aperture (f number) and the camera finds the right shutter speed for you.
  • S (or Tv) – the shutter speed setting or Time value. It sets the shutter opening time. The camera finds an aperture setting to match.
  • P – ‘Program’ allows some menu settings that ‘Auto’ will not allow. This auto setting gives only limited artistic control.
  • Also… B (not shown) means ‘Bulb’. It’s a setting for long exposures of more than 30 seconds. Bulb may not be available on all cameras.
Other modes

There are often other modes available. But these are really pre-sets. They do the same thing as manual and semi-manual modes. However, they give you less than full control over your shot. So I am not going into them here.

Camera Controls (intro) – command dial

Mike Browne goes through these settings (except ‘Bulb’). He explains the ideas and points out each mode. Remember, the command dial only sets the exposure controls for Auto-modes. The manual and semi-manual modes allow you to change the exposure factors from other controls.
Mike Browne  External link - opens new tab/page

Comments, additions, amendments or ideas on this article? Contact Us
or why not leave a comment at the bottom of the page…

Like this article? Don’t miss the next — sign up for tips by email.

Netkonnexion

Damon Guy (Netkonnexion)

Damon is managing editor of Photokonnexion.com with professional experience in photography, writing, image libraries, and computing. He is also an experienced, webmaster and a trained teacher. Damon runs regular training for digital photographers who are just starting out.
See also: Editors ‘Bio’
By Damon Guy :: Profile on Google+
The Exposure Triangle – An aid to thinking about exposure

The Exposure Triangle

• The Exposure Triangle •
Click the image to download an A4 *.pdf version to print.

Going manual with your DSLR.

For many people exploring manual settings is a challenge. There is a lot to learn. Without guidance it is difficult to work it out for yourself. Here is my approach to the subject.

Why the exposure triangle

The “Exposure Triangle” is a memory aid to help us balance light for a good exposure.

One thing you should remember. The exposure triangle is NOT a calculator. The aim is to help you get used to using the settings. The ‘Triangle’ loses its importance once you understand the settings. Instead you will see your visualisation of the shot as more important.

Beyond auto-settings

“Auto settings” in modern cameras are average types of shot. They are pre-set in the camera programming. Sports mode freezes the action; landscape mode gives deep focus in the shot; portrait mode promotes close focus and so on. The pre-sets make credible pictures but take creative decisions away from you. Controlling exposure gives you artistic control over our photos.

It’s all about control

Photographs capture light reflected from objects in the scene. Too much light – the object is over-bright, or worse, blown out (completely white). Too little light and the light does not excite the sensor enough. Thnthe object is dark, sombre, or worse – black. At the extremes we have blown out or black. In between are a whole range of capture intensities.

The trick is to balance the incoming light so the sensor can make the picture as we wish it to come out. the idea is to control the light in-camera to create optimal light conditions for the sensor.

Three essential elements

There are three critical elements that control the incoming light…

  • ISO: controls the sensitivity of the sensor and how we capture the light brightness. A sensitive sensor allows a shot in lower light conditions (example: ISO100). High sensitivity to light is referred to as High ISO (example: very high ISO = 3000). The penalty is the picture becomes noisy (Definition: Digital Noise) as the ISO gets higher. Noise affects the quality of the picture. The lower you keep the ISO, the better quality the final image will be.
  • Aperture: controls the amount of light allowed through the lens. It also controls the depth of field. As the aperture increase the amount of light entering the lens also increases. However, as the aperture gets bigger the lens loses the ability to focus at infinity. As the focus shortens part of the picture is not so clearly defined. Taking a photo at F4 means you might be able to focus on a face beautifully and with sufficient light. But you may not be able to discern any detail behind the head. The depth of field has been shortened by the wide aperture.
  • Shutter value or Time value: How long the sensor is exposed to light affects the amount of light you collect. Leave the shutter open too long and the shot is too bright, blowing out parts of the picture. Close the shutter too quickly – the result is underexposed. Long exposures tend to exaggerate movement introducing blur. Fast shutter speeds tend to freeze an object in place.
What is exposure?

There is no right or wrong for achieving the outcome we desire. But there is only ONE point at which the exposure (all three elements combined) is right for your picture. That is the one to make your photo come out the way you want. You must find the correct exposure balance for your visualisation of the picture using all three elements.

Exposure is the right balance of ISO, Aperture and Shutter speed which provides for your intended depth of field, movement blur, brightness and representation of the scene. It is a unique response to the sensor settings you think will make your shot come out right.

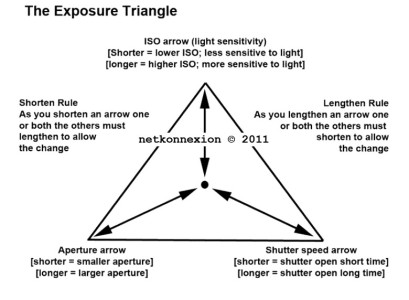
The Exposure Triangle is a concept to help you adjust the balance to get the exposure right. The key to using the exposure triangle is that the three elements of exposure: ISO, aperture and shutter speed, must always balance.

It teaches us to understand how the three exposure elements play off one-another. Shorten one arrow the others will need to accommodate by adjusting their length. You can increase one or both of the other elements to accommodate the change.

If you increase one element you will need to decrease one or both of the other elements to accommodate the change.

Full Manual Control

Our exposure settings aim to balance the three elements in the camera. This needs to be done on the ‘Manual’ setting or ‘M’ setting to get the desired result. To gain full creative control we must do two things…

  • First we must have a clear idea of what we are going to achieve for each shot. Do we want the water blurred in our stream or not? Do we want the final picture to look bright and breezy or dark and sombre? Do we want movement blur or sharp, frozen action… and so on. So look at the scene and determine what you want.
  • Secondly, on the basis of what we want we must adjust the camera settings to achieve the desired result.

How do we adjust the settings to get the optimal exposure? Simple. The camera light-meter indicates when exposure is optimal.

The DSLR light sensor is the key

Inside every DSLR is a digital sensor. It detects light intensity. If the light is correctly optimised it will be indicated on the exposure meter.

With the camera set to “M” look through the eye-viewer. At the bottom of the screen you will see a scale. There should be a needle above the scale. This is the indicator of the current exposure. The centre of the scale is the correct exposure level for most shots.

If the needle is off to the right the sensor is getting too much light. If it is off to the left there is insufficient light. The trick is to balance ISO, aperture and shutter speed so the needle is centred.

Your camera manual will show you how to change each of the three settings. There are normally three controls somewhere on the DSLR body to change each of them. Again, your camera manual should have a diagram of the readings in your viewer screen when you look through it. Check out that diagram. You will see the location of the settings on the screen that will change when you alter the controls.

A trick to get you started…

Put the camera on full automatic (the ‘green square’ setting). Take a shot like the one you want. Now look at the settings for that picture on your camera screen. Your camera manual will show you which setting you can look at on the screen. This gives you a guide to what your manual settings should be for this shot.

Now switch to ‘M’ or manual to vary the results. If you want movement blur then slow down the shutter speed (longer exposure, more light let in) and/or decrease the aperture (reduce incoming light) to keep the needle in place. One click of longer shutter speed needs one ‘f-stop’ less of aperture to keep the exposure optimal. But now you get the movement blur!

The aim here is to balance a change in one element by changing one or both of the other elements. In the process you try to keep the needle over the centre of the scale in your viewer. The centred needle tells you you have an optimal exposure that your sensor can use.

Experience…

If you practice regularly with your camera on ‘M’ you will get control of your shots. Try to relate the settings to the type of results you get. Relate shutter speed to the resulting blur/sharpness. Similarly, relate depth of field to aperture size. Relate ISO to balancing light sensitivity to achieve the correct sensitivity for your intended exposure. Gaining experience with these attributes will help you remember settings to use in particular situations.

Comments, additions, amendments or ideas on this article? Contact Us
or why not leave a comment at the bottom of the page…

Like this article? Don’t miss the next — sign up for tips by email.

Netkonnexion

Damon Guy (Netkonnexion)

Damon is managing editor of Photokonnexion.com with professional experience in photography, writing, image libraries, and computing. He is also an experienced, webmaster and a trained teacher. Damon runs regular training for digital photographers who are just starting out.
See also: Editors ‘Bio’
By Damon Guy :: Profile on Google+

Abstract photography – three abstract insights

When Science Meets Art - Fabian Oefner. (About abstracts in art)

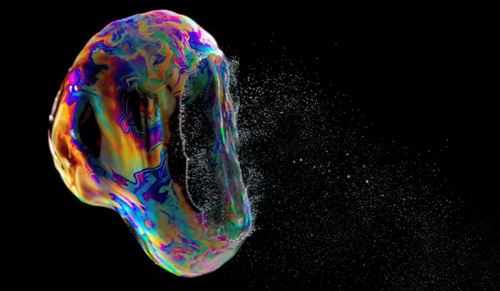
• When Science Meets Art – Fabian Oefner •
Abstract art is all around us. Some projects get deep into special ideas. Others are more about the abstracts we all miss right in front of our eyes.
{Image taken from a video below}

Art is not straight forward

Abstract photography is often about how an artist views things rather than what is shown. Abstracts bring out the artists unique view of the world. The photog isolates the special characteristics of the subject.

The nature of abstracts is…

The photographers vision of the world is often about emotion. We are able to see into a subject because we become attached to it, understand it. We try to feel its impact on ourselves and to find a way to translate that into a picture. Often such “seeing” comes from a personal study of composition and aesthetics. It helps to understand the elements of art too. These are not requirements for making abstracts. They are a base for abstract seeing. They help artists analyse and know “abstract”. However, they contribute little to creating one.

The real issue is the way that an individual artist approaches making an abstract.

Abstract art comes to those who observe more than the “whole” of something. The minute detail through to the overall view of a subject is important. Abstract artists are aware of form and shape, texture and colour and a myriad of other detail. This awareness is different in everyone. Certain details catch the eyes of some people and not others. Some forms or patterns stimulate some and not others. This uniqueness is the key to “seeing” abstracts.

By ignoring some details or components of a scene or subject, and by building up others, it’s possible to construct the ‘abstract’. This is a new entity emphasising these details and elements.

Success in making abstract photos grows with experience of, and a personal view of, the subject matter. That might be made up of a deep study of the material and behaviour of the subject. It might also be a deep response to cultural and artistic baggage in the artists character. It could be both and more.

The mystery of creating abstracts?

The emotions that commit artists to a creative act are not easy to analyse. The act of creating abstracts is difficult too. By knowing a little of our own background, interests and experience we can see how to approach their creation.

Our own creativity can develop from learning about it in others. One route to knowing an abstract artist is via their enthusiasm and commitment. In the videos below you see into the artists themselves. They may help your view of the process of making abstracts.

The first artist is Fabian Oefner. His interest is in abstracts through science. He shows a number of his projects. He explains how they came about and what was involved.

Fabian Oefner: Psychedelic science  External link - opens new tab/page

Lester Hayes was an early maker of abstract photos. He knew very little to start. He talks about becoming involved and why he saw abstracts. Clearly there is a deep emotional commitment for him in making abstracts.

Abstract Photographer Lester Hayes Uploaded by Anthony Mournian  External link - opens new tab/page

Next, we visit the world of Sergio Muscat. His abstracts have an organic quality. He shows his wonder of nature. He explains where he gets his vision with quotes and written comments between pictures. I became wonderfully connected to his thinking while watching.
Sergio Muscat  External link - opens new tab/page
In the quote below he shows that photos reflect reality. But they interpret the world. His insight into abstracts is about the same plastic reality on which photography is based.

Unlike other media, a photograph is always based on a real, material origin. Rather than looking at this as a disadvantage, we should understand that this same fact makes photography the ultimate surreal medium – simply because photography, although based on reality, is very far from the truth.
Sergio Muscat – Abstract Photography – YouTube

Photos never truly show what the eye sees. This is a deep part of the ideas in abstracts.

Seeing is not knowing

We may come to know the nature of the ‘abstract’. Yet, abstracts are a fragile gossamer. Each has its own essence. Catch it and you may destroy it.

Knowing a little of the artist helps. With that we may know a little of their approach to abstracts. That way we may learn to bring it out in our own work.

Further reading on abstracts

In other articles I have looked at the nature of abstracts. For more interest, follow up on these…

Comments, additions, amendments or ideas on this article? Contact Us
or why not leave a comment at the bottom of the page…

Like this article? Don’t miss the next — sign up for tips by email.

Damon Guy - Netkonnexion

Damon Guy (Netkonnexion)

Damon is a writer-photographer and editor of this site. He has run some major websites, a computing department and a digital image library. He started out as a trained teacher and now runs training for digital photogs.
See also: Editors ‘Bio’.
By Damon Guy see his profile on Google+.

Why do new? Just do you!

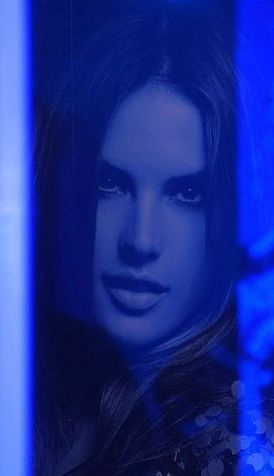
Reflection of a girl in a shop window. Don't do new, do you

• Monochrome girl in blue •
When starting out try out lots of things. As you develop your interests will start to find a focus.

Style is you.

Photography is your interest. Do it your way. When learning you’ll find joy in just trying out many new things. As you develop you will find your way of doing things becomes a form of self expression.

Self expression

Letting out the inner you in your photography is one of the highest forms of success. Every photograph is a unique form of communication. So when you focus on something that you are interested in, passionate about, you express your inner self in a powerful way. Self expression is how top photographers make a success of their business. Clients come to them because they like the way the photographer does it.

Doing new is not you

Less experienced photographers think that they will only “make the grade” by dreaming up something new. It is a seductive idea – our modern culture is built on “new”. Trust me on one thing. There are very few ways of doing something “new”. New techniques, new ideas, never-seen-before views… totally new stuff – these things are far and few between. Photographs are published online in their millions every day – literally. A photographer cannot hope to do “new” all the time or even frequently.

“New” is something that will happen – but normally as a result of a very individual form of expression. When you really express you, really do it your way, you are doing “new”. Truly individual expression comes from doing it your way. The picture may be of an oft-seen subject. The way you do it is what will make it a lasting image in the mind of the viewer.

If you concentrate on developing your pictures around your special way of seeing you will be developing your style. That is what will give you the edge, the new way of doing it. Look for the light the way you like it. Take the point of view you like to see things from. Express the colours in the scene in the unique pallet you love to have around you. These things will all contribute to your style and your expression.

Ironic isn’t it? So many photographers look for the new, the different, the next new idea. If they spent a little time looking at what they were really interested in they would find the “new” within themselves.

Remember to enjoy your photography

If photography becomes an stressful search for something that is not in you, then the fun will go out of it. Investing your shoot-time in a personal interest will bring out your passion in a unique way. In so doing you will increase your enjoyment. You will also find the “new” you were looking for. You will also find a new way to express your inner feelings about the world around you.

Comments, additions, amendments or ideas on this article? Contact Us
or why not leave a comment at the bottom of the page…

Like this article? Don’t miss the next — sign up for tips by email.

By Damon Guy (author and Photokonnexion editor)

Damon Guy - Netkonnexion

Damon Guy (Netkonnexion)

Damon is a writer-photog and editor of this site. He has run some major websites, a computing department and a digital image library. He started out as a trained teacher and now runs training for digital photographers.
See also: Editors ‘Bio’.

Can you write? Of course you can!
Write for Photokonnexion...

We would love to have your articles or tips posted on our site.
Find out more…
Write for Photokonnexion.

Visual toolbox for photographers

Sharpen up your creative photography…

It’s easy when starting photography to over emphasis the importance of gear. In fact it’s ‘photographers eye’ that really makes the difference. Your vision and insight into a scene are critical to producing a wonderful image.

Sage advice from a world master

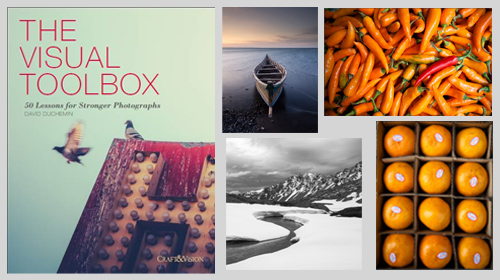
The Visual Tool Box by David duChemin is all about the skills of composition. He goes into depth around the background ideas which help you look at a scene. The ultimate success in photography is to make your image a pleasure to view. Aesthetics rule – it’s as simple as that. This book is dedicated to teaching you the tools you need to develop the ‘eye’.

David duChemin says,

These are the lessons I wish I’d learned when I was starting out.
The Visual Tool Box by David duChemin

This is my kind of book. He writes superbly, in simple, readable form. His examples are excellent and the pictures are just amazing. But most of all the book is organised for learners to extend their knowledge in easy, well structured steps. This book is all about putting new tools in your photographic tool box and it achieves that with an ease that any beginner will find a joy.

Composition

The book is packed with examples of the sort of compositional ideas that really work – for anyone. Just look at some of the topics covered…

  • Manual
  • Optimize Your Exposures
  • Master the Triangle
  • Slower Shutter Speed
  • Learn to Pan
  • Use Intentional Camera Movement
  • Use Wide Lenses to Create a Sense of Inclusion
  • Learn to Isolate
  • Use Tighter Apertures to Deepen Focus
  • Use Bokeh to Abstract
  • Consider Your Colour Palette
  • Lines: Use Diagonals to Create Energy
  • Lines: Patterns, Lead my Eye, Horizons
  • See the Direction of Light
  • Light: Front Light, Side Light, and Back Light
  • Quality of Light: Further Consideration
  • White Balance for Mood
  • Light: Reflections, Shadow, Silhouettes, Lens Flare
  • People
  • Experiment with Balance and Tension
  • Use Your Negative Space
  • Juxtapositions: Find Conceptual Contrasts
  • Orientation of Frame
  • Choose Your Aspect Ratio
  • Use Scale
  • Simplify
  • Shoot from the Heart
  • Listen to Other Voices (Very Carefully)

And there is plenty more content to complement and extends these ideas. What’s not shown in a list is the excellent and sage advice throughout the book. I will let David duChemin have the last word…

Pace your-self. Anyone can master a camera; that just comes with time. It’s the other stuff — learning to think like a photographer — that takes so much work and allows this craft to become the means by which you create art.
The Visual Tool Box by David duChemin

And it is thinking like a photographer that you will quickly learn from reading this book.

How to buy this great book

This book was originally published as an ebook. However, it is no longer available in that form. The book has moved into the real world. It will be available on Amazon as a Paperback From 31 Mar 2015.
The Visual Toolbox: 60 Lessons for Stronger Photographs (Voices That Matter)You can per-order the book from Amazon.

Comments, additions, amendments or ideas on this article? Contact Us
or why not leave a comment at the bottom of the page…

Like this article? Don’t miss the next — sign up for tips by email.

Damon Guy - Netkonnexion

Damon Guy (Netkonnexion)

Damon is a writer-photographer and editor of this site. He has run some major websites, a computing department and a digital image library. He started out as a trained teacher and now runs training for digital photogs.
See also: Editors ‘Bio’.
By Damon Guy see his profile on Google+.

A post to make you think… photographic creativity

Your Body My Canvas

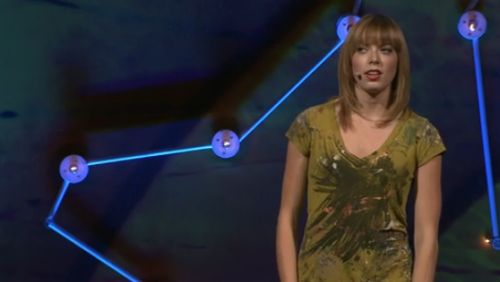
• Your Body My Canvas •
Simply turn things upside down to get a new perspective.
(Image from the video).

Take a new perspective.

The greatest inventions are often originated by people who play with ideas. They are not afraid to experiment, to try a different way. Creativity is more than just the sum of your experience. It is also the capacity to make mistakes, to explore ideas beyond the norm and to simply have a go.

And so she tried painting…

This video captures so much about what makes photography exciting – the unique experience and personal extension that goes into making every picture. I gained a lot from this short video. Here are seven reasons I think you will gain from watching too…

  • Photographers try very hard to make a two dimensional image look 3D. Alexa Meade is trying hard to make a 3D image two-dimensional. A bizarre concept, but enlightening. It teaches us so much about the nature of ‘form’ – the 3D manifestation of objects.
  • She shows that the nature of shadow is both transient and yet fundamental to the creation of both 2D and 3D images. This is something that photographers really need to understand and be able to observe.
  • Alexa Meade gave up her aspirations and suddenly became a painter/photographer with no previous training. She took a chance, tried something different, and got caught up in the idea. This launched a unique career and artistic experiment that provides us with some excellent photographic insights. This video shows that experimentation is the manifestation of creativity. This is a principle that learner photographers will gain a lot from exploring.
  • In her work she is marrying painting and photography. Some of the worlds most creative people are successful because they take things that are completely disassociated and create a new synthesis. You can do this too. Take your previous knowledge, your wider experiences and try to put them together in novel or unique ways. You are certain to hit some new perspectives for your own photography.
  • Photography is about art meeting technology. What’s created is an interpretation which is a unique communication by the photographer. This project is an outstanding example of that idea.
  • Alexa Meade follows a wonderful creative process in her work. She works through her visualisation. Her concept defined, she then applies the technology… visualisation, concept, action. This is a great model for producing creative images.
  • The artist in Alexa Meade has found a unique way to express herself buy turning well formed concepts upside-down. Not only is that brave, but it’s likely to lead to more wonderful insights. Creative work is often about dumping convention and trying another way. Think how you could use this idea in your photography.
Alexa Meade: Your body is my canvas


Uploaded by Ted.com  External link - opens new tab/page

Comments, additions, amendments or ideas on this article? Contact Us
or why not leave a comment at the bottom of the page…

Like this article? Don’t miss the next — sign up for tips by email.

By Damon Guy (author and Photokonnexion editor)

Damon Guy - Netkonnexion

Damon Guy (Netkonnexion)

Damon is a writer-photog and editor of this site. He has run some major websites, a computing department and a digital image library. He started out as a trained teacher and now runs training for digital photographers.
See also: Editors ‘Bio’.

Ansel Adams – Master Photographer

Ansel Adams Video

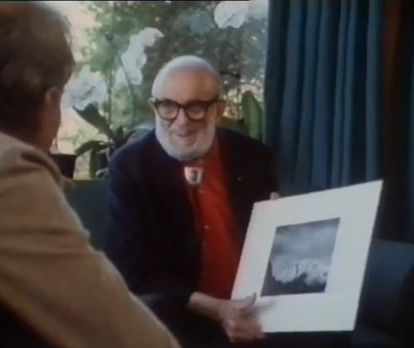
• Ansel Adams BBC Master Photographers (1983 •
Ansel Adams speaks about his photography and his development.
Picture taken from the video.

Exquisite insights to a legend.

The videos I show are usually for you to quickly watch and learn. This one’s different. It’s longer (34 mins.). And, there is so much in it that you will want to watch it over and over again. The wonderful insights run deep and some show us how much photography has changed.

Ansel Adams’ ideas, photographic insights and depth of feeling is magnetic. He was probably one of the first philosophers of photography. He was one of the undoubted masters too. I hope you enjoy this video as much as I did.

Ansel Adams – “BBC Master Photographers” (1983)

Uploaded by: Rob Hooley External link - opens new tab/page

Can you write? Of course you can!
Write for Photokonnexion...

We would love to have your articles or tips posted on our site.
Find out more…
Write for Photokonnexion.

By Damon Guy (author and Photokonnexion editor)

Damon Guy - Netkonnexion

Damon Guy (Netkonnexion)

Damon is a writer-photog and editor of this site. He has run some major websites, a computing department and a digital image library. He started out as a trained teacher and now runs training for digital photographers.
See also: Editors ‘Bio’.